

adamb
-
Posts
47 -
Joined
-
Last visited
Content Type
Profiles
Forums
Events
Everything posted by adamb
-
Hi Gary, I would say that some squeeze is necessary to make cowling fit the fuselage. Also when installing bottom insert between cowling and wing roots a small gap emerges (however some putty and sanding solves the issue). Except this - no problem wit a kit.
-
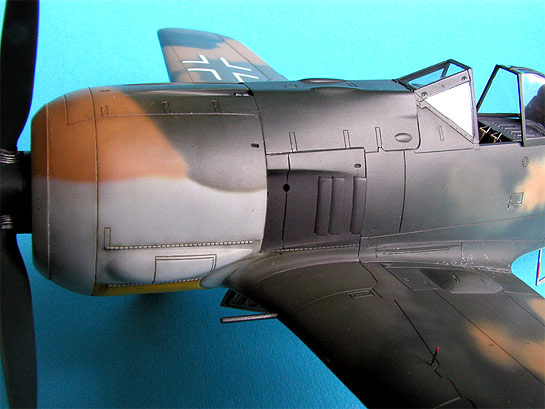
Cheers Chris! Excellent model and rather rarely seen subject. Inspiring as well too - I skipped K-4 kit, but now probably I'll get one when time permits. I am not an expert on Bf-109, but regarding your question: yes - this particular machine had enlarged exhaust covers. It covered exhaust pipes from side view - see JaPo book about camouflage & markings of Bf-109K for "White 5" photo. Hope that helps.
-
Hi Alan. Thanks for the info. However after seeing the pics you posted at first I thought you are doing a nightfigter. OK, just joking! Ahhh... lovely subject! AA853 of 302 Polish Sqn. And not very typical markings. Can't wait to see her done. BTW: I do not have masks you are using, but from small preview you attached I can say that white temporary bands presented in the instructions are too wide. They should be even slightly narrower than gaps between them. Anyway eagerly waiting for progress. Cheers,
-
Hey Alan, Sorry for some "side" question, but I'm very curious what particular markings are you planning for your spit?
-
Congratulations Murph! What else can be said? Excellent model. Great faded look. Simply beautiful.
-
OK. That's overall shot. Some details will be added to wheel wells, exhaust rings must be added also, few rivets should be restored and finally I hope to start painting. This build seems to progress very sloooowly...
-
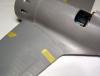
This extention works as a base for final strip which will be added later. So I can paint entire model and add "fake ring" at the end. At least I think so - hope it will work this way not only theoretically
-
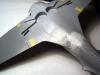
General construction is finished. Lots of sanding and filing mainly on fuselage to wings join. During work on testing the fit of front part of cowling I realized that... model has not engraved/moulded the steel ring between front part and engine (take a look at picture). I am usually not nitpicking about incorrect panel lines or some minimal differences between kits and real planes, but in my eye this ring is very characteristic element of any I-16. At first I thought about just scribing missing panel, but I am not very good at it (and don't have any proffesional tools for this) and was afraid of final result. So in the end decided to add ring "extention". I sanded slightly front fuselage to accomodate minimally added length. Then cut long strip of styrene sheet (1mm wide) as an extention spreader and glued it onto front part of a ring.
-
Hi Jamie, Good suggestion from D. If I may add something from me, and you look for something different, then why not to try Polish airliner? You can check out this link: http://modelingmadness.com/scotts/decals/tm48803.htm Cheers.
-
Some filler on bottom wing insert/fuselage joint. I did not have any strong, thick putty for this gap, so decided to experiment a little using standard Tamiya putty with some CA glue as a "hardener". I do not know if this works, but experimenting is a part of this game so I am prepared for redoing this area in case of failure.
-
I decided to glue main bottom fuselage part first and then to trim a little upper wing halves to achieve best fit I can in the wingroot area. Then bottom outer wings were glued to bottom fuselage part. So tomorrow I will be trying to match lower and upper wing halves and I can see already that some trimming and filling will be necessary. I will let you know.
-
Hello again. I am reviving this thread from shadows of history. However after seeing LOTS of excellent builds lately I have been hesitating to dig it out again because what is presented on LSP lately is far ahead in terms of modeling art than my simple build. But what was started should be finished so... enough of complainig and back to the workbench. To be frank I am scared when I see how old is my last post in this thread. Actually I thought I stopped work on this model in January, but it's been almost half a year. Incredible how fast the time passes! Did I write that fast builders could build this model over the weekend? Fortunately I was not thinking about myself. So after such long brake you have to remid yourself what was done. Last thing I did was glueing fuselage halves together. I guess after few months glue cured rather perfectly so I started today with sanding seam lines and hardened putty. Next was taping together all wing parts to check fit. Well, what other modelers said - some work here will be necessary.

-
Chris, I really can not add much more to all what was said. The cockpit is exceptional. Your idea of "dressing-up" pilot's seat works great - it really draws observer's attention. Watching your build I'm starting to think about exchanging my 1/48 Tank Buster for 1/32 version ;-) ...
-
Hi Alan. For Spitfire Vb you can find schemes in "earlier" camo (DG/DE/SKY) and "later" (DG/OG/MSG). I think it would be easier to help you in determinig the camouflage pattern etc. if you can reveal what particular aircraft you plan to make. But of course it does not change the problem of finding match for OG/MSG paints from Gunze
-
Hi Gustave, Probably not much can be said in this topic, but in short I would say that paints are water soluble, and that's what I use for thinning them for airbrushing. Also they are very thick in the bottle, so you can dillute them according your needs. Also confirm what Mango Kid said: I also have very good experience with painting by brush. Here is example of their French colors used on my D.520 (1/48). Looking to see your 406 finished soon - excellent build!

-
This is excellent Uboat! And a great modeling work. And also this is a first Uboat I have seen with "waterline weathering" - very cool looking feature. BTW: Seeing all those beautifully built subs my resistance for not buying one weakens every time. Fortunately I really have no place for such model to display
-
Second picture. While I am not a big fan of etched belts, but I like very much PE seatbelts in this kit. They are very nice addition to a cockpit. That's all for today.

-
Floor (not the best pic - taken unfortunately in bulb light)

-
Cockpit sides:

-
Hi again, Stef: Thanks for hints, I am not building very fast, so hope to testfit twice. I think wings to fuselage problem was mentioned somewhere also, so I am prepared. Thanks. (As a side note I let myself to say that I would be rather sceptical regarding coloration you suggest as a rule for I-16, and I suppose it is possible that you could be influenced by restored aircraft. Of course bright light blue is not obligatory for I-16 but it is known that such color was used. I decided to paint it overall because having a model with cockpit in light blue is not very often possible.) BTW: maybe you will decide to post another thread with your Type17 build! That would be third I-16 within a month on LSP. Dave: Well, I expected this question will be asked some day . As I wrote earlier I thought about doing Red Five's Ishak to see how this I-16 will look in 3D. Having your model still fresh in memory I am inspired even more to build it, but in the same time I am thinking about other possible schemes. So as you see I have not decided yet, but it will be for sure VVS aircraft. So let it stay as a secret for some time . Back to modeling: Today was a first day I managed to make further progress with this build. Not much was made, but cockpit is almost finished. Drybrushed parts, added few bits to busy the walls and wire to control stick. Those small additions are various PE parts I took from old, partially used PE set. In this case from 1/48th Spitfire set, so we will have here almost a Lend-Lease I-16... Just joking! To be clear - modifications in cockpit are not intended to be 100% accurate, but to add some elements to almost empty space.
-
Thanks a lot for kind comments. Anthony: I'd love to see those I-16 in the air too - I know only a pictures taken during the show. Maybe some day, however NZ is so far away... Dave: Light blue paint is Lifecolor's UA 037 (Air Superiority Blue). This is not "pure" bright light blue, it has likely some red hue in it but in my opinion it is close enough for cockpit work, as I often touch up some bits later and mixing "primary" color every time is inconvenient.
-
One more overall shot. Cockpit parts painted light blue and washed with thinned oils. Not perfect, but all parts will receive drybrushing and flat/semigloss clear varnish.

-
Finished instrument panel - some drybrushing and gloss clear for a dials (I'm afraid the panel will not be visible anyway)

-
"Door" outline on the right side of fuselage was removed, as it was absent on early types of I-16 (including type 10)

-
Cockpit. It is simplified and this area of a kit is perfect opportunity for detailers and scratchbuilders who want to rebuild it to have accurate replica. I decided to go easy way - only to add few bits to busy the walls; added straps to pedals. Also thinned cockpit's siedewall in its upper part.


