
Learstang
-
Posts
989 -
Joined
-
Last visited
Content Type
Profiles
Forums
Events
Everything posted by Learstang
-
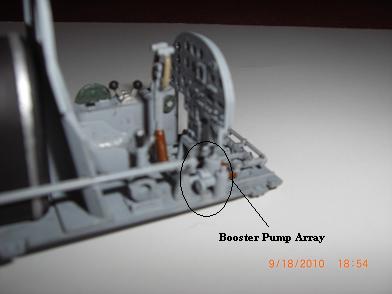
A rather complicated piece that is conspicuous by its absence from the kit cockpit is the primer/booster pump for the engine, situated on the front starboard portion of the cockpit floor on the real plane. The first picture shows a drawing of the booster pump, from the 1942 IL-2 Flight Manual, with the two small plastic tubes (located on the top of the large red arrow) I will magically transform into this device. The next picture (excuse the blurriness - this is the best I could do) shows the scratchbuilt apparatus glued to the cockpit floor. Unfortunately, I didn't think to take photos of any of the intermediate steps, but know that this was done just using properly sized styrene tubes and rods. There is still a little more tubing to be added, but it's essentially complete. Quite a lot of work went into those two fiddly bits, but I just wouldn't have felt the cockpit were complete without them. Regards, Jason

-
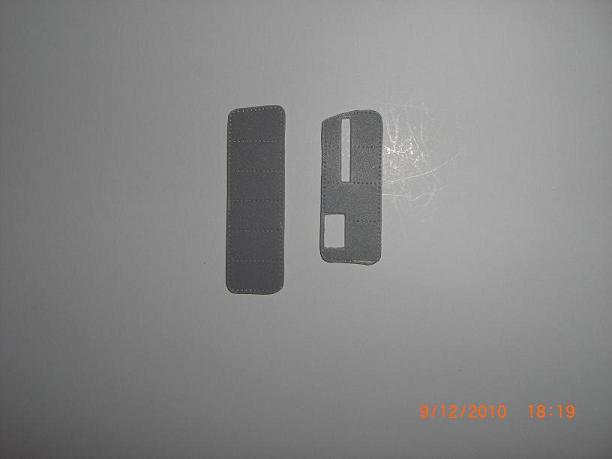
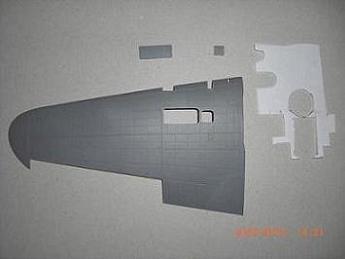
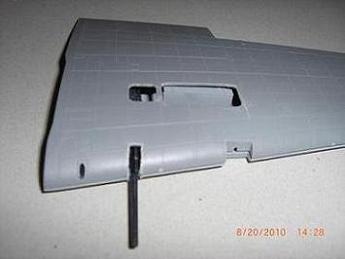
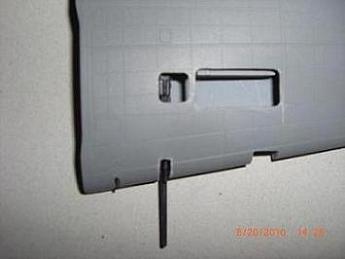
Here you can see the work I've done on the stratchbuilt upper access panels on the wings, and the supercharger(?) pipe. Unlike the underwing access panels, which were cut from the wings themselves, these access panels were cut from suitably thin sheet styrene so no thinning was needed. I've sanded down the elbow on the pipe a bit, but I'm still not sure I'm going to use it so I may not do anymore work on it. Above the pipe are the armoured shutter plates for the underfuselage radiator, which will be cut in half along the lines drawn on them and fitted to central posts which they rotated about (this will be clearer when I actually install them). Regards, Jason


-
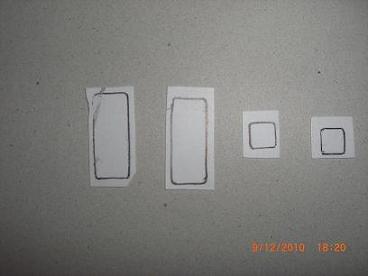
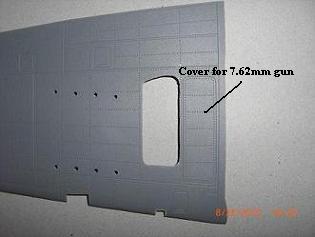
It's been awhile since I've posted some pictures, but I have been working on the model, primarily on the engine and the cockpit. The first picture below is of the firewall with the part to be cut out crosshatched, with the finished piece (for now) next to it. Next to the finished firewall is the scratchbuilt pipe that will lead to the back of the engine and attach to what I believe is the supercharger. One problem with this is the firewall itself - the way the kit is designed, the pipe will have to fit through a hole drilled into the firewall. I'm not sure that this is the way it was on the actual aeroplane so I may not end up using that pipe after all. More research awaits. The third picture is of the access panels I cut from the undersides of the wings - the larger panel is for the 7.62mm ShKAS machine gun on the starboard wing, whilst the smaller panel with the spent cartridge and link openings is for the 23mm VYa-23 cannon on the port wing. These have been considerably thinned down and I still need to add the reinforcing strips that went on the insides of the panels. Regards, Jason


-
Scratch built Westland Lysander Mk 1 1:30 Scale
Learstang replied to fozzy's topic in Works in Progress
Looks pretty good to me! Regards, Learstang -
1/32 Azur Polikarpov I-16, Repblican Forces, Spain, September 1938
Learstang replied to DougN's topic in Ready for Inspection
Great looking Mosca, Doug! The Ishak has always been one of my favourite planes. I need to get one to put next to my Hobby Boss IL-2 (whenever I finish it). Regards, Learstang -
I agree that a Judy would be nice (the inline version, like you have pictured). A Gekko (Irving) would be fantastic! I'm not that big of a fan of Japanese subjects, I'm more into Soviet, British, and German aircraft, but the Judy, Irving, Nick, Val, and Pete would all be nice to have in 1/32nd scale. Is anybody keeping track of these suggestions, so we might send a list to some of the major (and not so-major) manufacturers? I suppose this has been done before - maybe it's time to do it again. It never hurts to let the model manufacturers know that they have an audience for a particular aeroplane that maybe they hadn't even thought about doing. Speaking of which, it'd be nice to have a Firefly FR.I (if that hasn't already been mentioned). Regards, Learstang
-
Da, tovarich DrDave! Missings of Yakovlev and Lavochkin series of Heroic Soviet fighting machines in the 1/32nd scale is most improper! Hopefully, with hard proddings of proper capitalistic model makers we are to be seeing such brave aeroplanes from Great Patriotic War against Fascistic Invaders! Za Rodinu! Dasveedanye, Tovarich Learstang
-
Too right on that one, Roy! That's one I would love to see. It would be huge, but we can always hope. Now since we're dreaming, how about a Lincoln and a Shackleton?! Regards, Learstang
-
Thank you Kagemusha! Very nice - the Hi-tech version has the markings for famous Soviet ace Boris Safonov, with the slogan "Za Stalina!" - "For Stalin!", emblazoned on the side. Just the plane to protect my Shturmovik (which in the period of the war it's from, the winter of 1941-42, it would have been lucky to have had any plane protecting it!). Regards, Learstang
-
Here's what I've done on the engine and its associated parts (cowling, propeller, radiator intake trunk, etc.). I'm going to have to do some scratchbuilding for a few coolant tanks, two of which are in the photograph, whilst a third will go over the front of the engine (it isn't pictured as I haven't begun cutting plastic on it yet). In addition to the coolant tanks, there is some wiring that will need to be added. With the engine compartment as open as I intend it to be, I want to be as accurate as possible. In case you're wondering, some of the colours on the engine are based on a photograph of a wartime AM-38 being worked on, some on a restored AM-42 (it was the Griffon to the AM-38's Merlin), and to be honest just some plain guesswork. I realise the photograph is a bit busy with all the writing, but hopefully it makes sense, and gives some idea that I actually know where I'm headed with this beast (yes, I know, that was actually the NATO codename for the IL-2's replacement, the IL-10. For those who care, and even for those who don't, the NATO codename for the IL-2 was the "Bark"). Regards, Jason

-
Amen to that Dave! My IL-2 is going to need some company. First off I suppose is an I-16 (which kit has the engine provided as a resin part?). A Pe-2 would be fantastic! As would an I-15bis (I-152), I-153, Yak-9, etc. And whilst I'm dreaming, how about a Tu-2? It's about the same size as a B-25 (speaking of which I'll have to get that B-25 with the Soviet markings when it's released, and I've sold off my mother's jewelry to pay for it). Regards, Learstang
-
I'm not that big on WWI aeroplanes, but that's one I may just have to get (when I get the money, the space, etc.). It would be great if they did a Junkers D.1 in 1/32nd scale - that would be a little more reasonable in size. Regards, Learstang
-
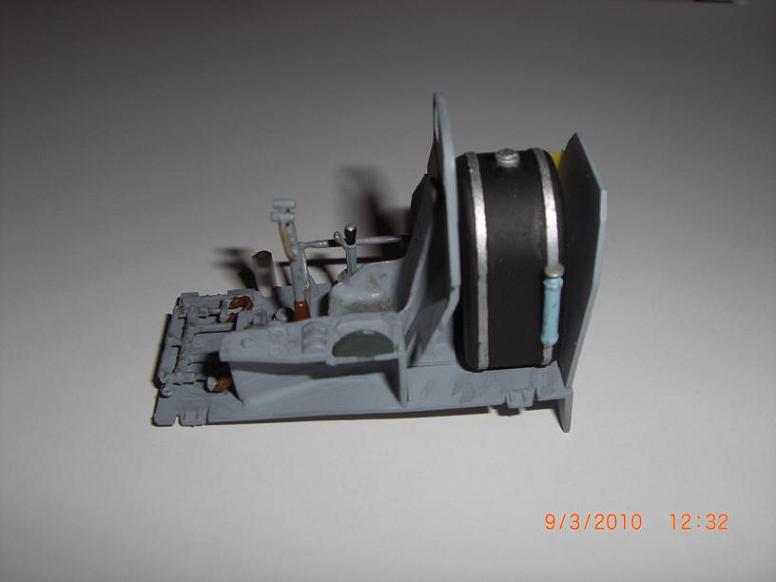
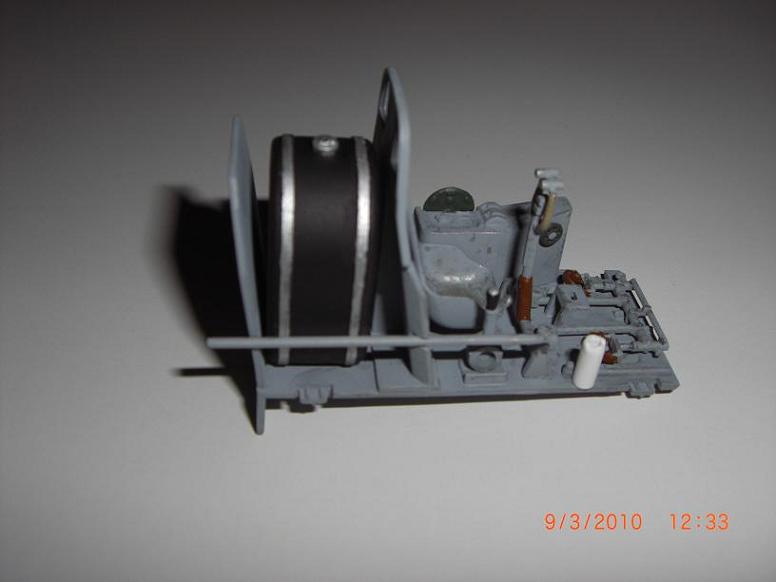
Thank you, Kev! And yes, you can see the fuel tank through the aft portion of the canopy. The carbon dioxide bottle (that's what I think the blue bottle is) probably won't be visible, but the tank and the cap on top will be visible. Regards, Jason
-
I've been mainly working on the engine lately, and will have some pictures shortly, but until then, here are a few of the cockpit, which I'm still working on. I've now added the fuel tank, and the white plastic tube on the starboard side is the start of the primer pump. Enjoy! Regards, Jason
-
Brilliant work, David! I'm reading the SAM guide to the Hunter right now, and I think you got that Hunter spot on. It looks well-weathered, as those replacement Hunters were. Regards, Learstang
-
Nice Furniture Waggon! The Wingnuts kit, of course. How did it go together? Regards, Learstang
-
Scratch built Westland Lysander Mk 1 1:30 Scale
Learstang replied to fozzy's topic in Works in Progress
Brilliant tutorial, Fozzy, thank you! And you Lizzie is looking great! Regards, Learstang -
Thank you, James! About the wing root, would you illustrate what you mean with a photograph, because I'm not really sure what the problem is. Do you mean that sanding down the fairing on the upper surface makes the juncture there a little off? Regards, Jason
-
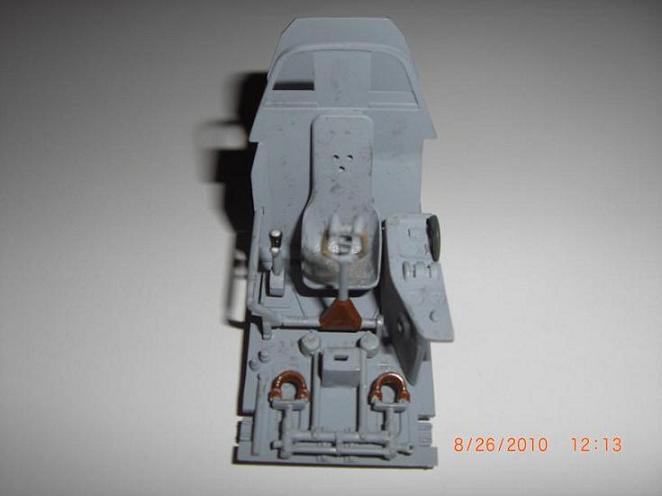
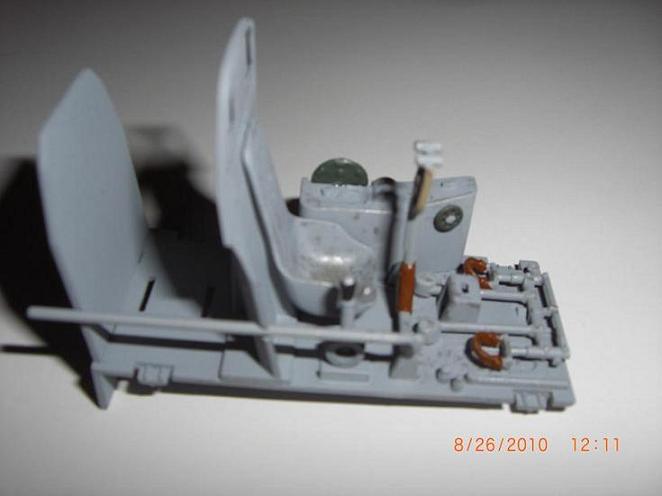
Here's the cockpit. As always I apologise for the somewhat fuzzy character of the photographs - I assure you that the cockpit is quite crisp and clear in person. I still need to add a few fiddly bits, do a little paint touchup on the rudder pedals, and make up the rather complicated booster pump on the front starboard side of the floor (in addition to adding the fuel tank behind the pilot, of course), but overall I'm pleased with it and I think the colours are pretty good. I based the colours on a b/w 1943 IL-2 flight instruction film. Since the film is in b/w, I had to make some intelligent guesses, but I think I guessed pretty well. Not only did I watch and rewatch the film, but I made about 20 stills (screen prints actually) from the film, which have helped me in the parts placement and colours of the cockpit, and will help very much in making the pieces that are missing from the kit interior, such as the primer pump, the gun recharger levers on the starboard side of the cockpit, and the manual retraction gear handle on the starboard side of the cockpit. If you'd like to see any of the pictures, please let me know. James, I am interested in the problem you noticed about the wing root - please advise. Regards, Jason P.S. Does anyone have any spare cockpit panel decals? There are a few gauges on the port console that I'd like to use decals on, instead of painting them. I would think any 1/32nd scale panel, or even a 1/48th scale panel would suffice. Thank you in advance for any help you can provide!
-
Scratch built Westland Lysander Mk 1 1:30 Scale
Learstang replied to fozzy's topic in Works in Progress
Nice explanation of vacuforming, Fozzy! I may have to try that someday. Good job with the canopy, also! Regards, Learstang -
I'm not sure where you messed up on the rear shutter, James, but the front shutter looks spot on. Good job! I've been busy mutilating the wings for the last week, cutting out just about every access cover I could. I don't think I've bitten off more than I can chew, but I can say that building all the interior structure is not going to be fun. Still, it's the only way I can show off the guns and ammo. I hope to have some new photos of my cockpit posted on my thread in a few days. For the rotating circular plates for the shutters, it sounds like you just used a punch and a hammer. What size punch did you use? Regards, Jason
-
Here are some more pictures of my slowly disappearing wings. In addition to cutting out the small access covers as I threatened to in my last post, I've also removed the large access cover under the 23mm cannon in the port wing. The attachment point was there, but I'll now just attach the cannon to the built-up spars, as it was on the actual aircraft. In this case, I'm going to probably keep the cut out cover, suitably thinned, as it has some nice rivet holes moulded into it that will be hard (for me) to reproduce on a replacement cover. I'll probably have the cover hanging from its hinge, as I've seen in a photograph. The edges of some of the holes I've cut/drilled out need some more cleanup, but overall I'm pleased with the results. What I'm not looking forward to is scratchbuilding spar extensions, ribs and stringers. It's starting to look like the wings are going to be the most difficult area on this kit, although I could have gone the easy route and left everything closed, in which case I would have just had to glue in the guns. This, however, would have wasted the detail that Hobby Boss provide such as the entire guns, the ammo boxes, and the ammo belts. In addition to building the interior structure, I'm also going to have to move the 23mm ammo boxes, which will be easy - they should be directly under the access covers, as I presumed. I may cut out the access cover under the 7.62mm gun, perhaps on the port wing, or perhaps on the starboard wing, or both. I'm still not sure about the placement of the internal chutes for the spent casings - this will require still further research. Regards, Jason
-
James, I'd wait to put the landing gear indicators on until you're about ready to finish the model. As you've found out, something like that is too easy to knock off. I'll probably do mine with something sturdy, like a fairly thick wire superglued into a deep hole in the wing. It'll be a while before I get to that stage, however. I'll be interested to see how you handle the radiator shutters; I haven't started on that as now I'm tackling the wings and how best to show off the guns and ammo, then back to the cockpit. If you're interested, I've started my own thread with my kit. It's nice having both threads going as I can see work you've done, that I haven't done yet, and vice-versa. I do think the carburettor intake looks good, and it's definitely more accurate than that rather rude-looking external filter. Regards, Jason
-
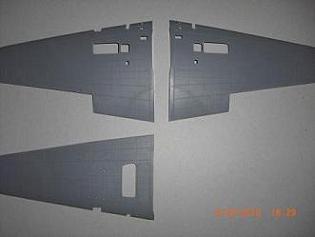
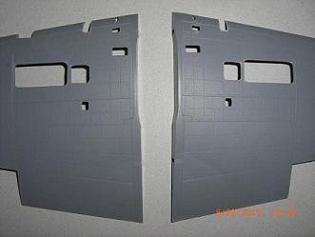
Thank you Dave! Hopefully I won't muck it up too much. I certainly don't want to lead anyone astray. Here are a few more pictures. In the first picture you can see I've removed the access covers on the port wing (such surgery to be repeated on the starboard wing). I won't use the cut out pieces, as they are too thick, but I will use them as templates for the thin white sheet plastic. I'll also punch out holes where the screws were, in the new access covers (no, I don't think I'm going to try and make some 1/32nd scale screws to go with them!). In the second and third pictures you can get some idea of how much you can see with the access covers off (I've just placed the wing halves together and placed the guns and ammo boxes in, nothing is glued yet). Unfortunately, the answer is not much. You can see the grey ammo box at the back of the bigger opening - why it isn't directly underneath the opening I don't know - I'll need to do some more research to see if I need to move it. There are some other small covers that I'll probably just drill out, and use the openings to make my templates. In that case, you'll be able to see some of the 7.62mm machine guns, and maybe some of their ammo boxes. I suppose I could also cut out the access covers on the bottom of the wing, which would really open things up. At any rate, I'll also need to add some more wing structure, such as extending the kit spars, and making up some ribs. With all that's going to be visible on this kit - the cockpit, the guns, the engine (at least a little bit of it), this model will just scream out for a diorama. Something with a snow base, of course, and maybe a 1/35th scale T-34/76 sitting next to it, with the tank having a white camouflage and a suitably big patriotic slogan splashed across it. The problem is space, of course. Oh well, I have to finish the b****y thing first! Regards, Jason
-
I've always liked the Kanguru - it looks like the b*****d offspring of the P-51 and the Fw-190A. I might have to take a look at this conversion set. Good luck on the build, Steve, and you too Bill! If I do one, I think I'll just do the straight conversion into the V-18. I just took a look at the conversion set - very extensive (and expensive)! Regards, Learstang