
ChuckD
-
Posts
914 -
Joined
-
Last visited
-
Days Won
9
Content Type
Profiles
Forums
Events
Everything posted by ChuckD
-
Hey, I forgot to ask... How do you know the pilot in the photos is Lt. Ray? Asking because I'm curious if you have any other background on this photo series.
-
Thanks for the insight here. I used a slow setting gel super glue for placing the Quinta stuff, but I think I'll try future or white glue next time as long as there's not a complex shape to form the decal around. Even the slow setting CA gel set before I got the parts exactly where I wanted them. In the end, it's more a mild annoyance than anything, but a little more time to get the position correct would be beneficial. I do have some 1/35 scale heads from Hornet lying around. Though they're "1/35" they actually look closer to 1/32, so they'll fit just fine. I've had mixed results sculpting figures in the past, so we will see how that phase goes. I think I have a 1/32 figure whose legs will suffice for the crew chief, so it'll come down to sculpting the jacket, arms, and hands. ... and then I have to paint them. Yikes. I'm glad you brought up the palm tree too. I've been debating on adding one or two to the layout. It's a toss up between a visually appealing vertical element to the dio and the utter disdain for the actual scale size of a palm tree in 1/32. Hmm. Surely there are baby palm trees, right? Also, thanks for the compliments and encouragement, gang. It's really helpful in keeping the steam up. <3
-
Boy howdy, there is nothing like spending an entire day adding miles... ...and miles... ...and miles... ...and miles... ...and miles... ... and miles... ...of wiring and linkages... just so that you can close up the fuselage and never see any of it ever again. C'est la hobby, I suppose. Anyway, as you can see, I've made quite a bit of progress on the cockpit. At this point, it's roughly base coated and the lovely Quinta set has been (mostly) added. I have obviously not yet done any weathering or anything, so it's pretty underwhelming at this point. The next step will be to touch up the base coat, paint the newly-added wiring and such, then gloss, wash, weather, etc. I'm not going to cover much of the actual build process of the kit itself - certainly not as in depth as I went on my A-20G a few months ago - because this kit has had roughly a half a million build threads devoted to its several iterations over the years. So, I shan't belabor that point, but as I get along and reach milestones, I'll post updates. I did receive the Black Dog figure kit and the paints I need to achieve the salmon primer, so we're moving forward there. I can't really start roughing in the figures until I at least get the wings under the fuselage. To combat my gnat-like attention span, I'm going to shift my focus from the a/c to the figures and groundwork as soon as I get the wings in place. I'm concerned that if I finish the a/c in entirety, I'll be too tempted to move on to something else and never actually finish the dio idea. Anyhoo, no more modeling for me today, my brain is fried.
- 143 replies
-
- 16
-

-
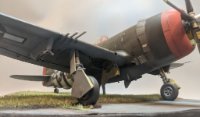
Thanks, Mike! I do appreciate it. Anything to provide more and clearer information to the scene is helpful! I spent yesterday getting the engine around. I added the spark plug wiring and other assorted oil plumbing. As always, the photographs make the dirt and oil speckling look far more pronounced than it is to the naked eye. And the data plate is a close approximate from the spares bin. All in all though, despite how much the ignition wiring fought me, I'm very happy with how it turned out. The forward cowling got a little love too. And the two dry fit together. The Quinta cockpit set is supposed to arrive today, so I should be able to get moving on the build proper today or tomorrow.
- 143 replies
-
- 27
-
-
Hi, all. After cleansing my palate and clearing a few lingerers from the shelf of doom, I'm back with another fairly large project... and no, it's not another big twin. If you've seen many of my posts over the last few years, I like to recreate historical photographs to the best of my ability. With this project, I'm going to try something a little more ambitious to include some figures and at least some basic groundwork. Inspired by @Effik's awesome F4U-1 build, I decided to crack open the box and get going on a project that's been simmering for a while. I want to recreate this photo... ... from this series of photos taken at Turtle Bay in Espiritu Santo in July 1943. I wanted to do this one for a couple reasons. First, I've never done a model with the red surround on the national insignia. I understand why it had a fairly short service history, but I always thought it was visually very striking. I've seen some modelers portray this airplane with light blue surrounds, but if this photo series was, in fact, taken in July of 1943 (and that seems to be the consistent theme), it sits smack-dab in the middle of the ~6 week period when red surrounds would have been used. Second, the sand and coral dust blown back along the fuselage is fascinating and should prove challenging to recreate. There are a few other interesting observations as well: the top cowl flaps are fixed closed and there's an odd patch of discoloration just forward of the cockpit that doesn't look like the usual fuel staining found there. Wondering what color that might have been. Also, a film crew is visible to the right in the 3rd photo; I'm not sure what was going on that day, but this a/c and pilot seem to be the subject of some interest. That said, I've got what I have on hand organized and ready to go: I've also got a few things on order that will enhance the build, though I'm not going for all-out perfection and nth degree super detailing. My goal with this project is to recreate the vibe and the feeling of the photo, not correct an out of place rivet or obsess over the perfect shade of salmon pink primer. In the mail are: - Barracudacast plain tread wheels - Anyz canopy frame - Quinta studio cockpit interior - Black dog resin figure for the pilot I've also got a set of cockpit placards from Airscale to gussy the interior up a bit if there are places the Quinta set is lacking. I'm going to have to sculpt the ground crew standing on the wing, so that ought to prove interesting, but that's future me's problem. As the Quinta set won't be here for a few days, and I don't want to just sit idle, I'm going to get started on the engine and maybe the wing sections first. More to come!
- 143 replies
-
- 17
-
-
#2 for the week. This is my take on the Tamiya M18 Hellcat. From unprimed to finished in less than 24hrs. The decals are from the spares bin an take a little artistic license. The 814th TD Battalion never fielded M18s. I just didn't care for the kit decal options, so there we go. As a personal preference, I don't much care for piles of stowage, so it's cleaner than most M18s you see. Anyhoo, enjoy!
-
Thanks, it's an old Dragon 3-in-1 kit, #6264. It had been in my stash for years, then I built it and it sat unpainted for a couple more years, now I finally finished it.
-
Thanks for following up. Good to know and glad it wasn't just some dumb mistake I made. What a weird quirk on an otherwise phenomenal kit.
-
Hi, all! I'm still working on clearing my backlog before the end of the year and here is build #3. This is a Panzer IV Ausf E in the colors of the Deutsches Afrikakorps. These tanks were shipped from the factory in standard Panzer grey, then hastily painted with desert camo once they arrived at the unit. Thus, the heavy chipping. I used the hairspray method to achieve that, and I recalled why I don't use it very often. It's rare for me to get the consistency just right and I either have to scrub the crap out of model to get the chipping effect, or I put on too much hairspray and the topcoat sloughs off in huge patches. This tended towards the latter, and even spraying a varnish coat activated some of the hairspray and cracked the topcoat. Ah well, it isn't perfect, but I'm happy with it. Now on to the next kit!
-
Hey, @leoasman, I'm curious - did you run into the same indexing issue I did on the right engine? Like it was keyed in a way that made it not want to fit correctly? Wondering if it was me, or the kit that made the folly.
-
 It's really best not to fight it. Just give in and let the kit's fine engineering do it's work. Andy's Hobby Headquarters has it for $180, and that's a pretty screaming deal.
 -
Wow, this is great. Nice work!
-
Lovely! Wonderful work
-
I really really like this. It's great to see a -1 Corsair that doesn't look like it's been run through the washing machine with a cinder block. In short, the weathering is subtle, beautiful, and not over done. Great work!
-
Love it! Can't wait to see it all done.
-
Thank you! It's a decent kit. Not Trumpeter's best, but by far not their worst. I built the SBD-5 kit a few years ago and it fought me the the whole way. Then the bottom of the fuselage split at the join just after I finished painting it. I promptly gave it to my son to play with. He had a lot of fun with it over the years, so it was a win in the end. That said, save yourself some serious heartache and leave out the stuff aft of the rear cockpit wall. There's no way to see it and it just makes the fuselage fit that much more difficult. In fact, for this kit, I snipped off or cut down the locator tabs on one side of all the cockpit pieces just to ensure they didn't interfere with getting the fuselage together. I left out all the doo-dads aft of the firewall too. Since I wasn't going to retain the clear cowl and engine bay panels, it didn't seem like a great loss to leave the accessory case and such off. Seemed to work out pretty well. Your mileage may vary.
-
Thanks, Tom. I go through phases for sure. It seems like late winter and spring tend to be my lulls, then I have 1 or 2 big milestones in summer, then crank out a bunch of kits around the holidays. It seems to have been that way for a while, but I've never put much thought into the pattern. Thanks for the compliments, guys. <3
-
Hi, all. I'm trying to clear my shelf of doom as much as possible before the end of the year and this was my 2nd candidate - an A6M2 Zero being my first. This represents a VMSB-233 SBD-3 Dauntless at Guadalcanal. Beat up, tired, but holding the line against the Imperial Japanese fleet. Paints are MRP, weathering is a combination of oils, enamels, airbrushing, and sponge chipping. Hope you enjoy!
- 16 replies
-
- 36
-
-
Beyond cool! Unique and awesome. Well done!
-
Holy smokes. The idea of successfully flying and landing the A-20 from the Gunner's position is a highly optimistic prospect.
-
Masters of the Air Release Date (Finally!)
ChuckD replied to Dennis7423's topic in General Discussion
I'm actually, literally laughing out loud at this comment. <3 -
Totally understand. I always try to remind myself that this hobby is about the journey, not the destination. If a project takes me some time, it's no big deal.
-
Looking good. Love seeing this come together.
-
Masters of the Air Release Date (Finally!)
ChuckD replied to Dennis7423's topic in General Discussion
This falls squarely in the in intersection of the venn diagram of "things I know" and "things I prefer not to acknowledge."
