Search the Community
Showing results for tags 'Fisher'.
Found 7 results
-
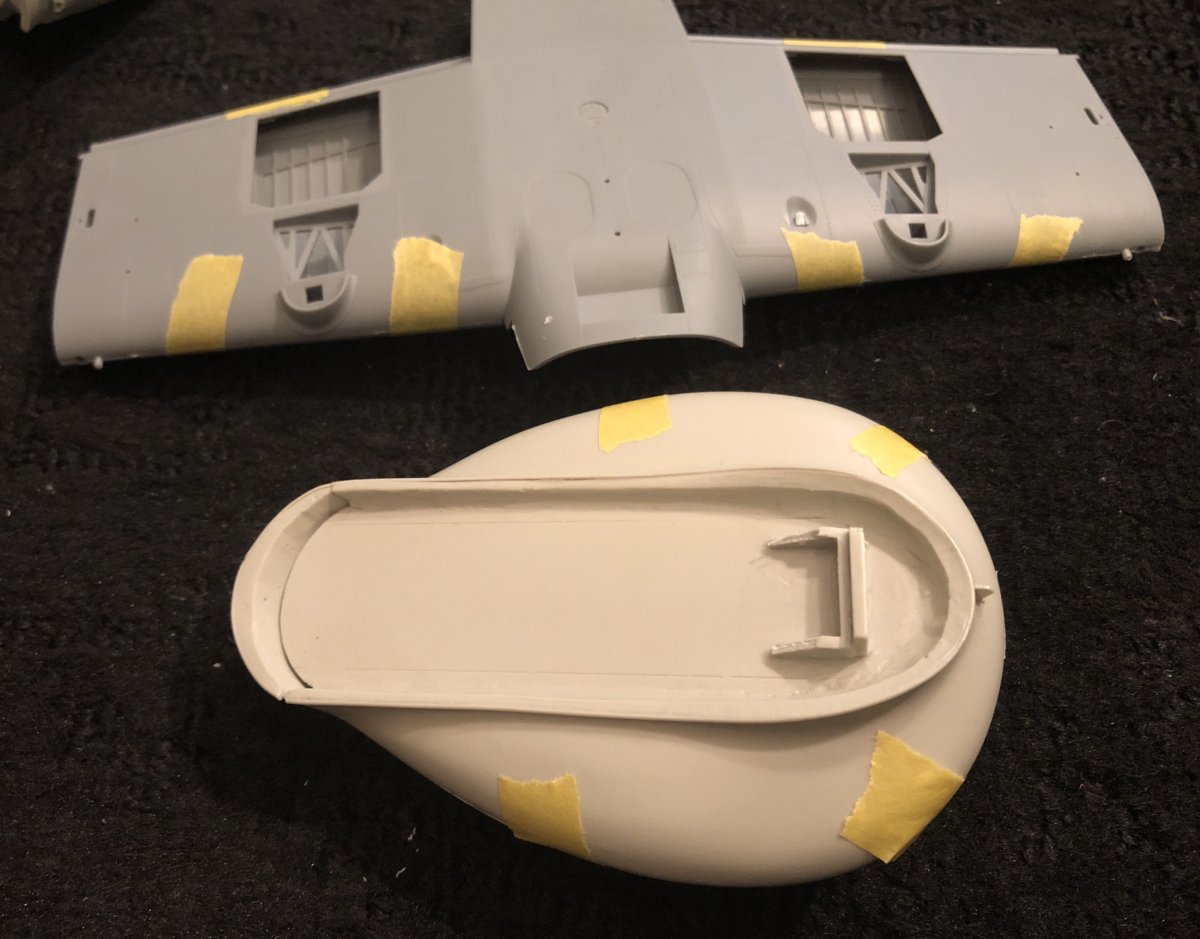
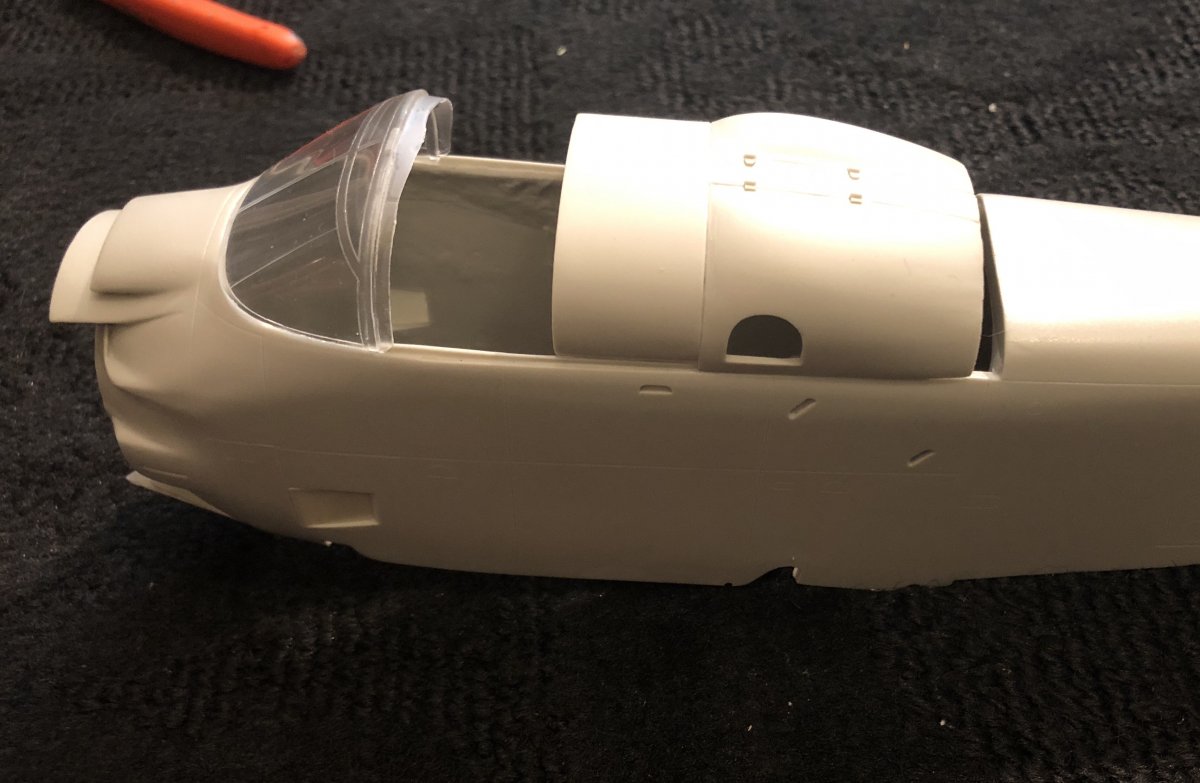
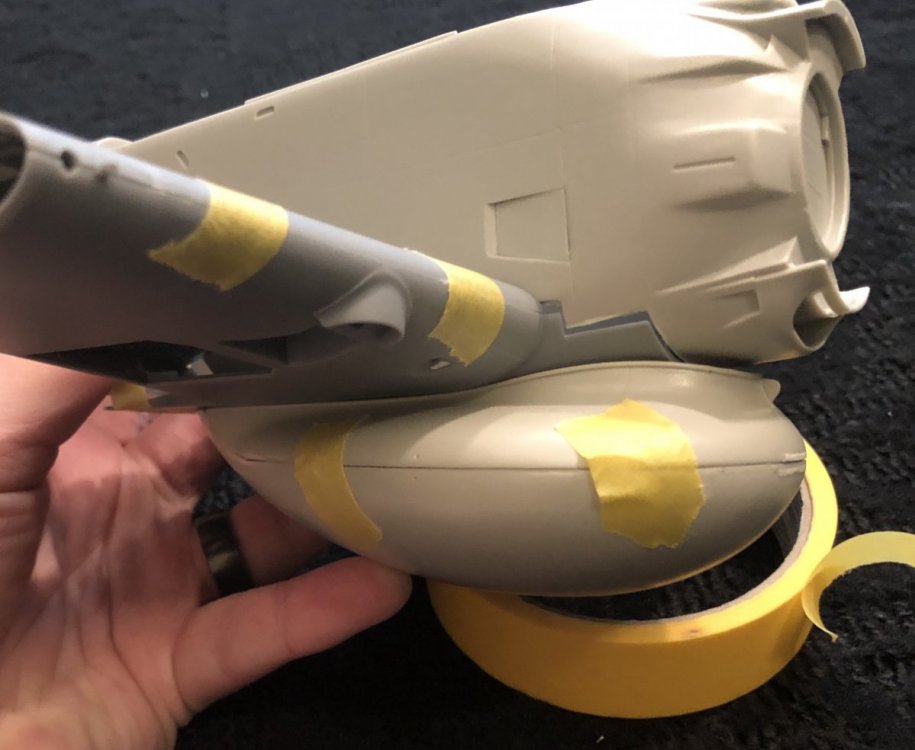
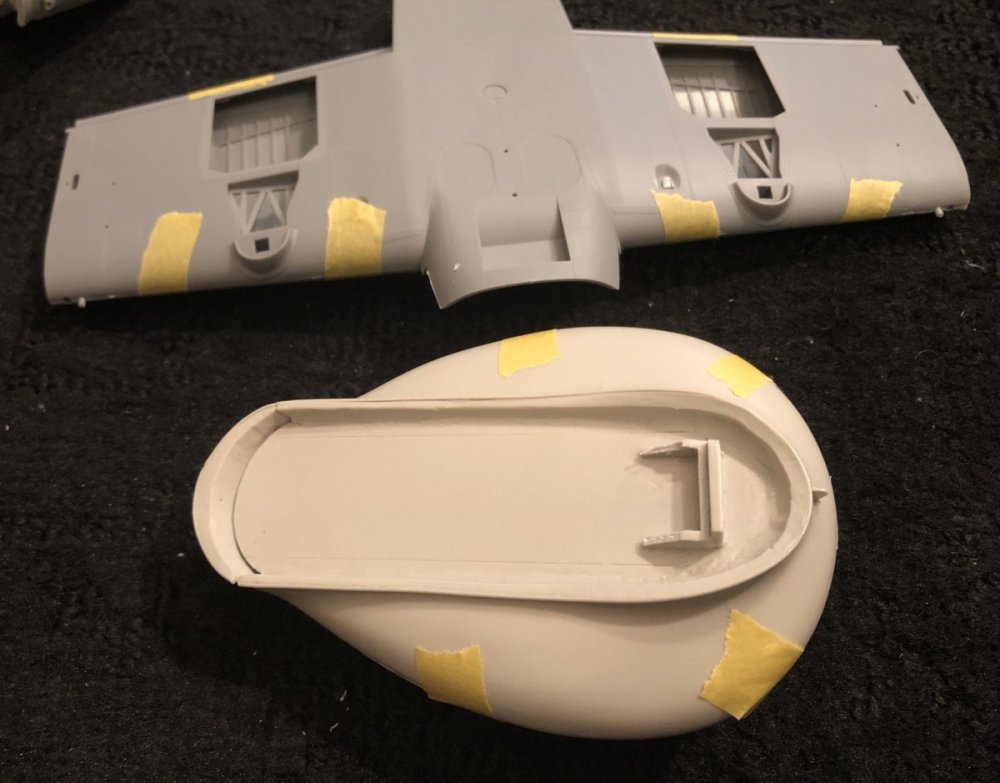
 Good morning all, I know I have another topic on the cooker right now (the Travel Air Mystery Ship), but as for the time being I have definitely stopped working on LSM's kit, and my correction work is more virtual modelling than anything else - but that will not last -, my longing for actually fondling some plastic (or resin for that matter) was definitely too strong. Time to start another one then ! Back in 1965 (or was it 1966 ?) my father was an officer in a tank regiment based in Kaiserslautern in Germany. We used to travel to my birthplace (Saumur, house of the Ecole de Cavalerie, and of a beautiful tanks museum - I remember playing inside a T-34 or a Sherman, but this is another story - for Christmas. On the way back home, at night, I saw a beautiful glistening ball on the banks of the Loire river: this was the dome housing the Chinon nuclear plant, a graphite-gas plant. I was hooked from then on with anything scientific and engineering. For that specific Christmas, I got a wonderful present : a book on aviation. This one hooked me forever on aeronautics. It was full of incredible shapes, and among these science-fiction pictures, were two which I still remember vividly, and which have set my unconditional love for those two beautiful airframes : the B-58 Hustler, and the Chance-Vought F7-U3 Cutlass ! The Cutlass was certainly unique for its time. It was plagued by an incredible "lemon", its Westinghouse J-46 (interesting parallels to draw with the still-present attitude of the Pentagon purchasers to stick to some suppliers or projects, against all evidence), but it was not a bad flyer according to some of its pilots, incredibly rugged, and fairly agile. When Paul Fisher released this one some time ago, I was totally elated. One of my favorites aiframes, in my only scale ! And the execution is typical Fisher : beautiful ! From the start, I wanted to make it in NMF. This short period of time when the Navy had its aircrafts unpainted makes for certainly interesting-looking aircrafts, especially as the Cutlass had panels made of aluminium, magnesium, Metalite - a glistening compound made of balsa wood sandwiched between aluminium foils -, silver-painted fiberglass, stainless steel, etc. Fisher, on its instructions, provides a very clear facsimile of which metal went where. This definitely calls for foiling. But when I got the kit, I was not sure I was ready to commit to foiling such an expensive kit. But, 1) I have now done an experiment in foiling with my ST-M (another gem from the Fisher stables) 2) I badly wanted to do some resin-fondling 3) Scott's thread about "get those expensive kits out of the stash" was a trigger. So, I hope I will entertain you, with this one : a 1/32 F7-U3 M, in NMF, under the colors of VX-4 when this unit was testing the Sparrow. The finish will use paint when the panels were painted, and foil when the panels were left natural metal. Let's get started by following Fisher's instructions : assembling the wings, central wing-box and top and bottom main fuselage. The wings are one piece mouldings, with strong tabs to insert in a central carry-though box, itself sandwiched between the upper and lower main fuselages. This makes for a very strong assembly, that will withstand the weight of the beast without any problems. Sorry, I have not taken any pics of the wings-and-wingbox assembly. I added some shims of plastic to make sure the wings were firmly set in the box. Be careful to measure where these shims need to be added (above or below the wing tabs), to ensure the wings are level and set at the same height. Fisher then advises that some fit issues will likely occur between the upper and lower fuse when mating them with the wings. This is true, but nothing plastic shims, CA filler and plastic filler, plus some sandpaper and elbow grease won't be able to overcome. The big gaps are at the rounded end of the lower-to-upper rear fuselage joint. I inserted some thin plastic cards shims, plus filled the rest. Ditto for the wing roots: there are gaps above and below where they join the fuselage. Some two-part expoxy filler was used, complemented by ordinary car-body filler. Now for some pics : The assembled rear fuselage and wings : It is a big bugger, in case you wonder. A comparsion with its younger cousin , the ST-M : Now for the seams. The pics speak for themselves. The seams are still WIP, as they now need some fine-filling with Mister Surfacer, and more sanding and polishing to restore a smooth surface for the foiling process. The very fine panel lines will also be re-engraved Lower rear fuselage joint : Lower front fuselage joints, left and right : And upper wing to fuselage joints. I have removed two small exhausts from the fuselage, to make the sanding process easier. They will be reinstated later. Their mark can be seen as a lighter "shadow" on the fuselage side. Thanks for looking. Hubert
- 22 replies
-
- 14
-

-
after long time not building a plane i will start this one The Su-25UB from trumpeter i didnt founduch online builds off the twin seater What ihave to start with I still note sure what paint job i will give here but im thinking the grey digital camo Just a few things i have to think about is the rivets on the back off the plane that are in real life raisd Will i go for it or not More progress later when i start the beast O and thanks Jack for this kit Mark
- 28 replies
-
- 11
-
-
 Update 8/2/18 - work has begun! Normally I’d wait until I actually start working to write an in progress thread but I’m too excited to wait with this one. Fisher has not started shipping the AD-5W Guppy conversions just yet; decals haven’t arrived to them yet from Cartograf. Nevertheless Paul was kind enough to send the resin of the Guppy conversion my way so that I could get started. Initial dry fitting of major parts and the Trumpeter inner wings show near perfect fit. The massive Guppy radome is cast in two pieces to save weight and has “walls” fitting into the oil cooler recess of the trumpy lower wing to aid alignment. I trimmed the back end of these with sprue cutters to get perfect fit. The AD-5 will go in the fluorescent red scheme from Fisher’s decal sheet, but I will be fully arming it with two Tiny Tim rockets and a bunch of HVARs on the outer pylons. Maybe not technically accurate for the trainer scheme but there are photos of operational aircraft with that loadout and it looks too cool to pass on. Undecided on which Guppy scheme yet... This is going to be a fun project!!!
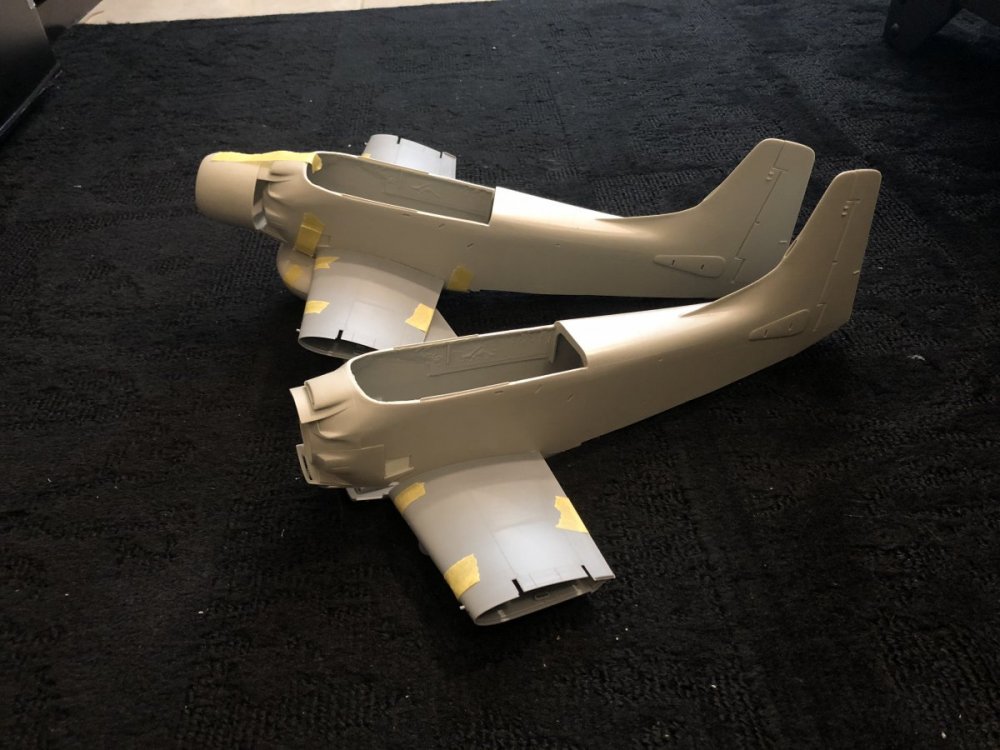
-
ok here we go with the conversion for the RF-8G After my ukrain bird it whas time for a new challenge I whas long thinking on how im going to make this and then i found this on the net so now lets get the party started what i have done so far Mark
- 41 replies
-
- 10
-
-

F4D-1 Skyray VF-13 1962: Update 9/19 Forward fuselage
EmperorKai posted a topic in Works in Progress
I recently picked up this wonderful kit via the LSP Traders forum, and after looking through it, decided this was the next one. I'll be building it out of the box with the provided markings for US Navy all weather fighter squadron VFAW-3 "Blue Nemesis". This squadron has the distinction of being the only US Navy unit assigned to the North American Air Defense Command. The scheme I'll be depicting, though with the black nose. The decals are for aircraft 32. The kit has seen several owners before landing on my bench. In the box Parts! The main airframe parts, which make for an "oh wow" moment when first opening the box. Decals, masks, photo-etch, all in part of the kit. Nice. So many Fords, so little time... Thanks for looking! Kai -
Here is my completed Fisher Ryan ST-M / PT-20. This kit is a first for me in many respects : My first compeleted kit in 15 years … My first completed aircraft kit in 20 years My first resin kit My first kit where I have been trying and used foiling for metal parts. My first kit where I used Archer rivet decals My first operational use of the Silhouette cutter, for detailing the engine My first use of Airscale instrument decals. They are as good as Peter is a great modeller, that much ! So it has enabled me to come-out of my modelling doldrums, regain my mojo, and overcome my psychological block on painting and using an airbrush. I have always preferred detailing and buidling over painting, but I this site has taught me that great kits result of good painting more than detailing. I will now feel more confident / less wary of painting in my furure kits. And I am now sold over to the benefits of acrylics in airbrushing, but not yet for brush painting ... However, given that I learnt or re-learnt a number of things in building this kit, it did not come out as good as I dreamt of. But I have learned many things in the process that I feel worth sharing with you all: 1) Archer rivets are very good. When used with Micro Sol / Micro Set or the likes, the carrier film completely disappears. They will take foiling well, BUT, if you mess-up the foiling, they will tear off with the foil when you remove it. So they have to be sealed under a coat of paint if you want to foil them over. 2) Being in the beginning reluctant to do any airbrushing, I used a Tamiya TS rattle can for the sealing overcoat. With hindsight, I should have used the airbrush and would have achieved a thinner coat, and therefore better definition of the details and rivets. 3) Tamiya TS rattle cans paint react with alcohol : when redoing foiling and cleaning-up the Microscale Metal-foil Adhesive, alcohol is the best way to do so, but will not work well with an undercoat of paint coming out of Tamiya rattle-cans. Another reason not to use them to seal rivets … 4) Foiling is easier and less daunting than one imagines. It is really worth giving it a try, as, in the end, nothing looks more like metal than metal... 5) When going over compound surfaces, small areas are better than big ones, and thick foil, that will stretch under the burnishing tool, much better than thin foil that will tear-off 6) Wood dowels, toothpicks and brush handles are great burnishing tools for foiling 7) Spread the glue onto the part rather than the foil. This way, you can control more accurately which area will be foiled. 8) Monofilament is great for rigging. I could have used Eazyline, but found out that the benefit of taut monofilament is that it contributes to structural strength of the kit, just like on the real aircrafts. Tensioning monofilament can be achieved by passsing near or under it an incandescent match or toothpick. After one or two « snaps », you'll learn how not to overdo it 9) A working jig is an absolute must for manipulating and building kits. I made mine in a few minutes using foamed cardboard, and that was certainly the best thing I did (and another first) in all my modelling life Now back to the kit. It is straight from the box, with the following tweaks : - I have used Airscale instruments decals for the instrument panels. - The belts are HGW's USAF laser-cut fabric belts. Very good, and taking washes very well, but the instructions on this specific set could be clearer - The cockpit as represented by Fisher is inspired by their (earlier) PT-22 kit. The control sticks are wrong : they should be straight, vs the kit's S-shaped ones. As they were chromed-metal on the real airplane, pins with a Milliput handle were an easy replacement. - The rudder pedals are not right either. The ones on the ST-M were different, with a brake pedal at the extremity. But they are barely discernible in the end, so you can bypass this tweak... - The engine representation is minimal. It will probably do, given the size of the opening, but I chose to redo it, using the Silhouette to cut the circular cylinder fins from paper, and stacking them over a central rod. The engine block was sculpted out a plastic block and painted KLM blue, Finally the pushrods were done using pins. - I added a 3 mm dia circular intake in the engine cowling face, as it was present on some early ST-Ms, if not all of them. - Take care when assembling the flaps of making sure their traling edge is aligned with the TE of the ailerons. As designed in the kit, there is a small step that should not exist - My kit was missing the wing to fuselage struts. I did new ones by wrapping a plastic rod with thick alu foil (from disposble kitchen-ware) - The wheels are a little anemic, and their hubs are too big in diameter. I beefed-up mine with Mr Surfacer, and turned a smaller (3.5mm) hub for them. But when in the wheel spats, this new hub is not visible anyway. - The kit-supplied exhausts are good. But I redid mine using some brass tube (1.2 mm dia) thinned from the inside with a 1 mm drill. The tube was then blakened using Uschi's blackening fluid. - Finally I added a pitot tube, made from a suitably bent Albion Alloy 0.5 mm dia brass tube. Finally, a list of some products I used and found great and very useful : - Micro Metalfoil Adhesive : nothing beats it for foiling. - Uschi Van der Rosten's blackening agent. Great to blacken brass parts … - Uschi Van der Rostens Blitz Dry : dries oil paints (used for simlating wood) in 1 to 1.5 hour rather than 5 days … - HGW fabric seatbelts - Tamiya Craft Bond glue, for gluing transparent parts. Looks like a white PVA glue but dries very fast and achieves a very strong (transparent of course) bond - Pebeo satin varnish. Found in Arts & Crafts stores in France. Levels well, dries quickly. Better results IMHO than using Future. - POSCA paint pens: it sometimes far more natural and precise to use a pen than a brush. These paint pens (found in arts & Crafts stores) are so convenient for small touch-ups and precise paint applications, and far easier to use than brushes in many circumstances. Plus you do not have to clean them after each use … - Albion Alloy micro-tubes. Besides the pitot tube, I used them for building the anchor points for the wires on the wheel-spats. The WIP thread can be found here: http://forum.largescaleplanes.com/index.php?showtopic=54706 Now for the pics. Hope you like the finished result in spite of all its imperfections. Hubert
- 26 replies
-
- 7
-
-
- Yellow Wings
- PT-20
- (and 3 more)
-
Hello all, As a part of finding my modelling mojo back, I did not intend initially to make a WiP for this one, just go to the RFI when it's finished. But then, I am getting so much from reading others' WiP threads that I thought that maybe, if I could help juts one fellow LSPer, then a WiP was needed. Unfortunately, some of the work is done and has not been recorded on pics, so you'll have to take it from where it is ! I start by doing some side-stepping around my personal life, because maybe it can also help fellow LSPers relate to what I have been living though, and understand why sometimes they have their own blocks in modelling. I have been on LSP for some time now, but I have so far failed to finish anything. There are plenty of (bad) reasons for it, the first one being that I could really spare little time for modelling for many years. To be precise, I was forbidding myself from any modelling as long as other priorities were not ticked over first, starting with taking care of the wife, the home, the companies I manage, including for some the tedious accounting records, etc... Then my life changed somewhat since the summer of 2011. I decided that bringing a stop to my then long-lasting marital life was in the end an inevitable - but better for me - decision. Then I met Patricia , whilst the divorce with my estranged former wife was dragging along. We bought a new home beginning of 2013, in which we undertook major works (I mean, really major ones ), then I bought new premises for my company, in which again I undertook major works ( ). Both build works were finished in the late summer 2013, just in time for 1) our wedding and 2) moving the company to the new premises ... all within 2 weeks in September 2013 ( ). Needless to say there was simply no time available for any modelling duting this period :frantic: This is when the old body decided to flash a big red warning light, and for a good measure say "Sir, you're burnt out !" I finished September 2013 in Intensive care ... Not quite the honeymoon Patricia had envisioned ... Since then, I have been very very very slowly coming back, whilst in the meantime catching up all the bacteria and viruses the environment could throw in my path. Needless to say this has left me with no energy for modelling during all this time ! Which means I had not finished any kit for the last 8 years , to the point where it has become a running joke with my buddies of "La Comète" (some of whom are members here, like Warbird, Frankey or SuperMario ) So I have really come back to active modelling in the last few weeks, and decided I needed a "small" project I would finish. I have others unfinished projects scattered around LSP, but they will come later. At least, the good news for them is that they are on the Shelf of Doom, not in the Bin of Doom ... (can you imgaine that when I started my scratchbuilt Aichi "Hansa", the WnW W-29 was not even a rumour ... ) End of the background story, and thank you for bearing with me and being the group LSP has always been since I joined : friendly, heart-warming, and always nice to others ! So my"small" project was going to be Paul Fisher's lovely Ryan ST-M / PT-20. The idea was that it would be an OOB build, a real mojo mender. It's a very nice kit, and others like Kevin and Eric have shown how great it can look when finished. Because I love Yellow Wings, it will be finished as an Army trainer. And for a good measure, I'll have a go at foiling the fuse. Paul has done a good job with his kit, but he has in some areas re-used the work for his former (just as great !) PT-22, which in real life was based on the ST-M (PT-20), and this is not always accurate for the PT-20. For instance, the control sticks of the ST-M were not S-shaped, like on the PT-22, but straight, and of chromed steel. I used pieces of sewing needles to represent the sticks, with handles made of white Milliput, suitably turned to shape with files after inserting the new sticks in the chuck of my mini-drill. As the fuselage is now all buttoned up, this the best pic I can show you of the new sticks : Of course, I never managed to butt-glue the new sticks to the kit's original support bar. I had to fabricate one, using a 1mm dia brass tube. Where the sticks were affixed to the bar, I sleeved on a bigger diameter (1.3 mm) tube, thinned-down from the inside with a 1mm drill. To ensure a good solid joint, the tubes were drilled transversally (carefully, as drilling a 1mm hole at 90° to a 1.3 mm tube is an interesting exercise ) On the upper right corner of the seats, you can also discern another chromed bar. This is the flaps control lever, which has been forgotten by Fisher, but is a prominent feature of the ST-M cockpit. It was also chromed steel on the real ST-M and they were done with a suitably bent 1mm piece of needle. The instrument panels did not match the pics I had. I made new ones in thin plastic card, duly punched according to my reference pics. The dials are Airscale's ones (you may notice that, as per original, the artificial horizon is not located in the same place on the front and rear IP), and the bezels, painted gloss black, come from an old Photocut PE set. To replicate the cracked-paint effect of the IPs, I first painted them silver, then applied with a paint pen some thick black paint, which was stressed before it was dry, using a very stiff paint-brush. A clear acetate film (the kit's one) was used to replicate the dials' glass. Sorry for the not-so-good pics, guys. On top of my unremarkable photographing "talent", it is not easy to get something from very close with my bulky camera without creating a shadow with the camera lens. I am not sure the ST-Ms has a wooden floor, but with the solid wing, there is no real way to represent the fuselage, and it would have made fixing the (very nice) seats very complicated anyway. So I used the kit's floor, painted then weathered to represent stained and dirty wood. The foot-pedals need some brake-pedals added at their inner extremity. Done with thin plastic strips and punched micro-discs. The whole interior was painted Interior Green on a silver base, and worn and weathered using a fiberglass-eraser, and some brown and black pastel chalks' powder. The seat-belts are HGW's "US Navy" belts (132085). They are good, but in fairness this particular set is lacking on the instructions' side. It took me a trial set to guess more or less correctly how to assemble them. Other mods have been done on the kit: the ST-Ms did not have a padding running all round the cockpit openings, as on the PT-22. The padding was just on the front of the cockpit sill, under the windscreen. I scraped the superfluous part of the paddings, but, as there still are some difficult seams to fill, I will probably remove them completely, to make new ones out of a Milliput roll. After assembling the fuselage halves, there were some seams to fill. I used some CA, then Mr Surfacer 1000 for a first round. There are still more seams to clean up, especially around the wing to fuselage joint. I want to make the best use of the way the kit is designed, i.e. paint the wings and stabilators before assembly, and foil the fuselage seprarately. This requires however that the seams are taken care of as best as possible before joining the wings to the fuselage. A critical area is the front lower fuselage to wings leading-edge joint (See Kev's own build if you want some pics of the area). To ensure a good mating of the wings, the cockpit floor is a hindrance, pushing the wing down. Fortunately, there is enough material to remove from the center wing, and this is what I'm working on right now. Finally the flaps and ailerons have been glued to the wings. On the kit, the flaps protrude behind the (virtual) trailing edge, when there should be a straight line with the ailerons and the rest of the wing. I scraped the extra material from the flaps trailing edge, and sanded them back to the proper thickness, being careful not to destroy the very fine surface rendering of the kit. The wing has been primed with Tamiya's spray-can white primer, a fantastic product. That's all for now, folks. I'll try to take pics of the future progress in the proper spirit a WiP thread for the future posts. Hubert.