

ruzlkampf
-
Posts
3,126 -
Joined
-
Last visited
-
Days Won
4
Content Type
Profiles
Forums
Events
Everything posted by ruzlkampf
-
Think I'll swing back to the cockpit for a bit and get the crew sculpted into shapes that fit. Also still have the MG81Z's to scratch up and it's ammo supply that goes between the 20's. Can't even imagine how the gunner could handle the racket from those going off next to his face! Yeeesh! Or. how the radar operator squeezed into the cubby-hole between the MG151 ammo bins on his little bar-stool of a seat for more than an hour & 1/2. I can see why the JU-88's were popular.(not that they have any degree of opulence!)

-
Some pics of the top cowling set in place so ya'll can see this won't take much putty to swoop into the spinners. Top cowls are kinda square across the top front to follow the upper crankcase, but I'll be rounding all that out.

-
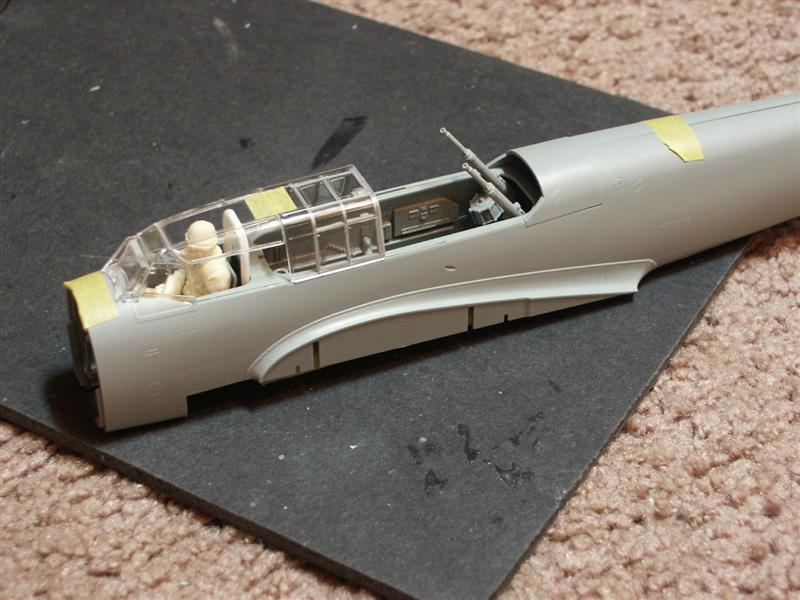
Different view. Oh yeah, I've got a new head on my pilot now. Goggles up with a mask. Seems more appropriate for flying at night.

-
I'm not going to glue the top cowls in until I get the flame dampeners and cut-down kit exhausts lines up. These are Hasegawa 109 spinners just for mock-up. I'll be using Eagle Editions resin spinners for the finale. Just showing these angles so ya'll can get an idea of what's needed to fair the cowling into the spinner. I'll be scratching up new oil coolers.

-
Okay, got the tape out and mocked everything up for a looksy. If I had more patience and/or time.....these cowlings coulda been removable, but delicate. Because I got ham-bones for fingers, and need the strength of glued joints for sanding/hacking/putty in this area,....I think I'll have them closed. Nice delicate detail and fit for anybody who chooses otherwise. This is just with the bottom cowl glued in place to line everything up.

-
Lemmee scruch down a bit and hear my old bones pop to take a different angle. Lotsa possibilities here for eye-bleeding detail, but I want to finish this before I'm reincarnated as a turnip and don't have any thumbs to grasp an exacto knife with. Let's move on;

-
Whoohoo! Major milestone was reached tonight,....I actually got it sitting up on it's gear! Thanks for stopping in and visiting my friends, it's kinda like watching a slooooow-motion train wreck happening, eh?! I really don't know why everybody thinks I build these so fast Brian? Everybody has their own speed, style, and level of detail that they enjoy putting into a build,....and that's all good and what makes the world go around. Be pretty boring if everyone built exactly the same. I don't build to race, impress, or compete against anybody but myself. Guess a lot of it is perspective? I look in awe at other builds and wonder what it's like to detail out a seat harness, or put brake lines in, or actually have the patience and perserverance to work on a build and savor it for 1-2-6-months. I just have to work within my own attention-span and limitations....just go with it and have fun! Uuuuuuhmmm, I guess it helps that I killed my TV 5 years ago too. Bahahaha! Just build em like ya want to, and do it in your own time buddy.....it's only a hobby and is meant to be enjoyed! Well, a I'm single confirmed bachelor also so there's no 'honey-dos' either. I don't have a prob telling any woman who has 'issues' with my hobbies, "don't make me decide". I'd rather live alone for all the right reasons, than with someone for all the wrong ones. That usually culls out all the 'pretenders', and they fly off into the night on their brooms with their little monkeys with wings. I'm getting too old for any drama. But I digress; Got the engines mounted on the fire-walls and wings glued together tonight. Yahoo, that was fun! If somebody was so inclined, this area is wide open for extra detailing. I think I'll pass, as I'm going to be sanding on the nacelles and need the strength for hammering on. They sure look cool though! Veery nice kit.

-
Hmmmmm, yeah....I'm not sure how far I'll take the engine mods until I see what the nacelles actually show. I know the oil sump/filler up front wraps entirely around reduction gear casing too. We'll see when it comes time to cross that bridge and I've got to kick that trolls arse to not pay a toll and get across. I'll be twiddling with the engine cowlings tonight, and pronounce some type of prognosis about which path I'll be taking. More into showing how I'm going to change the profile to smooth into the new spinners/props. If that goes smoothly, I'll take any time saved into detailing out the engines. Later!
-
I'm just about finished with the plethora of boxes and switches that got stuffed into the fuse, and working on actually getting a crew in there. Haven't decided whether to paint the interior or move onto the wings/engines next? Hmmmm, milk & cookies followed by a little nap will help chart my course. Before I un-taped the fuse mockup I took a pic of where I'm at so far on this assembly. Kinda getting pumped about modifying that nose with the 30mm snout and shell ejector chutes. Probably go with the engines,....I haven't puttied anything in at least 3 days and getting a nervous tick and twitch to slough something up. More pics later on tonight! Later, Russ

-
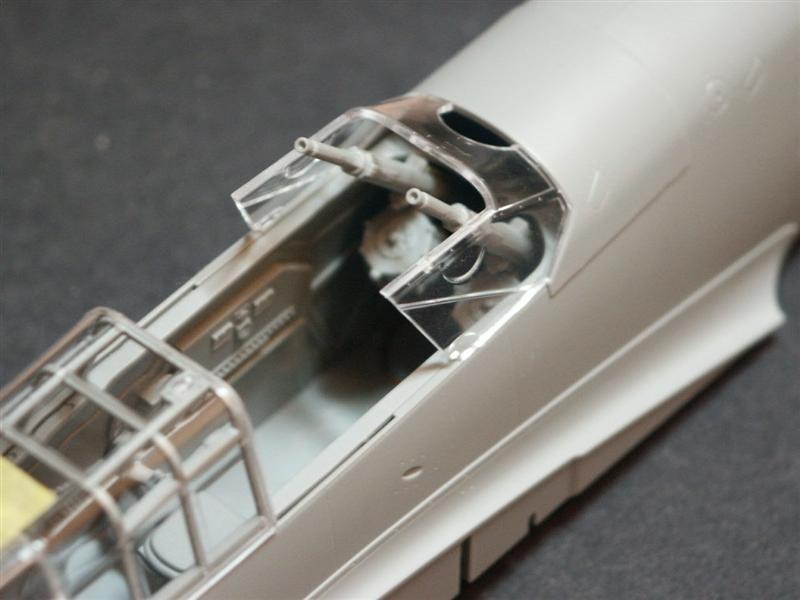
Bahahahaha! Ya know Pluf, last time I started on the Revell 110 making it into a G-2.....Dragon came out with this kit 2 weeks later! The way this kit is engineered, I KNOW they've got it broken down into doing a later version. It'd be too easy,.....maybe this build will provoke them into releasing it?! I can smell their fear. Really enjoyed watching you working on your 110, veeeeery nice! Thanks for following along Mr. Matt, these pics are for you. Using the drawing you supplied I mocked up something as similar as possible. Still don't have the relay box atop the shelf on the fuse, or ammo casing dump chutes afixed to the 20's yet,....but they are now slanted at 70 degrees and mounted for good. Nasty little business to get them in and aligned correctly and at the right height. Whew! Check it out; Here's what they look like gazing down into the fuse.


-
Whoooeee, that turned out great dude! You have that 'masking-the-markings' down cold. Veeery nice!
-

First finished for 2010: OOB Matchbox Spitfire F.Mk22
ruzlkampf replied to GMK's topic in Ready for Inspection
Nice one Greg! I like em with a pilot in the pit too. Turned out really well, your son is gonna have a BLAST varooming this one around the house! -
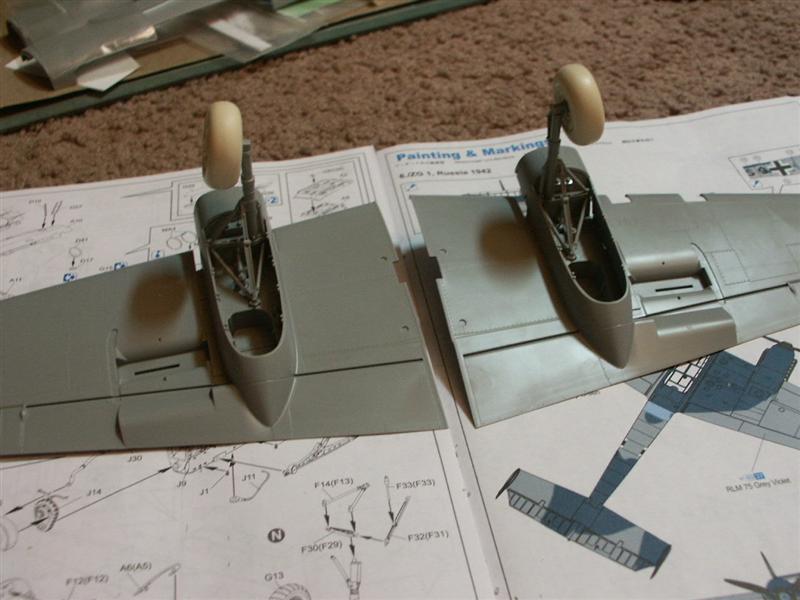
I got a kick outta how the main landing gear was engineered. Very nice,.....and very detailed and scale looking. The only mod I did in this area was shave the boot off the oleo. Pics I've been looking at have them both on or removed. I just had a hankering to whittle on sumthin. While I was into the underwing area, I took a looksy at the drop tank holes that are marked inside the wing to see which ones needed to be opened. The kit had the carrier brackets and center 'mechanism' already on the sprue tree for a later version. The brackets supplied with the kit lined up with the mounting tabs on the Hasegawa drop tanks I'm using exactly. Sweet! I've already got the new wheels drilled and ready for mounting too. I should have some more updates later on tonight when I pause for a break. More pics then, eh?! later, Russ
-
Also been piddling around with getting the wings mocked up in preparation for the engine nacelle mod. The engines in this kit (sheesh, actually the entire kit) are gorgeous! A few more additions will make nice representations of DB-605's out of these.

-
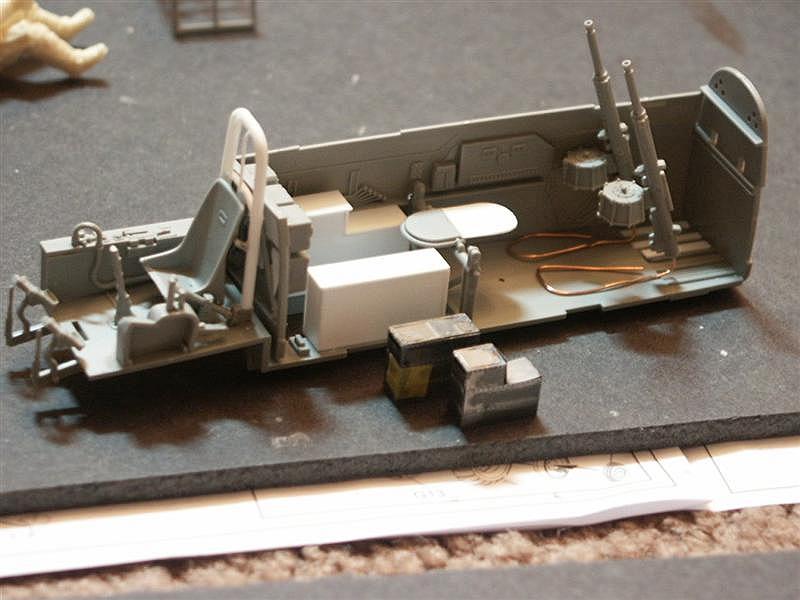
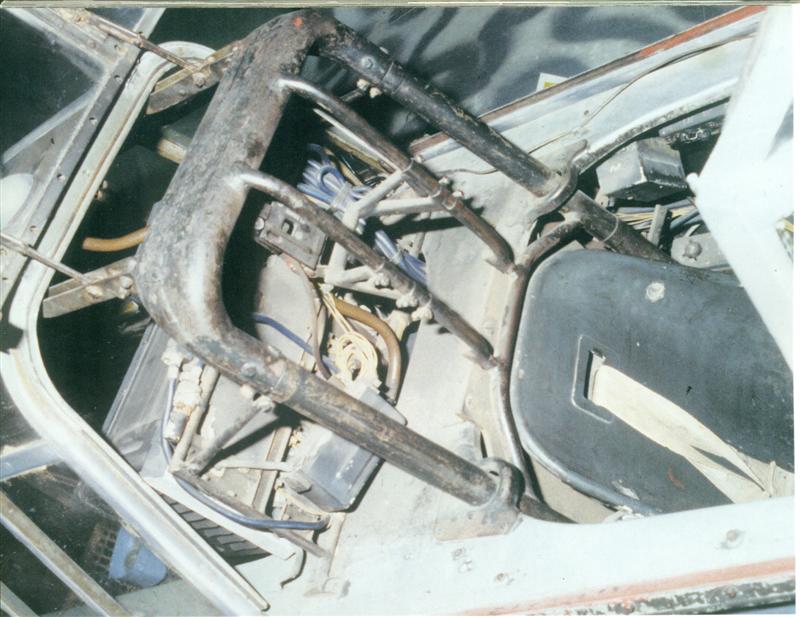
Been working on all the extra boxes and knick-knacks that get stuffed into the rear pit. This is where I was last night still test fitting the new ammo boxes and upward firing cannons. Got those at a slightly higher angle now. Those PE boxes in front are from the Eduard set and were much too small. Designed for the Revell kit so I've been cherry picking what I can use and scratching the rest. The rear seat is a woven contraption that I'm going to fudge on a bit as I'll have crew members installed, and it won't be seen. I think I have at least 10 more boxes/panels installed in the rear area now. This cockpit was CROWDED!!!!
-
Heeeeey Alfonso! Nice of you to drop in, you crazy peace loving BS-17 builder! Always a pleasure to have you around dude. Yep Matt, got yer email....and that's just the ticket for getting my 20's afixed to the floor. Most excellent, and THANKS buddy! I'm working on finalizing that installation today. Been in 'hibernation mode' lately, so I didn't post any updates last night. I'm a bit further along than these pics suggest and figured I'd pause and catch up a bit before I get much further. Got some more done on the pilots seat and wanted to show how I grafted into the 'C' version seat-mount to mod into a 'G'. This is as far as I can go with this until the fuse 1/2's go together as the balance of the brackets and Revi gunsight for the upward cannons work up from the top of the cockpit deck.

-
And the last pic for the night. Different angle with the glass in place. This is a really excellent kit, and is making this conversion go very smoothly. Can't wait to show ya'll what I did tonight when I post more tomorrow. Gotta scram now, but I'll be back later on tonight with more progress pics. Later! Russ
-
Heeeey Hans! Glad you're following along buddy! Yep, that's what I've been using for a reference so far along with the Osprey 'How to model the 110' book and a few others. That Squadron book is excellent for the work I've been doing on the ammo cans for the MG 151's and gunners position. Lots of new boxes and switches put into the 'G' from the 'C'. Not that tough to do though, this is a really easy conversion. Here's a broad overview of where I was after the first night. Got lots more done now, but that'll have to wait for the next update.

-
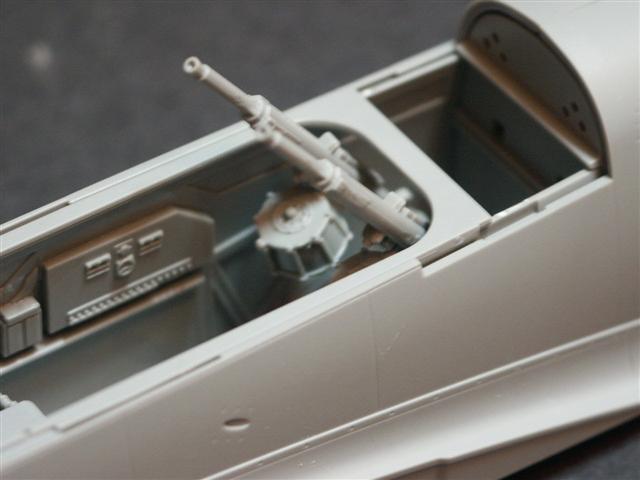
Let's swing back to the rear gunners area and see how those 20's fit with a piece of glass afixed. Now I won't be using this piece as I'll be vacuforming a 'G' version, but this gives a good idea of the height and angle. Different angle. Hmmm, yes....this has potential. Gah, really looking forward to mounting the gunsight for these pop guns in the top of the pilots canopy! heh heh.

-
Also to make sure the pilot is the correct height and doesn't bonk his melon on the canopy.

-
Checking to make sure the height of the roll bar is exactly below the top of the canopy line and doesn't interfere with the top piece locking down.


-
Now I want to move back into the cockpit. Here's another view of all the brackets and such that have to line up with the canopy, and some of the wiring from the radar I was talking about.
-
Different views. I'll have detailed mounts and extra ammo cannisters, but the wire gives me the height and angles I need to get this basic fit. I plan on detailing out this cockpit pretty well, this is just getting the major parts to fit then I'll work around them.

-
Broad overview of where I'm going with this. Looking kinda cool, huh?

-
Before I went much further, I had to mock up the radar. The PE 'boxes' were a PITA so I used the faces and just made up some styrene boxes. Also, the metal woulda been tough to drill holes into for the wiring I want to put in this area behind the seat. Another critical fit is the 'shrage-musik' installation. This is a tight cockpit, and I'm going to have three guys in it with varying poses....so I needed a way to get the right height, width, and angle to have them come outta the rear canopy perfectly between the correct frames. There IS no extra room in this thing. Here's how I'm getting it zeroed in.

