

Animalmother
-
Posts
84 -
Joined
-
Last visited
Content Type
Profiles
Forums
Events
Everything posted by Animalmother
-
Pacific Coast Models 1/32 Hawker Tempest MkV
Animalmother replied to Animalmother's topic in Works in Progress
The Tail wheel has not been added as the kit wheel looks like a button, waiting for the Barracuda Studios wheels. As for the rest, I'll look into them. Andy -
Pacific Coast Models 1/32 Hawker Tempest MkV
Animalmother replied to Animalmother's topic in Works in Progress
Thanks guys, as we've said the kit does have some challenges but builds into a great finished product. Andy. -
Pacific Coast Models 1/32 Hawker Tempest MkV
Animalmother replied to Animalmother's topic in Works in Progress
I have just realised that I never finished this thread off. Well the Tempest is now Complete and I'm very happy with it. The Invasion Stripes are far to tidy but tidy is a good thing....right !! Andy. -
It would seem that I've been absent for a week or so, in that time I've managed to get all the major parts attached to the He 162. I was going to be very detailed with my progress on this but to be honest theres not a huge amount of parts to this kit even with the resin upgrades, so really you haven't missed that much. If you look at the engine mount on the spine you'll see that I've taken some of the hight out of the two mounts, this is to bed the engine to the correct height. Iwas a little surprised when I came to join the Fuselage halves as normally with resin upgrades there's usually some easing to be done to get the halves to close. But in this case everything closed up beautifully. Now in the process of tidying up all the seams then I'll spray some primer to see if I've missed anything. Andy.
-
Had a Spiffing idea, thought I'd use the Kit Engine in the He 162 and put the Awesome Aftermarket Engine on a Trestles (like its being worked on). This is what the Kit Engine looks like along side the CMK one. Painted up the Cockpit this morning, still needs a little work and I want to weather the Seat Cushions but I've done them in Oils so it'll take a while for them to dry fully. The one thing I have found about the Aires Set is that the Ejection Seat actually fits inside the Ejection Rails (Nice). Thanks for looking, more later. Andy.
-
After spending Yesterday Cutting and Sanding all the Resin Engine Parts, today I've put them all together. And after loosing and finding a few small parts to the Carpet Monster, this is what I'm left with. Very pleased with it indeed, now to do it justice with paint. Andy.
-
Number 6 seems to be quite popular and I like it too, so maybe thats the one.
-
No, I'll be doing the normal wings, just hunting for a good paint job as its been pointed out that the one I like is a Desert Scheme and wouldn't sit well in a Forest !! So one of these may do.
-
Today the Update/Detail Sets turned up and I couldn't be more pleased. Both sets are packed with enough detail to keep anyone happy, now I have to be very careful not to loose any while cutting and sanding. The Aires Detail Set has Cockpit, Main Wheel Well and Weighed Wheels. The CMK Set has everything for a fully Detailed Engine and Engine Compartment. Now to start Building this Beauty.
-
Interesting looking mod but I think I'm gonna go with the Kit Tail on this build and I may cut out the Flaps so I can lower them slightly. It was just the Paint job I was gonna copy as most 162's look kinda bland with only the Red Arrow to lift them. Andy.
-
I'm sure that some of you will have one of these in your stash as there not expensive and Revell have really pulled out all the stops over the last few years. Anyway here's some Sprue shots of the 162 Only Five Sprues, so its not a complicated kit, but what is there is nicely molded with recessed panel lines, theres a hint of flash here and there but thats no big deal. The instructions call for 25g to be put in the nose but as we're going to use a resin engine I'll may have to up the weight. The Decals are nice but lack the Swastikas as usual, I'll be going through my Decal Stash to up the interest of the markings. Also as I said earlier I'll be using Uschi van der Rosten's Wood Decals on the wings. In the next post we'll look at the Aries Cockpit and the Engine Set. Andy.
-
Well after a couple of months messing around with a few Braille Scale Aircraft I'm back with the He 162. Now I have a few idea's for this one which include building it as a Fictional Aircraft rather than an actual Plane. It's going into a Dio of an abandoned He 162 on the edge of a Wood being discovered by Allied Forces. I've also decided on a different Colour Scheme for it and may use some of Uschi van der Rosten's Wood Grain Decals on the upper surfaces of the wings. I know that the Example above is a Swept Wing Concept but what the Hell, I like the paint job. I'm also waiting on an Aires Cockpit and a CMK Engine Detail Set, so there should be plenty to look at. Andy.
-
I emailed service@revell.de and 10 minutes later received an email back from dept x asking for my postal address. Hopefully that will be that ! Andy.
-
I've filled in the question form on revell.de asking if I can send the required bits back. There site says I need to ask as if I just send them, they won't deal with it. Here's hoping. Andy.
-
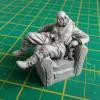
As the PCM Tempest build comes to a close I'm thinking about my next build and this one will be for next years Sword and Lance Model Show. As ever I'll use all the Aftermarket goodies I can lay my grubby hands on. I have just fired off an email to Revell Germany as the Kit I just received has no Clear Sprue in it, so no Canopy. Reading the info on there site it sounds like a long winded process to get a Replacement set, taking up to 10 weeks for it to reach me. So here's hoping they get back to me soon. This next build will be an In flight display so I need to find a good Pilot for it, if you know where I can find one let me know also if you know of an aftermarket Canopy just to cover all my bases. Hoping to start in a couple of weeks once I have all my bits and bobs to hand. Andy.
-
Pacific Coast Models 1/32 Hawker Tempest MkV
Animalmother replied to Animalmother's topic in Works in Progress
Been trying to get the Undercarriage to fit but because the main gear legs are angled slightly forward there very delicate when fitted. Plus the weight of the Aircraft itself puts quite a strain on them. I've had to remove one leg twice as its come loose which makes the plane dip at one side. I have it glued up again and will leave it overnight, hope it stays put this time or the plane will go on Trestles. Andy. -
I so want this Kit, so I'll be watching with interest, great start. Andy.
-
Pacific Coast Models 1/32 Hawker Tempest MkV
Animalmother replied to Animalmother's topic in Works in Progress
Well here we are again, I too have applied my Decals and started Weathering. Quite enjoying the process now the building is done. Working on the Tempest had encouraged me to pull out my Me109 G-6 and start on her again. The difference in size show how large the Tempest really was. Next I need to attach the Gear Doors and place the Canopy which has been dipped and painted, I may paint up the Kit Wheels and use them until I get the Barracuda Studios Update Set. Andy. -
PCM Hawker Tempest 8:25:13- Completed!!!!
Animalmother replied to scvrobeson's topic in Works in Progress
Looking good there, you've gone for the same version as me ! I'll be posting my pics tomorrow. Andy. -
Pacific Coast Models 1/32 Hawker Tempest MkV
Animalmother replied to Animalmother's topic in Works in Progress
The Dimensions are pretty damn close to the real Aircraft apart from the Wheels. All three need to be replaced with the Resin upgraded Wheel Set from Barracuda Studios. Accuracy of Detail could have been a little better but PCM are only a small Company and limited to what they can produce. But all in all other than a couple of fit problems the Tempest is a very nice Model. Andy. -
Pacific Coast Models 1/32 Hawker Tempest MkV
Animalmother replied to Animalmother's topic in Works in Progress
Good to hear Tony, remember to post your build. I've Kleared mine today, will start the Decals tomorrow. Andy. -
Pacific Coast Models 1/32 Hawker Tempest MkV
Animalmother replied to Animalmother's topic in Works in Progress
Excellent Kit !! Well it is now I've fixed all its fit problems ! -
Pacific Coast Models 1/32 Hawker Tempest MkV
Animalmother replied to Animalmother's topic in Works in Progress
I'll only be chipping and fading the paintwork so it won't be that bad. Andy. -
Pacific Coast Models 1/32 Hawker Tempest MkV
Animalmother replied to Animalmother's topic in Works in Progress
It seems like quite a while since I was here Ranting about this Kit, but now its together I'm really enjoying it. As others have said its all part of the Hobby to fix problems with out Builds. I've been working on it every evening and weekend so now we look like this. I have the Camo pattern on and have just finished the Invasion Stripes, also had to fix a little overspray I had on them. I'm not that worried about having them Razor sharp as she's gonna look pretty beat up once I've finished. I still have the Underside to stripe then I'll start fading the paintwork. I gave her a couple of coats of Hairspray to help with the Chipping later, this didn't go quite to plan as when I unmasked the Stripes I ended up pulling off some paint with the tape !! I've resprayed the areas and they look a little repaired which will add to the finished article. Andy. -
Pacific Coast Models 1/32 Hawker Tempest MkV
Animalmother replied to Animalmother's topic in Works in Progress
Yeah, knew that ! Was just testing you guys !!!!! (Looks Embarrassed).
