49bull
-
Posts
48 -
Joined
-
Last visited
-
I am in with my SBD 1/2 with Eduard Big Ed detail set!
49bull replied to 49bull's topic in Carrier Aircraft
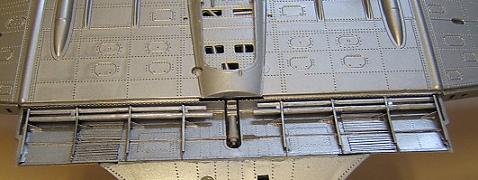
Here are the last two photos looking at the plane from the front showing the landing gear in place and a side view of the plane with the engine compartmnet attached. I hope to get the cowling in place by tomorrow and get the canopy masked and ready to paint. The dive brakes will take a bit of time due to the number of small pieces that need to be placed but it will look nice when done.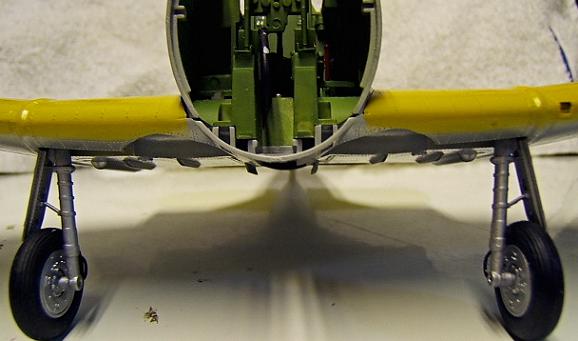

-
I am in with my SBD 1/2 with Eduard Big Ed detail set!
49bull replied to 49bull's topic in Carrier Aircraft
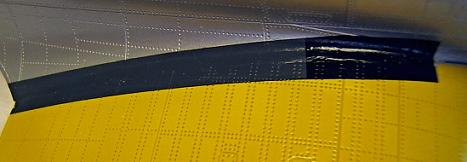
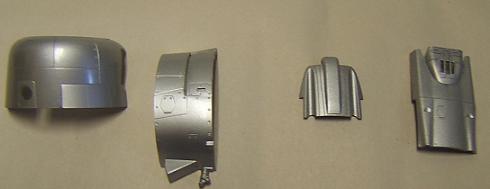
I did glue the main wing assembly to the fuselage and ended up doing some filling and sanding to smooth it out as the gaps were worse then expected. To avoid the need to repaint in the area, I masked the wing close to the joint and was careful to avoid sanding too far past the joint on either side. I missed a bit on the fuselage side but after I was done the sanding, I touched up the area by dry brushing gloss aluminum enamel onto the bare area. Then, I added the wing walk decals from Yellow Wings Decals (these settle in great but be careful as they are very thin and I did tear both). Once the decals were dry, I used gloss black paint to touch up the torn areas and voila! it looks excellent. The cowling half was painted (half is unpainted as it is clear and I wanted to be able to view the engine compartment from one side and show the color scheme from the other). The center dive break mechanism from Eduard was installed( as I said these were small kits in themselves) and the landing gear was painted and attached. I must have had a weak spot in one strut as I was working with plane and it broke off. I drilled a hole in both pieces and used metal wire to strengthen and secure the strut back in place. Next steps will be painting the interior of the cowling pieces, masking and painting the canopy, paitning the bombs and remaining pieces, adding the dive brakes and the rest of the mechanism which will take some time as each actuator is built from a PE and plastic rod then glued into place. The last steps will be attaching the small exterior pieces, bombs, canopy and the like followed by decaling the plane. I doubt I will finish by the end of the 28th though my guess is that 90% or more will be done. Here are some photos with the first two showing the wing root before and after adding the wing walk decal. The cowling piecs are shown and the center dive brake mechanism. The last two (with one on the next posting) show a front view of the plane and a side view with the engine compartment attached.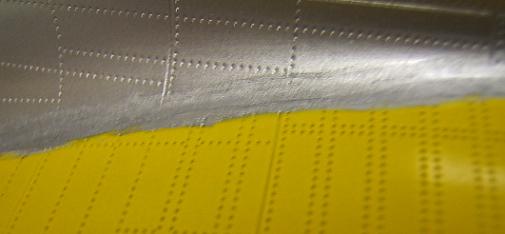
-
I am in with my SBD 1/2 with Eduard Big Ed detail set!
49bull replied to 49bull's topic in Carrier Aircraft
Dave, My theory is that though the wings don't line up perfectly with the fuselage, I made sure that the trailing edges lined up by slowly adding super glue and accelerator as I glued the wing in place. I also used super glue to "tighten up" the potentail gap between the wing and fuselage using the same technique whcih leaves a small, though visible, gap. Instead of trying to fill and sand which will destroy the detail due to the lack of height alinement, I figure when the decal foe the walkway is put in place that by positioning in a clever manner, I can hide the majority of the misaligned join. It isn't perfect, but this is one place in the kit that the parts don't line up great and it would be lots of filling and sanding and I think my solution will camouflagethe discrepency unless one really wants to look closely at the joint. Thank you for the comment on the yellow and it was tricky to get it to look good without using too much paint that would then hide the detail. I used several light coats then the last coat was applied to get that just "wet" look and once it dried it looked good. Bob -
I am in with my SBD 1/2 with Eduard Big Ed detail set!
49bull replied to 49bull's topic in Carrier Aircraft
Finally, I set the fuselage into the wing just to test fit it and decided to take a photo of it to get an idea of how it will look. Hard to distinguish the different yellow colors in this photo but the lemon yellow is definitely more yellow. Now let me get the engine compartment in place and glue the wings to the fuselage!
-
I am in with my SBD 1/2 with Eduard Big Ed detail set!
49bull replied to 49bull's topic in Carrier Aircraft
As promised here is the underside of the wing painted gloss aluminum.
-
I am in with my SBD 1/2 with Eduard Big Ed detail set!
49bull replied to 49bull's topic in Carrier Aircraft
Here is a shot of the upper wing surface painted in camel yellow. Next will be the underside of the wing.
-
I am in with my SBD 1/2 with Eduard Big Ed detail set!
49bull replied to 49bull's topic in Carrier Aircraft
Next up a shot of the fuselage without the engine compartment but painted in the proper colors:
-
I am in with my SBD 1/2 with Eduard Big Ed detail set!
49bull replied to 49bull's topic in Carrier Aircraft
It took some time but I finally have more pictures to post and give you an update on the progress of my build. After conversing with Wayne tevlin at Yellow Wings, it is possible that yellow wing SBD-2's had green interiors and the interior of the flaps was aluminum. From that, I decided to proceed with my project as a yellow wing SBD-2 and model the #2106 SBD-2 in its yellow wing configuration. Wayne gave me the paint colors he uses for these aircraft which are Tamiya enamels in spray cans: Camel Yellow for the upper wing surface and gloss aluminum for the rest of the aircraft. Thus far the fuselage except for the engine cowling has been painted in the aluminum and I also painted the tail and horizontal stabilizers lemon yellow using Tamiya acrylic paint applied with an Aztec airbrush. The Eduard flaps have been built up and painted appropriately so that I am now in the final stages of completing this kit. The next steps will be attaching the engine compartment and wing assembly to the fuselage followed by the engine cowling. To display the engine, I have decided to paint just one half of the clear cowling for this purpose. I will then add the flaps and the flap mechanisms which open and close the flaps. As this is being done, I will mask and paint the canopy and get the rest of the attachments ready (bombs, tail hook, prop, etc.) and apply the decals. I think I may finish by month's end though it will be close. If not, there will just be very minor things left to do. On to some pictures which will take several postings due to the 100kb limit. To start here are the flaps showing outer and inner sides to see the color and detail.
-
I am in with my SBD 1/2 with Eduard Big Ed detail set!
49bull replied to 49bull's topic in Carrier Aircraft
I am busy building up the Eduard flaps for this baby and that is like building a minor kit in and of itself! I should have some photos of these shortly (this week) at least the individual flaps. Then its adding the accuator pieces which are individual PE parts to which plastic rod is attached to position the flaps in the open position. I will probably just have the lower flaps open as my understanding is that the upper flaps were closed except during a bombing run. According to sources, the interior of the flaps is the same as the exterior for the SBD-1's when looking at a yellow wings version. Therefore, the lower flaps will be aluminum interior with the uppers a yellow orange or chromate yellow interior/exterior. I am not sure about the -2's in the blue/gray scheme but it is suggested that they early on had the same type of paint scheme for the interior of the flaps (uppers blue/lowers gray) which was eventually changed to the red that is the most comon color for the flap interiors. Any information relating to the flap configuration is greatly appreciated and if anyone knows the yellow tone used (yellow/orange, chromate yellow) that would help as well. Bob -
I am in with my SBD 1/2 with Eduard Big Ed detail set!
49bull replied to 49bull's topic in Carrier Aircraft
As it seems the interior color of the aircraft were changing during the time the yellow wing SBD-1's were being produced, which probably means as has been stated that some had the interior painted zinc chromate, I am going to poceed with a yellow wings SBD-1 with the green interior. If nothing else I am taking artistic license based on several relaibale sources supporting both aluminum and green interiors. The only other information that I could use is the FS number of the wing color as it was not yellow but more a yellow orange or I have seen chromate yellow noted as the color in some cases. Then I will order the needed decals and stencils and finish this baby. Thanks for all the information! Bob -
I am in with my SBD 1/2 with Eduard Big Ed detail set!
49bull replied to 49bull's topic in Carrier Aircraft
Brandon, Thanks! I will now proceed with my original plan and go with the yellow wing USMC aircraft. Now all I need to do is find the decals I need (I think Hannat's has them) and keep going. One question, was the overall scheme in gray (as shown in the Trump color sheet) or natural metal? My thought is it was probably natural metal with the wings "yellow" (they look more orange/yellow to me instead of what I would call a true yellow). Your inputs are greatly appreciated. I'll check out the web site as well. Bob -
I am in with my SBD 1/2 with Eduard Big Ed detail set!
49bull replied to 49bull's topic in Carrier Aircraft
Alfonso, Sorry I did not reply to your question and at that point I had already painted the interior and a number of the components so that it was a done deal on the interior color. I think I know the photo you are referring to in the Detail and Scale book which is in black and white and it never occurred to me that it was natural metal as opposed to chromate green. And the caption under the picture is the one referencing the SBD-3 color photos indicating the cockpits were very similar (except obviously for the amour plate for the pilot and gun ring and neither of these differences are mentioned) and no mention that by the way the interior was NM not chromate green. Unfortunately, I don't have the Walk Around reference and I know these have some excellent pictures. Since I have committed to the chromate green interior, I will probably paint and mark it as a Navy bird and I do have Rutman's resin SBD which I may be able to convert to the -1 (based on the small changes...I'll track down the Walk Around reference as well to get a look at the interior and the missing armour plating) and build as a yellow wings or I can always get another Trump model for that purpose; gives me an excuse to buy another!! Again, thanks for the input. Bob -
I am in with my SBD 1/2 with Eduard Big Ed detail set!
49bull replied to 49bull's topic in Carrier Aircraft
Thanks for the input and it is interesting input as I checked Detail and Scale's SBD as a reference and it states that there were minor diferences between the 1 and 3 cockpits and refers to the -3 cockpit color photos which show the chromate green interior. There is no mention that the finish was NM so that is what I went with (chromate green). The instructions also call out chromate green interior; therefore, I based my paint scheme on two references which coincided with each other. Oh well, by the time I had started posting, much of the interior was already painted and it was too late to turn back at that point in any case. Maybe I'll just have to build a Navy version or go with the Yellow wings anyway. It won't be the first time that references are wrong but I am wondering what reference you used to discoer the NM interiors on Marine Corp SBD-1's? I know Detail and Scale tends to be fairly correct. Thanks! Bob -
I am in with my SBD 1/2 with Eduard Big Ed detail set!
49bull replied to 49bull's topic in Carrier Aircraft
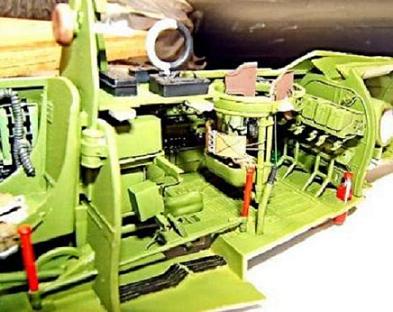
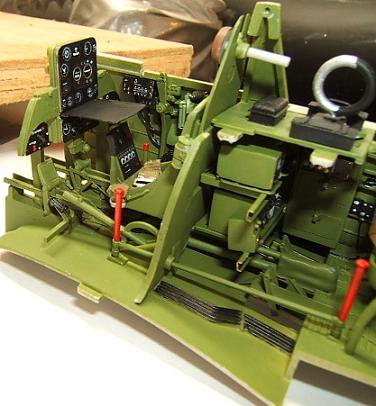
Last of the "open" cockpit pictures.