

Wurzacher
-
Posts
1,390 -
Joined
-
Last visited
-
Days Won
3
Content Type
Profiles
Forums
Events
Posts posted by Wurzacher
-
-
Good evening Guttorm,
fascinating as usual reading your built. Where did you take the numbers on the gear from? Are they in the kit? Maybe i should read the instructions...

I made a picture of one of the legs i do for mine:
Made some bolts and washers with my Punch & Die. Not finished yet...
-
the leg..now the shiny movable part is covered with black leather ( removed on this leg )
but it gives a good indication on the wires and stuff on the leg and also the unpainted covers
Ah! NOW i can see where exactly this yellow ring belongs to on the strut. Couldn´t make it out on the detail shot you showed earlier.
Guttorm, your work here is maybe the finest ever done on an aircraft! And it is a BIG help to make the fine Revell kit even better!! My sincere thanks!!
-
Hello Thomas!
Welcome here in the forum! In your picture the X-frame seems to be stored in the nose, separate from the device it belongs to, which i think to see on the left side. You, too, do not have a clue HOW it works...?
Thomas
-
They might just be talking about taking it off the base and storing it for protection while on the ground. Seems pretty prone to damage from bumping as unwieldly as it looks!
You are right, this is how i understand this sentence, too. If you don´t fly and use it, store it! Unfortunately this chapter of the manual doesn´t describe the function of the Kuvi.

-
Guttorm & any one else interested...?
Another pic. This time from a manual. I have tried an online translator but it doesn't really make sense to me...

At least there's enough pictures to reproduce this thing (I think it'll stand out quite well in the 'pit) - just frustrating to not know what it does..!
Matt
Nearly forgot to translate the comments on this picture. Here they are:
1 sight frame
2 pedestal
3 device (the Stuvi)
4 brackets (to fix it)
Pic. 21
Course sight Kuvi
fitted in the aircraft
------------------------------------------------------------------------------------
As before parts of the text in italic are from me trying to make the sense more clear.
-
Here's the text. Can any German speaker translate what it says?

Matt
Operation of the course sight Kuvi2 (pic 21)
The course sight Kuvi is mounted to a pedestal on the left side of the fuselage in line of sight. The supplier has adjusted it so that the center position is parallel to the middle center line of the aircraft. Demounting the device has not to happen fort his makes it necessary to adjust it again.
The sight´s frame (1) can be demounted from the device (3) and be placed in the sight´s frame carrier in the flight stations (or: cockpit´s) nose.
Mounting the dive sight
The dive sight Stuvi 5 of the BZA (Bomben Ziel Anlage - bomb aiming system) is to be placed into the bracket located on the cockpit roof in front of the pilot and fixed with the brackets belonging to the Stuvi.
The Stuvi´s electrical connection is carried out by insertion of the plug into the outlet R 199 on top of the instrument panel.
The Stuvi 5 has to be set up with aid of the set up screws for elevation and bearing (?) on to the lower spike of the sight triangle for the (Anschiesscheibe – didn´t find a translation for this word. I understand that this could be a device to be shot at to align a gun.) gun (refer to part 12 A „fire arm installation“).
-----------------------------------------------------------------------------------------------------------------------------------------------------------------------
Parts of the above text in italic are additions from me and not part of the original text. Please excuse my english, i try to give my best...
Greetings,
Thomas
-
Hi Guys,
i am trying to translate it. Just give me some minutes.
-
Rick,
this one looks very appealing to me. I am jealous that you can do such a great mottling, never had such good results when i tried one. This bird has to get in my stash some day, the more so as i have seen yours now!
Regards,
Thomas
-
I cannot believe it: i am still working on the first parts of my kit, the landing gear legs, and Guttorm has already finished his Ju 88!!
 Maybe i should go over to buy ready built collectors kits...
Guttorm, your Ju looks very good in my eyes! I only wished you could post bigger pictures one could use as a guide when doing the own kit. Do you have a picture of the finished underside with the decals on? How did the decals behave?
I would also love to see a close up of the radiators, the landing gear and cockpit. What colour did you use for the gear and radiators? How did you mask the clear parts? What colours did you spray for the blue and white (?) on the underside?
Please excuse the many questions. But i am very curious looking on your Junkers, and a little bit jealous...
-
Looks very good for me, congratulations!
And it remembers me that there is one somewhere in my stash waiting to be build since, let´s say alot of years. Maybe, some time...
-
Good evening, Guttorm!
I just stopped to built mine to watch you built yours!
 That´s the faster way ´round, as my built will take long... Marvelous idea with the original wood, i like that.
 Regards,
Thomas
-
rlm 77 is the correct grey..Not 02 !!! did a doublecheck today in the museum !!
I checked RLM 77 with the paint chips in Merricks book, and even in my old and trusty Monogram Painting Guide to German Aircraft. This is a VERY bright grey, the only use of i could find out was for the aircrafts coding when camouflaged as a nightfighter.
All the photographs, b/w of course, i have seen show the radiators a dark colour, i have trouble to make a visual difference to RLM 70 or RLM 71 from the upperside. Shouldn´t RLM 77 give a good contrast to the darker colours when used to paint the radiators? Or, asked the other way around: why to brake the effect of camouflage with the front sides of the engines painted in a bright colour? Why using a colour like RLM 77 to paint radiator faces on a 1941 bomber with a colour that will be used 1943-1945 to paint nightfighter codes?
Would be very interested to see this puzzle solved. Guttorm, can you please help again?
The Ju 88 gets interesting more and more!
-
i dont know what type paint you use.. but perhaps try a small mix of silver into RLM 77 ??
Good morning Guttorm!
I am afraid that adding a little bit of silver to RLM 77 grey will not give give the yellowish silver tone needed for the main wheel bays (not bomb bay) as we can see in the pictures. I use Gunze paints. Maybe there is a kind of yellow clear cote i could give over a silver base paint.
-
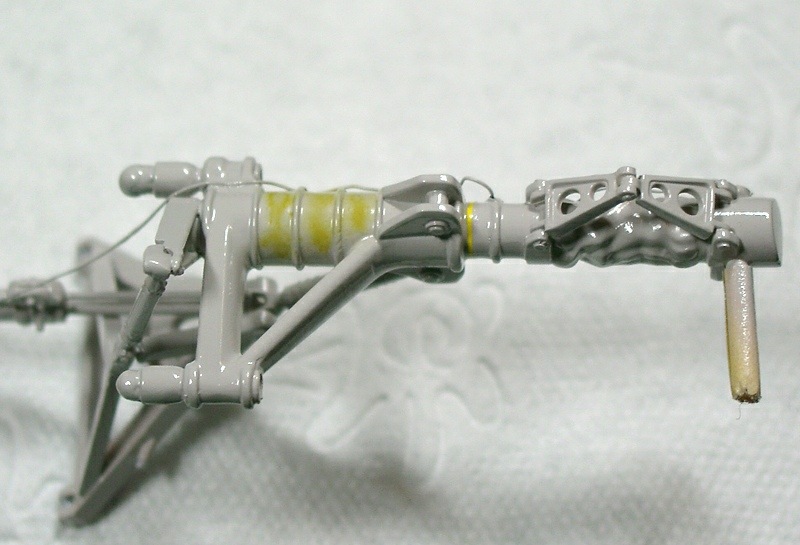
and PLEASE dont paint the undercarrigelegs green as the drawings says in the modell.. they are RLM 77 ( light grey )
here is a detail shoot of one of the legs..note the yellow stripe
i have seen atleast 30 different Ju 88 undercarriage legs..some restored ( some wrong ) all original legs i have seen are all the same light grey 77
I am a little bit puzzled on this, Guttorm, as my instructions tell me to paint the landing gear and the gear bay in RLM 02 Grey?!?
Looking on the paint chips in Merricks "Luftwaffe Camouflage and Markings" Vol. 2 the chip on RLM 02 is named "Grau", looks like a, let´s say greenish grey.
I will paint my landing gear legs in RLM 77 (hope, Gunze makes this tone...). You are the man, you have the real things at hand. That´s enough for me.
The wheel bay is, how to say, a silver or aluminium tone with a kind of yellow lacquer on? Any hint how to do this with a model paint?
Best regards,
Thomas
-
Good morning David,
and of course everybody else here!
 Your last picture made it clear, i just fixed this part where you show it. Had to cut of one of the locating pins because of a little bit pressure that always squeezed it out of the hole it should be glued into. Can´t be seen anyway.
Looking at steps 71 to 73 i always felt a kind of puzzled without knowing why. You are right: Revell shows the landing gear to be glued into the wrong nacelle! I built mine where it belongs, but looking at the instructions there was always something strange.
Thanks for finally making it clear to me. Yesterday i wrote to Revell on part D127a. I´ll inform them on the incorret placement of the landing gear in the instructions. Hope they can correct this in future versions before the go to make an other new kit in this scale, like a Ju 52, or was it something else mentioned here some posts before? My shitty IQ of 0,5...

-
Hi David,
thank you for these useful and good pictures. I think it possible to see the weird part in one of your pics. I made a copy of one of your pics (hoping for your permission to do so. If not please drop me a line and i will delete it) and added a red arrow to where i believe to see this part.

Do you or someone else have more pictures where one can see the exact location of this strut. It is noteworthy that this strut is not on the engineering drawing Guttorm posted before...
Best regards,
Thomas
-
Hi Guttorm,
i made a scan of the part, ahem, of the instructions:

Please follow the red arrow!
-
Hi Junkers88A1,
thank you for this update! I really appreciate your informations and am always curious for any news here. Maybe you or someone else can help me with a question on the landing gear in the kit. In step 71 where should part D127a be glued to? The position on part D127 is clear to me, but where to go on the other side on part D125?
I could not find any clue on photos here or in my AeroDetail book. Does anybody have exact photographs or engineering drawing of this area? Junkers, any photographs of this area?
Thanks a lot for any help!!
Thomas
-
Hello Guttorm,
please have my greatest respect and thank for providing us with all this enormous information! The Revell kit is maybe the best plastic kit i ever had in my hands since i started modelling around 40 years ago, and with your support even this kit gets beyond all borders!
Thank you very much!!
Thomas
Ju 88 A1 build
in Works in Progress
Posted
I also got the landing gear wells painted, now i can begin to glue them together. I first airbrushed them Tamiya Gloss Black as a primer for Alclad Duraluminium. After the Duraluminium i brushed a coat of Future or Klear as a barrier for Alclad Transparent Yellow. I wanted to get as close as possible to the pictures you posted in your thread on the details of the Ju somewhere else in this forum. Here a picture:
Not too good but good enough for me. What do you think, Guttorm?