
ChuckD
-
Posts
914 -
Joined
-
Last visited
-
Days Won
9
Content Type
Profiles
Forums
Events
Everything posted by ChuckD
-
 Thanks, Also Chuck. I spent most of Saturday reviewing your thread and found it very very helpful. I'll be taking some pointers from it for sure, but I gotta say you're much more meticulous than I am and I envy your patience and skill. Your end result was just wonderful. Glad you're along for the ride.
 -
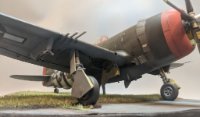
Okay, moving on. As outlined above, I originally planned to build enough of the basic engine structure to support the propeller. After spending several hours fuddling around with the left boom trying to get the engine and gear well to fit properly, I decided to ditch the idea. Call it cheating or whatever you want, but I'll be tossing the engines as they simply cause too much interference with the fit of the boom, the gear wells, and the intake scoops. I'll just glue the spinner to the front of the nacelle and call it good. Here are the gear wells, mostly dry fit. As you can see, the detail here is pretty sparse. I'll add some wires and brake lines here and there for visual interest, but I probably won't go ham on it as it'll never be seen once the kit is done. There's a glycol line included in the kit that I didn't have in place here, but that's really the only missing detail included with the kit. Some wires and clamps will spice things up a bit there and will be a good return on a relatively low investment. Dry fitting the left well into the boom showed quite a gap between the two assemblies. By cutting off significant chunks of the alignment lugs, I was able to reduce that gap to something that can be corrected with some super glue. A little better. Having built a number of Trumpeter kits over the years, I often find that they're heavy on detail in places that 1) will never ever be seen and 2) often cause fit issues for the parts around them. I'm thinking of the fully-realized, but poorly-fitting turbocharger assembly in their P-47D kit. Neat concept, but being so poorly executed, why bother? These engines are kinda the same story. Great little engine kits, but they just cause fit issues that I don't have the patience to deal with. So, they can take their rightful place next to the t-bolt's turbocharger in my local landfill. The good news is that, by ditching them, I'll have a great platform to add lead weights to the forward part of the booms. Also, since I have a little more flexibility in the forward part of the boom, I was able to fit the intake scoops nearly perfectly so that they do not stand proud of the booms themselves. The instructions call for adding the PE mesh screen to the front of the intakes, but I popped them off and glued them to the back of the intake scoops on the cowl. They fit and line up better there. The intake scoops have only been glued to one side of the boom so far, but dry fitting shows a promising fit for both the other half of the boom and the prop spinner itself. Here you can see that the engines themselves really add very little to the final kit. After fuddling around with the left boom for quite a while, the right boom went together fairly quickly. The kit props are unimpressive to say the least. In the end, I'm pretty optimistic with the progress today. I've got a long way to go, for sure, but by nixing the engines altogether, the Goldberg-esque construction of this complicated little beast should be greatly simplified. Anyhoo, I need to open up some scoops and clean up some vents as they've got lots of flash and plastic nubbies sticking off them, but at least we have a good plan going forward.
- 65 replies
-
- 29
-

-
Hello, all. Another year, another big twin on my bench. Not entirely sure where I'll display it, but that's future me's problem. In this tread, I'll be struggling through the 1/32 scale Trumpeter P-38L Lightning. I say "struggling" because, well, multiple review threads indicate that this was not a Trumpeter "A-team" effort, a la their delightful TBF Avenger series. Apparently fit issues abound and if you don't reinforce the upper wing piece, it droops and throws off the geometry of pretty much everything. In any case, I'll give it the ol' college try and hope to come out with a decent result. For this build, I'll be using just a few aftermarket sets to gussy it up a bit. Aires wheels Grey Matter props Master model armament set Eduard mask A seatbelt kit of some variety. Probably something 3D printed as my patience for building the microsocopic HGW sets is thin... but then again, I may have some in the spares bin. Time will tell. I've got a set of Kits World decals on the way and am, as of this writing, leaning towards this paint scheme for no other reason than I found it amusing. According to Kits World, this is a P-38L H5-C from the 392nd FS, 367th FG, called 'Gung Ho' sometime between April of 1944 and February 1945. David Doyle's Legends of Warfare book cites this as belonging to LTC Edwin Chickering and the photo being taken on January 3rd, 1945. I do prefer OD paint schemes, but by, near as I can tell, no P-38Ls were so painted, and I'm not sure I'm up to doing the work required to backdate it to a J model. So, here I am, just a couple months after proclaiming that natural metal finishes would be a "few and far between" prospect for me, diving into an incredibly complex NMF project. Quoth the ChuckD, "Few and far between." Somethingsomething... glutton for punishment... somethingsomething... Seriously, if anyone's aware of compelling evidence of an OD Green P-38L, I'm all ears. Anyway, I cracked the box yesterday, ordered a few of the above goodies and got to work. With only a few hours of time at the bench, the yesterday's work was... minimal. While large, the kit doesn't appear overly parts-heavy. Most of the duplicate sprues are, predictably, for the twin engines and boom sections. And here we see the sum total of yesterday's work. While the engines are really detailed, there's no provision in the kit to display them, so I'm only going to build enough of them to support the propellers. Accordingly, the build here is minimal. Beyond supporting the prop, I'm hoping that minimizing the bits hanging off the engines will 1) minimize fit issues with the boom 2) allow me to add lead strips to the inside of the engines to help keep the nose on the ground. As this kit is now old enough to vote in the US, there's a decent amount of flash and other nasty bits to clean up, and correspondingly, the fit isn't stellar. The cooler "pans" for lack of better term are obviously not well-fitting, but they'll be hidden anyway, so it's not a huge deal. The engine components, such as they have been constructed, seemed to fit reasonably well themselves. Anyway, back to the bench.
- 65 replies
-
- 17
-
-
Love it, Ernest! Wonderful finished product and great presentation.
-
Turning Japanese Group Build - Ki-45 Toryu "Nick"
ChuckD replied to ChuckD's topic in Ready for Inspection
Thank you, all. I appreciate the compliments! -
A Spanish Adventure - Around the world in Microsoft FS2020
ChuckD replied to ChuckD's topic in General Discussion
Whoa, close call. Thanks for sharing that. I'm fortunate that I don't have to deal with the politics in any of these flights. I just pick a spot and go, without having to worry about any of the logistics behind the scenes. Glad you and your family got out of there. -
A Spanish Adventure - Around the world in Microsoft FS2020
ChuckD replied to ChuckD's topic in General Discussion
Hi and welcome aboard! Glad you're enjoying it. -
A Spanish Adventure - Around the world in Microsoft FS2020
ChuckD replied to ChuckD's topic in General Discussion
Welcome back and thanks for joining me. The route map for today: You are probably wondering why on earth we're detouring 646 miles off course to the middle of the desert. No, there's not a city under the icon for that southern waypoint. There's not an oasis, a village, or a wadi either. There's nothing. For hundreds of miles. So why bother? To pay a small homage to these poor souls: Meet the crew of the B-24D Liberator (Army s/n 41-24301), nicknamed "Lady Be Good." Left to right: - 1st Lieutenant William J. Hatton, Pilot - 2d Lieutenant Robert F. Toner, Copilot - 2d Lieutenant Dp Hays, Navigator - 2d Lieutenant John S. Woravka, Bombardier - Technical Sergeant Harold J. Ripslinger, Flight Engineer - Technical Sergeant Robert E. LaMotte, Radio Operator - Staff Sergeant Guy E. Shelley, Gunner/Asst Flight Engineer - Staff Sergeant Vernon L. Moore, Gunner/Asst Radio Operator (Still Missing) - Staff Sergeant Samuel E. Adams, Gunner By spring of 1943, the Allied air forces had established heavy bomber bases in North Africa. From these, aircraft such as the B-24 Liberator and B-17 Flying Fortress could reach German and Italian targets in Sicily and Italy proper, probing what Churchill called "the soft underbelly" of the Axis powers. It was on one such mission on April 4th, 1943 that the Hatton crew boarded the brand new B-24 nicknamed "Lady Be Good" to attack port facilities in Naples, Italy. It was to be both the crew's and the aircraft's first combat mission. As the last part of a second wave of attackers, they were one of the last to get off the ground, departing around 2:15pm local time. As they climbed and made their way north, 8 of the 12 aircraft in their wave got separated in a sandstorm and turned back. Four, including the Lady, continued on to Naples in the gathering darkness. As darkness fell, the straggling group got separated, each ship now having to navigate its own way home. But fate was against the Lady and her men that night. Shifting winds, faulty navigation equipment, and an inattentive and inexperienced navigator all conspired against them. As they droned southward towards their base at Benghazi, they became hopelessly lost. Believing they were still fighting a headwind and deep over the Mediterranean on this pitch black night, they continued south for hours. Owing to sandstorms and low clouds, they didn't see the flares fired by the ground crews at Benghazi - fired when the ground staff could hear the bomber droning overhead. Onward they went, further and further into the desert, all the while believing they were over the Med. At 2am, after 12hrs in the air, the engines began to sputter for lack of fuel. First one, then, two, then three of the big bomber's four engines fell silent. Only the outboard engine on the right wing continued on its fumes. Still believing they were over the sea, and knowing the odds of surviving a ditching in a B-24 at night were slim, they donned their life vests and jumped into the night; the Lady flew on. One can only imagine their shock when their boots thudded down on a hard, gravelly plain instead of cold sea water that dark night. In the gloom, they fired pistols and flare guns to find each other and, before long, all but one man (John Woravka, the bombardier) had joined them. Realizing their error, they began walking north. Fifteen years later, the world had done its best to move on from WWII. The post-war boom was on in full swing and everything needed oil; exploration teams set out across the globe in search of the precious liquid. On a blistering day in 1958, a British Petroleum oil survey team was searching the Calanshio Sand Sea - a vast, tractless waste of gravel and sand dunes that stretched from horizon to horizon. Something caught their eye and when they moved closer, they were shocked at what they saw. A B-24 bomber stood alone in this vast nothingness where it had made a near perfect crash landing on the hard gravel desert floor. Though weathered and wind beaten, her perspex windows sandblasted to complete opacity, the name Lady Be Good was stenciled on the right side of her nose. The survey team picked through the wreckage carefully but found no trace of the crew. What they did find was a perfectly-preserved time capsule. Log books, working machine guns, operable radios, even a survival kit with potable water, edible rations, and more were among the items still on board the Lady. Puzzlingly, the navigator's log did not have a single entry in it after they'd left the target area in Naples. What it did have was doodles in the margins; throughout the log, the o's and b's and other letters with a circle in them were absentmindedly filled in. It was almost as if the navigator, Dp Hays, had just given up when they'd gotten separated from the other ships in their flight. Reporting their find to the nearest US military authorities, the team moved on. As the US had no record of aircraft losses in that area, they ignored the report. A few months later, a subsequent team investigated the site further and finally, on May 26th, 1959, the US Air Force sent out a recovery team to determine what had happened. In February 1960, the bodies of 5 of the 8 crewman who'd managed to join up that cold night in April 1942 were found huddled together 81 miles north of where they had met the first night. On the body of the copilot, Robert Toner, was a diary that told their tale, woven with welling agony, fear, and despair. It is available here, scanned in entirety, https://unwritten-record.blogs.archives.gov/2017/06/16/lost-and-found-the-story-of-lady-be-good-and-her-crew/ showing that they survived 8 days in the desert with a single canteen of water to share among them. They had trudged ever farther north, expecting the Mediterranean to appear over each rise, only to be met with more sand, more gravel, more wind, more blistering sun, and more freezing nights. Several days in, the desert transitioned from hard gravel to soft, sweeping sand that seemed to melt under their feet with each step. Imagine their despair as they fought their way up a soft, pillowy dune, struggling to reach the crest, only to see countless more beyond this one. After a few days, they were all but spent. Toner's diary indicated that five of the crew could not go on, but Shelley, Ripslinger, and Moore set out north, desperately searching for help. Shelley made it another 20 miles (101 miles total). Ripslinger 27 miles (128 miles total) further than that. Moore was never seen again. In August 1960, Woravka's remains were found not far from the crash site, his body crumpled under a partially-deployed parachute. Some might consider him luckier than his crewmates. I learned about this ill-fated ship and crew in the early 90s when I, by now firmly entrenched in my interest in WWII, checked out a book called "Log of the Liberators" by Steve Birdsall from the local library. The story of the Lady Be Good and the Hatton crew are the opening chapter and Birdsall told their story in such a way that it absolutely captivated me. Now, in my middle ages, I see that these guys were just kids and it breaks my heart. War is a story of infinite tragedies, but the story of the Lady Be Good and her crew stuck with me over the years. So, I knew I had to visit the site. Thanks to Little Navmap, the flight planning tool I use, I was able to enter the lat/long coordinates exactly into the GPS. I realize I'm just flying a flight simulator, and that I didn't *actually* go out to the desert to pay homage to these guys, but I was still in a somber mood as we picked up out of Mersa Matruh and began our trip south into the desert. We cruised at 3000 feet, occasionally scudding under some low clouds. An oasis slid under us, then gave way to endless waves of undulating, shifting sand. I had hopes of trying to land at the spot where the Lady Be Good touched down, but the terrain didn't allow for it, so I would have to content myself with circling the site. A few minutes out, we descended to the deck and slowed somewhat. At the waypoint, we turned off the autopilot and circled quietly. The shadow is almost directly on top of the point where the Lady Be Good came to a stop. After making a few circles, we turned north and climbed slowly to 9500 feet for the return flight. This leg of the flight took us roughly over the path that the crew walked as they searched in vain for the sea. We met the sea at Tobruk, the site of the famous siege https://en.wikipedia.org/wiki/Siege_of_Tobruk and turned west into the setting sun. With darkness gathering around us, we settled smoothly and quietly into Benghazi, completing the journey that the Lady and her men never could. Thanks for following along. -
A Spanish Adventure - Around the world in Microsoft FS2020
ChuckD replied to ChuckD's topic in General Discussion
Welcome back and thanks for joining me. Today, we'll be covering the progress of two legs flown over the course of a week over two separate posts. I'd planned on making it one long trip, but got busy with household stuff and decided it would be smarter to land and call it a day, then do the remainder later. The first leg was flown on Christmas Eve and was a relatively short hop from Cairo to Mersa Matruh by way of El Alamein. As I've mentioned, I am a WWII enthusiast, to the point where I'd probably call myself an amateur historian. Those who know me well enough know that my passion for WWII history has been the predominant characteristic of mine throughout my life. I can attribute that largely to a pair of books. The first came in kindergarten at age 5 or 6. One day, while wandering around the room during library time, I found a book about the Battle of the Coral Sea (we'll visit that too) on a wire rack in my elementary school library. On the front was this iconic photo of the Japanese aircraft carrier Shoho ablaze and taking a torpedo to her starboard side. https://www.ibiblio.org/hyperwar/OnlineLibrary/photos/images/g10000/g17026.jpg Awed, I checked the book out that day and have been hooked ever since. For those of you familiar with WWII history, the name El Alamein may ring a bell. For several months in 1942, this small stop on the Egyptian railway saw heavy fighting between the Axis forces of Germany and Italy, and the Allied forces under Britain, Australia, New Zealand, and others. It was there that the vaunted German Afrika Korps's eastward advance towards the Suez Canal was halted and eventually pushed back. Capture of the Suez Canal by Axis forces would have been a catastrophic blow to the Allies and their ability to wage war in the Mediterranean and China/Burma/India (CBI) theaters. With the benefit of hindsight, it's not unreasonable to suggest that the course of the war could have been vastly altered had the Commonwealth Allies not sacrificed and made their stand at El Alamein. All that being said, the two WWII theaters that I have studied the *least* are the North African campaign and the Sicily/Italian campaigns. So, for anyone with additional knowledge of those campaigns, feel free to correct me. For more reading: North African Campaign overview (June 1940 - May 1943): https://en.wikipedia.org/wiki/North_African_campaign The First Battle of El Alamein (July, 1942): https://en.wikipedia.org/wiki/First_Battle_of_El_Alamein The Second Battle of El Alamein (Oct/Nov, 1942): https://en.wikipedia.org/wiki/Second_Battle_of_El_Alamein The first order of business on this flight was to see some more sights in and around Cairo, as we were more or less ready to be done flying when we'd arrived previously. Departing from the Cairo West airport complex (*shockingly*) west of Cairo, we turned east and climbed to 2000 feet. Low clouds and smog hovered over the city like a heavy pot lid. As before, the areas nearest fresh water are surprisingly green, while the areas just outside are arid and barren. The contrast is profound. Cairo itself is huge. There were a few points of interest marked in the city proper, so I thought we'd go take a look. I briefly turned on the in-game markers to help me find them. Passing over them southbound, we looped east through a 270* turn to overfly them. Note the Mosque-Madrasa of Sultan Hasan directly below the aircraft. https://en.wikipedia.org/wiki/Mosque-Madrasa_of_Sultan_Hasan The Museum of Egyptian Antiquities The Cairo Tower https://en.wikipedia.org/wiki/Cairo_Tower The Sofitel Cairo Nile El Gezira (a hotel) And across the river, Cairo University https://en.wikipedia.org/wiki/Cairo_University From there, we left the city proper and took a couple more laps around the Pyramids of Giza for good measure. We weren't the only ones with that idea. We got a good look at the Sphinx which, for some reason, I almost completely neglected to see on our trip in. And with that, we bid adieu to Cairo and turned westward, the barren desert again spreading out below us. As we neared El Alamein, the thing that struck me is the vast flatness of the terrain. While the battles there were often centered around "ridges," they were only ridges in the context of the vast, flat wastes of the desert. With such flat terrain, direct-fire cannons could theoretically see and engage targets for miles, and the thought of being in a Sherman tank while German 88mm cannons are picking you and your mates off from miles away is terrifying. Approaching from the west, we headed parallel to the line of advance of the allied forces. This battle map shows the general dispersion of forces and in the above photos, we are almost directly over top of the British 1st and 10th Armored positions. Where once there was vicious fighting, tank duels, trenches, obstacles, and acres upon acres of minefields now stands a golf course. I wonder which had a greater impact on the environment. We continued westward to Mersa Matruh, again, open desert spreading out everywhere south of the Mediterranean. There are many stories of troops cracking and frying eggs directly on the armor of their tanks during this campaign. While possibly apocryphal, given the temperature, the burning desert sun, and the lack of any shade whatsoever, it is definitely feasible. Aside from being the destination for the first leg of this journey, Mersa Matruh was an important battle in its own right. https://en.wikipedia.org/wiki/Battle_of_Mersa_Matruh As the allies retreated from the Afrika Korps in the summer of 1942, the German General Erwin Rommel (https://en.wikipedia.org/wiki/Erwin_Rommel) strove to cut their lines of escape at Mersa Matruh. Though they did succeed, the German forces were too weak to maintain the encirclement, and the Allied forces were largely able to make their way further to the west. We descended into the field with cooperative winds and a relatively clear sky. The touchdown was uneventful and we taxied to the ramp. Thanks for following along. The next leg of our journey would be something of a sentimental one. -
Turning Japanese Group Build - Ki-45 Toryu "Nick"
ChuckD replied to ChuckD's topic in Ready for Inspection
Thanks, all. Is this a really satisfying part of a project for others too, or is it just me? -
Turning Japanese Group Build - Ki-45 Toryu "Nick"
ChuckD replied to ChuckD's topic in Ready for Inspection
Thank you! After taking pics, I turned around to put it on the display shelf and realized that I have absolutely no more room for anything. Hrm. -
And with time to spare... Ready for Inspection
- 60 replies
-
- 19
-
-
Hi, all. This time last year, I set a goal for myself to finish 8 kits throughout the course of the year. In mid-December, I was wrapping up build 7, so I decided to join the Turning Japanese Group Build and try to sneak this in before the end of the year to make this #8. Happily, through some holiday time off, I was able to do a few marathon sessions to make it a reality and with a few hours to spare, I met my 2022 goal. The build thread is here. Though it's somewhat brief, it does go through my impressions of the kit and has better detail shots of the interior before it was closed up. Generally speaking, the detail is excellent, the interior fit is wonderful, the exterior fit is okay, and the cowling fit is very very challenging. The instructions are a work of art on their own, however, and if you're at all interested in this subject, I would highly recommend one of the kits in this line. Kit is painted with a mix of Tamiya and MRP. Chipping was done via chipping medium for the large areas and by hand for the smaller bits. The only part not "out of the box" is the radio antenna wire which is EZ-Line. Markings were painted via masks except the tail insignia and small stencils. Weathering was done with a mix of oils, enamels, and airbrushing. Anyway, less talk, more pictures.
- 26 replies
-
- 47
-
-
Wrapping it up for today. Decals, hand-chipping, filters, pin washes, and flat varnish. Finishing touches and - God willing - an RFI tomorrow!
- 60 replies
-
- 22
-
-
Hitting the home stretch here. These are progress photos over the last couple days. After priming with Mr Surfacer 1500 light gray, I painted the leading edges and walk areas with Alclad II aluminum and then applied chipping medium with a sponge (it's not obvious in the photos) Then, pre-shaded with XF-1 black. I know some people tend to scoff at pre-shading, but I find it to be a good way to add color modulation to the basest of base coats. Next came the first, light coat. I sprayed the whole thing this lightly, then masked off the areas where the white home defense bands will be present. I wanted a greenish undercoat for the white markings as I figured that would help unify the overall color scheme while toning down the stark whites. With the second coat sprayed, I masked and painted the areas for the home defense bands. The hinomarus would go straight over the white. And here we have the sitrep as of last night. National insignias and leading edges painted, chipping fluid removed, base painting done, and everything glossed for decal application. I'm probably going to have to snip off the rudder actuators in order to apply a large decal where they sit. I wish I'd thought of that during the build or else I would have just left them off until afterwards. :/ This is the result of the hour I spent working in the first 1/8" of my Iwata Eclipse's trigger throw during pre-shading. Ouch. This hobby's equivalent of M1 Thumb. Still on track to finish up by tomorrow evening. Here we go!
- 60 replies
-
- 15
-
-
Yes, Ernest, I think you're on to it. There is zero reason a one piece cowl couldn't have been included with this kit. Ah well, I was saved by the super glue gods and the final product turned out okay.
-
Progress! There's not been a ton to show in the past couple days as movement has been slow and largely focused around the tedium of filling, sanding, priming, filling, sanding, priming... repeat ad nauseum. As wonderful as the interior fit for this kit has been, the exterior has been less impressive. Typical problem points like fuselage joins, wing roots, fairings, and empennage have all required a little filling and sanding, but nothing outside of what I would really expect. The cowlings however, can go take a long walk off a short pier. The fit of the rest of the kit is so good and the fit of the cowlings is so bad, I can only surmise that the problem is me. The cowls themselves are not handed, which is to say they use the same part numbers for both sides with no mirroring. They're all keyed in a certain way such that they will only go together in one way. The only handed parts for the entire engine assembly are the motor mount arms and the backing plate that they attach to. While dry fitting everything and having such a time, I quadruple checked the instructions to make sure I hadn't missed something or maybe use the wrong part somewhere. Insofar as I can tell, I did not and the cowl fit just is what it is. Suffice to say, they required a lot of pressing, a lot of superglue, and a lot of frustration to get together. Again, I fully admit that it may be on me, so for those of you who've already built this kit, did you encounter any issues with the cowlings? That said, despite the rude surprise of the cowls, I think we're still in business and on track to complete this before the end of the year. I've got most of this week available to attack this thing, so I think I can still make it happen and meet my new year's resolution goal of completing 8 models this year. Cross your fingers. A mock up from a couple days ago. The 30mm nose cannon. Just a small armor plate to be added behind it, then it's buttoned up and never seen again. Status as of now. The engines are dry fit, but the gear is permanently attached. Just need to wrap up masking the gear and stuffing the wells with foam, then it's off to priming. I'll be modeling the canopy open, so the closed canopy is tacked in place with white glue to act as an impromptu, but perfectly-fitting mask for the cockpit.
- 60 replies
-
- 19
-
-
A Spanish Adventure - Around the world in Microsoft FS2020
ChuckD replied to ChuckD's topic in General Discussion
Thanks, Maru. Merry Christmas to you too, my friend. Thanks for joining along for the journey. -
Thanks for the compliments, everyone. I do appreciate it. I'm hoping to wrap this up by the end of the year. If I can pull it off, I'll have met my 2022 new year's resolution of completing 8 kits over the course of the year. Crossing my fingers. As of yesterday morning, the build is more or less done. I'm stuck at the moment though because the ventilation for my painting setup is nothing more extravagant than a window fan stuck in a window. It's good down to about 25*F as long as there's little wind. It's currently about 6*F here and blowing like crazy. So, I'm basically at a standstill until maybe tomorrow evening or Monday before I can start laying down more paint and getting the sub assemblies stuck in place.
-
A Spanish Adventure - Around the world in Microsoft FS2020
ChuckD replied to ChuckD's topic in General Discussion
Thanks, John. I'm using an absolutely ancient set of CH products pedals. I've had them for probably close to 20 years and they're still going strong. I've had to take them apart and blast the potentiometer with electronic contact cleaner once, but other than that, they've been pretty bulletproof. -
A Spanish Adventure - Around the world in Microsoft FS2020
ChuckD replied to ChuckD's topic in General Discussion
Welcome back and thanks for joining me. When last we left off, we had done some sight-seeing around the Holy City of Mecca, the center of the Islamic faith. That represented something of a quick detour from our African adventures, and today, we will be winging back to the big continent as we continue northward towards Cairo, Egypt. Though I forgot to take a screenshot of the exact route, this is roughly the plan: We will take off northwest out of Mecca, cross the Red Sea, then head inland to pick up the Nile River valley so we could follow it north to Cairo proper. Weather was again very cooperative with clear skies and light winds. I was starting to wonder if the weather modeling was broken (it's been buggy before), but checking the actual weather reports at the time proved that the game was in alignment with the actual conditions. *shrug* Lucky me, I guess. With fair winds and clear skies, take off and climb out were pretty uneventful. I'm happy to say that after all this time, I've gotten better on my takeoff procedures (knock on wood). Generally speaking, when the tail comes up at 40 knots, it's a hard, sharp kick to the right rudder to keep the nose from yawing left. Then relax pressure to let the nose come right just a bit, then dance on the pedals until the big bird flies herself off the runway. The hills that dominate the inbound traffic pattern. We climbed to the relatively low altitude of 6,500 feet and settled into cruise, leaving Mecca behind. Soon, we had crossed the coast and were over the Red Sea, the sun at our backs. And before long, the rugged terrain of eastern Egypt crossed the horizon. From the coast, it was a short stint westward across rocky, barren desert to pick up the southern reaches of the Nile River and its lush, green valley. But from the dry, desolate sand, a long ribbon of deep, thriving green stretched from horizon to horizon. We'd reached the Nile. Turning north, we followed the river's valley whose fields and agriculture stood in stark contrast to the endless sand seas on the either side. Occasionally, we wouldn't follow a sharp bend of the river and were immediately plunged back into the deepest of the desert. But then the river would wind back and we would again find ourselves over deep greens and urban centers that seemed to spring out of the desert floor itself. As we worked northward, the agricultural areas widened, and the suburbs of Cairo slowly came into view. Turning slightly left, it was time to do some sight-seeing. Out of the sandy, wind-blown haze and urban pollution, distinct and unique shapes began to emerge. We pulled power and descended for a better view. We began orbiting the Pyramids of Giza to take some better photos. (we weren't the only ones) After a few passes, we turned northwest as it was only a short jaunt to our destination of Cairo West. Winds were cooperative and presented only a slight crosswind from the left, so we began our approach to runway 34 via a more or less straight in arrival. Rolling out on short final, we were on speed and in the groove. We touched down and rolled out to the general aviation parking ramp. All in all, I was pretty happy with the flight. The Pyramids around Cairo are well-rendered and a really neat sight to see. I'm not a huge traveler in real life, so this is likely as close as I'll ever come to seeing the pyramids of Egypt. We'll take a closer look at Cairo and its other sites on the next leg as we begin heading west along the Mediterranean coastline. Thanks for following along. Next up, the desert of ghosts. -
Hi, all. Lots of progress today. As I sat down at the bench this morning, everything had been glossed, pin washed, and decaled. I just needed to apply a flat coat to everything then start putting things together. State of affairs this morning: A pin wash dulled these nicely. I missed removing some masking fluid before the photo. The interior went together very well. I used ultra thin super glue and a glue looper to ensure that glue only went where needed, and things went together in a snap. After getting a few things done around the house, I was able to spend the rest of the afternoon pushing the build forward. The current state of affairs: So far, the interior fit has been phenomenal. The exterior fit is good, but not as good as the interior. The upper fuselage piece flat out wasn't long enough to fit the space needed, so I had to fill it with putty. The wings went together quite well and the fairings were fairly problem free too, though some filling will be needed on the lower fairing on both sides. The landing gear is sturdy and hold the weight of the aircraft well. Dry fitting the engines shows that they should attach reasonably well. As always, I'm going to push the build as far forward as I can before I need to paint again, so I might progress the cowlings a little further (dry fit, of course) so I can see how they go together. I have to say that I pretty much zoned out in a state of zen building this today, which is probably some of the highest praise I can give to ZM. It doesn't just "fall together" per se, but it's a perfect blend of good engineering, good fit, and challenge. If you're on the fence about grabbing one, I'd whole-heartedly recommend it.
- 60 replies
-
- 24
-
-

-
A Spanish Adventure - Around the world in Microsoft FS2020
ChuckD replied to ChuckD's topic in General Discussion
Welcome back and thanks for joining me. Last week, we'd bumped our way into Combolcha (sometimes spelled Kombolcha), Ethiopia, coming down over some fantastically beautiful scenery and setting us up for this week's flight over some interesting terrain, fauna, and sites. Recall that Combolcha's airport is nestled in the northern end of a canyon with steep mountains towering on three sides. So, our route would first, necessarily, take us south, giving us room to climb out of the mountain valley before turning northwest towards our first point of interest. From there, we'd turn north-northwest to hopefully see some more animals, then another unique building. After that though, I decided on something of a detour to visit the Islamic holy city of Mecca. As it turns out, there are a number of unique buildings there and it will help me check some of the western Middle East countries off my list so that I don't have to hit them on the way back. All that said, I will be the first to admit that I have very little in-depth knowledge of the Islamic faith, so if any of you out there do and want to chime in with information, please feel free to share! Once again, the weather was in our favor with crystal clear skies. Winds were relatively light, but gusty and, of course, a perfect crosswind. Sweetpea II fired up quickly and we taxied to the runway. As mentioned above, you really only have one departure option from Combolcha - south. As I lined up for takeoff, the wind was from the left and gusting from 7-15 knots according to the GPS. Unlike the unorthodox takeoff out of Comoros - where the crosswind was steady - these gusty winds meant I would not be able to effectively use differential power to compensate for the Beech 18's relatively low crosswind tolerance. I waited for the wind to abate a bit then applied full power and started down the runway. Just as we hit 40kts, a wind gust pushed the tail hard, yawing the nose left. Kicking hard right rudder wasn't enough to compensate and with the edge of the runway looming, I chopped power to abort the takeoff and tapped the right brake to keep us on asphalt. Crap. I decided I'd give it one more try, so I back taxied and lined up again. This time, I pushed the throttles forward during a wind gust, reasoning that the wind might then die down during the takeoff roll. We thundered down the runway and at 40 knots the tail lifted off the runway. Miraculously, the wind held off and we shot straight as an arrow into the afternoon sky. (Naturally, I forgot to get any pictures of this as I was so focused on trying not to bend the airplane.) We climbed with mountains rising all around us. Reaching 10,000 ft, we banked left to make a ~270 degree turn towards our course. A turn to the right, while closer to our on course heading, would have seen us pile drive into a mountain, so a climbing left turn seemed more prudent. Note the big red blotch behind us. In short order, we crossed back over Combolcha's airport and rejoined our track. The nearby city of Dessie is nestled into the cradle of a mountain plateau. We continued northwest, having to detour slightly for a large, bulky peak ahead. Even at 11,500 feet, the terrain was still a factor. Our first point of interest on this trip was a herd of giraffes that were rumored to be in the area. I had intended to do a low and slow flyby once I found them, but as we neared the area, it became clear they were at the bottom of a deep river valley. And, while I wanted to see them, I decided to use some gamey tools at my disposal to check them out. I didn't want to risk descending into a valley that I may not be able to climb out of. You can juuuust barely make out the white vertical POI marker below and to the left of the left wingtip. There was no way I was diving into that valley just to grab a picture or two. Instead, I let the drone camera do the work. Turning slightly right, we continued north in search of an elephant herd that was marked on the planning map. En route, the terrain was again beautiful. Unfortunately, the elephants were a no-show. Not sure what happened, but they were nowhere to be found, so we continued north over more dramatic scenery. The next stop was a unique building - the Church of Our Lady Mary of Zion in the town of Axum, Ethiopia (https://en.wikipedia.org/wiki/Church_of_Our_Lady_Mary_of_Zion) - which is said to be the resting place of the Ark of the Covenant. It also happens to the be the site of a mass killing by Eritrean militants in 2020. Ugh. In any case, it's a beautiful and architecturally interesting church tucked away in the middle of Ethiopia. Again, I make no claims to be an expert on this site, so please chime in if you have any additional information. From there, we turned northeast and began the long, slow trek over the Red Sea towards Mecca. A few puffy clouds lazily floated over the coastal areas. Sweetpea II is feet wet. After quite some time, the western shores of Saudi Arabia slid over the horizon. And Sweetpea II is feet dry. The coast was, incidentally, the top of our descent, so we throttled back slightly and began the ride down. Mecca is a large city with a expansive urban areas which are punctuated by high hills and craggy mountains. The Abraj Al Bait towers (https://en.wikipedia.org/wiki/Abraj_Al_Bait) which are situated directly next to the Great Mosque (https://en.wikipedia.org/wiki/Masjid_al-Haram) are immediately visible on the skyline. Dropping to 1500 ft above ground, we circled the location to take some photos. It's odd... for the devs to spend time crafting a custom building only to leave the immediate area around it untouched seems like a missed opportunity. In the above photo, the buildings between the Mosque and the highway are flat satellite images, as is the area to the left of the 3D Mosque itself. What a weird design choice. We flew around Mecca for a bit longer then headed towards the uncontrolled field just east of the city proper - appropriately called "Mecca East." With a mountain looming near the traffic pattern, we had to cut in close to the field for the downwind leg, so it wasn't my best approach ever. Getting ready to turn base: Too high on final, time to slip the aircraft. Slipping basically means to cross the controls (e.g. left rudder and right aileron) to expose the side of the airframe to the wind and act as something of an aerodynamic brake. It helps you reduce altitude while not drastically increasing speed as you would in a coordinated dive. That's better. Short final... ... and touchdown. We taxied to the pumps and pulled the mixtures to bring the R-985s to a much-deserved rest. 4.8 hours in the air, bringing our total flight time on this journey to 216.7 real-time hours. Thanks for following along. Next up, adventures of the geometric kind. -
Thanks, Tom! I'll give it a read through. Progress! I'd say base painting is ~95% done. I haven't really started the instrument panel yet, but most other bits have been painted, picked out, and dry brushed. I've got a little touch up to do here and there, but I've hit my limit for tonight. Next will be a gloss varnish and wash before dirtying things up just a little bit. Painting has been pretty easy as details are very crisp.
- 60 replies
-
- 19
-
-
Thanks for the compliments, all! Much appreciated. Thanks, Ernest. I'm by no means an expert, but I'm pretty happy with the water effects. This was only my second shot at water, so I may still try other techniques. There are some neat tutorials on youtube that I want to try out. Anywya, here are the basic steps I used. I cut a base of foam board big enough to fit the ship, trace an outline of the waterline on the board. Removing the ship from the base, I used 2-part epoxy putty to build and form the basic shapes of the waves getting the putty as close to the outline of the ship as I could. I think next time, I'll try air-drying clay to form that base layer. I thinned down some Liquitex modeling paste with water and stippled it on to the base to form random swirls and such. It was a little challenging to get it to look natural, but I found that a very thin mix of paste could be stippled with the a large makeup brush to recreate water texture. I repeated this step because the paste has to be applied in very thin layers or it cracks. Primed w/Mr Surfacer 1500 gray. Painted unevenly w/Tamiya Sea Blue (XF-17). I went heavier in the lower-lying areas and lighter on the prominent areas to help simulate depth. Overcoated with a thin mix of Tamia Clear Blue (X-23) to really give it those blue hues. I found that some of the lighter areas were too light, so I repeated steps 5 and 6 to tone some of them down. With painting done, I brushed on a liberal coat of Mod Podge gloss. This really brings out the depth and makes it look like water. Once the ship was completely built and the Mod Podge dried, I hot glued it to the base and filled in any gaps with more Mod Podge gloss. Once that dried, I used the methods outlined in this video to add the white water effects for wave peaks and ship wake. This took me a couple days as I had to wait for things to dry completely to see if I missed any spots. I recommend only using the extra heavy gloss gel when trying to build peaks or dramatic effects. The heavy gloss gel was far better suited for putting down the cotton tufts.

