
fozzy
-
Posts
1,462 -
Joined
-
Last visited
-
Days Won
8
Content Type
Profiles
Forums
Events
Everything posted by fozzy
-

CONTINUATION OF MY 1:20 SCALE SCRATCH BUILT B17G (RADIO ROOM)
fozzy replied to fozzy's topic in Works in Progress
Cheers Torben! -
CONTINUATION OF MY 1:20 SCALE SCRATCH BUILT B17G (RADIO ROOM)
fozzy replied to fozzy's topic in Works in Progress
Hi everyone Just when you thought that it was impossible to cram any more equipment into the turret Mr Sperry thought it was best to install the K4 gun sight!....and it isn't a small piece of equipment either!...it sat just above the gunners rib cage! I made the gun sight by shaping a small piece of balsa wood and then covering it with some plastic card....then all the bits and bobs were simply glued on! Here it is before being painted...... ....and here are some different angles of the K 4 gun sight before being placed into the turret..... So here are some photos of the gun sight squeezed into the turret.......poor gunner! Looking through the gunners hatch....... Here is a shot through the front glass on the ball turret showing the (blue) sight glass....... Its a slow old process but I think I am getting there! Next up is....yep you guessed it .....more equipment!! Till then thanks for taking a look...always appreciated Fozzy -
CONTINUATION OF MY 1:20 SCALE SCRATCH BUILT B17G (RADIO ROOM)
fozzy replied to fozzy's topic in Works in Progress
Thanks guys....and thanks Kev for the heads up on Postimage....I will see if I can retrieve some of my photos! -
CONTINUATION OF MY 1:20 SCALE SCRATCH BUILT B17G (RADIO ROOM)
fozzy replied to fozzy's topic in Works in Progress
Hi there chaps Been a while since I last posted due to the fact that Spring is here and every year I have to fix house problems tend to the garden etc etc also add to the mix that this turret build is pretty complicated! I am also experiencing problems with these posts as the photos keep disappearing..( Photobucket springs to mind!)...since Photobucket went silly I have been using.... Postimage....I haven't had any problems until just recently.I found out that they had been hacked....but I was told of a solution which works...some times!I am going to replace all the photos of this build one more time and hope that this time they stay here....but I'm not sure if they will...if they don't then this whole Radio room blog is just a waste of time!....I will try again......is anybody else having this problem? Any way on with this post............ I have a method in scratch building this turret now and that is to build it in layers!...from the top of the ammo cans to the next piece of equipment and then the next layer would be another part of the system to the next part and so forth. ....because of the amount of stuff that's packed into the ball its the only way I seem to be able to do it! So here is the next layer! ..... As you can see all the white parts are the detail that I have added since my last post....... This shot is looking in through the gunners hatch......... So with a bit of paint added here is what it looks like so far........ So now I have to put another layer of detail on....probably the last bit hopefully!...then I can get on with the Radio room! Thanks for looking in Cheers Fozzy -
Cheers guys!
-
CONTINUATION OF MY 1:20 SCALE SCRATCH BUILT B17G (RADIO ROOM)
fozzy replied to fozzy's topic in Works in Progress
I'm with you on that one Tony!....read somewhere yesterday that "some" gunners used to carry a pistol for a quick exit from their life rather than be trapped in the ball hurtling down to earth!. As I build this turret I can see that the gunner is totally surrounded by equipment and there really isn't an inch to spare....and as for a fast exit?.... -
CONTINUATION OF MY 1:20 SCALE SCRATCH BUILT B17G (RADIO ROOM)
fozzy replied to fozzy's topic in Works in Progress
Once again guys....thanks a lot for your interest in this build. As for the survival rate of these gunners I have also read different opinions!..some say as Bstarr3 has pointed out that the tail gunner was the worst position and then I have read that the nose section was a pretty dodgy position to be in.....(until they installed the chin Turret)...personally I think where ever you were positioned in the Fort flying over Germany in the early 40s was not a good place to be!....my greatest respect for all of those real Heroes! BTW....apologies for the photos on here that seem to have a mind of their own at the moment!...one minute they are here next they have vanished...I think that Postimage have been hacked....anyone else experiencing problems? Cheers Fozzy -
CONTINUATION OF MY 1:20 SCALE SCRATCH BUILT B17G (RADIO ROOM)
fozzy replied to fozzy's topic in Works in Progress
Afternoon guys! I have just returned from UK and I am now back in my office and can get to my bench!....the last time I posted was 15 March and of course not being able to do any modelling this post is going to be a small update. So its the continuation of the Ball turret that seems to get more and more complicated the more I look at the photos. I have many photos of different angles of the interior of the turret that I have collected over the months and its a real slow process of interpreting what I see!....not to mention that some of the equipment I have scratch built will be able to be seen but only if you look carefully in all the nooks and crannies!.....as in the real turret there isn't a spare scrap of space! So I continued with building an electrical control box that sits on the front of the ammo cans.....here it is..... I painted the said object and before placing into the turret I built the manual elevation shaft control that the gunner would use if there was no power to the controls....this sits somehow on the front of the electrical control box!....... The last 3 photos show the progress I have made by looking at the white un painted parts....... So as you can see....real slow progress for such a small part in this B17G project! When I have made a bit more progress I will post again....so until then... Thanks for taking a look Fozzy -
Hi guys I have been going through my RFI posts and replacing the photos that Photo bucket decided to steel from us all! This is my Super detailed Spitfire Mk 1 I posted about 7 years ago!..... Hope you like the snaps! Cheers Fozzy
-
Fabulous!
-
CONTINUATION OF MY 1:20 SCALE SCRATCH BUILT B17G (RADIO ROOM)
fozzy replied to fozzy's topic in Works in Progress
Thanks lads! -
CONTINUATION OF MY 1:20 SCALE SCRATCH BUILT B17G (RADIO ROOM)
fozzy replied to fozzy's topic in Works in Progress
Thanks bud! -
CONTINUATION OF MY 1:20 SCALE SCRATCH BUILT B17G (RADIO ROOM)
fozzy replied to fozzy's topic in Works in Progress
Thanks for your kind words Brian...your too kind! -
CONTINUATION OF MY 1:20 SCALE SCRATCH BUILT B17G (RADIO ROOM)
fozzy replied to fozzy's topic in Works in Progress
"Ball of death".......I like that Shawn! -
CONTINUATION OF MY 1:20 SCALE SCRATCH BUILT B17G (RADIO ROOM)
fozzy replied to fozzy's topic in Works in Progress
Hi there Lads and Lasses! I am off to the UK tomorrow but was able to do a quick update before I set off. I haven't done much but its a start to complete the ball turret part of this build. Looking at photos convinced me that the next best thing to scratch build should be the ammo cans that are inside the ball!....they sit just above (and I mean just above) the gunners thighs!....I can see why the ball turret gunners had to be small...there is just no room to move an inch!...no wonder they got cramp!.....lying there in that draughty enclosed space ...dangling under the belly of the B17 with the deafening thunder of the 50 cals a few inches from their ears!....... great respect for them! Scratch building the ammunition cans was a huge task in it self and I hope that they look something like them....I built them from a small block of balsa wood and then covered it with some yogurt pot plastic....just to save some of my plastic card! The rounds were made by cutting teeny pieces of telephone wire and gluing them on a strip of paper. Here is a photo of the can's and some of the ammunition that will be seen before painting..... The rounds were then glued into position and the whole thing was painted...... Then the real tricky part started!......fixing the whole lot into the small ball. I decided a few days ago that the whole idea of this B17G project was mainly to show off all the interior detail....and so I thought that the top of the ball should be open so that when its in the fuselage you can look straight down into the turret as well as looking through the gunners hatch which will be on the outside of the fuselage.....so to that end I cut part of the top off the ball as you will see in the next photos. It took a lot of dry runs to make the cans fit in the ball with the top half on....but managed to do it in the end. Here we have the ammunition cans in the turret minus the top half.... ....and here is what it looks like with the top of the ball temporarily attached... You might notice that only one side of the ammunition cans are painted....this is because a lot of detail will be attached to the un painted side later. So now I am off to UK for a few weeks and will be back to continue this mid April. Thanks as always for looking in and taking a peek! Laters Fozzy -
CONTINUATION OF MY 1:20 SCALE SCRATCH BUILT B17G (RADIO ROOM)
fozzy replied to fozzy's topic in Works in Progress
Thank you fellow modelers! -
CONTINUATION OF MY 1:20 SCALE SCRATCH BUILT B17G (RADIO ROOM)
fozzy replied to fozzy's topic in Works in Progress
Thanks a lot chaps! ....appreciate your support! -
CONTINUATION OF MY 1:20 SCALE SCRATCH BUILT B17G (RADIO ROOM)
fozzy replied to fozzy's topic in Works in Progress
Afternoon all! OK then.... I took photos of the bottom half of this turret this morning so that I could show you the progress that I have made so far. I have to say that I found researching the Sperry Ball Turret fascinating and it was ...and still is...pretty difficult to put it all together!...If I thought the lower section was hard it will be nothing compared to the upper half!.,..as I said in my last post it was difficult at times to know which part to scratch build first...wires and cables were hidden behind parts so I really had to think it all through!....this is my excuse in case you see any flaws...and believe me there are a few!... But I am happy with the way it turned out....so far! So here are the photos then......I think that the whole thing will look better when the top half is joined.......... ...and just so you can get an idea of the scale....... The next few photos show all the bits and bobs that go into the lower half of the ball.... So ....thinking ahead of the upper half I think I am going to have to think outside the box on this one as so far with this project I have put the emphasis on being able to see the internal workings of the B17G.....EG...the nose section was only skinned up to the cockpit plexiglass...so you could see into the cockpit....same as the last section I built...the bomb bay...although I think I might have to re visit the bomb bay as I don't think you can see into the bay very well....and so to this radio room....and to that end this Ball turret....I think I will design it so that the top of the ball is open enabling you to see down into the ball......its a load of balls really......but I think you know where I'm going with this! Unfortunately My Wife has fallen ill and I have to return to the UK for a few weeks to look after her and so I don't think I will be able to post any more up dates for a while ....might be able to slip a small one in before I go!.....this post is full of double entendre's!! Cheers for looking in chaps Fozzy- 258 replies
-
- 11
-

-
CONTINUATION OF MY 1:20 SCALE SCRATCH BUILT B17G (RADIO ROOM)
fozzy replied to fozzy's topic in Works in Progress
Hi guys I have managed to finish detailing the lower half of the Ball turret. I really had to think carefully how to approach doing this...because A. ..there is a hell of a lot going on in there!! and B....what I scratch build in the lower half will eventually have to marry up with the top half!. Luckily I have of photos of "said subject" but of course no dimensions!....and so this was all done by eye balling the photos and trying to scale it in my head down to 1:20.....how ever I am used to this and this is the part of the build I love doing. I started by building the two 50 cal Browning's. So it was time to get out my favorite box and tin of the only materials I seem to ever use when doing this................ Scrap plastic and bits of wire!....and I think I used a Christmas card some where in bottom half of this turret! So here we have the two Browning's ready for a bit of paint... The guns were placed into the turret ..(that was a nightmare!....took ages!)...and then on with a few more parts to be scratched. Here for example is the air regulator and heated suit unit that are tucked away in front of the armored plate that protects the gunners under cart!..... and here are the Air pressure gauges on their panel.... ...and with a little colour attached.... There was times I built a part and then had to start all over again....mainly a scale issue...but got there in the end! Tomorrow I will take photos of the completed bottom half and post again...its late here in Bulgaria...my bed is calling!! Until tomorrow then.... Fozzy -
Wonderful!...simply a joy to look at Michael
-
CONTINUATION OF MY 1:20 SCALE SCRATCH BUILT B17G (RADIO ROOM)
fozzy replied to fozzy's topic in Works in Progress
Thanks a lot guys! . Tony ...I welcome any suggestions mate...keep em coming....and if I had enough decent clear plastic I would have used it to vac form the turret! -
CONTINUATION OF MY 1:20 SCALE SCRATCH BUILT B17G (RADIO ROOM)
fozzy replied to fozzy's topic in Works in Progress
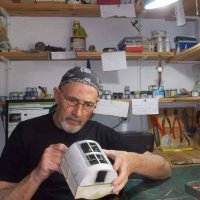
Hi guys Time for an up date on this Ball turret! So after a lot of cursing the designers of this turret...namely Mr Sperry!...I finally managed to complete the outer parts of the bottom half of the turret..... leaving me to start next on the dreaded interior! The hardest part was trying to replicate where the 50 cals go into the turret....I tried all sorts of ideas but in the end decided to use wire insulation. Very fiddly I have to say and a few attempts had to be made before I was kind of satisfied that it looked the part. Here's a photo of me in the process of making them.............. I have done this method many times before but this time it seemed harder due to the circular shape they had to be attached to!...Each piece of insulation was 1 cm in length and had to be opened up and cut to shape.....and a small piece of plastic with a hole drilled out that will take the barrels later on........ Here you have it...... Next up was also pretty dam difficult and that was cutting out all the glazing positions.....but finally the bottom half of the turret was ready for glazing............. After the glazing was done using cut pieces of an old food clear packaging plastic...I then placed all the framing around the glass. Here it is then ready to start the detailing of the interior........ ....and with the top on to give some sort of reference that it is.... in fact... supposed to be a ball turret!!! I have to say I am glad that that hurdle is over with.....although the top half will be awkward at least it wont have all that glazing! When I started this project back in the dark ages I really wasn't going to do the entire B17G....it was just supposed to be the nose section......one of the reasons why I shied away from it is the fact that I would have to do this turret....but I guess that's what scratch building is all about....pushing your self to the limit...and this ball turret has pushed me right to the edge!! ha ha! so......I am now going to have a go at the bottom half of the interior...so I better start looking at the 1652 photos I have as reference!! I shall be back...and thanks for looking in! Fozzy- 258 replies
-
- 13
-
-
CONTINUATION OF MY 1:20 SCALE SCRATCH BUILT B17G (RADIO ROOM)
fozzy replied to fozzy's topic in Works in Progress
Cheers Tony....but I just like to do it the hard way! .....no...The truth is that I didn't have any decent clear plastic to use...but it will be ok doing it this way.....I hope! -
CONTINUATION OF MY 1:20 SCALE SCRATCH BUILT B17G (RADIO ROOM)
fozzy replied to fozzy's topic in Works in Progress
Thanks for reminding me Rich!...would be quite a disaster if I forget! -
CONTINUATION OF MY 1:20 SCALE SCRATCH BUILT B17G (RADIO ROOM)
fozzy replied to fozzy's topic in Works in Progress
Hi chaps Here is a quick up date on the problem that shall be named......."The bl#@$y Sperry Ball Turret" :angry: I wasn't going to start this part yet because I knew that I would have problems with it!....just kept putting it on the back burner!....I thought that if I cant manage to scratch build the ball turret then the whole B17G project would come to a grinding halt!...so I started trying to think of ways how I can replicate it with the least amount of fuss and specialized tools...that I don't own!! That little yellow kids ball kept staring at me!...taunting me!...because it knew that it would be useless if I tried to use it for a mold for vac forming....not solid you see....rubbery little thing....but I just had to give it a go! I made a do it your self vac forming kit a few years back and I dusted it down ready for a trial run on the yellow ball. The Henry hoover was got out of storage....(I hate hoovering!!)...and was put to good use for once!!....all connected up and ready for the off.... I started on the first attempt to use some plastic food packaging......it was pinned to the frame and popped into the oven for a few seconds....hoover on for suction and.....................failure!...the little ball stood up to having very hot plastic wrapped around it but I reckon the plastic was too thick. So next attempt I used a sheet of plastic card.......no.....too thin!.....so in the end I tried a sheet of 0.5mm and hey presto a result!.......... Then I thought that the plastic would get stuck to the soft ball ,but I didn't have any problems extracting the ball!....so I re loaded another 0.5 mm sheet of plastic on the frame and popped it in the oven (making me feel hungry all this talk of ovens!)... So now I had the two halves ready for a trim up......but I decided that I needed to cut the ball horizontally as it would be easier for me to do all the detail inside the ball..... The next 2 photos show the two halves together......roughly!! So....so far I think so good.....the test will be later when I try to marry up the two halves......but first its down to a load of detailing...starting with the lower half of the ball....blue ink marks the spot! I am going to start trying to cut out all the glazing first....then on with all the detail....so I will be back when I have managed to do that! Cheers for looking in Fozzy