Butler
-
Posts
680 -
Joined
-
Last visited
Content Type
Profiles
Forums
Events
Everything posted by Butler
-
Cheers guys I've finished one wing and the front part of the fuselage. Here's a couple of pics, although it's almost impossible to take a decent image!
-
Thanks for the comment The photo's actually quite accurate I did a few test runs and found that the lines need to be slightly overdone as the reflective surface multiplies the effect. Once this wing's finished i'll give it a primer coat and check it looks ok. If not, the panels can just be peeled off and used as templates for replacements. The time consuming part is getting the shapes right, but the best thing about contact adhesive is that it can be rolled right off the model again!
-
After a test run i've decided not to depict the rivets, but leave an indentation to show the stressed effect, a sort of 'cushion' look. I hope this pic shows what I mean!

-
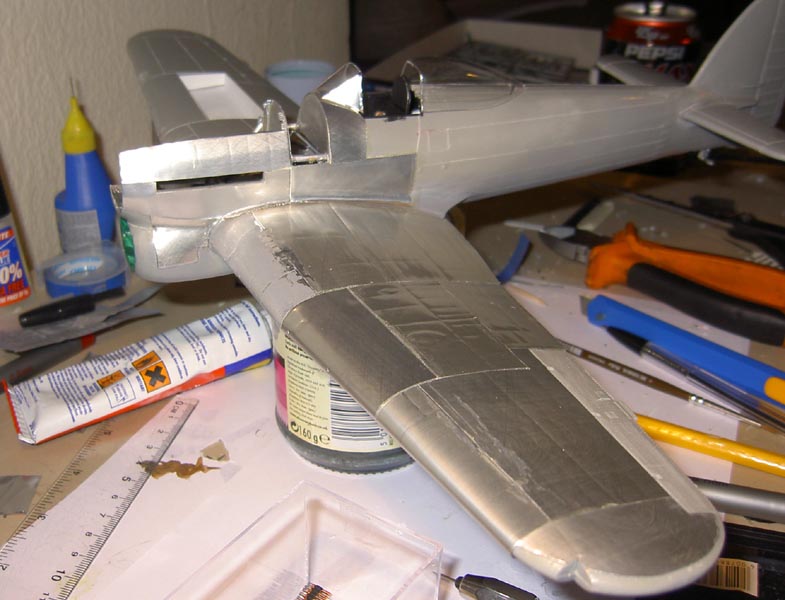
I've now decided to take a different tack on the surface preparation Looking at the real plane, the surface isn't perfectly smooth like you get on the model - the metal skin is rippled where the rivets stress it onto the frame and the panels don't all line up perfectly. I've decided to try and reproduce this sort of look with a cladding of drink can aluminium. This seems be easier than i first thought, its just a case of cutting the panels to shape and sticking them down with contact adhesive. They seem to take a nice rivet detail too, plus my weathering and stone chipping will look much more realsitic later in the build. (ignore the panel with the rivets on - that isn't stuck down yet and is my test panel!)

-
And a quick pic of the ammo belt that I randomly decided to make to relieve the frustration of sanding and filling :angry: This was a belt of a Revell Spitfire Mk22/24 kit that I bought by mistake a couple of months ago (I didn't realise this was a post-war plane and it looks really awkward with the 5 blade prop and long nose, I don't want to make it!) Looking at my reference books (thanks Warwickshire libraries ) the ammo looks way to short and maybe a touch too fat, so i've chopped off the front half and added my own extensions. I did consider filing the ends of the rounds, but in fact they don't look especially sharp in my reference photo. I've found Brian Cauchi's Hispano reference pics, so i might try a little fiddling here (i've posted a question on that thread). Brian's excellent Hispano walkround

-
Here's a couple of photos just to prove I haven't given up yet! The fuselage stuck together with some attempts at scribing....

-
My camera battery has gone flat, but there's not much to show photo wise. I've put most of the fuselage bits and bobs together along with a cutout in the starboard wing to show the cannon. My plan is to keep the port side fairly intact so as to give a more complete look, with all the cutouts on the starboard side. I'm going to have a go at rescribing the panel lines and reducing the 'cheese grater' effect of the rivets, although I haven't done this before Once this is complete i'll do the paint job, adding the cannon, engine etc later. The reason for this is because I like the scratch building part and want to 'pace' it through the build! James
-
I've not done much this evening, just a little work on the air intake/radiator. I've used the centre part from the box, but the rest of the bits are home made. I've used course grade sandpaper to simulate the radiator grille which I think works quite well (although the flash has increased the contrast on the photo!). The air intake tube is made from a section of propelling pencil I had kicking about:) There's still a few bits to add to this before it gets glued back onto the fuselage

-
Here is the wing piece finally attached to the fuselage. The scotch tape is there to let the superglue do its work keeping the wings level!

-
And here's some of my reference photos. The nice people at Hendon let me pass under the 'velvet rope' to get these! I'm guessing that the brown stuff is Waxoyl or similar that they've used to preserve the inside of the wing, rather than dirt or oil? I've reproduced that look anyway because it looks a bit more interesting than plain silver!

-
Here's the wheel wells finished at last! I've included parts of the undercarriage legs and the actuating piston for closing the doors so I don't have to fiddle about later. At least 60% of this was done when I came back from the pub last night - I can't really remember doing it, but it was a nice suprise in the morning

-
I believe that the Normandy example is a fibreglass replica - my reference book shows that this plane was destroyed by flak fire in Mezidon in July 1944 I've also been to visit the Hendon plane and it really dominates the hanger. The most beautiful plane they have is (of course) the Spitfire, but at Hendon the Typhoon imediately draws your attention.
-
Added a bit more detail before bed. I just need to add a couple of bits and bobs from my reference photos, including some mysterious steel rods, wires, compressed air bottles, and what i assume are brake lines. I'll post a couple of my reference photos tomorrow incase they are useful to anyone else

-
Ah, once you see my effort at painting it will all become clear! Cheers for the comments:)
-
And here is a bit more detail - i've still got to add loads of stuff though! ps Can anyone guess what the white object in the background is? Hint: i'll be using it in the base i'll make at the end...

-
Heres a quick pic of the undercarriage wells i've been working on. I've finally glued the fuselage together with the cockpit inside - the lower wing section is an interference fit now that the undercarriage well is glued on! The main spars match up nicely, so once the wing top is on it should look like they are doing a job.

-
Well this is really my 30+ model, but only the second since i've been an adult! The previous models were all 1:72s done in minutes and I only ever had enough pocket money for 3-4 paints! that was 15 odd years ago though... The first model i made properly was the Hasagawa 1:48 typhoon but the kit is almost too good, in that it went together so easily as to be no challenge. I added a few scratch built details to that, but this is the first one in a large scale. I'm certainly no engineer, I'm a horticulturalist by trade
-
And here it is with the missing piece of cockpit and the wing top. Note how poor a fit the 'car door' piece is The next job is to paint and detail the inside walls fuselage around the cokpit, and glue the whole lot together. I'll add the seat later - i've left a small shelf to drop it straight down onto with a dab of superglue.

-
Finished adding all the extra bits and bobs to the frame, in particular the rear of the side switchgear panel which is visible though the removable panel that i'll be leaving open, as well as various tubes and boxes. I've used lead wire for these tubes, with the fittings made from my favourite material at the moment - cue-tip slivers:)

-
Finished the instrument panel and controls. The instrument panel is the revell version with the original decal applied, then circles of lead wire or slivers of cue-tip added around the dials. The remaining decal surface was then painted black, just leaving the area inside the circles. I popped a drop of Johnsons Klear (future) in each dial to seal the circles in. I'll add another drop in each to create the glass finish. The compass top is a sliver of transparent sprue, the end rounded with sandpaper, then buffed clear again on my jeans The rudder pedals are completely scratch built, and the control stick is the Revell version tidied up a bit with some wires added. I also added an extension to the instument panel using the reference photos that Edgar Brooks emailed me. Still got a lot of small bits to add to this, then it's ready to fit into the fuselage. I'll make the oil tank and engine a little later in the build.

-
Thanks for that, there's some interesting pics in there James
-
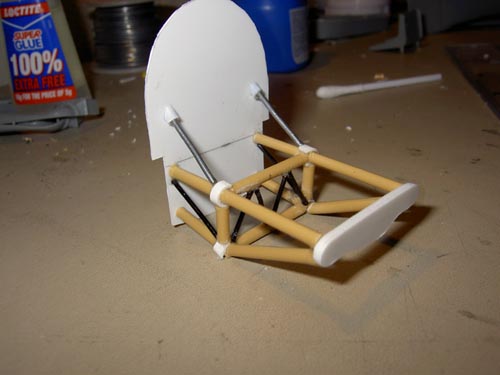
Just finished construction of the tubular frame - just got to weather it and add everything that's attached to it now! The frame is made from sprue, cotton buds and bonsai wire - the coton buds are especially useful as they are hollow tubular themselves. I plan to use very thin slivers of these to create some of the smaller dials. The frame tubes are slightly overscale I think, but i'm not too bothered as they have the desired effect! (the black is shiney because it's still wet).

-
Sounds interesting - I haven't seen a Mk1a model before. My reference book shows that R7578 was a very early plane given by Hawker to Napier for their use, so it was probably spotlessly clean! I can't wait to see your results side by side - almost the complete evolution of the type, with one clean and the other with signs of hard use!
-
Thanks for the comments! I've finished the engine half of the tubular frame, just got to add some ancilleries to the bulkhead. Amazingly the engine matches up to its exhaust cutout in the fuselage, which is more luck than judgement! Sorry about the bluriness in this picture. I hope you can see that i've added a small portion of the main spar (artistic license as i've never seen any photos) so that when the wing goes on it looks like something is holding it on!

-
^^^^^^ Note also on this plane there is a actuating rod passing through the air intake, although on the museum plane the rod itself is missing. Here is how far I have got this evening with the engine frame. I'll extend this rearwards into the cockpit once front is finished. P.s. i hope i'm not posting too many pictures