

miamiangler
-
Posts
484 -
Joined
-
Last visited
-
Days Won
5
Content Type
Profiles
Forums
Events
Posts posted by miamiangler
-
-
Willi
40 plus years is long enough to be considered a Floridian in my book. Growing up in Clifton, NJ; the Tri State area, sure is close enough to Long Island to share the joys of the Northeast. How long did it take you yo get use to the Florida summers ?
Peter
You never get used to the heat . this year has been hot . First day of Fall and it is 91 degrees.I learned to go boating early and get in before it gets really hot .Even the fish dont bite after 11:00AM . So long you say out of the Sun from noon to 3:00pm it`s not too bad .Cant wait for the days when it will be 75 degrees
 .
.Willi
-
Matt
Nice choice for the paint scheme - always nice to see a Marines landing on the forum.
Florida - Too hot and too humid for the Old Northern Boy. I was soaking wet from the humidity. To tell you the truth, I'm looking forward to th cold and snow for a while and the change of seasons. I guess when you a true Floridian as Wili is, the local weather is what you know.


Peter
Hi Peter ,
Nope I`m not a true Floridian , grew up in Clifton ,NJ. move down To Florida in 1971.It was really nice at that time plus fishing was a whole lot better also!
Willi
-
Matt ,I like the scheme you picked .It `s starting to look like a plane

Willi
-
I like the 78/65. It should look very striking. I don't see what the problem is with the arrows, they look fine to me. The treatment of the nose came out great.
The arrows are not curved enough so have to modify a little .I started with the RlM 71 on the back side giving it a little faded look hope it turns out alright . The photo does not show the 78/65 in the right hue. But when I placed the part on the chip looks the same . Hope to get most of it done before the Club meeting on Sunday. Saturday is my fishing day .This time I`m going
.Willi
-
Great looking Boat! I am in Germany as I write this but unfortunately in the Hannover area and not Sinsheim. Sinsheim is miles and miles from any coast. Its the last place one would expect a U-boat(s) in a museum.
Hi Ron,
Yes it`s quiet far . There`s a train that goes through the town ,but not on the main drag .It`s a small town so you would have to use different trains to get there . the best and I think the only way would be to use the Auto bann . The U-boot type XXI was used till the late 50`s I think .It actually went down the Rhine river on a barge my Uncle has pictures of it .That was over 15+ years ago . Hope you have a great time in Deutschland. My Deutsch is very rusty havnt written or spoken in years!
Willi
-
Thnx guys.
Here's the plan:
I'm going to attach this original WW2 me163 cockit light to a wooden base.
The light will really light the model.
As soon as it arrives I'll figure out a way to attach it and make it work.
Still thinning out the fuselage around the open hatches.
Cheers,
Jeroen

Jeroen where do you find this stuff? that`s so cool . By any chance can you find me a Me 109 or Fw190
just wondering !Willi
-
Awesome! Thanks for posting it Willi. Just the inspiration I need to open the box and put some of that etch to work. I really like the rigging and the rust, too cool. Now I just need to decide on a boat to do. Leaning toward Teddy Suhren's Black Cat... We will see.
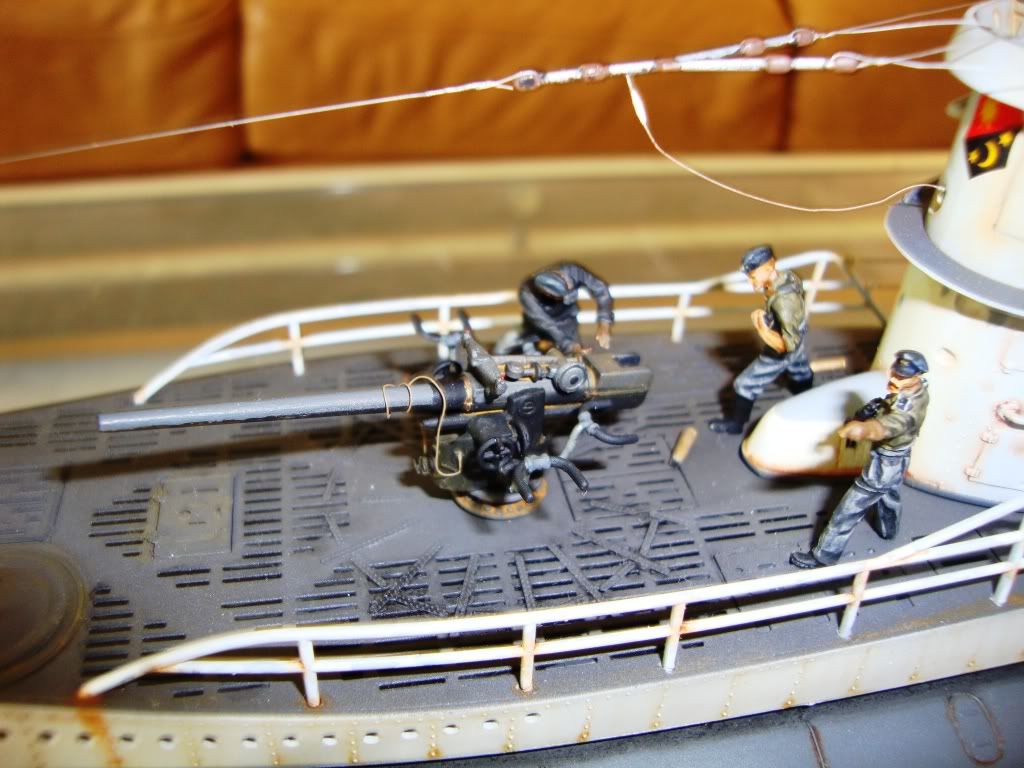
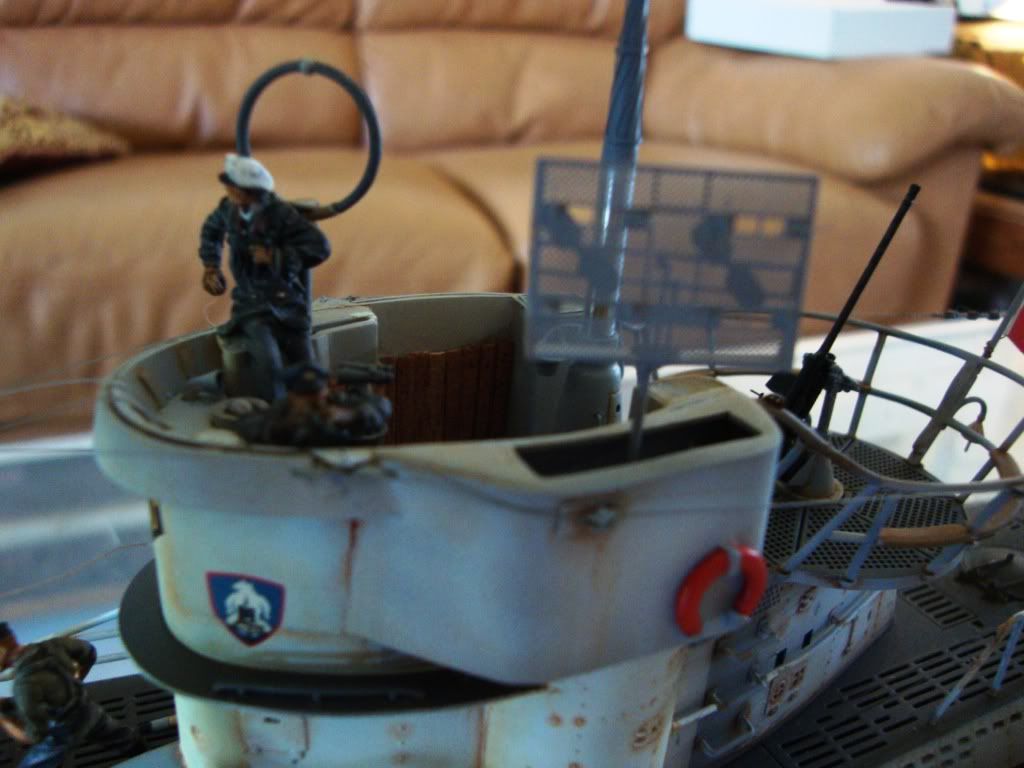
There`s lots of sanding to do for all the flood holes . you also have to check which sub you are doing all are different . there are afew holes i didn`t add because I did not have all the info on it . Also you have to move the ancor forward or it will hit the dive plane! I am half way with my #2 sub but same didnt do all the flood holes . maybe by the thrird one I`ll get it right! My friend did the rusting on the sub . As a cop he had to patrol the port of Miami so he had a good view of how a rusting ship looks like. that`s why my #2 sub is stalled at this time I need some weathering done on it

Willi
-
Really cool project. Very complete and nice detail touches.
I love U-boats. Finished the 1/35 conning tower this year and still fiddling with the 1/144 version with the Voyager update set.
Love the base as well. Great mantel piece.
Visited the St. Nazaire U-boat bunker last month. Impressive piece of work that gives you a good idea of the size and operation
of these wolves.
Cheers,
Jeroen
Thanks Jeroen,
I dont get to visit Germany as often as I did when I was younger . My relatives have to much going on and no place for me to stay. But One place that was cool to see is the Museum in Sinsheim . They have a Biber and Type XXI I think walked in side of it .Very cool also lots of armor and A/C.
The base is oak with a groves cut all around then I put oak molding around the wood base so my cover fits in the grooves then it is air tight so no dust can get into it..
-
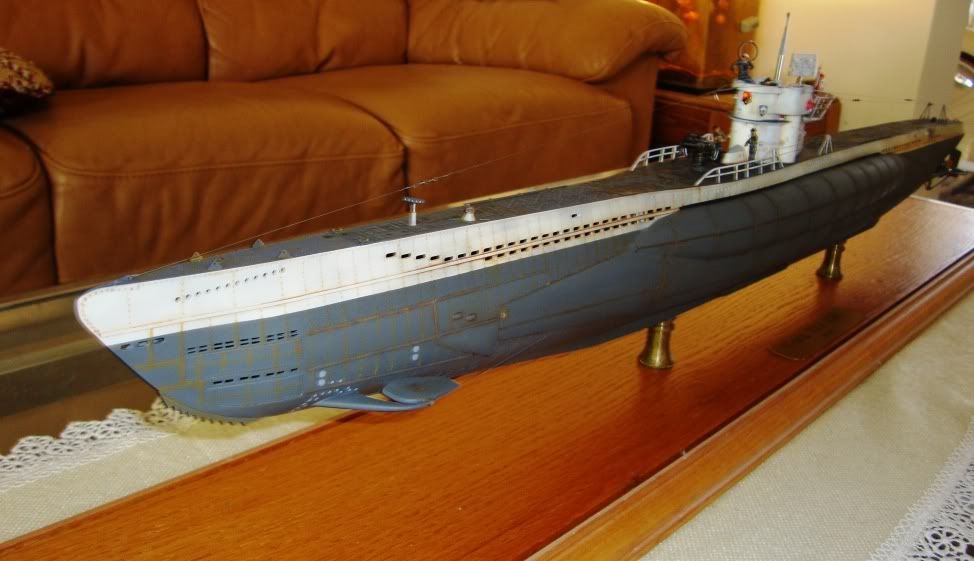
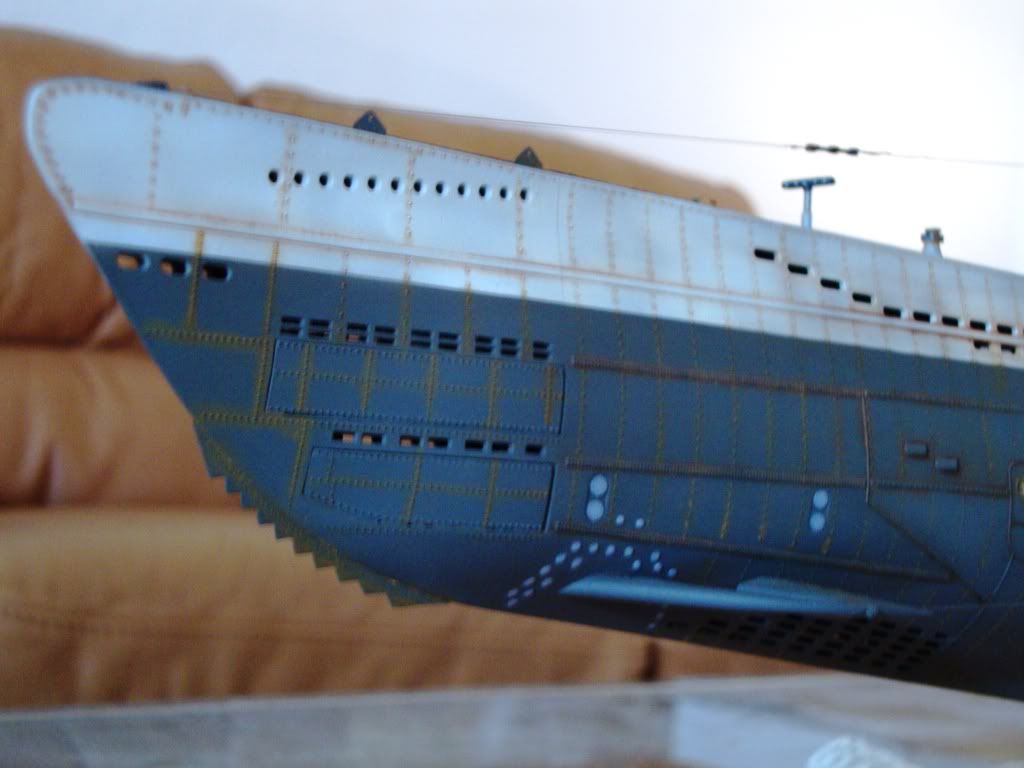
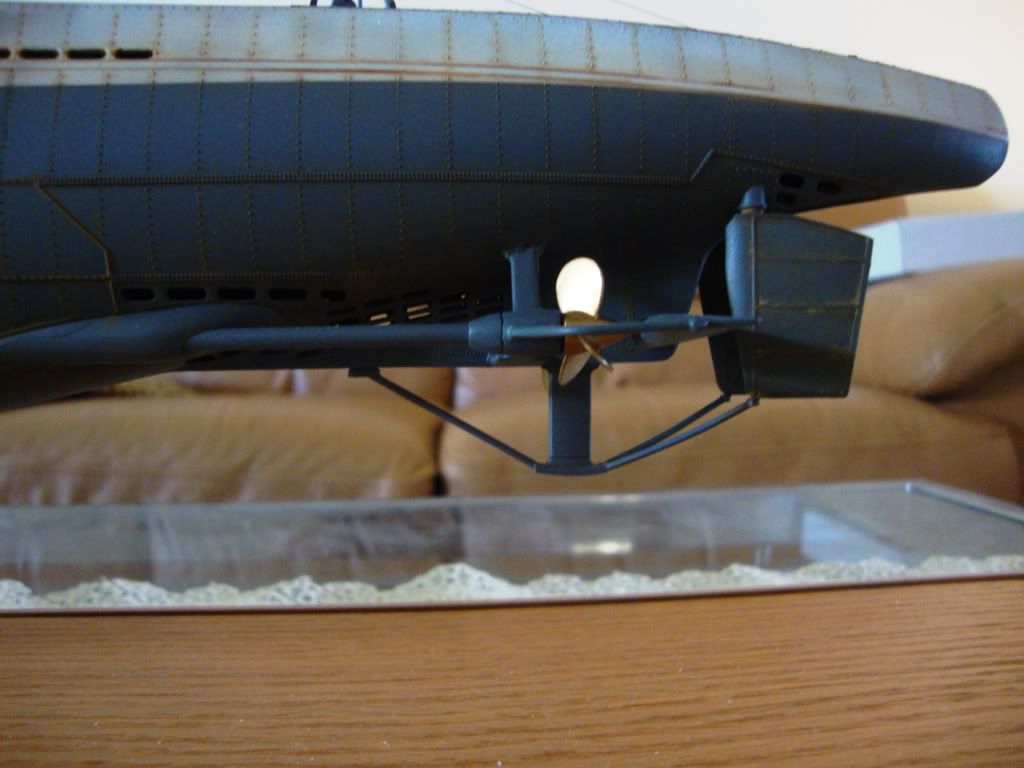
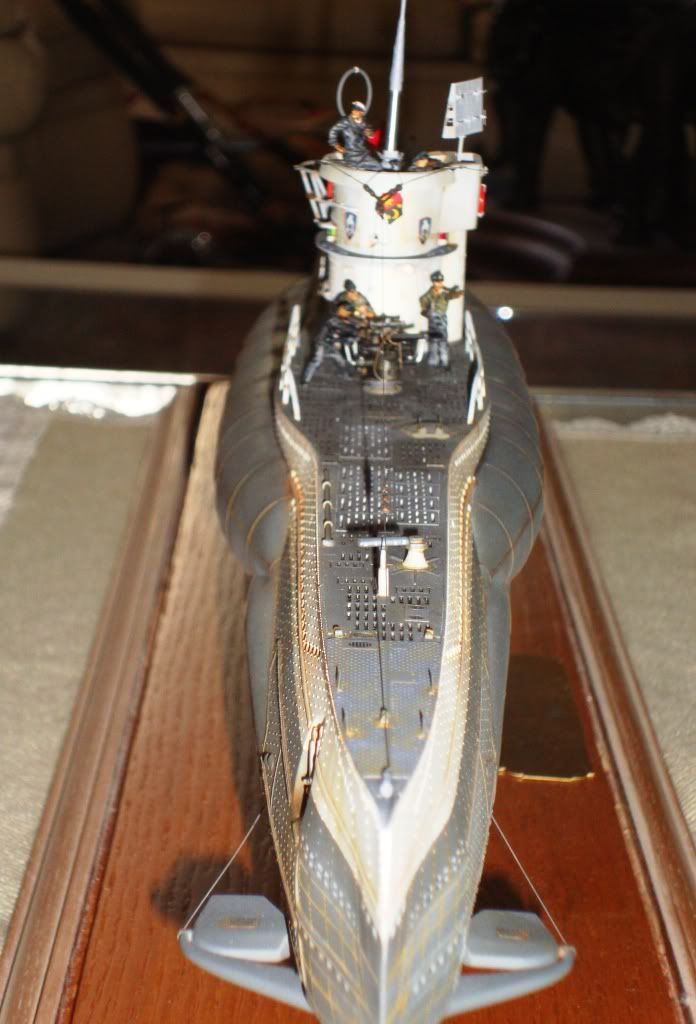
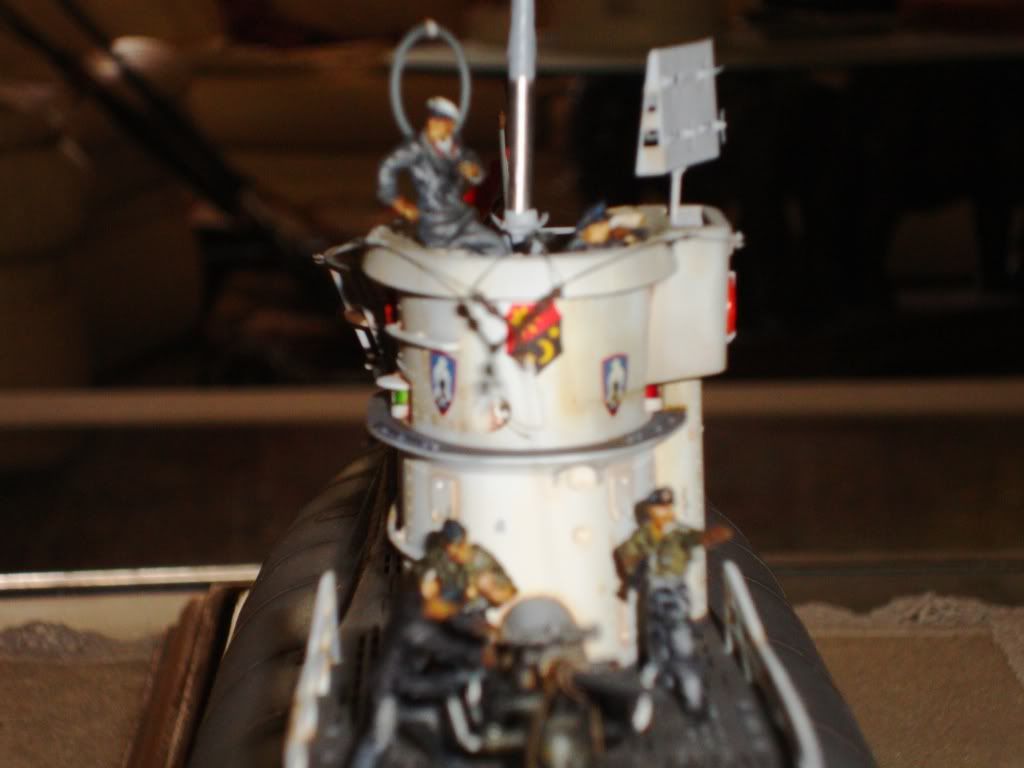
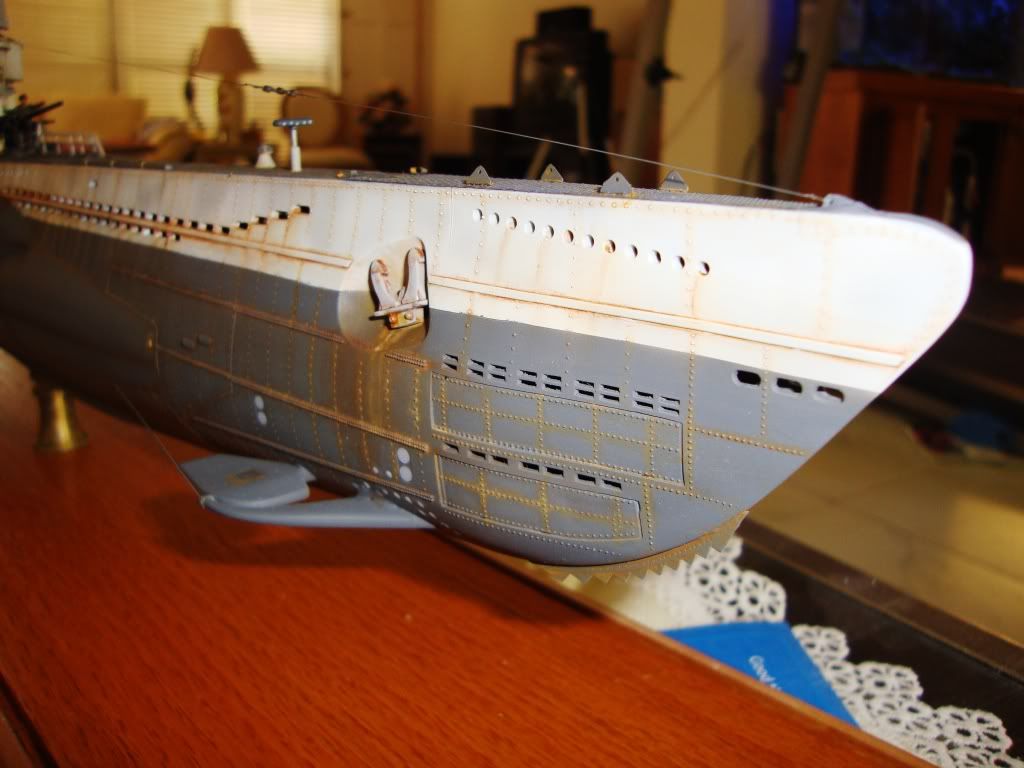
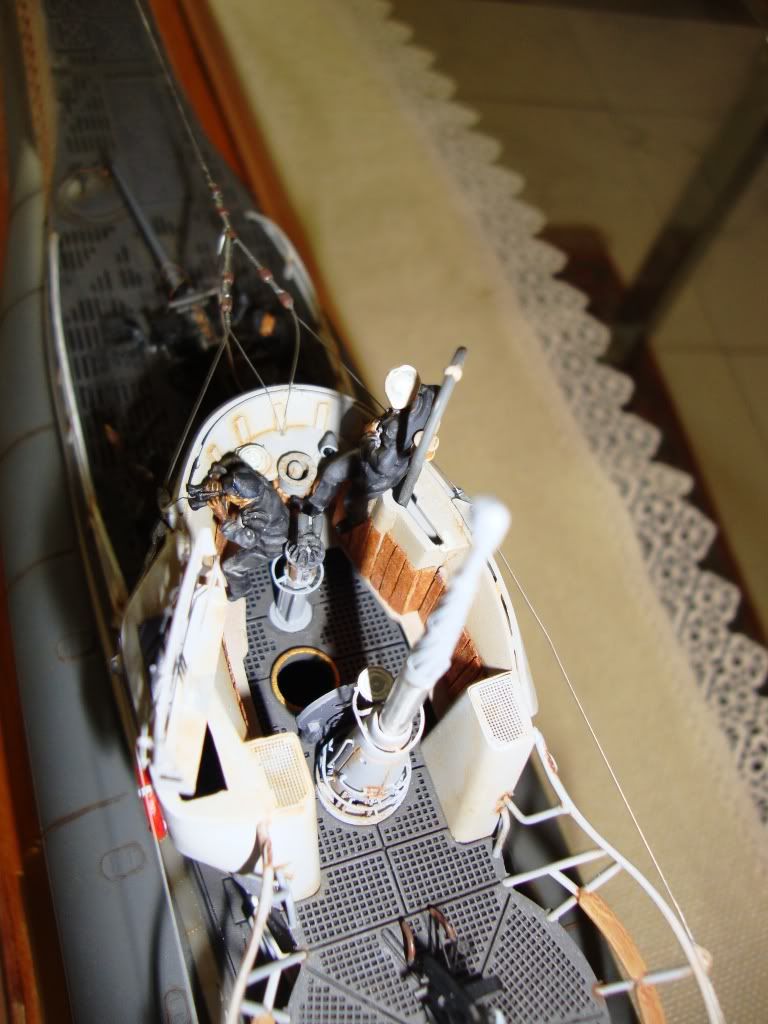
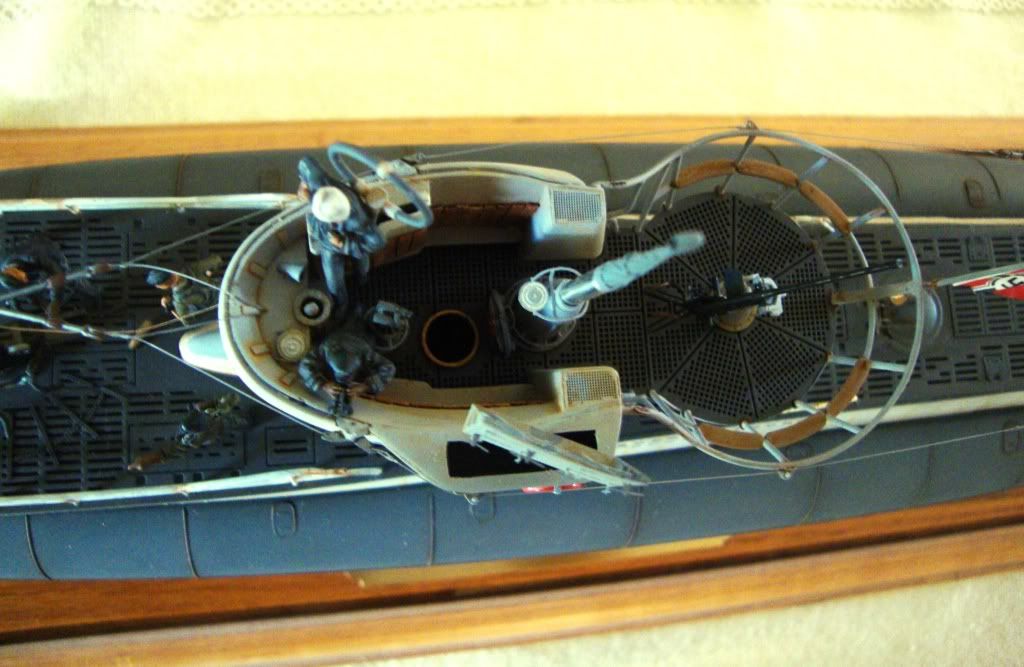
This is #1 build I did in OCT.2004. Winter scheme ,Baltic sea of the coast of Russia. I used the Eduard set which I had ordered before the set actually came out so I could enter the project in an IPMS contest in St.Petersburg ,Florida . Great company and very nice people to deal with .I also used the White Enston detail set .The coning tower I used wood to line the inside area . the periscope base was raised by 5MM because it is to short and the USO was also rebuilt . All of the flood holes were sanded down and opened up . The 88MM was also detailed . My favorate Tyger wire was used for the cables . The figures were painted by one of my friends. There`s more details but can`t remember all of them . Old age
Hope you enjoy .Willi
BTW this is for you Big Matt!
-
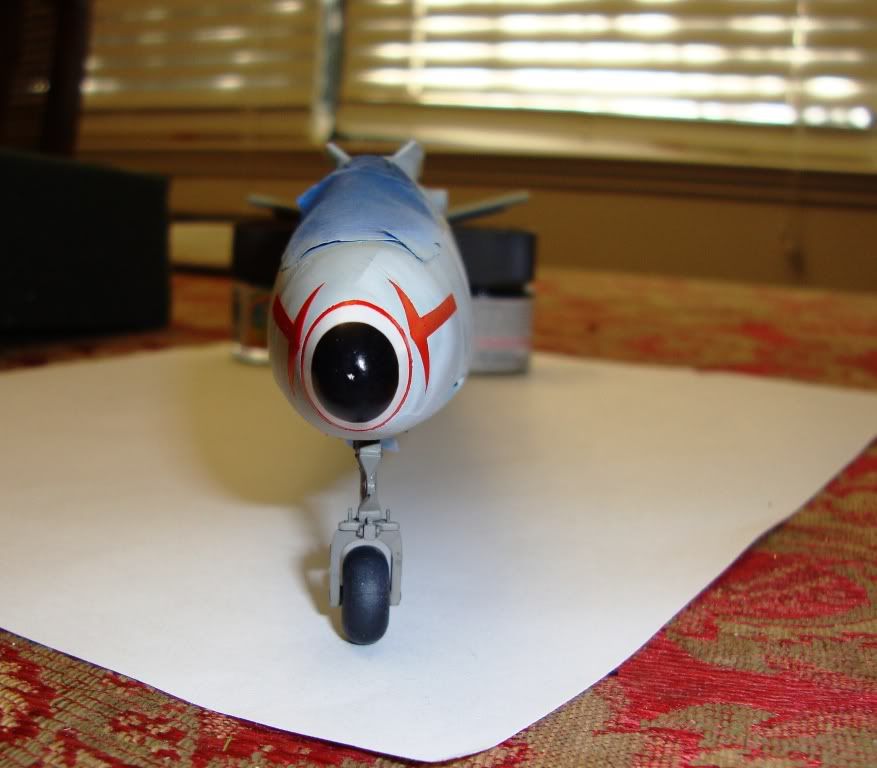
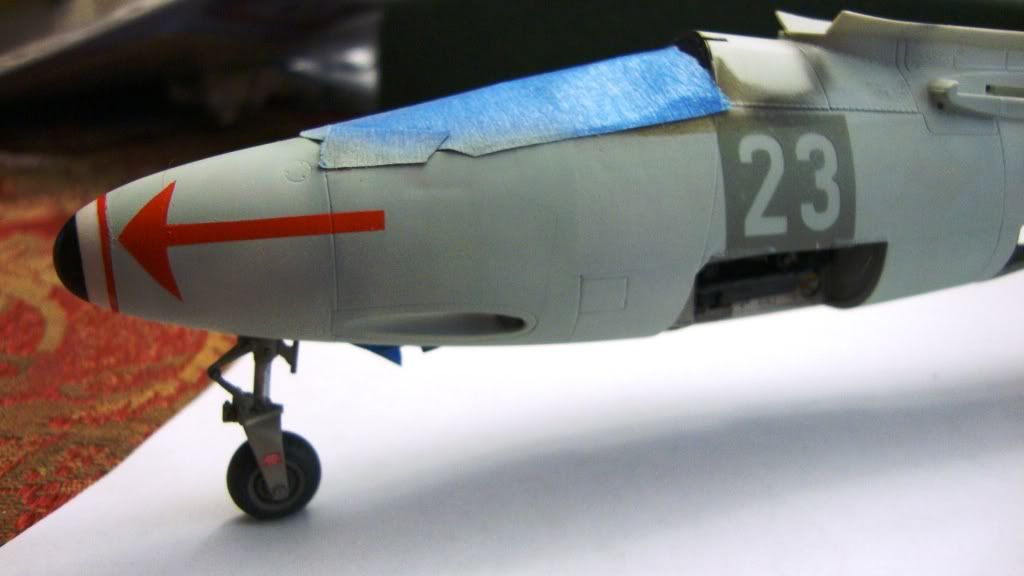
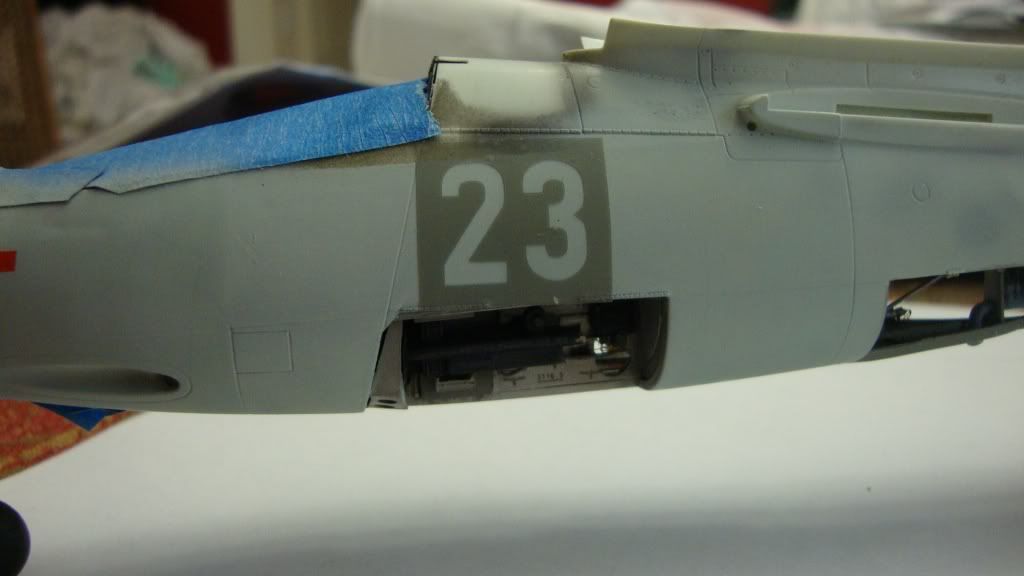
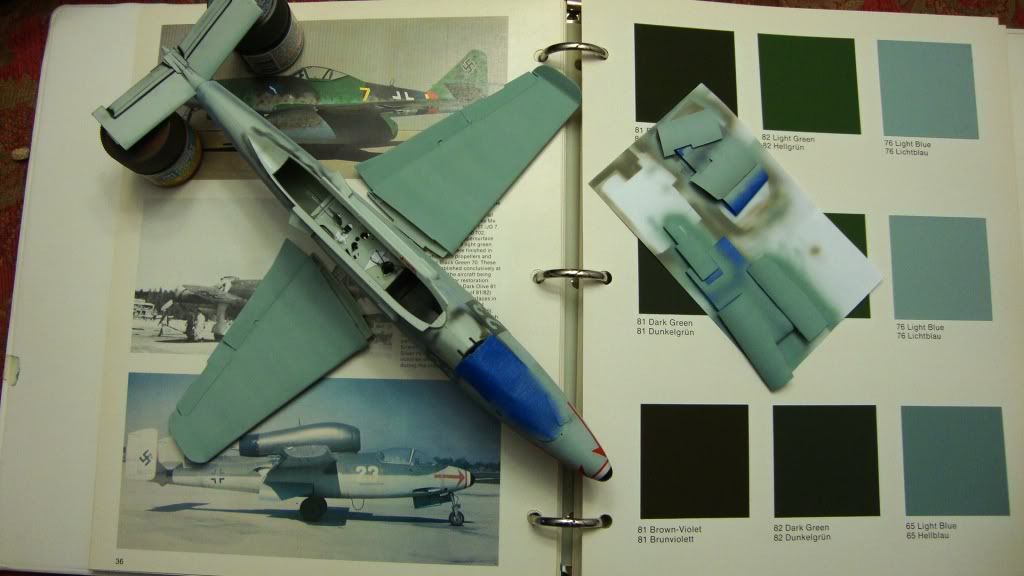
Today I added the red arrows and lined up the numbers so I can get ready to spray the RLM 71 . One foot note and I totally missed this one .Today I checked all the referances I have and read in the Monogram Painting Guide that the lower wing surfaces where also RLM 65. I found that the Testors and Polyscale RLM 65 was to greenish blue in color to the chips in the book . I used Aeromaster warbird color RLM 78 which turn out to be a exact match to the color chip RLM 65 . my second reference (IPMS color cross-reference guide by David H klaus)stated that RLM 78 was a good match to RLM65.
Thanks for looking more to come soon
Willi
-
Hi Doug ,
You can put me down for a Finnish Gladiator Please
Thanks ,
Willi
-
The tail looks great ! Yes ,let`s see some color
. -
Willi, the only chip I see on my screen that looks a match is from the top sample top left 71 gs. The rest look a bit off and I don't see anything with that braunviolet hue. Could that be 70 on top of the rear fuse at the insignia??? Just a patch maybe. There seems to be a matching section just aft of the canopy as well.
Sorry for stirring the pot

Hi Matt ,
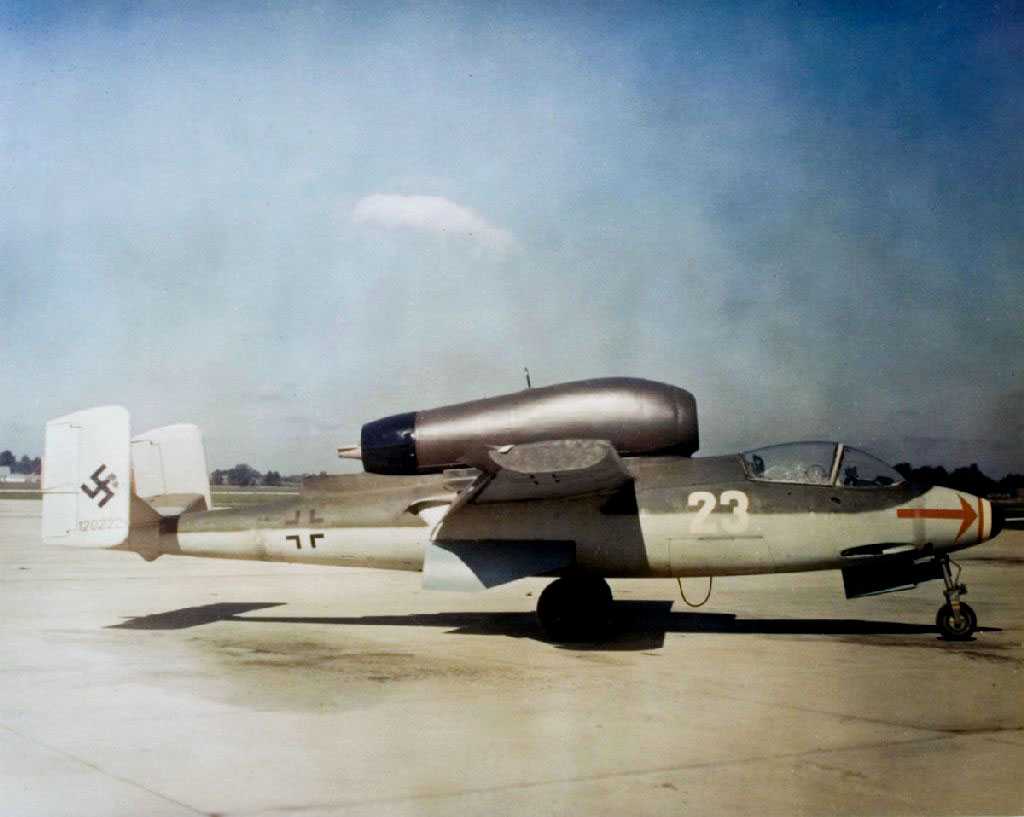
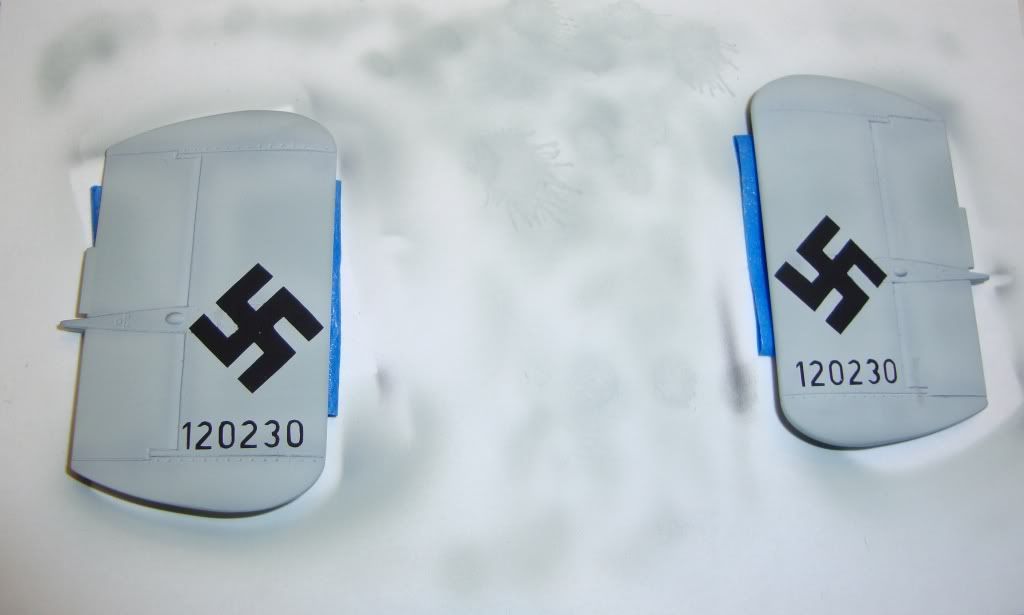
I remember when you wrote to me that it is a 70+photo which I took in to consideration. The two top colors chips are Gunze and ployscale . I was thinking the same the back looks lot more faded then the front . I have a close up photo of the nose cone which looks like it was 70 black green but this plane has been painted a few times and I am sure that was a recent painting maybe back in the late 40`s or 50`s. This color photo which I have posted was taken right after it arrived in to the U.S. after the war . One note the right wing has been painted over also in this photo , I know this because when the A/C was W.nr 120230 at leck field on the right wing there are 3 lines which I think are RLm 76 on the wing tips .
I did try some color chips in RLM 70 but all where way to dark even with the chip lightened .
I thought with the color chips up on the screen it would be easy to pick color s ,but it`s NOT!
 too bad there`s no way for me to go up to the A/C in Washington and get a chip off the Original Plane
  that probably would be the only way to find out the true colors.
Willi
-
WOW!!! definetely a grat proyect and a nice plane too, thanks for share you details.
Cheers.
Al
Hi Al,
Thanks for your comments .BTW welcome aboard !
Willi
-
Hi guys,
Does anyone manufacture aftermarket canopies for Revell's Ar 196A?
Thanks in advance!
Erik.
Hi Eric,
As far as I know no one has done it yet . I haven`t worked on my Ar 169 for a while , trying to get some work done on my He162 . Any way I am thinking of using my canopy to make a mold and have someone Vac. the back two pieces for me hopfully soon.
Willi
-
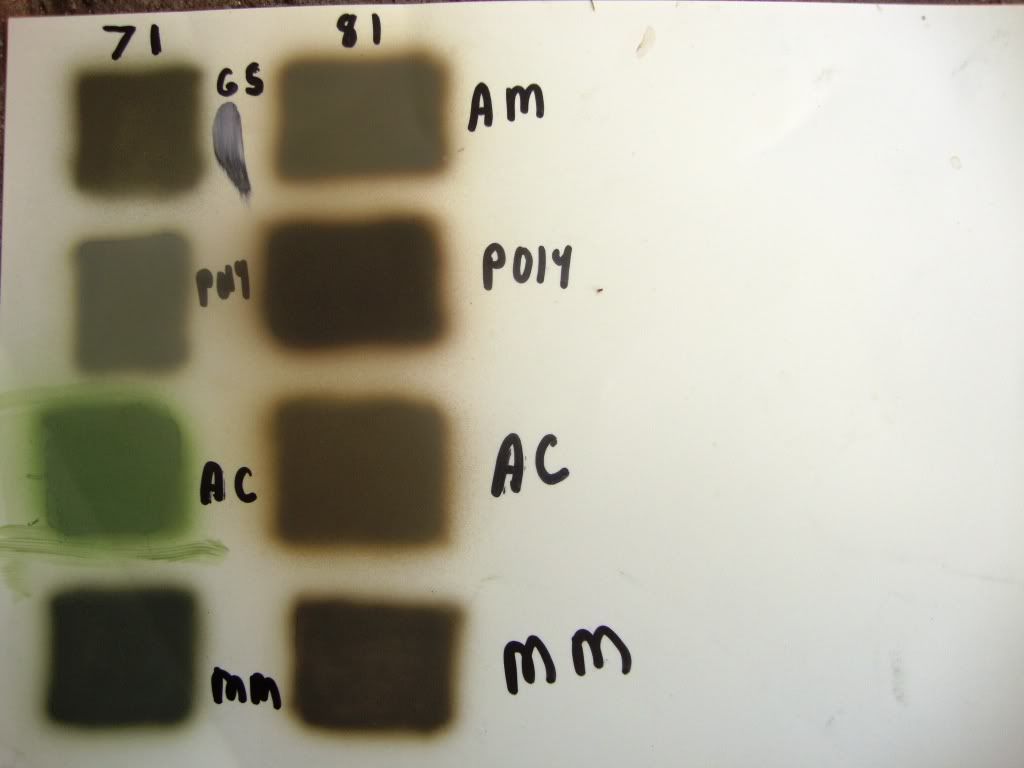
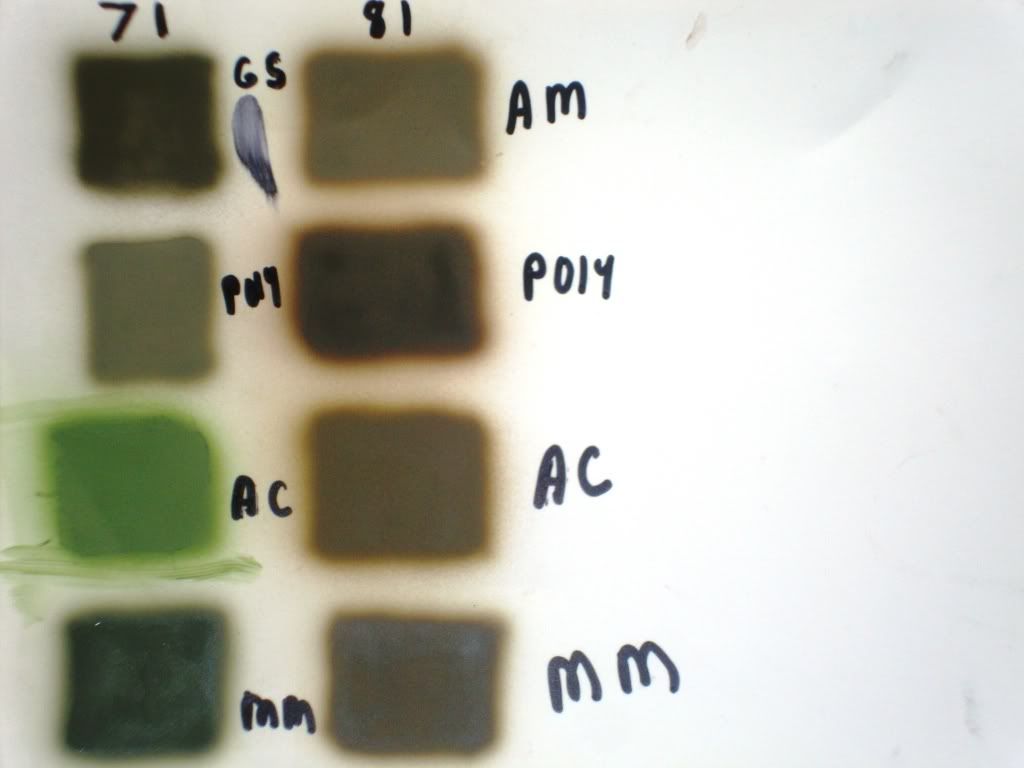
Here`s the color chips I sprayed ? Any Ideas? Top 2 left RLM71
Bottom two left RLM82
Right aide RLM81
-
Hi everyone,
Time for another update on the Spatz:
First I want to say A big thanks to Ian from Ad Astra Masks .He hit this one right . I found the masks very easy to use and looks great .
I finally started to put some color on this bird . I spent most of all Sunday spraying and masking about six times between the four colors . I think I got it close enough to the photo of White 23.The nose cone colors kept my blood pressure high!
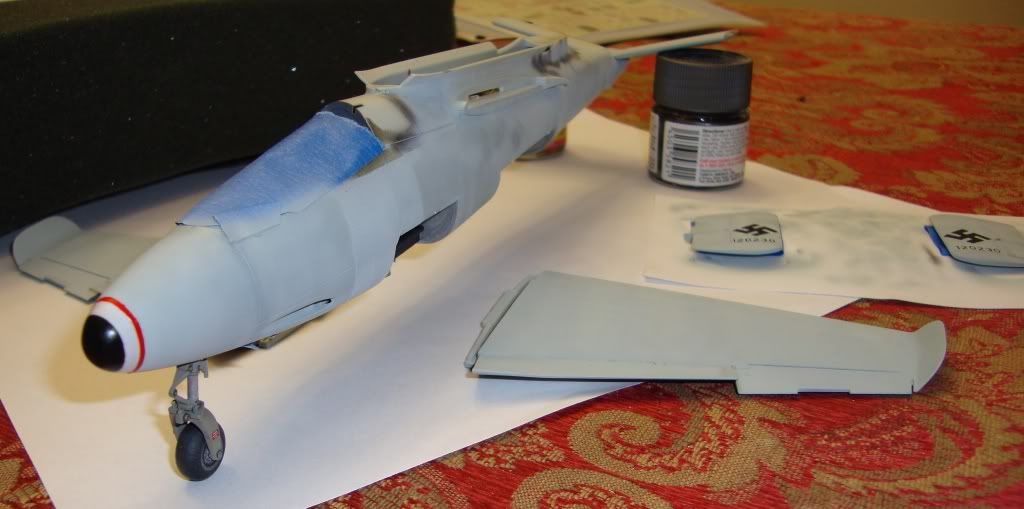
I got most of the RLM76 done with the dark staining and all .Now it is to try to figure out the top color which is the next phase before I put the red arrow on the nose cone .

Well that`s it for a while . Comments are welcome good or bad
.Willi
-
Matt
I'm on vacation in Hot and Humid South Florida but couldn't resist checking in and catching up after missing a few days. Ever update, the work just keeps getting better and better and of course, the level of detail is amazing.


Peter
Hi Peter ,
What you mean hot and humid ? It`s paradise here
. Careful you might get sand in your shoes.Willi
-
I like this project . Very cool .Be watching this one !
Willi
-
Looking good so far. Are you doing it OOB or adding some A/M ?
Willi
-
Hi matt ,
It`s looking real fine
.Well This is what I do when I need parts made from the eduard instructions  . I photo copy it then paste it to the plastic with white glue and when dry cut the parts out. I tried tracing the parts but it didnt work for me .
Willi :
-
Not sure he flew black 13 . I know his Ta152 W.Nr.150168. green 9 . with red and yellow tail band . with a hybrid green bar over tail band
-
arent you only supposed to use gloss black with a polishable alclad?
ususal stuff that isnt to be polished should have a regular undercoat yes ?
i uses an undercoat - got rid of any cracks and got a shine up that i couldnt get with a gloss finish and no filling. this is the part i thought was good
i must try Talon paint - is it only at Hawkeye hobbies?
Anywhere in the UK peeps?
Ads
Yes it is for the polished alumium finish but then I shade with different colors . that has worked for me the best way .I tried the duralumium with out the gloss black but does not look as good .
Willi
-
Excellent work and the fit and finish is right on.
Peter
Thanks Peter ,
Next to German A/C I love doing Finish A/C I`m waiting to see if Revell will do a Ju88A-4 in 1/32 So I can do it in a Finnish scheme .
Next one to get done is a FiatG50 bis in Finnish and Italian colors.
regards ,
Willi
Fisher F9F-5 Panther
in Works in Progress
Posted
Hi Peter ,
Looks pretty good after your repair . Cool Project ,Which A/C are you doing? Blue or gray scheme.
Willi