

IPanzer
-
Posts
25 -
Joined
-
Last visited
Content Type
Profiles
Forums
Events
Everything posted by IPanzer
-
Cockpit finished!
-
Thank you, Kev. I'm going to treat the exhausts at the final step. So it seems unfinished yet... Yeah those nets are from Eduard PE set, pretty good.
-
weathering Finally, the completed engine set
-
Exhausts, cut the "covers" (I don't know what they are used for, just see around the exhausts on real planes, could anyone tell me?) from the kit Coolant tank, which is installed on the firewall, behind the engine firewall and the engine supports are completely scratchbuilt Painted with khaki green Allison V-1710F engine, just assembled and painted the base color add some details for engine rear part
-
Hi all, I started this object last month. This is my first time building P-40 and it's a 1/32 big one. I decided to bring some features to this nice but plain Hasegawa kit, so I use Eduard's big set for P-40E, and then the engine is from Trumpeter's 1/32 P-38L, which use the similar Allison V-1710L engine as P-40Es do. I just finished the engine detail. Some progress here. Cut the engine cowl of the original kit cut the intake of radiators Inlet, fill the gap
-
Hi Ads, I'm sorry there is no photo of my doing the aerial works so I can just explain it in words... I first fix the lower end of the perpendicular aerial to the fuselage, where you can drill a hole on the fuselage, thread the aerial into the hole, tie a brass wire for example to the lower end of the aerial, so that the perpendicular aerial can be tense. Next fix the horizontal aerial in the end on cockpit side, hang the perpendicular aerial on the horizontal one, tense both aerials and form a ideal angle. Find the point where the horizontal aerial should fix on the fin, loose the perpendicular one, then fix the horizontal aerial on the fin. Wait until glue is dry. Then tense the perpendicular aerial again, you can find the effect you want. Keep tensing, glue the two aerials together and wait... It may take a long time, depends on the time your glue dry. Then cut the spare part of the aerials. Done. Hope it helpful! Leonard
-
Hi Ads, The aerial is made of 0.1mm fishing line, then painted with black.. Leonard
-
Thank you, Kev. Yeah, I used the rubber tyres in the kit, i found they're just nice though a little hard to simulate weight effect... I just sand the seams just as the way treating plastic kits. It's easy.. But rubber tyres are not good for painting, so i just put some MIG pigments.. Leonard
-
Hi Dejan, I use Tamiya enamel paint silver and brush with extreme thin tip to do the chipping. Hope it is helpful. Leonard
-
-
continue
-
finished last year
-
Thank you guys! Hope you enjoy it. Hello ron, Those intaking pipes are made of no brass tube but brass bar, so it wouldn't collapse when you bend it. But it is really much tougher to bend a brass bar than a tube. Konrad.
-
Thank you, Kev What you mean placards are the decals I get from an old 1/48 dragon's FW 190G-3 of mine. I think it is suitable for the nameplates on the engine. Thanks, Allok. Yeah, I'm gonna have the both side cowls opened, to show the engine in a real way.
-
Then painting... After washing and dry brushing, the final effect Hope you enjoy! To be continued. Konrad
-
Push rods The air intaking pipes Some details I added This part is hollowed out I added the fuel pipes, and I used a fire extinguisher from a 1/35 tiger to make the oil filter
-
Hi all, I started building this hasegawa FW 190A-6 "Checker Nose" in august. I decided to build my first 1/32 FW 190 with the engine detail being shown, so I think this would be a very tough work and will last for about 3 to 4 mouths. I bought hasegawa's old tool 1/32 FW 190 (ST6) just for the entire BMW801 engine detail. There are a lot of mistakes on the old tool 190 but better than nothing. I reconstracted it and I think it is much better now. Here are some photos of progress. This is the original engine kits I cut the "push rod" Some details I added The original crank box of new tool (left) and old tool (right) I cut off the old tool magneto and put the new tool magneto on the old crank box The bolts on the crank box The ignition circle
-
Hi all, I'd like to build a 1/32 P-47 Thunderbolt. There are two choices, kit from Hasegawa or Trumpeter. I'm loving Trupeter's interior details, and its rivets are to my personal taste. But I've no idea about the construction. Which one is easier to assemble? Thanks for your help! Konrad
-
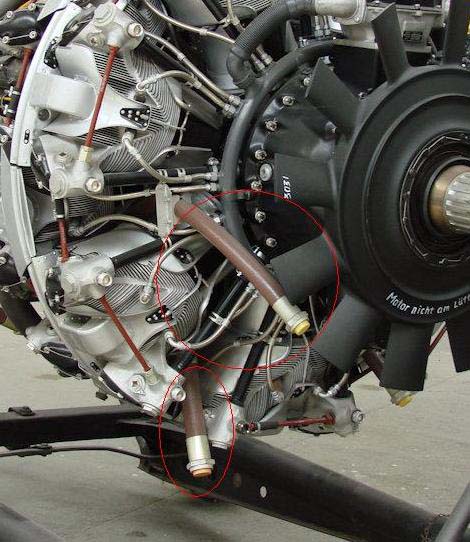
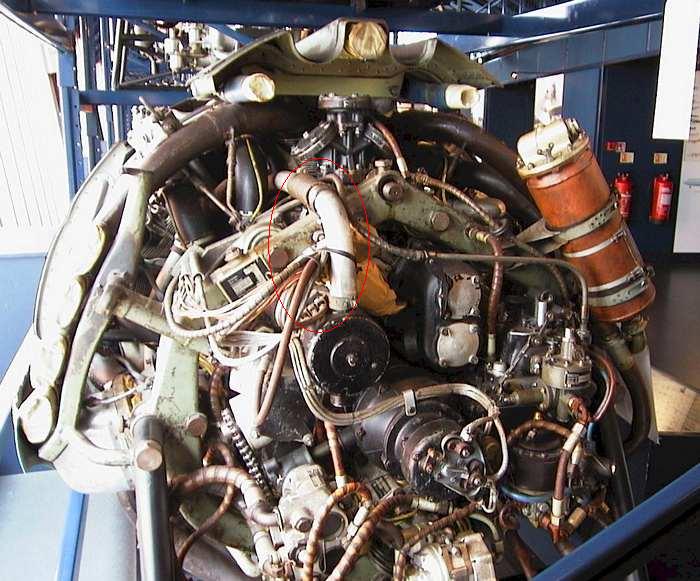
This photo is pretty nice. Thank you, johan! Yeah, that is very kind of you. Would you send them to my email? konradjiang@gmail.com Thank you for your help, Nick! Thank you for your reply, Radu and Steve So the two brown pipes link the oil cooler in the cowl ring to the oil filter, right? The handbook shows the fuel system very clear. Thank you very much, Steve! Konrad.
-
Another pic, Thank you for your help! Konrad
-
Hi all, I'm working on the engine from the old tool hasegawa FW190A. I've already added ignition wires, push rods, pipes for air intaking, and fuel pipes on the cylinders. But the kit has a lot of mistakes on the behind part of the engine, where the supercharger and electric motor are placed.Where the fuel pipes come out from the behind side of the engine? where the pipe on the oil filter leads to? What are these pipes using for in the pics below?
-
Thank you, James H. Wonderful pics! They are very nice and helpful to me. Konrad.
-
Thank you all, friends! I have just bought a old-tool hasegawa kit, which has the engine detail. It's old and not as much detailed as resin set but is enough for me. Konrad.
-
Thank you, Kev I'm pleased to make your acquaintance.
-
Hello, I'm building Hasegawa's 1/32 FW190A-6 "checker nose", and I decided to show engine details and gun bay for this plane but the engine given by the kits is too simple and has just half side. I found resin gun bay for FW190 in Aires, but there is no resin detail sets for 1/32 BMW801 engine. Or is there any resin set for 1/32 BMW801 engine? Thank you for your help! Konrad.
