Cicciuzzo Posted December 9, 2020 Share Posted December 9, 2020 (edited) Good morning. I am a new member of this community. My name is Francesco (Cicciuzzo for friends ) and I write from Italy (Siracusa - Sicily) and I am a jet enthusiast. I want to start with my wip from the 1/32 tamiya F-4J kit. You already know the box with its strengths and weaknesses. I will try to do a good job but in the meantime I present to you the subject I would like to create and the work done so far. Let's start from the subject I would like to represent: These are the accessories. You see that the resin air intakes are missing because I'm going to modify those of the kit as I saw another model maker do: The first intervention concerns the modification of the air intakes (I used a method made by a web modeler): 1st step Semiconductors glued and grouted 2nd step In the second modification, the intent is to glue the first part of the duct to the internal air intake. First I "recorded" the right joints from the outside and then a small cast of cyanoacrylate to attach the first two pieces 3rd step After gluing the first part of the duct to the air intake, now you have to cut the other upper part of the duct which is all one piece with the fuselage and glue it perfectly inside the air intake. Cutting the upper part of the duct Overall view of the three pieces 4th step Upper part of the duct glued inside the air intake 5th step Plasticard and putty for the entire internal part of the air intake Completed. In your opinion, I have saved 40 euros to buy the resin vents? final effect this picture shows what the vents are like without modification Well young people, finished with the air vents, I dedicated myself to eliminating all the embossed panels present on the entire fuselage of the kit and re-engraved; i also modified the two rear grilles. I don't know in which specimen Tamiya saw them ... I then glued the vents together using cyanoacrylate glue to fill the gaps in the joints. Here are some phone photos of the glued air vents The 1/32 scale is really beautiful both for the quality of the details but also because it makes you discover details that would otherwise go unnoticed. Leafing through images after images I noticed several details regarding the vent tubes along the entire fuselage. In the J / S version (and I think also in others) there are two small exhausts on the sides of the fuselage in the rear part of the air intakes and another in the metal part of the exhaust area wikimedia.org primeportal.net I also spotted other exhausts at the bottom of the fuselage. In this step I changed the tail plans. The kit includes assembly with the fuselage closed but if you want to glue the metal part of the engine area first then you need to separate them to mount them later. Here is my little change: cut piece here I cut the edge for insertion gap filled with plasticard try inserting tailerons Well, finished the first works, now it's time for the exhaust nozzle. After viewing many pictures of the GE J79s, I used this personal method to paint the exhaust petals: first I colored in Alclad Aluminum then I added clear yellow and clear blue. I sprayed XF-1 opaque black and with a cotton swab soaked in thinner I slowly removed the black until the underlying aluminum color showed through. Here is the result and I hope you like the effect and above all I ask you if this effect is realistic for an F-4 Phantom or is it exaggerated? What do you think? well modeller, here's the job done so far. I hope it is to your liking and so are the comments and criticisms that are always well accepted. Thanks and to the next step. PS: sorry if my English is not perfect because I help myself with the translator. Edited July 19, 2021 by Cicciuzzo GMK, Landrotten Highlander, LSP_Kevin and 27 others 30 Link to comment Share on other sites More sharing options...
Cicciuzzo Posted March 5, 2021 Author Share Posted March 5, 2021 Good morning friends of LSP. I show you the images of the AIRES cockpit. Let's start with the colors: FS36231 lightened with white for the tub, instrument panels in matt black. The chairs are in matt black and olive green for the seat, the headrest and the side straps (darkened to give detachment to the green of the headrest); khaki for the backrest; gray for the parachute together with the straps. I open a small parenthesis for the chairs: several images on the net inspired me and I wanted to overdo it a little in enriching them with some details that in 32 seemed a must. I added several cables and cables laterally to the structure and to the parachute as well as side handles and leg straps but I have specified everything better in an image. Polished everything with Tamiya, whatering with oil colors and opaque with Gunze even if the side structures of the chairs I preferred in semi gloss. I hope you enjoy my job. Vintage photo Good picciotti. Any comment is always welcome GRAZIEEEE!!!! dodgem37, John1, themongoose and 31 others 33 1 Link to comment Share on other sites More sharing options...
Cicciuzzo Posted March 5, 2021 Author Share Posted March 5, 2021 (edited) guys, sorry but how do you change the title of the post? I changed the subject and I will make a F-4J "Silver Eagle" and I wanted to include it in the title. Thanks for the reply Edited March 5, 2021 by Cicciuzzo Link to comment Share on other sites More sharing options...
jgrease Posted March 5, 2021 Share Posted March 5, 2021 Really enjoying your work so far - I really like the look of your exhausts! John Cicciuzzo 1 Link to comment Share on other sites More sharing options...
Landrotten Highlander Posted March 5, 2021 Share Posted March 5, 2021 2 hours ago, Cicciuzzo said: guys, sorry but how do you change the title of the post? I changed the subject and I will make a F-4J "Silver Eagle" and I wanted to include it in the title. Thanks for the reply When you look at your original post (the first one...) you will see 3 horizontal dots on the right hand upper corner. click on that and you will see the 'Edit' option. There you can change the title whenever you want, but always from the first post (not from later posts). Hope this helps Cicciuzzo 1 Link to comment Share on other sites More sharing options...
John1 Posted March 5, 2021 Share Posted March 5, 2021 Amazing work! I really like your approach to those nozzles. Cicciuzzo 1 Link to comment Share on other sites More sharing options...
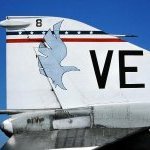
Cicciuzzo Posted March 5, 2021 Author Share Posted March 5, 2021 (edited) Thank you guys. I wanted to tell you that I have changed the subject: I will make the sample of the "Silver Eagle" using badges and numbers of the AOA decals sheet. See you at the next update The specimen is that of the photo the photo is copied from the site:http://nabe3saviation.web.fc2.com/aF42un.html and posted for visual purposes only Edited March 5, 2021 by Cicciuzzo Rockie Yarwood, John1, Talon and 6 others 9 Link to comment Share on other sites More sharing options...
jimbo59 Posted March 5, 2021 Share Posted March 5, 2021 your doing great work. I’m following this thread with great interest Cicciuzzo 1 Link to comment Share on other sites More sharing options...
crobinsonh Posted March 5, 2021 Share Posted March 5, 2021 Lovely work - really like what you are doing. Looking forward to your next update. Cicciuzzo 1 Link to comment Share on other sites More sharing options...
Mel Posted March 5, 2021 Share Posted March 5, 2021 Awesome work!! Cicciuzzo 1 Link to comment Share on other sites More sharing options...
themongoose Posted March 5, 2021 Share Posted March 5, 2021 Those seats are to die for! you seem to have a good approach to the yellow and black striping on the ejection rings over the headrest. How did you do them? Cicciuzzo 1 Link to comment Share on other sites More sharing options...
Cicciuzzo Posted March 5, 2021 Author Share Posted March 5, 2021 35 minutes ago, themongoose said: ....... How did you do them? simply cutting a thin strip of tape and wrapped it around the ejector levers. then I sprayed yellow. Thanks Landrotten Highlander and Uncarina 2 Link to comment Share on other sites More sharing options...
Cicciuzzo Posted March 5, 2021 Author Share Posted March 5, 2021 Good evening people of LSP and thank you for your compliments: I'm glad you liked the cockpit. This afternoon I dedicated myself to the QMT auxiliary air. Here is the final result. Hope you like it Alclad Aluminium thanks for your comments always welcome Greg W, F-4Phanwell, Landrotten Highlander and 8 others 11 Link to comment Share on other sites More sharing options...
Marcel111 Posted March 5, 2021 Share Posted March 5, 2021 The cockpit looks excellent! Very interesting technique on the exhausts... hard to tell from the pics if the effect is spot on or a bit too dirty looking. Cheers, Marcel Cicciuzzo and Anthony in NZ 1 1 Link to comment Share on other sites More sharing options...
Cicciuzzo Posted March 5, 2021 Author Share Posted March 5, 2021 7 minutes ago, Marcel111 said: The cockpit looks excellent! Very interesting technique on the exhausts... hard to tell from the pics if the effect is spot on or a bit too dirty looking. Cheers, Marcel I softened the effect a bit with some very diluted sprays of alclad jet exhaust. thanks to you too for your comment. Anthony in NZ 1 Link to comment Share on other sites More sharing options...
Recommended Posts
Create an account or sign in to comment
You need to be a member in order to leave a comment
Create an account
Sign up for a new account in our community. It's easy!
Register a new accountSign in
Already have an account? Sign in here.
Sign In Now