Thunderbolt Posted May 26, 2019 Share Posted May 26, 2019 (edited) Hi all, I wanted to share with you a kit I built in 2007 when I was 18 y/o. I had read the Blonde Knight of Germany a couple years before that and was inspired by Hartmann's story. I'll post this as a WIP, since I took a handful of WIP pictures at the time. The process of getting into medical school, then completing it, and now residency has kept me away from producing meaningful work in the last decade or so, but as residency reaches a more stable and predictable point, I am hoping to get back into the hobby meaningfully. I have been following fondly all of the amazing work on here over the last few years. Any and all comments and critiques are appreciated. The build: HAS Bf 109G-14 MDC Bf 109G Cockpit MDC Bf 109 G Spinner MDC Bf 109G wheels Eduard Luftwaffe PE Seatbelts EagleParts Bf109G spinner EagleParts Bf109G supercharger intake EagleParts Bf109G radiator housing Eduard Bf 109G instrument panel Eduard Bf 109G exterior Eaglecals Bf 109G decals Gunze Acrylic paint Construction began with the cockpit. IIRC, the MDC cockpit was very high quality, and was not difficult to install. Edited May 28, 2019 by thunderbolt1988 LSP_Kevin, F-4Phanwell, rafju and 1 other 4 Link to comment Share on other sites More sharing options...
Thunderbolt Posted May 26, 2019 Author Share Posted May 26, 2019 (edited) I painted the starboard sidewall based on what I thought was accurate, though I question some of my decisions now. Tamiya German gray base coat and model master enamels for colors Edited May 26, 2019 by thunderbolt1988 shadowmare, coogrfan and LSP_Kevin 3 Link to comment Share on other sites More sharing options...
Thunderbolt Posted May 26, 2019 Author Share Posted May 26, 2019 (edited) Moving on to the rest of the cockpit. The cockpit floor was impressively detailed. It is a shame that MDC does not make these cockpits anymore. The port sidewall The MDC instrument panel. The KG13 control stick. One of the best examples of this I've seen. Edited May 26, 2019 by thunderbolt1988 coogrfan, LSP_Kevin, TorbenD and 1 other 4 Link to comment Share on other sites More sharing options...
Thunderbolt Posted May 26, 2019 Author Share Posted May 26, 2019 (edited) The cockpit assembled and painted. I eventually decided not to use the MDC instrument panel, as I will show later. I thought the Eduard IP was more realistic in appearance. These were the colored PE panels where each gauge ring was etched and colored separately - the panel alone took hours to assemble. Edited May 26, 2019 by thunderbolt1988 coogrfan, LSP_Kevin, shadowmare and 3 others 6 Link to comment Share on other sites More sharing options...
Thunderbolt Posted May 26, 2019 Author Share Posted May 26, 2019 the cockpit with the instrument panels swapped. XOPCT, Dany Boy, coogrfan and 2 others 5 Link to comment Share on other sites More sharing options...
Thunderbolt Posted May 26, 2019 Author Share Posted May 26, 2019 Further cockpit details: LSP_Kevin, TorbenD, shadowmare and 3 others 6 Link to comment Share on other sites More sharing options...
Thunderbolt Posted May 26, 2019 Author Share Posted May 26, 2019 (edited) Airframe assembly: I used the MDC riveting tool using a blueprint as my reference The EagleParts radiator intake fitted. Edited May 26, 2019 by thunderbolt1988 D.B. Andrus and LSP_Kevin 2 Link to comment Share on other sites More sharing options...
Thunderbolt Posted May 26, 2019 Author Share Posted May 26, 2019 (edited) Airframe assembled. The Eagleparts supercharger intake is evident. The MDC spinner fitted temporarily. I later placed this with the Eagleparts example. Airframe canopy masked off and airframe painted alclad aluminum as a primer Edited May 26, 2019 by thunderbolt1988 Dany Boy, TorbenD, LSP_Kevin and 4 others 7 Link to comment Share on other sites More sharing options...
Thunderbolt Posted May 26, 2019 Author Share Posted May 26, 2019 Preshading. coogrfan, alain11, D.B. Andrus and 2 others 5 Link to comment Share on other sites More sharing options...
Thunderbolt Posted May 26, 2019 Author Share Posted May 26, 2019 (edited) more WIP to come! Edited May 26, 2019 by thunderbolt1988 shadowmare, Martinnfb and rafju 3 Link to comment Share on other sites More sharing options...
Thunderbolt Posted May 26, 2019 Author Share Posted May 26, 2019 Martinnfb, shadowmare, Gazzas and 4 others 7 Link to comment Share on other sites More sharing options...
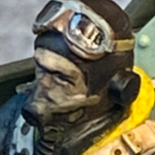
Thunderbolt Posted May 26, 2019 Author Share Posted May 26, 2019 (edited) finished: Edited May 26, 2019 by thunderbolt1988 Pfuf, dodgem37, rafju and 12 others 14 1 Link to comment Share on other sites More sharing options...
LSP_Kevin Posted May 26, 2019 Share Posted May 26, 2019 Excellent result! Kev Thunderbolt 1 Link to comment Share on other sites More sharing options...
Guest Vincent Posted May 26, 2019 Share Posted May 26, 2019 Me like a lot to see my patterns in use so beautifully ! Link to comment Share on other sites More sharing options...
Thunderbolt Posted May 27, 2019 Author Share Posted May 27, 2019 4 hours ago, Vincent/MDC said: Me like a lot to see my patterns in use so beautifully ! Yes, I thought the cockpit was lovely. Did you discontinue producing it? Link to comment Share on other sites More sharing options...
Recommended Posts
Create an account or sign in to comment
You need to be a member in order to leave a comment
Create an account
Sign up for a new account in our community. It's easy!
Register a new accountSign in
Already have an account? Sign in here.
Sign In Now