Out2gtcha Posted August 31, 2018 Share Posted August 31, 2018 Untold riches................... Imagine if you could have shown those guys a crystal ball, and what all that stuff they were chopping up and completely destroying would be worth some decades later? Link to comment Share on other sites More sharing options...
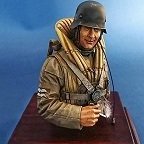
Suresh Nathan Posted September 1, 2018 Author Share Posted September 1, 2018 (edited) 7 hours ago, Out2gtcha said: Looking good! Figgies for me are one of THE most difficult things to do well; especially eyes. Its a make or break sometimes. I have my figgie god guide book (AKA Shepes HTMD book 2nd edition since I literally wore out my 1st edition) but Im still a novice at it. If I can make a suggestion...... Study your actual figure. Really study them. The eyes are often little slits in which case simply dropping in a black wash and touching up would do (like Marseilles and the driver figure here) . Then there are the others - typically high quality figures of specific characters (like Galland) whose eyes need to be painted. Those can be hit and miss. If you follow this simple rule you will need to paint eyeballs in only a third of your figures. I used to paint eyes in all my figures - looking back on them now I think I may have painted the lower eyelid as an eye in many of them. Lol. Edited September 1, 2018 by Suresh Nathan Out2gtcha 1 Link to comment Share on other sites More sharing options...
Suresh Nathan Posted September 1, 2018 Author Share Posted September 1, 2018 7 hours ago, Broadside said: What price would that scrapheap fetch today? At Kingman Depot where planes were flown to: The Wunderlich contract at Kingman was successful, and resulted in the ultimate recovery of significant resources: 46 millions pounds of aluminum 6 million pounds of aluminum from engines 5 million pounds of aluminum propellors 21 million pounds of steel 1.6 million gallons of aviation fuel 256,000 gallons of oil A total of 85 reconnaissance aircraft, 615 fighters, 54 light bombers, 266 medium bombers and 4,463 heavy bombers were disposed of at Kingman. These 5,483 aircraft scrapped by Wunderlich at Kingman generated $7.5 million in gross income. So do the math - this is only a small fraction (1/50th) of the 265000 aircraft the US (alone) produced. The rest were smelted elsewhere, used in landfills or sit in open lots. A tiny fraction were repurposed. Boggles the mind! Link to comment Share on other sites More sharing options...
Out2gtcha Posted September 1, 2018 Share Posted September 1, 2018 41 minutes ago, Suresh Nathan said: If I can make a suggestion...... Study your actual figure. Really study them. The eyes are often little slits in which case simply dropping in a black wash and touching up would do (like Marseilles and the driver figure here) . Then there are the others - typically high quality figures of specific characters (like Galland) whose eyes need to be painted. Those can be hit and miss. If you follow this simple rule you will need to paint eyeballs in only a third of your figures. I used to paint eyes in all my figures - looking back on them now I think I may have painted the lower eyelid as an eye in many of them. Lol. Yeah, Shep did a wonderful job with his "cross" technique that works very similar but putting it all into actual practice is different. I really just need practice. LSP_K2 1 Link to comment Share on other sites More sharing options...
Suresh Nathan Posted September 1, 2018 Author Share Posted September 1, 2018 37 minutes ago, Out2gtcha said: Yeah, Shep did a wonderful job with his "cross" technique that works very similar but putting it all into actual practice is different. I really just need practice. The Shep technique is absolutely the best starting point ever. And yes, I thought it was practice too. But now looking back I think the slit/eyeball rule is worth considering. He actually mentions it in his book. As a side note, I was in Shizuoka recently and saw Shep's work up close in the Tamiya factory. He absolutely used the black wash in eyeslit technique in all his 35th scale figures. If you want to add some definition to that you can sometimes scratch in a pupil and allow the wash to define the lines better. Cheap cheat! Out2gtcha 1 Link to comment Share on other sites More sharing options...
LSP_Ray Posted September 1, 2018 Share Posted September 1, 2018 Figures look great, Suresh! You are correct. Most 1/35th figures the eyes are just slits, especially if they are outdoors as most people would be squinting anyway. With 1/16th figures you have more work to do. Shep's book is a classic. It is how I learned to paint my first figures. My biggest problem is I just don't do enough of them to develop a reliable technique. Suresh Nathan 1 Link to comment Share on other sites More sharing options...
Suresh Nathan Posted September 10, 2018 Author Share Posted September 10, 2018 (edited) Did some detailing on the engine and radio compartment. Hosiery, cables and wires. Should be able to start painting! Edited September 10, 2018 by Suresh Nathan LSP_K2, LSP_Kevin and Out2gtcha 3 Link to comment Share on other sites More sharing options...
Suresh Nathan Posted September 11, 2018 Author Share Posted September 11, 2018 Quick update: Was laying in the colours on the Big Jumo and it's quite impressive. This version of the Jumo is from Jerry Rutman and make a RR Merlin look like a lawnmower engine! Out2gtcha, LSP_Kevin and scvrobeson 3 Link to comment Share on other sites More sharing options...
Suresh Nathan Posted September 13, 2018 Author Share Posted September 13, 2018 (edited) Been busy with the assembly. At this point I'm pretty glad that I went with the wreck idea...... In many ways it is a wreck. Don't get me wrong I like giving life to these old kits but as it is nothing fits on the base model. With the upgrade parts, the problem is compounded. Nothing lines up. Like I said, I'm glad this is a wreck...... The Dora has flush rivets on the top and pan heads below. So in some sense the Revell rivets were helpful as they were sanded down. Put together, everything is generally OK but it wouldn't pass muster as a standalone. The wheel wells had to be modified by opening up the inner wells to expose the engine and general detailing. Trying to combine the Rutman and Verlinden sets was harder than expected. Verlinden provided the wrong dials and I used the kit decals. The Verlinden hood wouldn't fit the Rutman bulkhead and it had to be split. Sigh..... Yeah..... Edited September 19, 2018 by Suresh Nathan LSP_Kevin, AlexM and Out2gtcha 3 Link to comment Share on other sites More sharing options...
Shawn M Posted September 13, 2018 Share Posted September 13, 2018 at least the 1:1 had the revi off set, so no harm no foul! Suresh Nathan and LSP_K2 2 Link to comment Share on other sites More sharing options...
Out2gtcha Posted September 13, 2018 Share Posted September 13, 2018 Wow, excellent! Suresh Nathan 1 Link to comment Share on other sites More sharing options...
Suresh Nathan Posted September 16, 2018 Author Share Posted September 16, 2018 (edited) Did some work in the wing gun bay and wheel wells. All scratchbuilt. Edited September 17, 2018 by Suresh Nathan Out2gtcha and LSP_Kevin 2 Link to comment Share on other sites More sharing options...
Suresh Nathan Posted September 19, 2018 Author Share Posted September 19, 2018 (edited) The port wing will sustain some serious crumpling at the end of this. I built a new section out of brass and aluminium foil. It's not perfect but it's going to be crushed anyway. Edited September 19, 2018 by Suresh Nathan Link to comment Share on other sites More sharing options...
Suresh Nathan Posted September 19, 2018 Author Share Posted September 19, 2018 (edited) Papagei Staffel!!! Fairly complex paint scheme but very satisfying. Edited September 19, 2018 by Suresh Nathan MikeMaben, scvrobeson, Out2gtcha and 1 other 4 Link to comment Share on other sites More sharing options...
Out2gtcha Posted September 20, 2018 Share Posted September 20, 2018 Wow! Great paint work Suresh Nathan 1 Link to comment Share on other sites More sharing options...
Recommended Posts
Create an account or sign in to comment
You need to be a member in order to leave a comment
Create an account
Sign up for a new account in our community. It's easy!
Register a new accountSign in
Already have an account? Sign in here.
Sign In Now