Thunderbolt Posted February 7, 2012 Author Share Posted February 7, 2012 (edited) @ daywalker: My pleasure, and thanks for your nice comment! @ Krow: Thank you for offering your decal sheet! I'll take it if you want to sell it to me or just send it to me. Send me a PM! Here's some extra progress: did some sanding, and the joints are starting to look better: test fitting the gun cover with the rest of the engine. looks like a shim forward will be needed. I decided to use some 0.9 mm wire. Test fitting revealed this as the perfect solution. General repeairs and body work: broken mast: incorrect gun port alignment: other: Edited February 7, 2012 by thunderbolt1988 tomv87 1 Link to comment Share on other sites More sharing options...
Thunderbolt Posted February 7, 2012 Author Share Posted February 7, 2012 (edited) Gents, I thought that I might add a few thoughts to the colour discussion of this aircraft. By way of introduction, Dave Wadman and I did a detailed analysis of this aircraft (amongst others) for our first Experten Decals book (1993). This was based on a number of available photographs from Jim Crow and Tom Hitchcock's collections, and others, and of course, our knowledge of Luftwaffe camouflage and markings at the time. Since then, we have learned more about the subject and we shared our knowledge with fellow researchers Larger, Deboeck, and Poruba for their JaPo series. With respect to "Blue 12", Werknummer 500570, of 8./II./JG 6 there are numerous photos of this aircraft, and most importantly, one in colour ( a Kodachrome slide from which I received a copy from the original). These 500000-series aircraft appear in a number of "hodgepodge" camouflage schemes, likely reflecting their manufacturing process of assembling various components built by widely dispersed subcontractors. The aircraft generally follows the Braunviolett 81 / Hellgrün 82 scheme. On the fuselage, following a coat of green-blue (grünblau) shade of RLM 76 on the sides, Braunviolett 81 was along the fuselage spine up to and including the gun cowling cover. This was followed by Hellgrün 82 over-sprayed on the gun cowling on top of the 81, and forward of the rear fuselage insert up to the canopy. RLM 82 was applied to the spine over the RLM 81 from the base of the fine forward to the jacking point. The Jumo engine "power-egg" was delivered as a complete component to the final assembly facility that completed this aircraft. It was most likely given a single coat of RLM 76. When attached to the aircraft, it too was given a coat of RLM 81 on its uppersurface, followed by a second coat of RLM 82, which appears darker given the darker underlying colour. In addition, a new photo of the port side of the cowling shows that the making "(E3)" is incorrect and is actually (and more appropriately) "(213)". Our original interpretation was that Blue 12's upperwing colours were Grauviolett 75 and one of the primer grey colours, or Hellgrau 77. Re-interpretation of extant and new photos of Blue 12 and other aircraft permit a re-assessment. This is particularly based on photos of an Fw 190 D-9, White 16, WNr.500636 of 1./JG 6, that clearly reveals its upperwing camouflage scheme as a combination of Braunviolett 81 and the fuselage side and undersurface colour: the green-blue (grünblau) shade of RLM 76. Again, the best references for this are the photos of White 6. The aircraft's underside colour is a combination of RLM on the forward half, and the remainer left in natural metal. The control surfaces were completed by a subcontractor and finished in RLM 76.The fuselage underside is in natural metal only from the wheel wells back to the tail. The rudder was another subcontracted part and was painted in RLM 75 with a mottle of RLM 76 applied. The fin was another subcontracted component given an overall coat of RLM 76 upon which was applied a dense fogging of RLM 81. Hope this helps. Cheers, David Hi David, First and foremost, thank you so much for contributing to this build with your knowledge! I greatly appreciate it. Now, a few questions for you: 1. How do you know 82 was sprayed over 81 on the nose? What rules out the idea that the entire engine was replaced and the new cowlings were 82? 2. May I see the photo showing the 213? Until I see it, I would argue based on the photo below that the marking is actually a stencil specifying coolant volumes. The photo is from the second JaPo book. Restudying the pictures of the port side, I am near convinced this is what was painted rather than the number of the engine or some arbitrary 'E9.' 3. JaPo suggests RLM 76 sprayed over 81 as the uppersurface color. What are your reasons for omitting 76 as a possible uppersurface color in place of "84?" 4. RLM 75 was discontinued right around the time Doras entered production. What are your reasons for suggesting 75 was used? I ask because I myself think I see RLM 75 at the base of the fin in the most popular color photograph. I disagree with JaPo that the color there is 76. Thanks, Christian Edited February 7, 2012 by thunderbolt1988 Link to comment Share on other sites More sharing options...
Thunderbolt Posted February 7, 2012 Author Share Posted February 7, 2012 Also guys, I am in desperate need of the kit tailplanes/elevators. I lost mine two years ago probably. I realized the tailplanes I have are inaccurate and I'd like to to revert to the ones provided in the kit. Also, the smooth tires if anyone has a set from their kit. My references show the tires on 500570 were smooth, not radial tread. I will trade you my true details wheels if you'd like! In asking for these items, I am assuming that you have already built a 1/32 Fw 190A/D with resin replacements for either the wheels or the tailplanes, or both. I wouldn't ask you to send me parts you would normally use. Just spares, or parts you plan to replace with AM. Thanks! Link to comment Share on other sites More sharing options...
David E Brown Posted February 8, 2012 Share Posted February 8, 2012 Hi Christian, Regarding your questions: 1. How do you know 82 was sprayed over 81 on the nose? What rules out the idea that the entire engine was replaced and the new cowlings were 82? If you study photographs of Doras from the 5005xx-5006xx series, you will notice one of the diagnostic features is the position and style of the upper surface demarcation line on the fuselage. This is a slightly wavy boundary that sweeps up and over the fuselage balkenkreuz and continues uninterrupted on the engine cowling. On the Kodachrome slide, the application of RLM 82 over the RLM 81 is clearly seen, and creates the impression of a narrow wavy line of 81 separating the 82 from the fuselage RLM 76 (grünblau variety) This causes the 82 to appear darker, but its higher chroma confirms that it is indeed Hellgrün. I have sent you a PM with a colour image of a Dora D-13 'power-egg' that reveals that it was finished in overall 76 and later given a mottle of 81. 2. May I see the photo showing the 213? Until I see it, I would argue based on the photo below that the marking is actually a stencil specifying coolant volumes. The photo is from the second JaPo book. Restudying the pictures of the port side, I am near convinced this is what was painted rather than the number of the engine or some arbitrary 'E9.' I have sent you a copy of the image in question. Not the best to be sure, though it was all I received from the JaPo authors some time ago. It does not show any detailed script as per your example and I believe that image shows a 213. A better quality print is required and I shall endeavour to obtain one. 3. JaPo suggests RLM 76 sprayed over 81 as the uppersurface color. What are your reasons for omitting 76 as a possible uppersurface color in place of "84?" I agree that the lighter colour was sprayed on top of the darker colour as shown in the photo on page 274 (from my personal collection). I will concede that it could easily be standard RLM 76. Regardless of the colour, it does appear darker that the 76 or variety thereof sprayed on the fuselage side. This overspraying of a lighter colour over a darker one makes sense. Most of the large components were subcontracted to facilities in dispersed locations, and assembled at specific sites. As such, they needed to be transported by truck, rail or barge, and given the increasing Allied air dominance over Germany needed to be finished in a dark colour for camouflage purposes. Once received and assembled, then the lighter contrasting colour(s) could be applied as we see in the example of White 16. 4. RLM 75 was discontinued right around the time Doras entered production. What are your reasons for suggesting 75 was used? I ask because I myself think I see RLM 75 at the base of the fin in the most popular color photograph. I disagree with JaPo that the color there is 76. I believe you are confusing RLM 75 Grauviolett / Mittelgrau with RLM 74 Dunkelgrau (grünlich), which Sammelmitteilung Nr.2 of 15 August 1944 decreed that: "As a result of the new revision, the following colours will not be used in the future: 65, 70, 71 and 74. Colour 70 however, is still prescribed for (metal) propellers." RLM 75 could and was still used was an uppersurface colour right to the end of the war and was observed on many Bf 109s and Fw 190s in combination with other contrasting colours such as 76 and 77 (lighter), and 83 and 81 (darker). For Doras in the middle of the 500xxx series, there are but a few good images of the wing uppersurfaces. What is visible are wings with a two-tone pattern of a medium and very light shade. The example of "Weiss 16" WNr.500636 of 1./JG 6 is a good example. Images of it appear on pages 274-275 of the JaPo book (Volume 2). I differ with their RLM 81/76 interpretation and believe that the darker tone is lighter than the known 81 on the fuselage, and it is also darker that the 82 seen on the rear fuselage / base of the fin. Hope this clarifies things. Cheers, David Link to comment Share on other sites More sharing options...
krow113 Posted February 8, 2012 Share Posted February 8, 2012 Gents: As stated earlier the stencil is featured in the vol 2 of J Crandalls work with an actual close up artwork of it.I used the one that came with this book: It appears to be close to the contentious stencil: Although I admit I did bugger the camo line around it. Extremely interested in this thread. As far as the parts needed I have a H.G. Hase kit w/numerous amarket accy , pm if ya want it. Link to comment Share on other sites More sharing options...
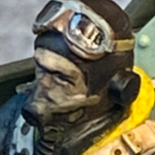
alberto49 Posted February 8, 2012 Share Posted February 8, 2012 Very nice work so far! About the soldiers, if you are still looking for them and if you don't know it yet, just have a look on this site: most of the subjects are 1:35 but there are several pilots in 1:32 scale. LINK Cheers Alberto Link to comment Share on other sites More sharing options...
Micke D Posted February 9, 2012 Share Posted February 9, 2012 2. May I see the photo showing the 213? Until I see it, I would argue based on the photo below that the marking is actually a stencil specifying coolant volumes. The photo is from the second JaPo book. Restudying the pictures of the port side, I am near convinced this is what was painted rather than the number of the engine or some arbitrary 'E9.' I have sent you a copy of the image in question. Not the best to be sure, though it was all I received from the JaPo authors some time ago. It does not show any detailed script as per your example and I believe that image shows a 213. A better quality print is required and I shall endeavour to obtain one. David why do you still believe its written 213? The scan from one of the JaPo books a few post earlier by Christian, shows the stencil with coolant instructions in exactly the same place as the "E9" or "213" on W.Nr. 500570. One can also faintly see the red text with coolant volume on some of the photos in Jerry Crandalls Dora book. I have more to say about this plane, but not the time to do it now, I'll be back! /Micke Dahlström, Sweden Link to comment Share on other sites More sharing options...
Thunderbolt Posted February 9, 2012 Author Share Posted February 9, 2012 (edited) Yeah, Im going to state it wasn't an "E9" or "213." It was the stencil I showed.If you study the pictures of 500570 carefully, you can actually SEE the two rows of red writing under the white and blue stencil. check corner photos of the second japo: pg 402 and 403. look for the rows of writing. one sits right at demarcation, the other just under it.Sorry, folks...The whole stencil debate is important because it undermines the credibility of EE. For that reason, I will most likely paint 500570 as shown in the second JaPo book, with some minor changes. Moreover, the EE version of the famous photo is simply too green. I just don't buy it. Below is a photo from David Brown which is supposedly as close as we'll come to an original. The 82 overspray is obvious here. It's also obvious in a bw picture when the plane is piled up for scrap...bottom of page 403.I'm still trying to convince myself the gear doors were 81 and not 75. The narrow part of the door looks like 81, but the wider part below looks faded and less like 81.I believe I see 75 sprinkled around the tailfin base in the most famous photograph, but 76 appears to have been patch painted near the top. Therefore, what I could be seeing at the base is an off-lit 76. The JaPo authors say in the second book that RLM 75 was discontinued. I will find the excerpt and page in a few days and post here. So I'm relectant to put any 75 on the model.The possibilities are frustrating, as some old 75 could have been laying around and saved exclusively for patch jobs despite the discontinuation. We will never really know, will we.I am committing to the 81/76 uppersurfaces, for now. 75/77 is off the table, and definitely 74/75. I may consider 81/84.Color film of the port side canopy seems to show that is was painted 83 dark green, and yet the well known color photograph shows 81 from the gc to the tail. very frustrating. I will likely argue in the end that the film is off color, as it is brightened up quite a bit. I would essentially paint it 81 from nose to tail and carefully overspray 82 on only the engine cowling as I have no real reason to beleive the gc had any 82 on it at all. 82 on only the engine cowling supports the idea that the engine was replaced.JaPo dropped the ball analyzing this photo:If we are to believe 81 was used for the gc to the tail AND on the gear doors, then why are the shades so obviously different? you can see the picture is quite light as the 82 is nearly unrecognizable as a luftwaffe color, while the 81 looks like 83. What's that patch between the colors? Is it similar to the tailplane patch? The exhaust staining barely shows in this picture. It's all very odd to me. JaPo gave this photo too quick of a pass. Edited July 12, 2013 by thunderbolt1988 Link to comment Share on other sites More sharing options...
krow113 Posted February 27, 2012 Share Posted February 27, 2012 Looking forward to the finish on this. Link to comment Share on other sites More sharing options...
Thunderbolt Posted July 12, 2013 Author Share Posted July 12, 2013 (edited) Hi everyone, It's been 17 months since my last post. Work on this project has been very sporadic as school has been taking up all of my time. I intend to finish this project for good this summer. Here's a picture with some update work. Custom masks have been applied and some painting done. Right now my focus is on painting up the engine and integrating all the wires. Lead wire is a nightmare to realistically pose! The engine is a bit of a mess right now as it took a lot of abuse being contorted into the right position. I ended up having a lot of difficulty getting it to sit level. Assembling the Aires engine parts OOB leaves the modeller with an engine pitched up appreciably. The Eagle Cowls replacement cowl was cut in half to ease the gluing/placement process. The machine gun hood really had to be wrestled into place. The central engine cowl has been glued to the other engine panels as well as the EP cowling, which has the High-Grade Fw 190D-9 cowl flaps installed around. Each cowl flap was mounted separately with a push-rod behind it. Should look nice when the model is finished. My photography is sub-par but I lack the equipment to do it properly. Edited July 12, 2013 by thunderbolt1988 tomv87 1 Link to comment Share on other sites More sharing options...
Sparzanza Posted July 12, 2013 Share Posted July 12, 2013 What a sexy looking FW! I'll definitely keep an eye on you finishing this bird. Link to comment Share on other sites More sharing options...
theseeker Posted July 12, 2013 Share Posted July 12, 2013 Very nice FW! Link to comment Share on other sites More sharing options...
LSP_Kevin Posted July 12, 2013 Share Posted July 12, 2013 Wow, great update! Glad to see you back at this one. Kev Link to comment Share on other sites More sharing options...
Juggernut Posted July 13, 2013 Share Posted July 13, 2013 Here's blue 12 I did many, many years ago using information from EagleCals, the Experten website and my own interpretation of the uppersurface colors of the wings and tailplanes determined from a color photo in the Fw190D monograph by Monogram Publications (if memory serves). I surmised that the light color on the uppersurfaces of the wings was RLM 76 as it looks too blue in the photograph to have been RLM 77 (at least in my opinion). Good luck with your build, it's looking super in spite of the time its taken to get it to where it is. Just keep plugging...it'll get done. Link to comment Share on other sites More sharing options...
D.B. Andrus Posted July 13, 2013 Share Posted July 13, 2013 Link to comment Share on other sites More sharing options...
Recommended Posts
Create an account or sign in to comment
You need to be a member in order to leave a comment
Create an account
Sign up for a new account in our community. It's easy!
Register a new accountSign in
Already have an account? Sign in here.
Sign In Now