Anders_Isaksson Posted December 14, 2011 Share Posted December 14, 2011 (edited) Hello all, While I have been an LSP member for some years I have not yet gotten around to posting any WIP, but here goes. It has been slow work on this one but the cockpit was finally completed last summer. The kit cockpit was enhanced with the relevant resin bits from BarracudaCast, excellent stuff indeed! http://forum.largescaleplanes.com/public/style_emoticons/#EMO_DIR#/smile.gif Hope to resume work on the main fuselage soon... Edited June 7, 2014 by Anders_Isaksson Link to comment Share on other sites More sharing options...
LSP_Kevin Posted December 14, 2011 Share Posted December 14, 2011 Lovely work Anders! If the rest of your build is up to this standard, it will be well-worth following! Kev Link to comment Share on other sites More sharing options...
Anders_Isaksson Posted December 14, 2011 Author Share Posted December 14, 2011 Thanks, Kevin! Not sure why this build came to a halt but I hope to pick it up again soon. Link to comment Share on other sites More sharing options...
Guest Posted December 14, 2011 Share Posted December 14, 2011 Very nice, so far. Don't stop now. Need to see more !.....Harv Link to comment Share on other sites More sharing options...
Wolf Buddee Posted December 14, 2011 Share Posted December 14, 2011 Oh c'mon Anders, this is no time to stop now. I've found that time at the bench has been hard to come by myself but we need to push on my friend. I'm hoping that I'll be able to get some building done myself today as there's a bunch of stuff I need to scratch-build on the engine of my Mk IX. I was actually hoping to get it finished before year's end but I'm beginning to think that it simply won't happen. Keep at it though and I look forward to seeing some more WIP posts from you. Cheers, Wolf Link to comment Share on other sites More sharing options...
Guest Posted December 15, 2011 Share Posted December 15, 2011 Nice ! Looks the part....Harv Link to comment Share on other sites More sharing options...
Loic Posted December 15, 2011 Share Posted December 15, 2011 looking good! Link to comment Share on other sites More sharing options...
BloorwestSiR Posted December 15, 2011 Share Posted December 15, 2011 Looks great so far. Also, if you are interested, Ad Astra has made a set of masks for the GreyNurse markings. I have a set on order from Ian there. They'd re not on his website but drop him an email and he can send you the details. Carl Link to comment Share on other sites More sharing options...
Derek B Posted December 15, 2011 Share Posted December 15, 2011 Hello Anders, Slow is best...The quality of your work is outstanding - I love the way you have painted and weathered your cockpit - very subtle (I wish that I could paint like that!). Derek Link to comment Share on other sites More sharing options...
Anders_Isaksson Posted December 21, 2011 Author Share Posted December 21, 2011 Harv, Wolf, Maru, Loic, Carl and Derek: Many thanks for your encouraging replies and apologies for my belated response. (Seems like the automatic email notification is not working for my topic.) Not much to show for progress, but at least a little step forward has been taken. A pair of fuel tank vents need to be added, me thinks. Looks great so far. Also, if you are interested, Ad Astra has made a set of masks for the GreyNurse markings. I have a set on order from Ian there. They'd re not on his website but drop him an email and he can send you the details. Carl Many thanks for the tip, Carl! I will investigate this ASAP. Link to comment Share on other sites More sharing options...
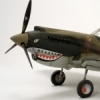
Anders_Isaksson Posted May 12, 2014 Author Share Posted May 12, 2014 (edited) ... Not sure why this build came to a halt but I hope to pick it up again soon. Ok... soon is about now, right? Finally got this one back on the bench. With the fuselage closed up I turned to the engine. This was sort of a speed build where I didn't spend an extra second on cleanup, so not much to see here. Too bad about Tamiya's excellent engineering and detail here but not much to do as I plan to have all panels in place in order to show off the sharkmouth. Still, I figured most of the engine had to be included in the build to act as a point of reference for the exhaust stubs framework for the panels. Thinking about wether to use a set of QB exhaust stubs or go with detailed and thinned out kit parts (as per Mr Buddee's impressive build). Decisions, decisions... The styrene parts can of course be glued the usual way with plenty of time to get everything aligned, while the resin stubs probably will require messing about with slow drying epoxi to enable time for alignment - not an attractive proposition. The basic airframe is taking shape, and as expected no problems have been encountered so far. Wings only dry-fitted here. But I am wondering about the separate parts for the MG and cannon fairings, should these be faired in so the seamlines completely disappear? My references does not really have a clear pic of the wing leading edge so I am a bit in the dark here. The MG fairing has not been glued just yet, that is why it looks to be a bit off in the pic above. Edited May 12, 2014 by Anders_Isaksson Link to comment Share on other sites More sharing options...
tbell Posted May 13, 2014 Share Posted May 13, 2014 But I am wondering about the separate parts for the MG and cannon fairings, should these be faired in so the seamlines completely disappear? My references does not really have a clear pic of the wing leading edge so I am a bit in the dark here. The MG fairing has not been glued just yet, that is why it looks to be a bit off in the pic above. Looking good, Anders. To answer your question, yes the MG and cannon fairings should be blended in with the wing. All to often I've seen otherwise excellent Tamiya Spitfires that have this seam showing. The good news is that the rivets on the leading edge of the wing back to the spar (i.e. the panel line in line with the forward edges of the ammo covers) were filled and sanded smooth. You will not have to restore any rivet detail lost by filling the gun insert seams, but rather you can fill in the rivets forward of the spar. Cheers, Tony Link to comment Share on other sites More sharing options...
Kagemusha Posted May 13, 2014 Share Posted May 13, 2014 Nice to see you back on this, love the Spitfire, could you have the gun fairings on the wrong wings? Link to comment Share on other sites More sharing options...
Anders_Isaksson Posted May 14, 2014 Author Share Posted May 14, 2014 Thanks and great input! I will fill and sand those seam lines asap and crack on with construction. Also, I remember now about part of the wing surfaces on real thing being filled and sanded smooth, I will perhaps sand down these areas to reduce the rivet pattern somewhat, but I don't think I am prepared to completely eliminate the rivets. Nice to see you back on this, love the Spitfire, could you have the gun fairings on the wrong wings? I did a quick double-check and the pieces are in their correct slots, but from reading other WIPs it seems many have more or less problems with how they fit. Good to know I am not alone here! Link to comment Share on other sites More sharing options...
Anders_Isaksson Posted May 29, 2014 Author Share Posted May 29, 2014 Wow, things sure move fast on this forum as I noticed my WIP had slipped way back. Anyway, gun ports were filled and sanded... ...but couldn't stop thinking about those rivets on the forward wing sections, so then I decided to mask off the area... ...and apply a good coat of primer. I went with Vallejo as I think it is a tad thicker than my favourite Tamiya primer. As soon as the paint has cured the plan is to sand down the primer until it only remains in the rivets, hopefully making them almost disappear. Let's see how that works... Link to comment Share on other sites More sharing options...
Recommended Posts
Create an account or sign in to comment
You need to be a member in order to leave a comment
Create an account
Sign up for a new account in our community. It's easy!
Register a new accountSign in
Already have an account? Sign in here.
Sign In Now