Search the Community
Showing results for tags 'Dragon 1/32'.
-
With my F6F5-N build on hold, I'm starting on the next one, which is the Dragon Bf110C-7 backdated to a C-3 variant, flown as a night fighter by the Italians. I can only guess that the Luftwaffe wouldn't have given them new machines.... My main source of reference is the fantastic book about the Bf110 by John Vasco and Fernando Estanislau. If you're building the 110 C, D or E, this is a must-have. Mg17 barrels will be replaced by brass ones from Master, and the colour scheme is from a set of decals I have from Owl. I'll make my own masks though on my Silhouette, using the decals as reference. I had a choice of schemes/decals to choose from, but the oddity of the scheme won me over.... For the cockpit I have the choice of Yahu panels, Eduard Panels or the kit panels. I will most likely end up going with the kit interior....the first two, although they're OK, just don't offer that 3D look of the plastic parts. I'll put some Airscale decals and placards on it, and it should look the part. That being said, I might use the Eduard throttle quadrant box details on top of that to spice up that portion. The Dragon Bf110 kit is getting harder and harder to find, which is a real pity, as they are a real gem of a kit. I have 6 of them already, as I plan to do a night fighter version of all the main variants - C (in progress), a D (built), E, F, G2 and G4. The detail on the kits is excellent - crisp moulding, awesome texture and the plastic is lovely to work with. The instructions themselves are dodgy at the best of times, but once you've figured them out, and in most cases deviated from them, it's plain sailing! To make the most of the tooling and moulds, I think Dragon based almost everything on the D/E variant, and then tooled details that would make building the C's possible. To convert this kit to a C, all I had to do was fill the cockpit fresh air vent just aft starboard (from E variant onwards) and fill the port aerial connection point on the fuselage (only C-2 and earlier had the twin aerials) According to my reference book, the changes between a C-7 variant as in the kit and the C3/4 were miniscule. Deleting the central bomb rack basically mods the C-7 to a C-4, and then between the C2, 3 and 4 there were differences in the radios, belly radio mast and whether or not it carried improved MG-FF/M cannons. But as some frames were retrofitted with different modifications, the sources state that it is almost impossible to externally tell the difference between a C3 and C4....makes life easier for this conversion though! So I have started with assembling some of the major components - some for test fitting, some for details - like the engines - (which will be concealed beneath cowlings) to the firewalls and gear bays. That gap forward of the horizontal stabilizer is meant to be there....the angle of the stab was adjustable. Test fit only to the fuselage, that's not glued either. The kit has had its Mg17's removed, but I managed to keep all the retention clasps for the guns as per the kit - so the Master barrels are a slide-fit into the nose. So no pointy bits to break off whilst handling the model, and they can be burnished towards the end of the build and inserted into the nose cap. So that's it for now! Hope you enjoy the process with me! Iain
- 132 replies
-
- messerschmitt bf 110
- dragon 1/32
-
(and 6 more)
Tagged with:
-
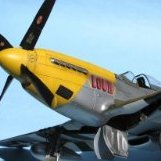
Always wondered what would have happened in the Pacific if the Mustang had shown up much earlier. What if the P-51D had been used by the American Volunteer Group and a new plane showed up in China for the group? Going to use the Dragon 1/32 kit dressed in Flying Tigers colors, Chuck Older's aircraft, and in a departure from most of my builds, will be strictly OOB. Just getting started on the cockpit detail. Ohhh so different from the Tamiya kit! The engine is the bare minimum I think is needed to get the prop and all installed since I'll keep the cowls buttoned up. Using the PE instrument panel as I just could not figure out how to use the clear plastic piece. But FIFTEEN separate decals!! Painted the bottom a variation of the British Sky Blue. On the wing top I've put down the Earth Brown, currently showing some initial weathering (maybe a hastily applied paint job before the plane was dispatched to China?) Will be VERY interesting trying to fit the P-40 sharks mouth onto the P-51 tho. Hoping to finish this up before the end of August.
- 7 replies
-
- Dragon 1/32
- P-51D
-
(and 2 more)
Tagged with:


