Search the Community
Showing results for tags 'yoxford boys'.
-
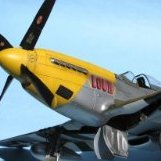
Well, since Duchess Arlene is getting close to wrapping up, time to start a new build! This time found a completely NON-NMF Mustang in one of the kit's marking options: Capt Hershel Pascoe's Desert Rat. Can't really remember if I've ever done a 'D' model that didn't have some NMF on it so this will be fun. Looking forward to working on faded finishes. Notice in BOTH of the pictures below how glossy the wing is. In both pictures you can see the reflections from the fuselage markings. Something to keep in mind for the finish... Also have collected a rather insane amount of AM of which I will use liberally on this build, and whatever is left maybe I'll use on my last Revell Mustang in the closet. I've also already liberated a few Eduard PE pieces left over from Duchess Arlene too. This will be an interesting conglomeration of bits... I think we've seen this before... Had the kit for probably 2 years? Got it for $20 in Chattanooga. I think I've tripled (at least) the cost just in AM... Picked up a lot of these bits in Telford over the years, esp the CMK and RB Productions pieces. Really wanted to give Radu's weathered floorboards and his resin bits a try... Did the typical wash and dry... Not nearly as many bits as with the Tamiya kit, as we know. Missing are the two sets of sprues for the wheels/drop tanks... The clear parts are still a problem but I'll get to that later. Here are Radu's worn Mustang Floorboard decals which I've wanted to try for a while. Prepped the floorboard with a coating of Vallejo Gloss Black Primer, the green is MRP Interior Green. Radu's decals are SHINY and very smooth. I angled the floor to catch the light to show how shiny they are. I may do a quick review on them, but definitely this is one of the times when it pays to follow directions. For a flat surface I normally would not put down Decal Solution, and Radu specifically says NOT to use a setting solution under his decals. After applying I pressed them down over the floor detail with a damp paper towel. After drying for a day I sprayed them with a clear matte: Not sure about the silver bolt heads over the black non-skid or where the surface has been worn, but after the matte spray, they look terrific. Similarly, one of my favorite things about the Revell kit is the cockpit... I took a lot of extra time with a toothpick trying to get all the gauges into their recesses on the IP. I came close! Will add some Airscale and Barracuda cockpit stencils to the IP (and the cockpit) to augment the already good details from the Revell kit. I did cut the selector switch decal into three pieces as the center 'switch' is too fat for the decal to settle down on. I SHOULD have just cut off the selector switch and used an Eduard PE piece. But this still looks pretty good. My first experience with CMK products is this resin seat. I bought both options, with and without seatbelts. For Desert Rat I opted for the seatbelts. The detail is really tremendous and extremely easy to paint. Base is Vallejo gloss white primer, then a spray of MRP Interior Green, specifically blotchy. The seat pad is Vallejo Model Air Hemp, followed with a wash of Vallejo Model Air Dark Brown, RLM61 - both brush painted. The RLM 61 was thinned 3 drops paint to 2 drops thinner. Seat belts are Model Master Acryl Tan, with seatbelt hardware brush painted using Vallejo Metal Color Dull Aluminum. After that had set, I used a damp paper towel, slightly dipped into the RLM61 to dab onto the seat for a bit of texture. Really hard to see here. Still need to add a bit more detail to the seatbelts. Its a start! Chris


