Search the Community
Showing results for tags 'trumpeter'.
-
Just finished my Trumpeter Mig-29M. This is a build prompted by Trumpeter announcing last year that it would release new tooled Mig-29 and I wanted to build this one before. It is build OOB with the addition of an Aires bangseat, Aires cans and Master static discharger. Decals are from the Begemot Mig-29 set and stencils from HAD models. This is a purely fictional scheme as the Mig-29M never wore that livery. Stencils for the weapons come from Begemot Su-27 stencils sheet. Camo is painted with Mr. Paint. Metals parts are Alclad. This is a very good fitting kit and it was a pleasure to build. If the new Mig-29 from Trumpy are just as good, this is going to be a treat. I hope you like it. Cheers, David
-
Good evenin' folks, from Middle Earth. My first thread here in over two years - it was supposed to be my Kittyhawk OV-10A, however I'm waiting on some EZ Line getting here (I'm ruthlessly copying Brian's idea on mine), and this 109 has been waiting patiently for three-and-a-half years for me to finally notice it, so this afternoon I started hacking at it: Hopefully at the end of the process it will look a little like this... hopefully !! In the meantime, I put the block together to a point where it's ready for a splash of paint and started filling/sanding the myriad of sink holes in the cowl covers. Couldn't resist taping together, just because... The moulding are superbly detailed and the rivets/panel lines very delicate indeed. Also they match exactly the drawings in the old but still good IMHO AeroDetail book from Bunrin-Do, published in the mid 1980's. Stay tuned, folks, I don't think this one will take-up too much time on the bench... or I could be completely wrong and still be working on it in eighteen months time !! AFN Ian.
-
Dear LSP community. I have been lurking around the forum here for a while. Finally I got around to photographing and sharing my first RFI post. This is the Trumpeter 1/32 Scale MiG-21UM in Czech Air Force colors. The model is pretty much out of the box. I had the Verlinden set, but its pretty useless if you ask me. The seats are undersized so I used the photo-etched parts only. The other goodies included Quickboost air scoops and pitot and AOA sensor. The rest is as in the box with the ejection seats heavily modified using all kinds of material. Not 100% accurate but a bit better than in the box version. The markings for this CzAF jet are a combination of kit decals (stencils) my own masks (national Insignia, tail art, serial number) and decals (the little guy on the front) that I had cut and printed locally. The model was "riveted" using RB Productions Rivet-R according to drawings published in the WWP and 4+ publications. Paints Used: ALCLADII, Gunze H, Vallejo, Future and I used Dark wash from Sira Hobby and my own custom mix of oil paints. A word of caution for the MiG-21 experts: I did not modify the shape inaccuracies the kit has. I know they are plentiful, but I just did not have the nerves to do the changes. It does look like a MiG-21UM to me. Yes a sinful approach, and yes I did spend quite some time working on the MiG-21 and other CzAF aircraft but this still did not convince me that the model needed to be modified, as it was a question of forever parking the project to the shelf of doom, or just soldier on and finish the kit as is the best way I can. Photos are a mix of white and black background as I was trying to see what works best, so I apologize for the non-uniformity of the images. Cheers, Jarda Hajecek
- 16 replies
-
- 17
-

-
Well, it's got 2 engines, 2 peeps, 2 tails and I've been wanting to do this for too long I know there was only one that was converted for testing and it never went any farther than that, but I've always wanted to do one up as though it was used in Desert Storm. With that in mind, I have an F-15E kit that was started and abandoned by a friend, who gifted it to me that has parts that will lend itself to this project. The original release of the Tamiya F-15E Alot of parts... Some of the aftermarket. Will also have Eduard armament set and exterior details. Would like to include the Sierra Hotel correction set, but money is a little tight right now so I'll have to stick with what I've built up in the stash for now. Mainly for the TER's GBU-12's Target for today... I know this has been done several times before (Andre Dorian did a beautiful one among others), but with limited operational use, I feel compelled to color outside of the lines a bit on this one. Not going to obsess over the details too much on this one- Just wanna have fun Thanks for looking! Kai
-
Following on from Uilleans excellent thread , and having seen a few other impressive builds online, I thought I would splash out and have a go at the "Wobblin Goblin" myself. Back in 1990 I remember watching the F-117 and the strike damage being broadcast on TV to the world, during the first Gulf War. The aircraft is a source of fascination for me considering getting the unusual shape to fly as well as the technology to make it stealthy and virtually invisible to enemy radar defences. So time to gather some references and decide on what after-market items to add to the kit. http://lh4.googleusercontent.com/-gTvCde6KOFo/UzMTz-4Z8SI/AAAAAAAASsc/CYc-0Pk2yWI/s1024-no/IMAGE_668.jpg The Squadron/Signal Walk Around Number 26 is very good, and probably the best reference for the modeller that I have seen. The Pilot's Flight Operations Instructions are less useful but of interest to anyone interested in the checklists and general operation of the aircraft. There are no photos in this volume and only a few line drawings of the cockpit and a few scrap drawings of wheel bay equipment. Half of the manual consists of performance graphs. Additionally I purchased the excellent Eduard Brassin Resin wheels set, with accurate tyre treads and wheel spokes for later production aircraft. I also purchased the Eduard, Weapons bay detailing set, the Cockpit interior and exterior detailing set for the various mesh grilles that cover the various exhaust ports on the fuselage. I don't intend to reiterate anything that Uillean has already said on his build, but will post some progress shots, and try to mention any traps or pitfalls with the build as I go along.
-
Hello, everyone. I just finished this one today, after exactly one month of working on it, pretty much all day, every day. I'm not usually one to get the newest kit the second it hits store shelves and, even if I do, it will normally sit for quite some time before I get around to building it. For some reason, however, I had to get this kit and buid it, as soon as it came out. I'm not a Stuka fanatic or expert, by any stretch, but there's something about the early A model Stuka (often referred to as "Anton") that appeals to me. Anyway, I started this kit with the intention of just doing an out-of-the-box "quick build". However, I started to see a few areas in the kit that I thought I could improve upon and things kind of snowballed from there. I have to thank all of the guys who followed along with the WIP thread, (found here: http://forum.largescaleplanes.com/index.php?showtopic=53021), as many of them helped me along with photos, additional information and, especially motivation and inspiration. I want to give a special thank you to Alain, for pushing me to put more detail into the cockpit, as well as for the idea behind the first aid compartment and it's panel (which turned out great!). The kit's pit is not too shabby, but adding even more scratch detail to it and posing the canopy open to show it off was a great decision and I'm glad I followed Alain's advice and finally "saw the light" of his vision. The list of modifications and additions is too long to get into here, but you can read all about it in the WIP thread. I did my best to explain and photograph everything as I went along. Overall, the kit isn't so bad. Some of the parts and assemblies fit as good or better than any other model I've ever built. Some areas are not as good, however. The kit has more than it's share of shape and detail issues, but I was able to at least improve the look of a lot of these things, at least to the point that it satisfies me. Other than a few flaws that I decided to live with (and a few more that popped out at me while editing the photos!), I'm very happy with the way this model turned out. It's very unique and looks great in my display case. I also learned a lot more about Stukas while building it and it also allowed me to stretch my skill set and try some new things. I hope you enjoy viewing it as much as I enjoyed building it! John First off, the only photo of the plane I wished to model (which wasn't on the decal sheet, of course!).
- 43 replies
-
- 12
-
-
Hello folks Has any one seen the Sprues or a review of the US Coast Guard HH-65C Dolphin 1/35 from Trumpeter? Looking at pick up one of these after seeing a lot of great Helicopter builds of late here. http://store.spruebrothers.com/product_p/trp05107.htm Cheers
- 18 replies
-
- 1
-
-
- US Coast Guard
- Trumpeter
- (and 1 more)
-
 Hello I have a Trumpeter Republic P-47N Thunderbolt. I need a After market Cockpit for it. What is out there for the Trumpeter kit? Thank you. Danny
 -
It's been quite some time since I've been active on LSP and busy times are no excuse of course, so my excuses for that. My posting again might drop the overal level, but I have to play my role! Tonight, however, I've managed to finish a kit: Trumpeter's F8F Bearcat. Very nice kit of a really cool looking aircraft. I added just a little detail; the open panel could use some. It truly was a joy to build and the decals are from the box. They went on like a dream, by the way. I used Tamiya and Gunze paint. The dark blue wasn't the easiest colour. It was very transparent and I had to put on about seventy four layers or so. Enough of the bla-blah; here are a few photos. This Bearcat is pretty high on its feet because of the propellor. Makes the gear a bit wobbly in the beginning, but it turns out great! First layer was chrome, followed by a spunch of maskol and the dark blue. Shading was done with tire black. A view on the other side: Little close-up of the nose and the open panel: The open panel edges are simple sprue with a plenty of holes that were punch in it. Only took me eight tests to get it exceptable. Anyway, if you have one in the stash, build it! It's fun! I hope you enjoy the result and I'll try to be back sooner (auch!) Nic
-
 What I have so far, with more on the way. AMS seat, Rhino intake (re-posted on ebay recently), Master Model pitot and the SAC landing gear. Some of my references. A couple more on the way including the Schiffer book Crusader! Also have the Ginter series in pdf. I've really been wanting to do these markings for quite awhile- seems like a good opportunity now to finally get around to it. VMF-312 was at Da Nang for about 6 weeks, from Dec '65 to Jan '66 for 718 sorties. Right now, looks like I'll be doing the wings straight, up, flaps and slats down, refueling probe out, brakes open, but everything else closed up. In typical Marine style, will hang Mk82's and Zuni's. Will follow up with open box and more pics later Kai
 -
Usually i build models so that i can sell them on built up to pay for the next one. This one is a keeper! I love it. Its Trumpeters 1/32 A-1J. It has been built straight from the box with no faffing. I seem to have gone off weathering too. Im happy with just exhaust streaks. It is what it is , a plastic model. Great build with no problems at all. Im so impressed i am just starting a Trumpeter 1/32 A-1H , which again will be straight from the box but with gun bays open , engine shutters closed but cowling open and wings folded. I havent put the seat in this one yet , i will leave that for another day. I was too lazy to mask the camo so i just airbrushed it freehand.
-
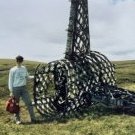
I'll be joining in with a quick project (taking a break from the A-10B) with a North Korean Air Force Yak-18. Some quick history: The USSR supplied North Korea with about 12 Yak-18 aircraft. Inspired by the Russian Black Witches, the NKAF modified their PO-2's and Yak-18's for light bombing. Three of the Yak-18's were shot down during the Korean conflict, all between June 30 and July 20, 1953 and all by Lt. Guy Bordelon. Curiously, there is no mention of these kills in any of the aerial victory lists that I have come across. In this picture, the bomb racks are barely visible. Night-time nuisance raids were stepped up during the last six months of the war, when the front lines has stabilized. On the night of June 16, 1953, approximately 15 PO-2's and Yak-18's bombed Inchon, hitting the fuel dump and igniting a massive fire that ultimately destroyed 5.5 million gallons of fuel In June 1955 (some sources cite late 1954), a Yak-18 bearing construction number 59 and which took part in the Inchon raid, was flown by two defecting North Korean pilots to South Korea. This aircraft was given tail code 47-7715, designated as T-10G and evaluated by the Air Technical Intelligence Center (ATIC) from 1955 to 1957. It was donated to the USAF Museum in Dayton in 1960, then later transferred to the National Air and Space Museum. It is currently listed as on loan or in storage. Note the bomb racks on the underside. Sources: Leatherneck.com National Air and Space Museum Aeroflight Shine Your Light I'll be depicting the aircraft in North Korean markings as it may have appeared on June 16, 1953. Kai
- 95 replies
-
- 4
-
-
- North Korea
- Trumpeter
- (and 3 more)
-
Last one for today, I promise. . . Here we have the fiddly and complex Trumpeter Me.262B-1a/U1. Although a bit of a slog to build that fights you in many areas, it really does build up into an impressive rendition of the legendary Swallow. Kit is OOB except for BarracudaCast wheels and Master Models radar antenna. Finish is RLM 76 with 75 spots over black using Model Master enamels. Please feel free to share any comments or criticism. That's how we get better! -Daniel S. Westminster, CO
- 12 replies
-
- 13
-
-
Squadron has as a part of its May deals the Trumpeter Stuka Ju87B-2/U4 for $35.99. It is stock number TR03215. It is the one with skis. However, it still has the sprues with its landing gear and full fairings, the kit is just missing the main and tail wheels. So a good deal as the wheels could do with replacing anyway. They also have the Ju87A for $71.19, stock number TR03213.
-
Hello here my entree for the group build. And this is the plane im going for. Im going to use the trumpeter kit with the CE cockpit set. Just the air scoops,pitot tube and some Pe has to arrive. Mark
-
Hi folks, As there seems to have some interest in this project, I'm starting a thread to help the poor souls willing to get a similar result. A short summary of this project is nonetheless necessary. I was aware that the Revell kit was far from perfect and decided to avoid it for many years. The final release of the Begemot decal sheet changed my mind. So, I got the single-seater as well as the Zacto detail set (more bout this later). A quick assessment showed that the resin set was really necessary to get something looking more or less like a MIG-29A. I purchased many detail and accessory sets to help me but the problem stayed for some areas. Assessment showed that the Revell main landing gear zone was really bad and asked for complete re-construction. I realized than that the Trumpeter MIG-29M could be a source of parts and solve some problems here and there. The more I looked at both kits, the more I realized that the Revell kit had not ONE correct section, part or panel line. Nearly everything had to be replaced or corrected! The sole correct things are the general dimensions of the airframe. This made me wondering if it would not be a better idea to use the Trumpeter kit as the starting point and the Revell kit for some parts here and there. As SAS used to say: Who dares wins! So, I took the plunge! I enlarged some plans and took my best razor saws!
-
So I have finally sold enough of my stash to get one of these honkin' big beauties for a new project. Not only have I been looking forward to building this jet, this will also serve to help me get my modeling mojo back after almost 10 months of hobby inactivity. My wife and I just recently moved, so I will also be breaking in my new modeling space. Let me get started by being a little more long-winded. Just so we all are on the same page, I am not a rivet-counter; I like to build stuff that looks as close as I can reasonably get within my skill level and on a budget. As I stated previously, I sold off a bunch of stuff from my stash to raise funds for this project, so here is a list of what I have accumulated: -Trumpeter 1/32 Su-27 B -Aires cockpit for above kit -Eduard Su-27 Flanker B exterior PE -Begemot Flanker Family Stencils (4 pages of stencils!) -Linden Hill Flanker Sparka Su-27/30 Family Two-Seaters (we'll get back to that in a minute) -A full set of Akan paints for the plane I'd like to build I also have the following items on order: -Zactomodels Su-27 replacement nose cone -Quickboost Su-27 instrument panel -Mastercasters Su-27 weighted wheels About the decals - I ordered these initially to do the Russian "weatherbeaten" standard Flanker, but everyone who's done one of these planes has done it. So I decided to do one of the blue-over-blue-and-blue Kazakh Flankers. I figure I'll do a fairly-new out of refinishing plane so I can load it with stencils (I love stencils!). My compromise here is that I will wind up painting the plane in the scheme used on the two-seaters because they just look nicer. Also, I'm wide open to suggestions and advice- if you've done this already, I'd really appreciate all the feedback I can get. This is my first WIP on LSP so please let me know how I'm doing! I've gotten a start on some small stuff, so my next post (after dinner) will show where I'm at as of today. Thanks for indulging me!
- 64 replies
-
- 2
-
-
- Aires
- Linden Hill
- (and 3 more)
-
 OK, for Paul I am trying to get one done. Thought about a CAC Sabre - nah, too much work. Started a Trumpy MiG-17 - nah, too much work. So picked a true adversary to the US military: a N. Vietnam SA-2, as kitted by Trumpeter. The cool thing about the NV SAMS were that many were camo'ed with a random pattern of two shades of green. So, it will be like German mottle on the rocket!
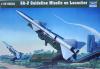
-
Helo here my second build. The A-1H from trumpeter OOB only the decals are from zotz(underway) Things are slowing down on my mig(foiling) so i whant to keep building. The only thing done so far on the kit. Test fit of the feuselage and gleud a part of the wings. Now i will start the engine i hope to have a update this weekend. Mark
-
- 27 replies
-
- 15
-
-
I built this straight from the box with the exception of the seat harness (too out of scale). I love the Extra Dark Sea Gray/Sky combination and colors presented in the Indian Navy markings. I planned to finish this with a wash but want to wait unitl I can find some Flory wash to give that a try. Otherwise, the kit went together with the usual angst regarding these kits. Kit needs a lot of nose weight. I used about 10 grams pushed in around the nose gear bay. More is better in this case. The rest of the kit was fine.
-
Here is my 1/32 Trumpeter Swordfish Mk.II. ...
-
Ok here we go I have this conversion for almost a year now. Time to start the beast. I hope it will look like this when compleet. What i have for the start at the moment. The conversion set. A bit off reference. also i will use live resin weapons and some eduard an cobra company stuff(those pics ill follow) Time to cut some plastic but i still need to work on the mig. Mark
-
Hey everyone, I'm back for more after my Beaufighter build which ended with most of my hard work to be completely hidden and almost for naught. I've been busying myself by cutting down the stash to make room for a new Hawker Typhoon, favourite plane, next to the Fw190 D-9, of which I have one of as well. There is also an up and coming IPMS show where some shopping will be done. Here is the topic for this build. Something not 40 years old this time: Here are just a quick snapshot of my builds since the Beau: Hasegawa 1/48, F-16C "Wolf Pack" which just became some made up aircraft and markings. Not a great build, but kinda fun detailing the landing gear and wheel wells and continuing to practice and hone my skills. Also, Academy 1/35 M-10 Wolverine, again just for fun and a completely made up paint and marking job. Built as a damaged and abandoned M-10. The figure is a mash up of Tamiya figures and the long coat sculpted from milliput. (first ever sculpting) Should have some build progress up soon. Cheers!
-
Hi, Here is my Trumpeter P-47D. I've started it a few months ago but i've put it aside for a few weeks. It's painted with various alclad, and the national markings are painted, too. The stencils are hobbydecal dry transfers, and the other markings are decals from kitworld (great decals as the film become almost invisible even on NMF). THere is no varnish on it, only a light wash of flory dark dirt (i've also tried to use enamel wash from AK or Mig, but dont do that if you have hobbydecal stencils as they do not survive the enamel thinner experience...) and then a light dusting with Mig pigment. The kit is the trumpeter P-47D with dorsal fin. It is not a bad kit, i've liked this build, even if there is a few small defects. The cockpit is detailed with the eduard PE set, some scratchbuild, HGW belts (or RB? i dont remember) and a resin gunsight from master details. THe wheels are from Barracuda, and they are great ! (but pretty difficult to make the paint stick on them, even with many degreasing operations). The engine cowl flaps are scratchbuilt as the kit part is totally messed up. The exhaust staining is done with some alclad burn metal colors and then with highly thined acrylic chocolate and mat black. Hope you like it ! Here is a link to the WIP thread : http://forum.largescaleplanes.com/index.php?showtopic=49771
- 39 replies
-
- 11
-
-
- P-47D
- Slick chick
- (and 1 more)


.thumb.jpg.dcaaac7ca187fee833430d28711f104e.jpg)
