Search the Community
Showing results for tags 'trumpeter'.
-
I cracked this open mid summer '16 with hopes to finish by 7 Dec for 75 anniversary. Pearl Harbor P36, P40B, A6M2b. As usual, life, family and another wrecked knee kept my bench-time to a minimum. My bench is configured as a 36" (91cm) tall standing bench. The wrecked knee dictated my time to no more than 30 minute sessions. Trumpy's P40B with all it's known short comings. Will address cockpit, wheel well, fabric and rivet issues. P40B "White 300" based at Bellows Field 7 Dec, 1941. This Bellows Field post 7 Dec P40B has seen better days. The cockpit is short so I secured Lone Star resin correction set. Lone Star's resin sidewall correction (left) and kit. Depth difference is markable. The casting of Lone Star's correction is showing it's age. Soft detail and lots of bubbles/imperfections. That said I have decided to scratch build the deeper cockpit. Using Lone Star parts as template I draw on styrene card stock. Apologizes for the photo quality.
-
 Hello all, I thought id try something a little ambitious on this 109 as I had three sets of decals for a Fliegerkompanie J-371 Bf-109 E-3, I guess I swung away from doing it before as the size of the decals was a little scary. So I painted it up ready for the decals knowing I had a degree of safety having three sets to get it right............hmmmmm! I gave up,and then broke out the masking tape for a masking marathon ​. In hindsight, it was the only way to get this scheme done and I am pretty happy with the overall result. All comments are welcome
 -
This is a my second build in a few days that I have completed while I'm trying to get my mo-jo back for the ju-87 I am building. The model kit is from Trumpeter kit and builds quite well, only issue I found was the correct seating of the undercarriage. The way the undercarriage is built up is a bit of a strange approach and doesn't exactly help the modeller and once complete, it isn't the strongest 'set' I've come access, other than that, a good build. Built out of the box and painted with Humbrol paints except for Mr Hobby for the RLM04 yellow. Hope you like it, all comments are welcome :-)
-
Hello guys, I took these photos of a former VNAF Skyraider on display in Saigon. Incidentally the propeller blades on this plane are mounted backwards (back to front). Should they be mounted properly, I wouldn't have noticed this curious detail: a small angled 'ledge' running lengthwise on the trailing edge of the blade. Now that I know it's there, I can see it on several other Skyraider photos although it's hard to notice since the 'ledge' is located on the back of the propeller. Can you A-1 experts shed some light on this curious detail? Thank you Quang
-
Hi guys, I'm currently building the 1/32 A-1H Skyraider from Trumpeter. Can you tell me about the stick-like ordnance these A-1 are wearing? I read somewhere that they are practice dummies. I'd like to know more about them and maybe get a link to some close-up photos. Can you help me? Cheers, Quang
-
Hello I was wondering what your thoughts on the Trumpeter MiG-29 UB. In general what aftermarket do you think it needs? I was looking at Aries aftermarket exhaust if the kit needed it? For example. What decals are available? How are the north star quality for the Wheels early and late? Thanks in advance Danny
-
Now here is a serious release of an oft-neglected subject: http://www.trumpeter-china.com/index.php?g=home&m=product&a=show&id=3059 If I'm not mistaken, this is a more recent kit, and has no reviews on it???? Anyone here know about it? I mean, it has to beat the old 1/48 Special Hobby no-locating-pins/mixed-media release, and the local price is not bad...
-
Hi everyone! I've been a lurker here for far too long! For years. I've learned so much from all your builds and got heaps of inspiration, so thank you! On the bench the past few weeks, (started 15ish years ago) is my Trumpeter hog. I'm building a 1991 Desert Storm 23rd TFW. To me, it's the classic hog. Growing up in the 80's, this was my favorite jet and I loved watching them at the local air shows. The Trump kit has a strange mix of old and modern detail, so there's going to be a lot of mods to backdate it properly. I've got all the usual aftermarket goodies lined up for it: Cutting Edge Cockpit Cutting Edge Exterior Set Cutting Edge Decal Sheet Master Model brass gun & pitot Cutting Edge Dual Rail Adapter Cutting Edge wheels AMS Resin Mk 20s & ALQ-119 Zacto or Cutting Edge Sidewinders Random bits in the box: Reworking the front wheel well. The kit detail leaves a lot to be desired, so I'm trying out a little scratchbuilding. Today, I removed all the kit's detail, and blocked out a new wheel well box. At first. I tried just removing the molded in detail on the kit part, but this looked really ugly, so I decided to completely replace it. Here's my new detail-less well box: Pretty happy with the fit! Took lots and lots of sanding and dry-fitting. Here's the inner fuselage, I had to fill some gaps here, note this is before sanding! And here's the fit check with the Cutting Edge cockpit. Doesn't look like it, but this took half a Sunday of hard (but fun) work! That's it for now, next will be scratching in all the detail for the front wheel well. Thanks for looking! Any and all comments appreciated! Aaron
- 15 replies
-
- 14
-

-
- desert storm
- warthog
- (and 2 more)
-
P-40 finished. I made few corrections and added things to cockpit and engine. Tail wheel bay is bulit from scratch. Decals are from Techmod and gun barrels and pitot tube are from Master. Unfortunately i broke pitot tube ending. Edit. As always I forgot about something. Gunsight added: Works in progress thread: http://forum.largescaleplanes.com/index.php?showtopic=69082
- 17 replies
-
- 17
-
-
Hi, my new project is a Trumpeter P-40B/Tomahawk in African RAF colors: Photo of my plane: It will be mostly from the box. Now i'm doing the cockpit. I found an easy way to correct it's too high position. I cutted the support for floor and i putted it under the back plate: After this i added an rib extension to cover a hole which appeared: I know that this is not entirely correct but for me it's good enough.
-
Trumpeter MiG-3 with Part set, resin exhausts and Montex masks. Inscription on the side means "For the motherland". Nice kit with, surprisingly, no major errors. I improved few things like a propeller blades - awfully thick in the kit. As a support for photos I used old cigarette case from Soviet Union when Saint Petersburg was a Leningrad. For Poland where I live, it was a dark and hard time. May it never come back.
-
 Well, what do you do if you have to wait for parts for your other projects being milled or 3D printed? Easy, get one of your most expensive kits out of your shelf and start hacking it into pieces, add some styrene and make it look even uglier than before, just for fun. Well, that's not exactly how it was. While it's true that I cannot proceed with my other projects as I am really waiting for essential parts to be produced, I was planning to build an EA-6B since the Trumpeter Intruder was announced. The only problem was - the kit was just too expensive. Having spent a few hours on the net looking for good offers, I found somebody in Austria who sold his slightly started A-6A + Avionix cockpit for much less than 100€ - now that was an excellent deal! The wait for the kit was spent finalizing my drawings and once it arrived, everything went rather quickly. A few cuts, some styrene and voilà , it starts to look like a Prowler. I've cast a copy of the windscreen to find out which modifications are necessary without destroying the clear part. It's not quite perfect yet, but I am getting close. Since these pics were taken, I've given it a light coat of primer and added some groove lines. The next step will be finalizing the windscreen shape, adding the football to the fin and starting the cockpits. More pics will follow!
- 523 replies
-
- 22
-
-
Hi guys, Having actually started this model instead of just looking at the parts and then putting the box in the cupboard, I thought a thread recording the build might help keeping me on track. Trumpeter Swordfish. Out of the box, it makes up into a very impressive model. There are quite a few aftermarket sets for it, most of which I seem to have added to the stash! Like all kits though there are plenty of areas that could be improved upon, so I thought I'd give it a go. I have also started a bit of web site at www.flyingstart.info, but I suspect I'll get the progress pics here before updating the site. Please guys, badger me to keep going if I stray from the path! Right, a few pics of progress so far. I've skimmed off all the panel latches as these will be replaced with Eduard etched items.The pilots Browning MG blister and blast trough have been smoothed over by wielding a razor saw and dollop of white fine milliput, and the panels lines refined and deepened slightly; the Swordfish is a very 'panely' aircraft, especially after a lot of maintenance, where the edges of the panels get dinged and bent. I want this model to look like it really HAS been 6 months on a MAC in the North Atlantic... The wings, tailplane, fin and rudder have all been sanded smooth, as I consider the rib tape 'detail' is a bit OTT, (Over The Top) and the starving ribs effect on the wing fabric is waaaay OTT, so that has all been filled with 3M Red filler and smoothed back. I've tried to keep a hint of tautness, and of course I'll have to put something back for the rib tapes, but I'll tackle that later. Funny, all Swordfish and SPAD kits have traditionally suffered from grossly exagerated fabric sag, I have no clue why!! I'm going to have to do the same job on a Hobbycraft SPAD I have in the stash... Other jobs done so far include skimming out all the cockpit sidewall details above the moulded longerons. I'm going to leave the rest as it will be hidden behind the tubular fuselage structure and other details. I ditched all the kit bombs as they are hopelessly misshaped, so drew up some more accurate shapes on Rhinoceros 3D CAD program, and had them build on a rapid prototyping machine. I then made up some RPs with 22 guage stainless tube cut to length, and warheads, fins and supports, and a 250lb Depth Charge as well. Next job will be putting all the fuselage details back, using the Eduard etched bits, and cutting out the slats and ailerons. More pics soon. Any comments or suggestions more than welcome!
-
Hi all, I thought I'd post some photos of my 1/32 Trumpeter Ju 87A, done in Condor Legion colours. The markings are custom masks, as is the emblem on the spat. The model was built with Eduard extras, and the paints are from MRP (Mr Paint, Slovakia). In all, a trouble-free project. I modded the cowl to correct a couple of anomalies but didn't bother with the lower spat shape. I could live with that. This model and build article are in the latest edition of Military Illustrated Modeller, which should be in the shops right now.
- 16 replies
-
- 21
-
-
Hello! I am in with Trumpies well-known F4U-4 kit. With Snake! - markings of course Have the kit on the to-do list for some time. I want to build it OOTB, only adding a little bit of AM to overcome ejector pin mark jamborees around the UC and to correct a few omissions of Trumpeter; mainly seat harness and prop shapes. So I will go with the kit and: - Aires wheel bays - SAC UC legs - Eduard interior PE - Quickboost visier - Rutman prop blades - Rutman wheels Next stop: Stashdiving to locate Jerrys resin parts... - dutik
-
After finishing my first full resin kit for the Eric Brown GB (HS-123), I needed a good fitting kit for a change. As I just finished reading Flyboys from James Bradley (an excellent book) about Avenger pilots being shot down over Chichi Jima (150 miles from Iwo Jima), one of which being George H. Bush (who was rescued by a US submarine), I decided to finally build the Avenger in which '41 was shot down over Chichi Jima. I had this kit in the stash for a while and had slowly collected AM for this build. I am not aware of decals for the President Avenger so I will go the paint masks route, thankfully the scheme does not look too complex: I will be using D&S Vol.53 TBF & TBM Avenger for reference and it looks like a very useful book. Box shots of the kit with the AM: For once this kit does not start with the cockpit but with the engine and it has been a pleasure to build. Good details and sound construction. I hope you will enjoy following this build. Cheerio, David
-
 The “Bismarck†was the first of two Bismarck-class battleships built for Nazi Germany's Kriegsmarine. Named after Chancellor Otto von Bismarck, the primary force behind theunification of Germany in 1871, the ship was laid down at the Blohm & Voss shipyard in Hamburg in July 1936 and launched in February 1939. Work was completed in August 1940, when she was commissioned into the German fleet. Bismarck and her sister ship Tirpitz were the largest battleships ever built by Germany, and two of the largest built by any European power. In the course of the warship's eight-month career under its sole commanding officer, Capt. Ernst Lindemann, Bismarck conducted only one offensive operation, in May 1941, codenamed Rheinübung. The ship, along with the heavy cruiser Prinz Eugen, was to break into the Atlantic Ocean and raid Allied shipping from North America to Great Britain. The two ships were detected several times off Scandinavia, and British naval units were deployed to block their route. At the Battle of the Denmark Strait, Bismarck engaged and destroyed the battlecruiser HMS Hood, the pride of the Royal Navy, and forced the battleship HMS Prince of Wales to retreat; Bismarck was hit three times and suffered an oil leak from a ruptured tank. The destruction of Hood spurred a relentless pursuit by the Royal Navy involving dozens of warships. Two days later, while heading for the relative safety of occupied France,Bismarck was attacked by obsolescent Fairey Swordfish biplane torpedo bombers from the aircraft carrier HMS Ark Royal; one scored a hit that rendered the battleship's steering gear inoperable. In her final battle the following morning, Bismarck was neutralised by a sustained bombardment from a British fleet, was scuttled by her crew, and sank with heavy loss of life. Most experts agree that the battle damage would have caused her to sink eventually. The wreck was located in June 1989 by Robert Ballard, and has since been further surveyed by several other expeditions. (source: www.wikipedia.com) 1/200 - Trumpeter's big Bismarck Several time ago, Trumpeter released the Bismarck as 2nd kit in their big 1/200 scale series (after the USS Arizona). Later, several more kits were released until today, and more future kits were expected. The kit of the Bismarck consists of more then 1.700 parts, 13 plates of PE-parts. The total length will be about 125cm. I already built one of the big Trumpeter kits with the additional parts by KA Models / MK.1 design (and more) several time ago. This time… I will do it in a different way.... First of all… what parts will be used to build the Bismarck as detailed as possible? This time… I will use the big “Advanced set†by Pontos Models which includes a lasered wooden deck, 318 turned brass parts, turned gun barrels for all guns on deck, 15 plates of PE-Parts, 27 resin parts, 25 life rings, dry transfer decals. Additionally used are some resin parts by CMK which were very high detailed. Further PE-Parts by Modellschlachtschiffe.de (which I still have on my stock from last Bismarck project). Fabric flags and EZ-line for rigging, decals for the big markings on the deck by Blue Ridge Models, and the wonderful 3D figues by North Star Models. Brass lamp risers for the display of the kit are ordered and needed before starting the project finally. Right now I am waiting for these to start the project. The painting of the kit will be done mostly with colors by Lifecolor in the camouflage 1941 scheme with the white/black stripes and the painted waves at the bow/stern. Weathering will be done with several oil colors, pigments, and other stuff. I hope that you would like this new project and that it will be of interest for you! Starting soon, as soon as the parts for the display arrived! I think it will become a long lasting project again..... and a lot of patience Cheers. Michael
 -
Hi, A new project for me. I had the Trumpeter kit starring at me for years, and i was looking for a reason to not to. With release of a Mig-21 Lancer from Icaerodesign, it was just to much to resist. This conversion looks very nice at the first sight, and i must say that it's even better when you start playing with, at least for the cockpit (i only started the cockpit so far). The fit is really excellent and it's a simple replacement of the kit parts. No surgery needed. It's designed to build a Lancer C, the air to air version. There are also a strike version and a 2 seater A and B, with different camos, but i dont know which are the technical differences with the C version, nor if one can build a A with the C conversion. Anyway, the supplied decals/masks are for a C version. So, let's start with the begining : the cockpit. I still have to paint it, but it's a drop fit. I also add a HAD KM-1 seat as the seat is not included in the conversion (nor the control stick). A control stick is supplied with the seat, but the end with the button is very different in the Lancer, so i will make one from scratch later. All the parts waiting for a coat of primer. Yes there's also another cockpit for another project.
- 60 replies
-
- 6
-
-
- Mig-21
- icaerodesign
- (and 2 more)
-
Hello folks, I start a new project. This is the bad (very bad) Trumpeter Lightning F.6. I know, this kit has a lot of mistakes from Trumpeter. But I really like this Big, Monster Britain Jet !!! I will add a Aires cockpit and exhaust. The decal sheet is from Xtradecal. Ok, maestro :
- 24 replies
-
- 10
-
-
Greetings Finally finished my F117. Had a few upgrades on this one: -Eduard photo etched interiors and exterior -Eduard Brassin F117 Wheels -Aires Cockpit This is my Nephew Nathans fav aircraft and i built it for him to appreciate. its also a tribute to my all time fav band http:// For those who are not familiar with the band, they fly their own aircraft http:// and is piloted by their lead singer, the amazing Bruce Dickinson http:// Here are some pics of the finished model, hope you enjoy them http:// http:// http:// http:// the noseart on the bomb bay is from Iron Maidens second album http://http://i1169.photobucket.com/albums/r516/shan1968/HARRIER/maidencomparison_zps74badd56.jpg i had always wondered on the inspiration for the noseart, and finally one day, i got a reply from the man who inked the noseart himself. The following was his reply to a post i made on a forum Hey, I was looking through some F117 pics on Google and came across your pic with the Iron Maiden album cover. I was pretty excited to see that someone caught that! I designed that "nose art", and came up with the name, The Toxic Avenger. I'm Ron Harmon btw.... (SGT Ronald Harmon). http://http://i1169.photobucket.com/albums/r516/shan1968/F117%20NIGHTHAWK/c2_zpsbwnbilnc.jpg You asked about the art work on my jet (813), so here you go.... sorry if it's too long. In 1990 we didn't have the Internet so the closest thing we could come up with in Saudi Arabia for an example of "a" Toxic Avenger was Iron Maidens mascot Eddie. Somebody had the Killers CD and that was a perfect pose, so I had the guy painting it for us put a pilots uniform on him. I wanted him to be holding the stick with one hand and dropping that bomb with the other. It was his idea to have the stick ripped out with the wires hanging out if it. I loved that! The bomb that he's dropping comes from the previous nose art which never actually got painted on the jet. The jets name was Special Delivery when I first got on the crew. Somebody before my time had painted a picture and hung it in the hanger. It was an awesome picture of a skeleton in a delivery mans uniform with the big bus driver cap. He was holding that round bomb with the fuse lit and had the words Special Delivery at the top of the pic. I really wish I could have gotten a copy of that. Like I said, it was awesome! When we got a new Crew Chief - Jerry Bies we renamed it to The Toxic Avenger. I came up with that name from that old B movie with the same name. Seemed fitting since everything on that plane was toxic! I didn't really expect it to be approved. When we got a new commander, Col. Whitley, he chose our jet to put his name on. I assume that was because of my superior mechanical skills in maintaining my jet to the very highest standards in quality and workmanship! haha. Anyway, that's why my name and my nose art is on the decals. The Wing Kings jet gets photographed a lot! Oh, and I painted the 29 bombs under the canopy too. That's 29 missions where we dropped at least one bomb. Anyway, that's my story. Hope it wasn't too long!
-
hello to you all like i have said here is the toppic on my next build to get the juice flowing. Im going for some armour. This is the kit im going to build. The kit hase about 800 pieces the construction start with the chassis. This is what already is done the until today. [/url Next up to do is the suspension. Mark
-
I wondered if anyone with a ZM Skyraider kit would be prepared to measure up the kits windscreen moulding for me? I'm sizing up a Trumpeter kit for an AEW1 conversion but withe the overwide Trumpeter kit parts, the differently shaped sliding canopy on this version is getting seriously overwide to look good. I think I will have to sort out the windscreen after all..... Thanks in advance Tim PS if I could borrow a canopy windcreen to measure, that would be even better! Promise not to damage it of course!!!
-
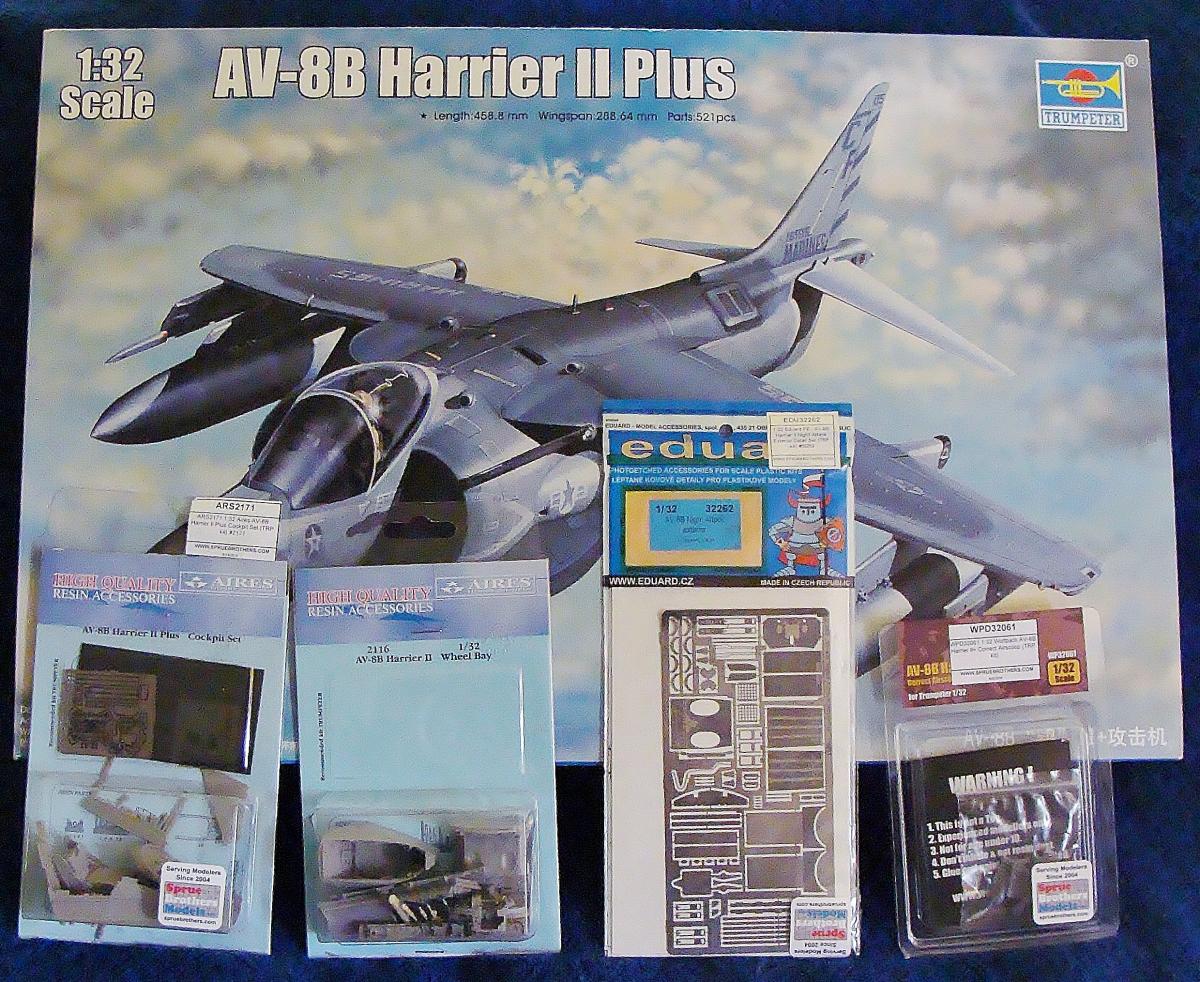
And so it begins! A lot of things have been written about the Harrier series of kits from Trumpeter, and to be honest, a lot of folks have either been scared away from the kit because of a few minor shape issues and the somewhat negative reviews that came out just after its release, and you dont see a ton of them built as a result. The good news is that most of what needs to be "fixed" can be done so without a huge drama post condemning the kit and curse words flying across one's model bench onto the internet. Yes, this will require modeling skill, not just aftermarket, but anybody who has worked with plastic, putty and glue a while should be able to do this. I hope to show that with a bit of work, This can be a really great model. I have spent the better part of 3 weeks in my spare time collecting references, reading build logs all over the internet and watching video of the real aircraft from as many angles as I can. I dont know why, but doing this programs my mind to look for things that are not correct as far as the lines of the "model" aircraft when dry fitting, assembling and painting. It also helps to know that LSP'rs are around and lots of you like to help, so If I'm missing something I will ask for help, count on it! I will be using the following : Trumpeter kit 02286 Harrier II + Aires cockpit set 2171 Aires wheel bays 2116 Eduard photo etch for the exterior 32262 Wolfpack models corrected Air scoops 32061 I will possibly still pick up a vinyl det cord for the canopy and still need some decals. So far I've opened all of the boxes, the kit is fine some of the Aires is broken already, not hard to fix but I wish they would work on their packaging some times. I am currently cleaning up the cockpit resin since that's where I will start. Here is a pic of the whole lot, I just got the Harrier in a trade this morning! Thanks again to Jan and Ernst More as soon as I have something to show, Paul Lets Fly!
-
Here my finished Jumo 004, that I plan to add to a Ar-234 B-2/N 1:32 Nightfighter. Its a model of its own and a lot of joy to build. Around 40 parts were added. Its not 100% correct regarding the orginal, but pretty close. Dirk
-
I'm a slow builder, but here we go. 1/32 Trumpeter P-47 Razorback kit. Keeping this one pretty basic with limited aftermarket. Using Montex masks/decals. I'll probably also pick up some aftermarket gun barrels as well. Some initial impressions - The kit seems nice but way over engineered. While some builders may love the fact that Trumpeter included the entire supercharger and ductwork, I can't help but argue that it 1.) It will never be seen and 2.) Its just more parts that need to be lined up perfectly in order for the fuselage to close nicely. Originally I considered just leaving these parts out, but it's not really possible because they hold the cocpit in place within the fuselage. You'll also have to bear with me as I I'll be taking photos with my cell phone. They turn out ok, not great by any means, but it is way easier and less time consuming that the dslr. Maybe this thread will give me the mojo to take better pictures. The plan is to use Montex' decals and make up "Touch of Texas" flown by Capt. Charles D. Mohrle who was awarded the DFC while flying this aircraft. I'll be using the kit cockpit. It has enough detail for myself. Decals used for the instruments, then I filled the round areas with future floor wax to recreate a "glass" look. I also applied a dark brown wash and dry brushed aluminum to add some wear to the floor and seat.


.thumb.jpg.f0920d798d5d8600fb58b1d8a906ddff.jpg)