Search the Community
Showing results for tags 'quinta studio'.
Found 6 results
-
 I'm back, and hopefully not with another kit that ends up on the shelf of doom. This is a bird that I've been interested in for a very long time, having read Termite Hill and Lucky's Bridge by Tom Wilson years ago, both of which focused on the Thud. I've also recently read Hunter Killers by Dan Hampton about the creation of the Wild Weasels, all of which I recommend for some background info on the F-105 and it's uses. So, after nothing was fitting on the T-28C/D Trojan I'd been working on, and the lack of interest in the plane as well, it's ended up boxed at this point, sitting on the shelf for (hopefully) another rematch someday. Now I've got the F-105G, and a bit of aftermarket, to make some winter time building. Now, the first thing.....this thing is HUGE compared to the other 1/32 kits I've built. It'll dwarf my Corsair and Dauntless, whenever it ends up in the display cabinet. I've picked up a few bits of aftermarket, with the Quintas Studio's cockpit the one I'm most interested in trying. I'm going to see what I can do to combine this with the Aires cockpit, Eduard PE and the kit parts. We'll see how well that works! I also have GT Resin's update set for the Wild Weasel, with a new nose, vertical stabilizer, engine, etc. New resin wheels/tires and also a nice turned metal nose probe to top things off. I'll also probably be needing to find some metal landing gear, as all of this is going to get heavy, plus adding additional weight to the nose to keep this from turning into a tail sitter. Special thanks to @Dragon for sending me some decals a while back that will get used in this build! And....finally, I also picked up something for later, Randy Coopers Blade Runner 2049 Spinner. This will be a challenge, as I've never tackled a full resin kit!
- 63 replies
-
- 22
-

-
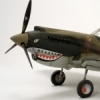
I'd like to join this little party with a GWH Curtiss Hawk model 81-A2, or P-40 to many of us. It looks like a really good kit, from what I've seen from people's postings. I'll be adding a little after market with this build, in terms of a Quinta Studios 3D decal set, which I hope will add a little more to the model. As I only started to look at this yesterday, I haven't got much done yet. I've added a few of the parts that go inside the rear fuselage, put the pilot's pew together as well as the fuselage fuel tank. I like to add what parts I can before paint goes on, so long as they don't create shadows behind. There's a few more parts to go in, as well as ejector pin marks to sort out, but some already seem to be where they won't be seen, so less work. And some thought by the kit designers. Once I've finished this stage, I'll slop some paint about. As I understand it, most of the inner surfaces should be yellow zinc chromate, and I think the the cockpit should be some shade of interior green. Photos I've seen suggest this should be a darker colour than green ZC and with a slight bronze tint. I do know that Curtiss were a little cavalier with their paint colours and didn't stick exactly to the specified paint. If stock ran low, they'd get something close at the local hardware. Whatever works, I guess. Cheers, Michael
-

Hobby 2000 Messerschmitt Bf-109E-3, with 3D decals
Dpgsbody55 posted a topic in Ready for Inspection
This is my latest model, a Messerschmitt Bf-109E-3 from Hobby 2000. It represents a plane flown by the CO of 2/JG 2 based in Germany, Frankfurt-Rebstock, in early 1940. I've aslo added a small diorama made using a Trumpeter display base, augmented with part of an ICM 1/32 Luftwaffe ground crew set and an old Tamiya Pilot figure I found in my spares box. The model was completed with the aid of a Quinta Studio 3D decal set, plus a little bit of scratch addons. This is the first time I've used 3D decals, and I think the results are impressive. I've also built it with a pivot for the canopy, which is quite easy on 109's. Weathering has been applied, but only lightly. Since the plane is unlikely to have seen any recent action, I thought heavy weathering would not be appropriate. The W I P is here, if you'd like to read further. Engine close up. Cockpit. Underside. Top views. Pilot and mechanic figures. This was a frustrating build at times, but at other times a very enjoyable build. Problems arose thanks to inaccurate instructions in parts, but mostly troubles sourcing the gun cowling which was missing from my kit. That aside, I think this is the best kit available for an early 109 and worth the effort. Having sorted out those issues, I'd happily build another, though that wasn't the case earlier on in this build... Here it is on display now with another 109, this time Trumpeter G-4/R-6. Cheers, Michael -
My next project will be another Messerschmitt 109, this time an E-3. I plan on painting it as a Battle of France machine, using the kit decals. Here's the obligatory box shot. I'll also be adding to the detail with a Quinta Studios 3D decal set, but I think this will be the only add on. Very little progress so far. All I've done is attach the cockpit rear wall to the floor, and assemble what I think is a tank that sits behind the instrument panel. This is only in place as there's four parts to this, so it's placed only for alignment while drying. Then the whole lot is placed in the fuselage halves, again for alignment. Looking at the parts and instructions, this looks like it will build up into a nice model. It seems well molded, though lacking in rivet detail. One nice touch is that the each fuselage half has matching tabs and slots to aid alignment when gluing each half together. More soon, I hope, which may include getting to grips with 3D decals - a new experience. Tips welcome here. Cheers, Michael
-
Greetings colleagues! I hope you are safe and sound during these difficult times! Let me take part in this event. I have 1/32 Revell He-162 with a few additions, like: Aries, Quinta 3D decals (just in case) and wheels from True details. I think, that it will be "what-if" camouflage... not shure for now... Thank you, and sorry for my english.
- 17 replies
-
- 9
-
-
- aries
- quinta studio
- (and 1 more)
-
With the advent of 3D decals from Quinta et al I find myself having difficulties on choosing which path to go. 1. Quinta IPs + resin seats + resin canopies with inner frames etc https://aerocraftmodels.bigcartel.com/product/mcdonnell-douglas-phantom-replacement-canopy-set-for-tamiya-kits 2. All resin+PE cockpit set (like Aires) which caters for all areas but probably with more assembly and trial fitting involved. And yes, I dislike doing cockpits but still really like the look of a well-finished office. Any thoughts?
- 6 replies
-
- 1
-
-
- aires
- quinta studio
- (and 1 more)
.thumb.jpg.f23b2dc356f90ead35d25aa5e3609a95.jpg)