Search the Community
Showing results for tags 'ZOUKEI-MURA'.
Found 13 results
-
I purchased a Zoukei-Mura A-1J Skyraider from a member here, but am leaning towards building an H. Now the LOGICAL thing to do would be to build the J AND buy an H and then build it. But life is short and kits are many, so looking at the sprues and build manuals, it seems like all the parts for an H are in the J kit, plus an M sprue for changing the wing tips and adding some electronics on the spine. The J seat parts appear to already be on the A sprue. So I'm hoping those of you who have built perhaps both kits can confirm the above or correct any mistakes I have made. My goal is to build a VNAF Skyraider, and the most-appealing are the white Hs that got REALLY dirty and weathered.
- 17 replies
-
- 1
-

-
- a-1h skyraider
- a-1j
- (and 2 more)
-
I've always loved the look of the F-4EJ Kai and the various colorful markings it carried. However, this stands out for me: So when Zoukei Mura, one of my favorite kit manufacturers, released the Kai it was just a matter of time until I would work on this kit. Then DN Models released not only a canopy mask set, but a mask for the 50th Anniversary markings. I do have a Silhouette craft cutter and was prepared to make my own masks, but this saves a lot of time. Along with notes from Alex's excellent build, here is what I will bring to the build: Aside from the DN Models masks, I will be using the very good DXM decals for the 8 Squadron SEA camouflage, the Kits World seatbelts (haven't tried these before, fingers crossed), and the Royale Resin wheels. The kit is my first 1/48 build by ZM, and so far I've been impressed with the fit and finish. It does lack seatbelts for the seats, but on the other hand it includes mirrors which both the Tamiya Tomcats and F-4B kits lack. Speaking of comparisons, here are both cockpits. I used the ZM decals and the Quinta set for the Tamiya kit: For the decals I used MicroSol/Set and a moistened Q-Tip. I then sprayed the cockpit with a flat coat, then picked out the dials with Modge Podge Super Gloss-Brilliant. I'd say the two cockpits are broadly comparable (the Quinta set is definitely more detailed). In any case, I'm happy with the ZM kit so far. Here's a pic with the seats, which are a work in progress: And the cockpit added to the right fuselage: I'm now working on the seats and starting on the belts. Until next time! Cheers, Tom
- 12 replies
-
- 10
-
-
- dn models
- zoukei-mura
- (and 1 more)
-
Hello Here's something I am not used to do: a WIP of one of my built. I've decided to share with you the built of my ZM skyraider. I digged up a bit in the archives here and found that built to inspire me https://forum.largescaleplanes.com/index.php?/topic/38670-z-m-douglas-a1-h-skyraider/& The Skyraider is a large plane in real lif. So this will be a big model and I don't know yet where I'll put it when it will be complete. We'll take care of that later. I showed you some weeks ago the content of the package brought by Mr UPS. As ZM does not provide the weapons in the kit, I had to take their addon for the US bombs and rockets. I also took two Rocket launchers from CMK and the gun barrels from Master. In addition I'll use the textil seatbelts. At that scale I should manage to assemble them without hurting my eyes too much... The kit itself is quick nice. ZM provides a lot of stuff for the ones who want to build it open. This is a good basis for a big scratch built exercise but that's not what I gonna do. I don't really like planes with many panels and doors open. I'm painting with brush and Humbrol Enamel as usual. I started just before summer break with the seat and its seat belts. The seat is painted grey 140 and then I showed some wear and with and dry brush of aluminum 56 and a black juice to finish. Then the front and lateral panels. Just black 33 and a bit of dry brush to give to give it a bit of depth. I used the cristal version of the dashboard with the instrument decals. ZM provides also a regualr plastic version with all the instruments engraved.
-
Hi, two weeks ago I started my first ZM kit. I went for the Raiden, a type I have never build so far. I just dry fitted all the sub-assemblies into the fuselage and all have a perfect fit. 10/10 points I attach a first snap shot ... Have a nice sunday!
- 54 replies
-
- 12
-
-
I got this kit last week, and I couldn't resist opening it up to sniff the styrene. I'm going to take this one slow, as a fill-in when I've got things drying on my George builds - or as a mojo enhancer when I get bogged down. This will be a strictly OOB build, too. At this point, I plan on building it buttoned up - though ungainly, I find the lines of this plane pleasing. First impressions: Despite the lack of exterior rivet detail, despite the molding of exterior surfaces in clear plastic - it's a beautiful kit. The molded-in details are in a word, crisp. What parts I have put together fit like a glove. The instruction booklet is comprehensive. The only improvement I can recommend as I start is that I wish the color photos of completed assemblies were a little larger. At the bottom of each page is a legend on paint colors used in the steps for that page. No flipping back to the front to look at color callouts! I've given the fuselage halves a coat of Mr. Surfacer 1500 black (new to me, but highly recommended). I didn't really see ejector pin marks until I primed - another disadvantage of clear plastic and old eyes. Here we go... I poted this on another thread, but it's important! Do NOT use snips to remove this sprue attachment point! Notice the ejector pin marks. On mine, they are raised. Some forethought will be required to prevent tail sitting. I've looked at every conceivable place to add weight (as far forward as possible). Before my dentist retired, he gave me bags of sheet lead from used dental x-ray film. They're very good for filling small oddly shaped crevices, like the back side of the supercharger. More weight added to the Mk 103 ammo chutes. lead shot and J-B weld. I would recommend using a fuselage half to set the proper angle on the rear cockpit bulkhead. A detail shot of the fuel compartment bulkhead. I have yet to do any detailing. And the nose gear bay with a coat of RLM 02 I gave the IP a coat of Mr. Surfacer and applied the decal once dry. I opted to use the single decal for the entire panel. This decal was thick! It took several coats of Microsol to finally get it to settle in. I would recommend cutting off the four red switches at the bottom and applying them separately. Otherwise, that single decal will have to traverse two 90 degree bends. I couldn't get that part to line up properly.. That's all for today.
-
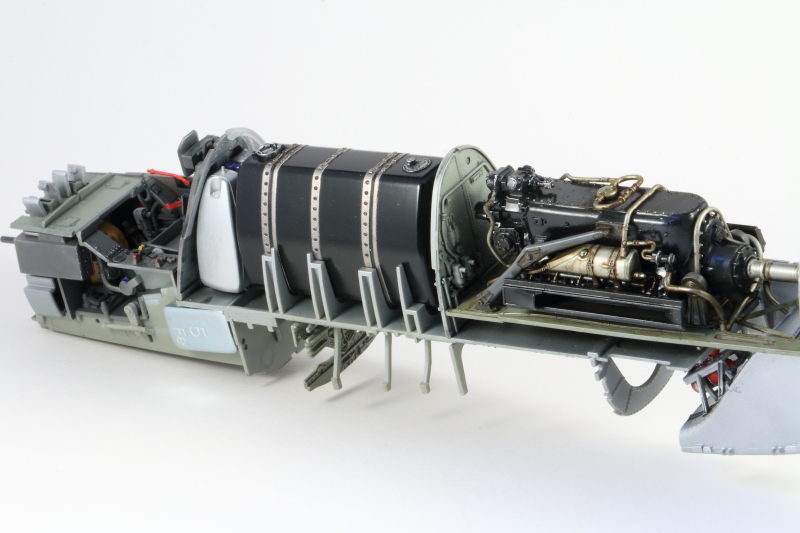
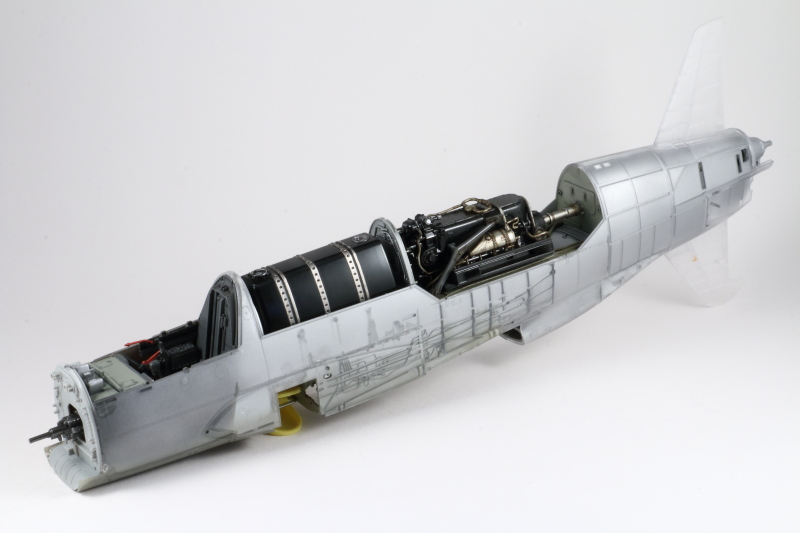
Work in progress for one of the mags - great kit - lots of detail - slow build due to complexity. Lots of fun though! Cockpit, fuel tank bay and rear engine: Fuselage buttoned up - I really hate working with large chunks of clear plastic: Wings and tail parts all done as well - so should have a complete airframe over next few days. Iain
- 106 replies
-
- 18
-
-
We here at VOLKS USA are proud to announce that we'll have the SWS 1/32 Dornier Do 335 A-0 available for purchase! VOLKS USA would like to hold a special campaign to commemorate this first release, to show our appreciation and to thank our many customers! â– 2 Special Campaign Goodies! 1. We'll release the kit earlier than the general public! 2. If you pre-order during the pre-order period, the “SWS 1/32 Dornier Do 335-A-0†will be sent to you with “free shippingâ€!! *Free shipping is only offered to customers in the continental United States. Please read below for details *Free shipping is only applied to the “SWS 1/32 Dornier Do 335 A-0†ã€Pre-Order Information】 Pre-Order Period: 4/8 ~ 5/7, 2016 PT Delivery Date: Sequentially from 5/14, 2016 Price: $185.00 Make your way to VOLKS USA, the official store of ZOUKEI-MURA for your pre-orders! â–¼Webstore: Webstore:SWS 1/32 Dornier Do 335 A-0 Pfeil http://volksusastore.com/webstores/scale/index.php?dispatch=products.view&product_id=5962
- 12 replies
-
- 4
-
-
- ZOUKEI-MURA
- VOLKSUSA
- (and 3 more)
-
Production Memo #1 There has been very much demand for the SWS production memos from the Japanese SWS Blog to be translated into English! These production memos introduced the Cut Model Skyraider. The creator is Mr. TAKE-san. It's written as TAKE but pronounced Tah-Kay! This time in the production memo, the cool areas are shown from the left part. * Engine cowl. Cockpit. Fuselage side. Wing machine gun parts. We'll show four cut parts of the model. Aside from just showing you how to do a cut model scale, we'll be introducing to you how to add more detail using the ZOUKEI-MURA option parts. Today you'll see the painted parts of the console and instrument panel. You'll see the beautifully molded areas once they're cleaned off. If there are any protruding areas, you can use a modeling chisel to sand them off. If there are any indentations in the area, you can use putty. Other auxiliary parts can be made brighter using lighter paints. ▼1/32 US Navy Douglas A-1H Skyraider http://volksusastore.com/webstores/scale/index.php?dispatch=products.view&product_id=277 Production Memo #2 Skyraider Model Production Memo (Number 2) Today's topic will be the fuselage area. Before we get to that, let's go check out the SWS Concept Note No. III! And it goes without saying that the important images have been put up! It looks like there are tons of wires, but there are only 8 of them! There are so many in the workings of the wires aren't there? Let's do our best to recreate this for our scale! The point of construction is to start from the A-4 partition wall and to end at A-38, which ends at the arresting gear. From start to finish decide where you would like to put 8 holes in. There will be 16 holes that need to be drilled. You can look at the picture and while doing so, you can carefully design the drilling position. A number 6 black wire is used for this. Look at the spacing between the wires which should be around 30cm for 8 wires. Tie the ends together and then finally glue it together with instant glue. Drill a hole through A-4 to A-38 bulkhead using a 1mm drill which will allow the wire to pass through the bulkheads without having the need to open holes in the center and allows lightening the holes. From the A-4 bulkhead to the A-3 frame, make sure to check each wire one by one on each side before continuing on. 4 wires on each left and right side. While looking at the Concept Notes, you can check the holes and to see which ones pass and do not pass. Make sure that the tension of the pin doesn't interfere with the partition wall. So how is this shot? It looks almost identical to the real thing doesn't it? While pulling on the pin, make sure that it is secure by crushing the aluminum pipe. If the tension is ok, you can use glue on the ends to secure it in place. ▼Concept Note No. III US Navy A-1H Skyraider http://volksusastore.com/webstores/scale/index.php… ‪#‎ZOUKEIMURA‬ ‪#‎Skyraider‬
- 15 replies
-
- 4
-
-
- A-1H
- ZOUKEI-MURA
- (and 1 more)
-
Yesterday Zoukei-mura has send us some more pictures of this build test shot. I was allowed to publish them on our forum and thought I should also show some of them here too, if the admins don´t bother. We got more than a dozen pictures and I will post some of them here. All of them may be seen here: http://spamodeler.proboards.com/post/13412 The pictures we got are rather large (!) so I reduced them to a more suitable size to show them. I had the pleasure to have more than one very close looks at this prototype while attending Zoukei-mura´s booth at the Nuremberg Toy Fair. This one is maybe the very best kit ever done by this Japanese company and I definitely will add one to my collection!
-
**Edit: Winterfest is actually being hosted by Secret Society of Model Builders; sorry for the confusion!** To view the rest of this archived email please visit : http://us8.campaign-archive2.com/?u=db9ef354023359ab0480915d2&id=90bfdf23a8 To view past archived emails please visit : http://us8.campaign-archive2.com/home/?u=db9ef354023359ab0480915d2&id=53b2019632 Want to subscribe to our Scale Model Newsletter? Sign up here: http://eepurl.com/ZZCBj
- 4 replies
-
- 1
-
-
- ZM
- Zoukei-Mura
- (and 2 more)
-
The newest SWS Concept Note for the Ho 229 - Horten is coming to VOLKS USA on Dec. 20th! This Horten Concept Note made abundant use of pictures and data of the actual machine; that was collected at the Smithsonian Museum. A perfect addition to your SWS collection! Announcements from the VOLKS USA Office: New shipping options were one of the changes we wanted to work on for our customers when we renewed VOLKS USA, Inc. The new shipping methods are “USPS Priority Mail†and “USPS First Class†and will start from December 20th 2014! Currently, this service will only be available for domestic orders (Continental USA). We are hoping to add new shipping methods for international customers in the near future. **Taken from our monthly newsletter; you can view our archived newsletter from Dec. 2014 here!** To see past newsletters you can find them here: http://us8.campaign-archive2.com/home/?u=db9ef354023359ab0480915d2&id=53b2019632
- 6 replies
-
- 1
-
-
- ZOUKEI-MURA
- VOLKS
- (and 2 more)
-
 Well this little beauty showed up in the mail this morning a few days early (Thanks Jack!) From This kit I will be building a USAF A-1J From the 1st SOS NKP 1969 She will be marked using Zotz decals for Miss Eileen I have all the parts in the box to do the USAF modifications courtesy of Jack( again) so I'm all set. I'll decide later what else I'm going to put in and on the plane as far as A/M, I'm going to get a good ways into my A-4 build before I get this one going. All the best, Paul
- 222 replies
-
- 2
-
-
- 1st SOS
- Miss Eileene
- (and 4 more)
-
About half an hour ago I got new pictures from Zoukei-mura, showing stunningly build up samples showing the four marking schemes given in this coming kit: