Search the Community
Showing results for tags 'RAF'.
Found 23 results
-
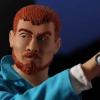
Greetings fellow modelers: This was one of the most enjoyable projects I've done. The Kotare Spitfire Mk.Ia "Brian Lane" kit is fantastic. The Kotare team certainly put a lot of effort into creating a wonderful build experience for the modeler. And they pulled it off. In this brief, ready-for-inspection summary I'll share my build overview, my thoughts on the kit and some recommendations for future kit builders as I go through the photos. Here's a link to the build: Ok, here's my rendition of QV-K P9386 from September 1940. The quality of the molding, engineering, decals, and thoroughness and thoughtfulness of the 24-page instruction book really made this project a pleasure. I built the kit completely out of the box with the exception of Eduard masks for the canopy. Kotare's design philosophy made for a superb assembly process. Each main engine panel was molded as an individual part -- no seam lines or glue clean up. The fuselage aft section parts all intersect at panel line joins. The wing fairings are each single molded parts that fit perfectly. It's designed so that one can assemble the entire plane almost without a single seam line that intersects a rivet line or panel line. What a pleasure. The only area where this occurs is underneath the aft section of the fuselage -- conveniently away from normal viewing. I can't think of a single situation where the fit was not PERFECT. For example, there is only one way to install the landing gear struts. Full stop. There's no play, no wiggle, no uncertainty. One of the best designs I've seen. The horizontal stabilizers are one piece and there's only one way to install it for a nice, tight fit in perfect alignment. The prop assembly installs by literally fitting a square peg in a round hole for a perfect fit. Another nice treat is that the rudder and elevators are positioned off-center and match the positions of the control stick and rudder pedals in the cockpit. I haven't seen that before. That's just one of the many nice details and surprises discovered as one works through the build. Even the trim tabs are offset slightly. As for painting, the instructions provide extremely helpful guides for painting the cockpit as well as the exterior. For the cockpit, painting call outs are provided during the build steps and there are also summary diagrams with multiple views in full color. For the exterior, four full color views are provided for the aircraft with color call outs and key points. I used Mr. Color lacquers for the main camo colors (C361 for Dark Green and C369 for Dark Earth) and MRP Marking Yellow for the spinner. I mixed by own version of Sky Blue for the underside using Mr Color White, RLM 76 and Sky Blue. Since I wanted to emphasize color variation across the different subassemblies as the instructions pointed out, I painted some of the panels a little darker or lighter or a slightly different shade of green or brown. For example the fabric covered sections are a little more faded than the metal sections. I used the kit decals by Cartograf, which were fabulous -- perfect color, perfect register, nice and thin, no excess carrier film. All good. The main challenge with the decals was getting them to settle over the raised rivet areas on the aft part of the fuselage. It took several days of bubble popping and decal solution application to get them to finally behave around the rivets but they got there. I planned out the weathering process at the start of the project. My goal was to reflect what I saw in the reference photos -- and there are multiple clear photos of P9386 as well as several other Spitfires that are very helpful. One of the photos of a real spitfire elevator section has a humorous caption highlighting that there's no evidence of preshading on the fabric area. After priming with Mr Finishing Surfacer 1500, I painted the wing roots MC201 Super Fine Silver, then applied AK worn effects fluid over the silver areas. I pre-shaded the panel lines in black and then applied heavy marbling using spatter templates and random airbrush patterns to break up the solid panel colors. After the main camo painting, I dabbed the wing root areas with a wet brush to get the chipping effect I was after. Next was a gloss coat to seal in the chipping and prep for decals. After the decals and flat coat, I augmented the chipped wing roots with a sharp silver Prismacolor pencil to add some scratches and make some of the chipped areas "less round" and more random looking. The exhausts each are molded in top and bottom halves. There's a nice close up photo in the instructions showing the weld seams that can be replicated when you glue the exhausts together and let some glue squeeze out of the seams. I needed to add a little material to the tips of the exhausts to get the proper shape and I used my motor tool to drill out the exhaust interiors. I used reference photos for guidance on painting the exhausts. I started with gloss black and then applied a 1:1 mix of Mr Color Metallic Black and Super Stainless. After the decals were applied on the lower side of the manifolds, I used Tamiya acrylics to achieve the exhaust gas/heat color pattern. Black, purple, brown, orange, and deck tan were used. The cockpit detail that comes with the kit is astounding in my view. The instrument panel dials all have individual decals and there are placards all over the place - sidewalls, compass, gunsight, etc. Also, in the photo above, the molded seatbelt harness is visible, which I think looks pretty good. The figure of Brian Lane was a nice bonus and here's my attempt at painting him. There's a nice painting guide in the instructions. Overall Summary of the kit: Highlights Clear, detailed, comprehensive instructions. I may keep the book as a reference for other builds. Excellent. Design and fit for easy assembly and minimal clean up. Decals by Cartograf - cockpit decals and placards as well as the main markings and stencils Brian Lane figure - Colorful RAF pilot uniforms are great subjects. Aircraft interior and exterior color profiles in the instructions Surface detail - stressed skin effect around some fasteners, rivets, panel fasteners, hinges -- all good. Fine and consistent panel lines Landing gear design - "weighted" wheels with flat spots and slight bulges. Things to look out for (for future builders) My copy had some very slight molding sink marks on the tops of the wings above the wheel wells. Easy clean up. The exhaust manifold tips needed some extra filler material (CA glue). Again, easy clean up. The molded seatbelt harness is fairly thick in the section between the seat top and the armor plate slot. I thinned the seatbelt quite a bit by scraping underneath and cleaning up. Another option is an aftermarket seatbelt as the kit provides a seat without the molded seatbelt. Some of the molded detail needed a little sprucing up. Nothing major. Thanks for looking. Needless to say, I highly recommend this kit. Comments and critiques are more than welcome. - Jim Jenson
- 23 replies
-
- 29
-

-

-
- battle of britain
- raf
- (and 6 more)
-
"What's a Lockheed Gold Star?" I hear you ask: the answer is a silly idea I had whilst looking for a scheme for a 1/48 T-33 which I bought on impulse. It was an Academy kit, and I almost did one of the box schemes, but I was in a silly mood so this won out. No elaborate back story, simply that there was no Folland Gnat in my alternative world, which not only allowed me to put a classic scheme on this classic trainer, but meant I could use a serial that had belonged to a Gnat irl. As for the name "Gold Star", it continues two de-facto series: Lockheed aircraft carrying names relating to stars; and the RAF naming trainers after something academic. OK, perhaps not as academic as naming it after an Oxbridge college (eg Balliol), an Ivy League university (eg Harvard) or a teacher/professor (eg Magister), but still vaguely to do with school. Markings were a mixture of decals and sprayed with home-cut masks. It was done very quickly as a mojo-restorer, so don't look too closely at any imperfections, of which there are many: just see whether you agree with me that this classic trainer looks rather good in a classic trainer scheme it never wore in reality. I thank you.
- 2 replies
-
- 11
-
-
- mojo-restorer
- raf
- (and 3 more)
-
Tim Perry at Flying Start Models has been busy beavering away in the background designing and printing a range of ordnance in 1:32 - today we take a look at his RAF 1000lb Free Fall Bombs... Blue skies! Iain
- 10 replies
-
- 7
-
-
-
- flying start
- raf
- (and 2 more)
-
 We review a new set of decals from Fantasy Printshop covering the striking 2021 display scheme Eurofighter Typhoon of 29 Squadron, Royal Air Force: Blue skies! Iain
- 3 replies
-
- 9
-
-
-
- typhoon
- eurofighter
- (and 1 more)
-
Hi again, 1/32 Spitfire PR 1G and PR IV conversion for Revell Mk II kit - coming soon. Cameras designed and printed already and as per stand alone contents below, awaiting test shot of PE, decals at printers plus awaiting new canopies designed by Tore Martin of Falcon canopies. Photo preview show 1/32 parts (PR XI canopy and set also being worked on for Revell Mk IX kit) 1/32 RAF camera set - 2x F 52s, 2x F8s and 1x F24, control box and heater box, plus decals and PE Best wishes John
-
Hi everyone, I have been very quiet due to my bad hands - no improvement at all sadly. Pressing on..... the RAF Camera sets in 1/72, 1/48 and 1/32 are ready now and I also have a new 1/32 Gloster Gladiator Exterior Detail set available. anyway to save me typing too much just have a look at my updated website please and email me at aimsmodels1@gmail.com if you need anything, thanks http://www.aimsmodels.co.uk/
-
Well i finally got there, ive managed to source all of the bits i need to start this project so heres what ive got Kit Airscale cockpit instruments decals Resin seats (may not use these depends on the kit ones) Litining pod (thanks to wunwinglow) both the xtradecal and fantasy print shop decals (thanks to Phartycroc and Scotsman) also im tempted with the storm shadow's from the Revell typhoon i have spare metal pitol as for the exact aircraft, the plan is for ZA614 in the special livery, this is a photo i took a few years ago at RAF Coningsby all i have to do now is clear the bench so a few days before i start, and dont expect a fast build, im working 40+hrs a week on nights as a Nurse, more when i can
- 114 replies
-
- 19
-
-
-
G'day everyone, @mozart asked if I'd post some pics of this build, so here are the pics I have! I'm on a bit of a trainer kick at the moment so when I saw this for a good price on internet auction site, I decided to add it to the collection. Typical short run kit, plastic is very carvable, with fine recessed panel detail oh, a small sheet of photo etched, injection molded clear canopies with pre-cut masks and a nice selection of paint schemes. The kit makes you work with lots of carving and cleaning up of parts, gaps to fill and lots of interesting fit issues to solve but overall a nice model of a rarely kitted aircraft. I'm not entirely sure how either plastic instrument panel, or the photo etched instrument panel are supposed to fit to the instrument panel coaming. I ended up chopping up the photo etched panel and modifying the plastic panel to suit the coaming. Denzil
-
New release from Elan13 Miniatures RAF Pilot With Dog WW2 1/32 resin figure £15.00 www.elan13.co.uk
-
 I feel I’m on a roll at the moment so the above kit has come down from the high shelf stash. I’ve no shelf of doom builds or almost finished builds to get done. It was a coin flip between the Harrier, or an A-10. Both come with fairly poor rep’s, but I’m ready to give them a fair crack of the whip to create a couple of good lookers. To the Harrier first, I’m utilising some Wolfpack-D Extras. Cockpit, external parts, and using the model alliance decal sheets for ZD433 of No1 Squadron. I’ll be adding some AM weaponry too, later down the line. I know about the poor shapes of the nose, and won’t be correcting them. I’m simply not that good a modeller. I tend to make do with what I have at hand in terms of plastic. If it looks like a Harrier at the end, is good enough for me. All that said, I’ve made a start on trimming and dry fitting the office into the nose section. That’s nearly done. So I set about the canopy, polishing the seam from the outside, and sanding polishing the dry’ cord from inside. I’ve had a go at making my own from wire, using a drawn template. Not bad for a first go, but improvements needed for subsequent attempts. The only problem now is that during the lengthy polishing session, I’ve cracked the canopy a little. I’m gonna see if a dip in future and adding the new det’ cord will distract the eyes from the crack. If not, I’ll source another from somewhere.
- 5 replies
-
- 3
-
-
- trumpeter
- 1 squadron
- (and 2 more)
-
Hi everyone it is figure day! Picked up my painted Hans-Joachim Marseille (32F002 £12.00) last night and this morning received preliminary photos of my painted Rev Keymer (32F003 £12.00) and also this morning received the renders of my RAF / FAA pilot - 1950 flight suit sculpted by Greg Girault which I share now for the fist time. This figure will be in 1/72/148/132 and 75mm. I will post when it is ready. Email me at aimsmodels1@gmail.com if interested, thanks, John
-
Hello again, all. After a couple of non LSP kits, I decided I'd get back to the Master Scale. My lovely wife bought me the MkVIII Spit for Father's Day, so I thought I'd get right to it. I just have to say, this is, as we all expect from Tamiya LSPs, a beautiful kit. It could be built straight out of the box and look fantastic. So, naturally, I bought a bunch of after market . Actually, as I'll discuss later, I think I may have actually bought too much aftermarket (is such a thing even possible?) I went with HGW seat belts, Barracuda decals and cockpit upgrades, the Eduard exterior photoetch set, and a Yahu IP. My first attempt at HGW belts had been frustrating, so I have left that part for now. I do, however, want to talk about the interior resin upgrade set. It is of course, beautiful work from Roy as always. However, more to the praise of Tamiya than to the detriment of Barracuda, I'm not sure that it is that much better than the kit parts. I've posted below some comparison photos of the relevant parts. The seat is the one clear winner for me. Fortunately it's sold as a separate piece. Tamiya elected not to mold the very prominent backrest cushion, which Barracuda has corrected. The other thing I do love about these particular parts is that they're made to be drop in replacements to the kit parts, complete with attachement points of the correct shape to fit to the sidewall. (I have since removed the flare rack from the front of the seat, which to my understanding is not correct for this mark. The compass is nearly identical. I honestly can't even tell you which is which in this photo The throttle quadrant does show a couple of nice additional details, but the kit part is very good on its own. As you can see, I still struggle with cleanly separating parts from the casting block. That handle is askance because I had to glue it back on after breaking it during sawing. Undercarriage controls. Again, a few nice details, but not a stark contrast as there is with some kits. The control column. The barracuda part comes with wire and asks you to drill three tiny holes to accommodate them. I used a #80 drill bit but still managed to break the part. I ended up using the kit part, with the resin handpiece, which does add some nice detail where the lines attach. Sidewall painted up with paint scraped away for the bulkhead attachments. Rather than try to drill again and ruin my only remaining control stick, I used lead wire and just cut it where it's meant to be going through, picking it back up on the other side. Some solder added for the hydraulic lines from the undercarriage lever. For some unknown reason, Tamiya have chosen to leave very prominent defects in this door. After trying unsucessfully to fill and sand them, I scraped away the detail, smoothed it over with some Bondo, and re-added the detail by scratch. The open door below shows that in progress. I deviated from the instructions and added the sidewalls to the fuselage halves so that I could add some wiring. I just noticed on the second picture that I'm missing a couple of bits that still need to be glued down on the starboard side. These upclose photos also unfortunately are demonstrating my sloppy painting. I usually brush paint Model Master Acryl semi gloss black for these parts, but have been unable to get it appropriately thinned - it either runs everywhere or goes on too thick, as below. I'm expecting a bottle of UMP universal thinner, which I'm going to try on it before switching brands entirely, but does anyone else have a favored paint for this? I prefer not to try to mask and spray all these little parts, so brush painting is a must. Control column and rudder pedals. There is a trick of the light, here, the starboard pedal has not suffered from green overspray. I added straps to the rudder pedals from Tamiya tape. Here's my door. Need to clean it up a little still. Waiting on a new bottle of MRP RAF interior green. The crowbar has yet to be built, but I am thinking that I'll whittle it out of styrene strip. While waiting for my Yahu panel to arrive, I decided to paint up the kit part. It has the usual coke bottle effect on the instrument glass, due to the way Tamiya engineers them, but looks pretty good. The Barracuda set also comes with placard decals. I will add those as well, and may save this pre-made panel for the next 1/32 spit I do (there will definitely be another, as I love Spits and this kit - probably Skalski's MkIX). I just realized looking at this that I somehow lost the bottom three instrument decals! D'oh! And the Barracuda resin seat. First with a base coat of MRP ochre wood, then dabbed and swirled with some burnt siena and burnt umber oils for the Bakelite effect. I was going to give this a top coat with MRP clear red brown, but I think it looks pretty good as is. Thoughts? Anyway, I'm about to go away for the holiday weekend, so I'll leave these oils to dry for a few days and hopefully my IP will be in the mail when I return! Gloss, decals, washes, and seatbelts still to go before I can close up the fuselage halves. Thanks for looking - as always comments criticisms are welcome!
-
This year I aim to be building mainly RAF subjects and/or Great War subjects*, and here's one that's both, as my subject was from post-April 1918. As it happens, I had a clear workbench on the 30th December last year, and nothing on the Shelf of Doom, which is a first for me in a long time. So what to start my centenary-inspired RAF-fest with? I decided on the RE.8, so without further ado, I seriously devalued the kit in my stash by cutting the fuselage and wing parts from the sprues. There is not much progress so far. I've identified the wooden parts, and painted them, now I'm waiting for the oil "wood-grain" to dry. The lighter wood is Tamiya XF-59 with Burnt Sienna "grain", and the darker wood - prop and instrument board - XF59 and Burnt Umber. Any better suggestions, and indeed any comments in general, welcomed. Please be gentle though - my photography can probably be best described as "decent gear, but not much idea". As for my subject, I'll be doing C2731 of 5(AC) Sqn RAF, which is option 2 from Pheon's sheet RE.8 sheet. *Unless I get side-tracked by something ... Thanks for looking.
-
 1/18 scale Hafner Rotabuggy flying Jeep Willys Royal Air Force 1943 Solido diecast conversion & scratchbuilt The Hafner Rotabuggy (formally known as the Blitz Buggy or Malcolm Rotaplane) was an experimental aircraft that was essentially a jeep (actually a Willys MB) combined with an autogyro. It was designed by Austrian born British designer Raul Hafner of the AFEE - Airborne Forces Experimental Establishment after their development of the Hafner Rotachute enjoyed some success. The prototype was built by the M.L. Aviation Company at White Waltham in 1942. One of several failed concepts for the equipping airborne forces, the effort and risk in getting the Rotabuggy into battle would probably have outweighed its utility. Initial testing showed that a Willys MB could be dropped from heights up to 2.35 metres (7.7 ft) without damage to the vehicle. A 12.4 metres (40.7 ft) diameter rotor was attached, along with a tail fairing and fins, but no rudders. The design work was carried out by AFEE staff, while most of the construction was undertaken by R. Malcolm Ltd, with H. Morris & Sons assisting in the manufacture of the rubber hub. The serial numbers RD123 and RD127 were allotted for the two Malcolm Blitz Buggys, although they were never to be used. The basic Jeep was fitted with a pylon to support the two-bladed rotor and a fairing to carry the tail surfaces. The Hafner Rotabuggy, as it became known, was to carry a pilot and a small load, together with a complete tankage of fuel and spare wheel, spare tank, tools and snow chains. The pilot occupied the starboard front seat, but an alternative arrangement for a second pilot was made in the port seat with dual controls. The tail fairing was a plywood monocoque structure attached at four points to the rear of the Jeep and cabin. Because consideration loads were transmitted through the fairing in some conditions of flight and in heavy landing, the Jeep was strengthened locally at the points of attachment. The twin-spar tailplane had trimming flaps on either side which were adjustable on the ground by means of turnbuckles. Large endplate fins were set at a slight angle in plain view to give incidence relative to the local airflow. Replacing the standard Jeep windscreen was a streamlined sheet metal framework with perspex sheets. The remainder of the cabin was built of plywood. Access doors with large perspex panels were fitted both sides. A hole in the cabin roof accommodated the pylon, with allowances for movement owing to the elastic suspension. In the cockpit a special dashboard on the starboard side contained an airspeed indicator, a rotor speed indicator, a sensitive altimeter and a turnand- slip indicator. A standard telephone system via the towrope allowed the pilot to communicate with the tug pilot, the amplifier and batteries being located behind the starboard seat. The Hafner Rotabuggy, camouflaged, carrying RAF roundels and a prototype “P”.
 -
Hi everyone, Here's my quickest built I ever did a few years back, took me 5 weeks, almost OOB except for the True detail pit. A very affordable hasslefree kit , hope you like. Dan. More to come... Dan.
- 16 replies
-
- 20
-
-
-
- true detail
- raf
- (and 1 more)
-
Hi there I finished this some 4 weeks ago and have not had the opportunity to photograph it. Now I can ruin a decent model in one click and as you can tell it's not my thing!. I bought this at Telford SMW 2017 and it was one of those I had to have it as I normally buy 2nd hand kits. It goes together quite well and I'm pleased although it's tiny in scale and I had doubts at the beginning but I have vowed to leave 1/48 to the experts, I simply find it too small to make it an enjoyable build. Anyway some crappy photos to humour you with. Ignore the base as it's 1/32 and the only one I've got. IMG_0612 by Stephen Priestley-Dean, on Flickr IMG_0611 by Stephen Priestley-Dean, on Flickr IMG_0610 by Stephen Priestley-Dean, on Flickr IMG_0609 by Stephen Priestley-Dean, on Flickr IMG_0608 by Stephen Priestley-Dean, on Flickr Thanks for looking Steve.
-
Here it is, my first WIP thread on this site. I've been back in the hobby for a little over a year after a couple of decades layoff, and have been working in 1/48 exclusively and posting on FSM mostly. This will be my first 1/32 build, and I will be taking it slow since it's such a huge kit. I will be eventually painting and marking her up as one of the Amiens raiders from 464 Squadron. First picture is just the kit in box in my newly reorganized workspace. Also pictured is my brand new homemade spray booth. I think I'm going to start tonight and will post some pics once I begin. I have no hope to produce something of the same quality as some of the amazing threads I read on here, but I hope to have fun and learn a lot. I welcome any and all comments and criticisms - it's the only way to get better! Thanks for having such an inspiring and welcoming forum.
- 355 replies
-
- 14
-
-
Happy new year all. I've just acquired the Tamiya 1/32 Phantom F4j and am thinking of converting this to the UK version. I know that shortly after the Falklands war the UK bought 15 retired “off the shelf†F4j' s from the USAF. Any Phantom experts out there with advise on how much work would be involved to fo the conversation. Also any help sourcing RAF markings would be appreciated.
-
Folks - did a search on the site here but didn't find the answer. A web search also turned up an amazing number of mixes and comments about what are the 'right' and 'wrong' colours... SOOO - my friends, what are the 'proper' colors for WWII Roundels for a Spitfire (I am assuming the colours were standardized, but just in case...) Mk IXc? I'm building 2 1/72 Spits and have decals, but am trying to practice using masks hence my question. I see lots of comments about decals having the wrong colours so rather than just trying to mix a match for the decals I thought I'd ping this knowledgeable community. Oh and also for the fin flashes. Assuming the same blue and red but better safe than sorry. Can't wait to see where this discussion goes! Chris
-
So, this is my 3rd attempt at scratchbuilding a 1/32, aviation related vehicle. It has been in making for quite some time, but now it seems to come together rather well... I initially bought the new Airfix 1/48 Bedford MWD kit, to use as a guide for this build. 1.5 x 1/48 = 1/32 The chassis is scratchbuild using different parts from the spares box (engine, gearbox, rear axle) Fenders are made from milliput using a Humbrol paint jar as template... The grill on the bonnet sides, was quite a challenge, but after 3-4 trials I finally was satisfied with the result. Wheels are from E. Z. Models - Wheels for British trucks...
-
I know this may be a stupid question, but when I was a kid, this Mustang was very popular in the UK thanks to the Matchbox 1/72nd Kit. At the time, Dooleybirds upper cockpit surround were always shades of blue. Nowadays though, they seem to be invariably yellow with an OD anti-glare shield. Is this based on anything concrete, or simply Back and White Photo translation? I can understand why the OD Glare shield is now common currency, but having seen this plane in profiles and models which have DF loops which the original did not have, I am just trying to figure out if there is anything definitive...
-
 Here's my Spit, which I began over two years ago, with an extended break in between... (The WIP is here) This was a kit of firsts for me: My first camo paint job My first use of aftermarket decals, resin, and photo etch parts It would be no surprise for me to report that it was a well engineered kit and any fit problems I may have experienced were of my own doing... Further, I was delighted for the most part with the resin parts, especially the engine rocker covers, the pilot seat, and the cockpit hatch... I am not sure I would purchase the cockpit add-ons, other than the photo etched control panel... The Barracuda Cast decals (stickers) were really quite excellent and settled onto the craft better than any decals I've used; however, they are tender and must be used a bit more carefully than OOB decals... Finally the Gator masks I used for the camo paint job were excellent too... I would grade my build performance from two different perspectives: From the perspective of the top builders on this site, I give myself a B-/C+, because so many of the Spits contain far more extras than I could imagine adding, plus they are far cleaner builds than mine... From my own personal capabilities and experiences, I give myself an A-/B+ for stretching myself on a build further beyond where I have ever been before... much of that stretching was a result of following so many excellent builds on this site... I really love epic builds and this was one for sure...
 -
Hi folks, I've been working on this little project for a while, my first injection moulded kit, subject the T31 training glider used for several decades by the Air training Corps gliding schools. I've done pretty much all the kit design, including decals, and have had several 3D printed sets of parts made to check assembly. I'll have these on show, with some CAD images, at the forthcoming ScaleModelWorld show at Telford. If you are there, do call by and have a look if you can. Scale is 1:32 so it will match the Revell glider kits, and a whole lot more besides! Kit will be injection moulded, as finely detailed as I can manage while keeping it sensible for moulding. Decals will cover a number of different colour schemes, and enough code characters will be included so you can finish the model as 'YOUR' aircraft. I should stress this is still just a kite flying exercise at the moment, but all the hard work is done on the design. I'll be showing progress so far at Telford with a view to assessing financial viability and interest, before looking at funding the tooling. More details shortly..... Tim Perry
- 11 replies
-
- 3
-
-
- T31
- Air Cadets
- (and 2 more)


.thumb.jpg.5da8bff9741de420eb2e87addd8f2cf6.jpg)


