
Lee White
-
Posts
2,907 -
Joined
-
Last visited
-
Days Won
11
Content Type
Profiles
Forums
Events
Everything posted by Lee White
-
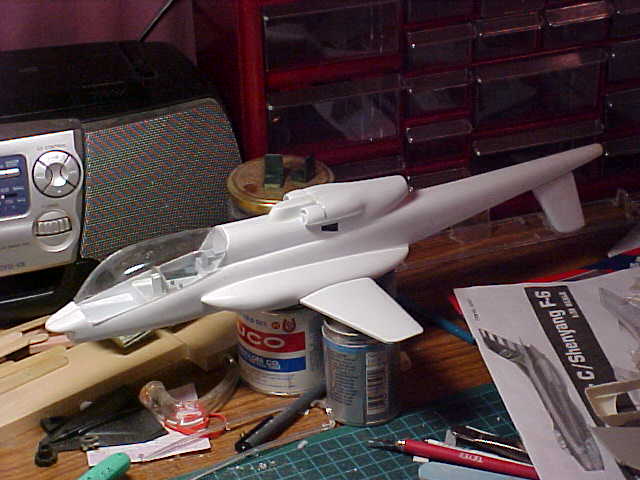
Hi Guys! I've had a few folks inquire as to progress, so I'm posting a pic to update what's happining on it. I had not done much to it for about 2 months, but now I've got a cockpit, (not yet painted) almost done, and I cut out the canopy to see how it fits. Well, it seems to be short by about 3MM! I can't figure out when/where this happened, but I'll be able to make it work by sliding back the pilot's portion, and moving the front half forward a smidge, and that should camoflauge this problem. I'll try to be a little more timely in the future with these updates. Thanks to everybody whom has asked about it!! Lee
-
Hey Jack!! The Bronco looks great!! I understand the need to re-work some parts of the model, since I now realize that that I myself would have done some things differently if I were building it today. I agree with your assessment that the nose needed to be re-worked. Originally, I was going to build an A model, but when I found a pic of the YOV-10D NOGS Bronco, which had a 20mm turret under the pod, I modified the nose. That's why the model had no pylons included. Keep us all posted on the build up. Also, to anyone following the build, you should all know the level of scratchbuilding involved on Jack's part is truly amazing. I started this model, and know all the "skeletons in the closet" involved in its construction, and the level of work he has done to make it an acceptable model is simply incredible. Lee
-
OK, I guess i'm gonna have to print a retraction here- The model reviewed by the good Dr. isn't the one I had. Now I'm going to have to research which kit I had. Maybe I can start by asking; "Who made the worst 1/32 Zero kit?" Thanks, Lee
-
Had this kit a while back. Paid $6 for it, and gave it away. HUGE rivets and very basic detailing. I'm not sure what it would take to backdate a -5 to a -2, other than the cowl and exhaust, it prolly would be worth it using a Hase Zero.
-
Yeah What he said....
-
The Lodela issue of the Revell kit comes with a vac canopy, vac torpedo and stabs, and a photo-etched cockpit bits. The can be found on eBay from time to time at very reasonable prices. This kit turns the "normal" Mk I/II kit into a Mk X. Nice decals too, IIRC. Lee
-
Alumilite is the most common model resin, so you've got the right stuff. Yes, it can be glued with CA. I have had pretty good luck avoiding air bubbles in my resin, and I think it's because I stir it a little longer than usual. When mixing the 2 parts 50/50, the resin will start to cloud while stirring. Don't stop. Keep going until it turns a deep,clear, amber color, and then pour into your mold. It seems to thin slightly this way, and maybe thats why I've had good luck. The parts take only a few minutes to form, ( the label says 3 minutes), but I like to leave them in for a few more than that, until the heat has dissapated. HTH!
-
Hey Joshua! Very nice work there. Keep posting hose pics!! Are you going to slush-mold the fuselage, or will it be solid? TTFN!! Lee
-
Hi everyone! If anyone needs a 1/32 RIGHT NOW, check out this link- http://www.papermodels.co.il/OV10A.htm Have fun!! Lee
-
Hi again, Just as an addendum, if you do try to make your own model, I'd like to suggest starting on something simple. That's why I chose the Bronco- Slab sides, minimal compound curves, and a wing that wasn't swept, and did not have a taper. Initially, it was a short nosed version, since I wanted to do a Black Pony, but then i saw the NOGS version, and made a longer nose. That is why there is no pylons on it. This model was pretty rough, and to see what Jack has done with it is truly inspiring. Might have to do another, now that I know what I'm doing!! Lee
-
True. The molds were part of my first attempt at making my own model, and were made of balsa and an R/C model filler that was very light and easily sanded. They couldn't take the heat, and began disintegrating almost immediately. I tried other methods too, like fiberglass covered foam, and keel and frame before just going the conventional route of carving Basswood. It really isn't difficult, and has become rather enjoyable in it's own right. The subject of my keel and frame experiment was to have been a 1/32 B-47. I got the fuselage started, getting as far as glueing all of the frames, or bulkheads onto the keel, before stopping. It is feasable, but I stopped 'cause it is too friggin' big. Makes my XB-51 (almost 3 feet long) look like a 1/72 kit. I still have it, and will dig it out and snap a pic. Anyone who wants to try thier hand at scratchbuilding should get the book by the same name by George Lee and John Alcorn. When I first got it, it looked intimidating, but after reading it a few times, realized that it wasn't so difficult. I would really like to encourage anyone who is thinking of trying it to do so!! Lee
-
Hi Gene, I seem to recall the Combat model being about 1/36 scale. I was looking at F-16 for the main gear, and MiG-21 nose gear.
-
Hi Gene! Looks like a fantastic model!! Is it a scratchbuild, or a corrected Combat models Crusader kit? Keep posting updates!! Lee
-
Hi Jack! Sorry to tease you like that! I'm sorry that i did not write back sooner- The few pix i have of the Bronco's flaps show what appears to be a smaller segment between the wing and the flap when in the lowered position, but there is no daylight visible between these segments, so they're not slotted. I hope that this helps- there aren't too many pix i could find. Hopefully, your cheyenne will arrive shortly!! i know you and Larry will do great things with this model!! Lee
-
#4

-
#3

-
#2

-
Here are some in-progress photos of my Cheyenn. Wings are just placed against fuselage, and forward fuse is not yet glued. I'm gonna need some putty around those intakes!!

-
Hey Larry!! First off, it's an AH-56, not AH-64!! You'll end up with some wrong info if you do a web search for the latter!! I'm gonna use bits from the Apache and cobra, but not much. The rotor is totally different- if you use an Apache rotor on the Cheyenne, it will be noticable. The oddball main rotor was what made the cheyenne different from all other helicopters, before or since. I'm building mine with the canopy closed, since it is so big, and seeing inside won't be a problem. I've got the kit cut and sanded, and a cockpit tub built. How far along are you, Larry? I'll bet you're almost done! Lee P.S.- Be patient, Jack!! It will be there soon- LW
-
Hey guys! I'm hoping that one of you will finish the kit first- I'm the slowest builder under the sun, and it will probably take me till 3 days past forever to finish one, and I'm hoping to see one of yours here on LSP to motivate me to finish it!!! Lee
-
and some simple "instructions" to help Larry and Jack (and myself!!) navgate the build.

-
These are thie simple resin bits- The nose turret, belly turretw/ fairing, and landing gear fairings.

-
This is the canopy. I thought that this would be a bear, since the canopy is undercut due to the bulged sides, but it wasn't a problem at all.

-
Here are some pics for you- This first pic is the major parts-

-
Hey Mike! Thanks for the wildcat update. Hope to see it at the first Legacy meeting!! BTW, When where ois it? Gotta make sure I'll be there! Chesley (AKA Lee to most everybody else here)
