
Derek B
-
Posts
11,089 -
Joined
-
Last visited
-
Days Won
25
Content Type
Profiles
Forums
Events
Everything posted by Derek B
-
Hi Tony, Mind-blowingly great work, as usual! I understand your transparency woes. Perhaps a compromise may work? As you have put a lot of time and effort into your transparencies for 3D printing, why not prepare them for clear resin casting instead of vacforming? Cheers Derek
-
Nice choice Karl...I shall follow this one! I am also impressed by O.W's models - especially the Hellenic F-104G! Derek
-
Hi Sean, I cannot find any specific technical information for this piece of equipment online. However, there are some clues. My instinct, based upon your single image, is that the colour means something; normally, anything painted red indicated take care or do not touch. The second thing is that it does not appear to be part of the ejection seat itself or part of its normal operating system. Also, it appears to be present in one form or another on most Hunter aircraft types irrespective of whether a Mk.2 or 3 type ejection seat was installed. Therefore, it is my belief that this is most likely part of the canopy jettison system initiation assembly, which feature a cable which is connected to a cartridge sear attached to the rear of the ejection seat frame. I think that Hunter aircraft had a seperate canopy jettison handle on the left forward instrument consul and initiation of ejection using either the face screen blind or seat pan handle would also jettison the canopy, so they were both probably mechanically interconnected. HTH Derek
-
Interesting Sean - I haven't noticed that feature before! I do not know what it is (yet!), but I shall do a little investigating to see if I can figure it out for you and get back to you when I do! Cheers Derek
-
I haven't thought about that yet? I shall see how accurate they are to start with, in terms of location, and they look pretty good already if somewhat very understated, so I may just enhance them. So yes, I may well rescribe everything (I will also fill and sand the windscreen). Cheers Derek
-
Lovely start Sean. Derek
-

Hawker Hurricane 1/12 scale scratch build
Derek B replied to hurribomber's topic in Works in Progress
Fantastic work Thomas. Derek -
This is such a magical stage of construction, where the whole airframe is presented in such a mouth-watering way and just begs to be completed (the imagination simply runs wild!). Great (and expeditious) work Peter. Derek
-
Hog's firepower display - A-10C - Full makeup
Derek B replied to red Dog's topic in Works in Progress
Massive improvement over the standard kit parts - well done Oliver. We're gonna need a bigger airframe... Derek -
Thanks guys. Fuselage halves now glued together. Derek
- 35 replies
-
- 10
-

-
Good choice Max (and a very popular modelling subject at that). Yes, I believe that you are right about the rudder mass balance weight modification. Researching the Supermarine Type 224 will probably provide you with a wealth of background and development history which was eventually incorporated into the Supermarine Type 300. For instance, those darker wing leading edge panels identified on the above 1/48 scale build correlate to the originally designed - but abandoned late on in its development cycle - evaporative radiator panels, which was a carry-over from the RR Goshawk powered Type 224 aircraft. Some more Type 300 images for you: Interestingly, one of the Type 300 design proposals looked like this, which shows clear Type 224 lineage: (Somewhere, I have seen a photograph of the original full size Type 300 wooden mock up hung from the Supermarine factory roof rafters to save space - it looks very much like the above drawing). Derek
-
Shaping completed. Having taped all the parts temporarily together in order to determine the undercarriage balance point, lead sheet pieces were secured to the cockpit bulkhead. As directed by the assembly instructions, strips of plastic from the kit scrap plastic sheets were cut into corresponding lengths and were glued to the fuselage centerline using normal polystyrene tube glue. Whilst at the UK IPMS Scale Model World (SMW) show at Telford earlier this month, I found some 1/144 scale Finnish Airlines DC-10 decals by Classic-Airlines.com, so I bought a couple of them in order to resolve my cracked and aged Welsh Models decal sheet issue. Derek
-
I can tell that the fun and enjoyment elements are going to be high with this one! You'll have to stop doing this sort of thing Peter, as you are beginning to cause me thoughts of wanting to make something in this scale as well! lol Derek
-
Ooh, I didn't see that one coming Peter! First thing I noticed was the cockpit photograph - specifically the internal longitudinal fuselage spars - which shows the very clear future Spitfire ancestry! Good luck with what will be an awe-inspiring build. Cheers Derek
-
Laminar Flow Design + Tamiya = Spitfire XIVe
Derek B replied to Uncarina's topic in Works in Progress
Looking great Tom! Derek -
Love the early Spits Max, especially K5054 in its final form before its demise (pretty much Mk.1 standard in many respects). With regard to the gun situation, Wikipedia has this to say about it: https://en.wikipedia.org/wiki/Supermarine_Spitfire_prototype_K5054 Continuing development[edit] (Mid-to late 1936?) Back again at Martlesham Heath, speed tests proved the troublesome secondary undercarriage doors to be unnecessary and they were removed. A standard set of eight .303" Browning machine-gun armament was fitted with the wings, already designed to accommodate them, being modified accordingly.[27] [27] Price 2002, p. 49. This may suggest that a production set of wings (with full eight gun armament) may have been installed on to K5054 at this time? (something which will require further confirmation). The first two images below may support this hypothesis when the two underside views of K5054 are compared (early flights Vs. last flights) - note the what appears to me installed guns and gun bay heat vents on the the wings of of K5054 in its later incarnation. Derek
-
Very nice Chris, well done! Derek
-
Great work Tom. Many modellers are shocked by the size of the Avro Lancaster in 1/32 scale. Although the Short Stirling had a similar wing span to the Lancaster (as did all of the British four-engined bombers due to the maximum hangar door width during WW II), it had a considerably longer and deeper fuselage, which makes this model a real monster in 1/32 scale! Derek
-
More work on the 'hot end'. Jet pipe exhaust internal detailing completed and both sections re-joined together. Derek
-
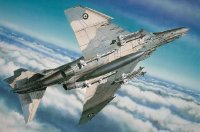
RAF FG.1 XV571 WILD HARE Phantom Conversion
Derek B replied to Anthony in NZ's topic in Works in Progress
Wonderful (and essential) AM tanks Ed, well done and thank you for producing them. Derek -
Hi Max, Just some general Google image searches (Hawker Hunter F.5, 56 Sqn RAF Hawker Hunter - with and without WP115 - etc). Some of the black and white images are here: https://www.ebay.co.uk/itm/196064736464 (the images enlarge when you scroll over them). Enjoy! Derek
-
Hmm, they do appear to be in a straight line on most of the images I have seen Max, although as you say, they generally have tanks and ammunition collector link tanks fitted, however, I am certain that yours will look superb whatever way you decide to keep them! Derek
-
Laminar Flow Design + Tamiya = Spitfire XIVe
Derek B replied to Uncarina's topic in Works in Progress
Thanks for that Tom, looks like I will have to sign up to the LSP masks website! (I have all the gear, but no idea!). Cheers Derek -
Always nice to see an aircraft on its own legs! Great work Chris. Derek
-
Looking good Kev! Derek


