

ruzlkampf
-
Posts
3,126 -
Joined
-
Last visited
-
Days Won
4
Content Type
Profiles
Forums
Events
Everything posted by ruzlkampf
-
Doing the same to get a width;

-
Select my 'ruler' and slide it over to even it up against my drawing to get a 1-1/4inch overall height. Your methods may vary, but ya'll get the idea?

-
Going back into my dungeon, I hold a ruler up to my monitor and draw a line to use for a 'ruler' for scaling out my new marking. Again, the reason for showing how I'm doing the markings for the ME-110 are for their simplicity. I couldn't have chosen a better subject. Doing my chicken-peck pixel counting method to get a width for my white crosses, and using my digital 'scale' to get things lined up.


-
You'll see what it looks like all bunched up in a bit. Now I want to do some upper wing crosses. Just like for the codes on the fuselage sides I took a piece of paper and 'guesstimated' about how big they are by crudely drawing with paper/pencil. After measuring the overall length/width,....it came out to be 1-1/4 inches. This doesn't have to be too exact, remember how we can select an image after it's drawn on our canvas and resize it to exactly what we want anyway? It's always a good idea to get it fairly close to begin with, because there's a GOLDEN RULE when doing image editing. "Big image reduced smaller.....GOOD, small image enlarged bigger,....BAD". More on that in a future tutorial.

-
Let's use the magnifying glass to zoom back out and see what we've got. I can see the red center of the roundel on my original, but the limitations of posting here make it kinda tough for everybody else here. This is actually just about right, but I don't like the spacing so we'll move them a few pixels closer. Like this;


-
Now remember my 'M' is 3/4 inch tall? (that's about what,...18-20mm to the rest of the world?) I'm going to use my pencil an deftly make an illusion of this kill marking. As everybody can see, this wouldn't work for squat on a 1/48th or 1/72nd model, but just squeeks by in 1/32nd. I hope. Now that I've made one,...I'm going to do the select/copy/paste thing to make a row of them. And this is what I came up with;


-
OK, I'm back. Derek! You're AWAKE? Whuh oh, and here I am giving him crust and talking about him behind his back. For those who have been following along, you must've figured out by now that Derek and I are dear old friends,.....and I've known him for a least a week, and my 1/2 brothers 4th cousin married his adopted uncles 5th wife before she ran off with a camel and hasn't been seen since. So basically we're brothers with a different mother who can almost claim to be related. I hope I got that right? Bahahaha! Hey, I'm a dumba$$ American who can't count past 9 cuz I ran over one of my toes with a lawnmower after I rolled into that fire dreaming spiders were chasing me and only woke up cuz of the smell of burning hair and haven't been able to blink since.....throw me a bone here, OK? heh heh, I was hoping you'd join in the fun buddy.....we're going to talk about dots now,and I know that's a subject dear to your heart and something you've been pondering since adolescence. " How small is small Russ?" ( No, I'm not talking to myself, I'm just musing aloud) Let's ponder the imponderable shall we class? Before ramble off into quantum physics and my pizza gets cold. lets find out. My 68dpi dot above is as small as I can go, but somebody with a 300dpi canvas would be able to go 3 times smaller and be able to draw in much more detail. There is still a law of diminishing returns here somewhere. A squadron badge on a 1/144 scale Phantom is only so big, and a 1/250 Phantom badge would only appear as a dot to our human eyes no matter how much detail it had under a microscope. We're going to create an illusion of a German WWII kill marking in 1/32nd scale. This usually consisted of a British roundel on top of a white bar. Lets use that red dot as the center of that roundel (curious fact about digital painting, there are technically NO circles.....they're round squares if that makes any sense) and go around it with a bit of blue to leave a one pixel white center roundel. This is as small as we can go.

-
Whew! That part is done. Hurray! Let's make some kill markings now. Whoaaaah Nelly, not so fast. Yes, we can thump our chests like some silver-backed gorilla and crow about our prowess with making some block letters now,.....but we have some limitations (gaaaaah I hate that word) here. Come sit down beside me for a short chat whilst I wax eloquent. I'm going to pull out that magic key to illusion I talked about called 'resolution'. Not going to get technical, cuz we're dummys and Derek is already nodding off again back there. We just want to know how to put a serial number on our Piper Cub, right? Remember on one of the first posts I had about re-sizing your 'canvas' to fit your decal paper? I underlined what the 'resolution' was in the paint program while ya'll were throwing spitballs at each other? On my home PC it's 68 dots(pixels) per inch.(at work it's 81 dots per inch,.....or you'll see it written dpi) I'll have to ask my 'European Consultant' what it is in metric, but ya'll get the idea right? This is no accident that the numbers are in this range. The human eye can't differentiate too good on anything over 72dpi and things blend into illusions that are recognizable as images to us. Anything less than 72dpi looks to our eyes like those jagged pixellated letters of mine under zoom. Those hotty-totty guys like ScanmanDan with their Photoshop software can begin an image at 300-600+ dpi. That's 3 times more dots than we got. What does this mean. More dots,....'smoother' less jagged image. I'm going to illustrate that here under the guise of making kill markings and kill 2 birds with one stone. But first, I'm going to run to the 24hr mini-mart and get some java whilst everybody talks amongst themselves.....and ponders the pixel. Back in about 5 minutes;

-
Here, I'll do it again for those that took a snooze 2 pages ago. Last time though, we've got to move onto doing some printing!

-
All back to black now, and everything is sized correctly. Being a lazy sack of potatoes, I don't want to redraw this again so we're going to do the 'select', right-click,'copy', 'paste' trick again. Remember how to do that? I zoomed back out to do this cuz it's easier.

-
Well, I want black codes and did them in green for ya'll for some contrast while I was doodling around with them. Let me zoom back in using the magnifying glass, and choosing my color for 'line', or 'brush, or 'pencil'.......I'm going to start changing these back to black. I wanted to do it this way, cuz a know a few might like to see putting a contrasting color border on an image.

-
OK, now I'm going to pull a rabbit outta my hat.....(oh wait a minute, it's gone. Dadgummit I wondered where that darn Derek got that coney for his lunch) and go to the magnifying glass button and bring this to the canvas size we made originally. Looks a lot different from what I typed out originally, eh?!

-
I got this,.....2 letters that are the wrong color for what I need, but are correctly sized and look like pixellated lumps of crap! Bwhahahahaha! Aaaaaah, but my mentally challenged friends,....the entire digital WORLD is nothing but a bunch of pixels that look like jagged shards of glass. Just like any kind of art,...it's all about the illusion. The human eye can be fooled and tricked so easily it can seem like sleight-of-hand and magic, but it's just a bunch of dots on a page! The key to the magic world of illusion is something called 'resolution' in an image. More on this in a minute when I do my kill markings.

-
And using the eraser tool and pencil to get rid of all those barnacle-like pixels that keep hanging around,......

-
Doing the same thing I did with the 'M' using the pencil and brush to fill things in;

-
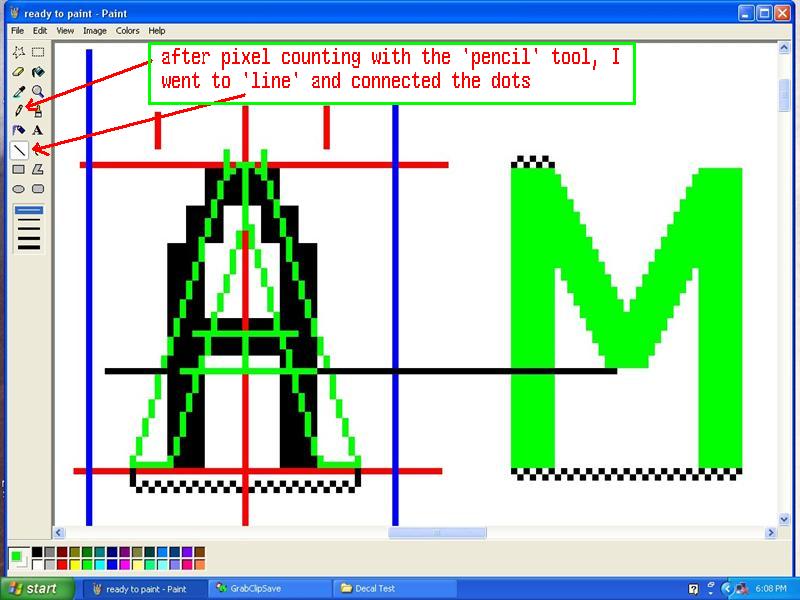
Using 'line' and choosing a color I start connecting the dots.
-
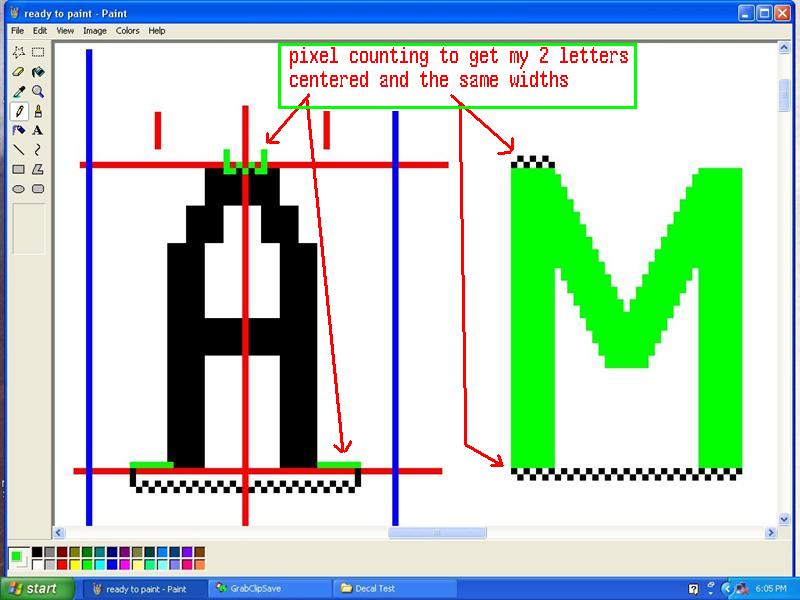
Now, we've gone thru almost all of the buttons that youll probably ever use and the Paint part of this lesson is almost over. There is no substitute for experience, so just doodle and erase, flip and rotate, everything until you get the hang of it. This part of the lesson has been about CREATING from scratch images in paint for those with no scanner. It'll start getting fun when we start importing images and editing them to our tastes and stuff. I'm going to move on to the 'A' now and do my chicken-pecking pixel count to again get everything centered and the same width as my 'M'. I started with these letters and fonts for creating something from scratch intentionally as they are block letters and 'easily' duplicated. So we're going to pick up our skirts(uuuhhmmm, well except for Derek who prefers evening gowns. Just kidding with ya again my dear friend!) and start moving along at a faster pace now that we have an idea of what these buttons are capable of doing. Again, you may find that you have an easier way of doing this that works for you. Go for it dudes! Getting my widths and general outline started by counting pixels;
-
Here's what you get after wiping all those unwanted and unloved pixels off the page. All this may sound complicated, but it's really only a few clicks of your mouse and a moment of your time in the real-world. As I said in the beginning,.... it's a lot easier to do than explain. Let's move on.

-
Here's what that eraser menu looks like. Choose the size of your photon-torpedo to send the pixels into another quadrant of the galaxy. It's fun! Whups!, Forgot I was talking to dummys,.....it will only erase while holding down the left mouse button. Remember the 'undo' button!

-
Heeeey Remington! Glad you're enjoying this long slow dirge into infinity! Paint program isn't difficult, there's only about what,....8-10 buttons? The difficulty is describing how to get these tools to get what you want them to do without banging your head on the desk! Once I get past all these basics(this is the LAST Paint tutorial by gosh!) things will get a LOT more interesting. I'm sure a lot of others with different editing software will be chiming in and the knowledge base will grow explosively. They don't want to play with us yet, cuz we're still riding around on tricycles, and haven't even moved up to a bike with training wheels yet! OK, I went ahead and picked those little buggers out of the tops of the legs on my 'M' and can use the 'eraser' tool to clean huge swaths of area around my image. Here's where you find it, and it's use is pretty obvious. Any problems or questions with this, well, you'll just have to talk to my 'European Consultant' when he gets back from the bathroom,...looo,...head,....powder room? Ohhhh whatever. He's been taking notes.

-
After filling everything in, it's time to clean up around my letter and see what it looks like. There's an eraser on the tool bar, but it won't get into the little crooks and crannies of my 'M'. I'm going to paint those areas white like my background with my pencil,....but what if you're background is some color that isn't on that color palette below? The 'color selection' tool is one of the handiest things on this tool bar, and it's usefulness will become obvious the first time you use it. Basically when you choose this your mouse curser becomes an 'eyedropper', that when you put it on any pixel and left click will display the color of whatever INDIVIDUAL pixel it is pointed at on the palette below. I'm keeping things basic here, and just took a sample of my background color(white) to choose a color for my pencil to get up into the tight places of my letter to get rid of all those lines I laboriously slathered all over my image.

-
Now let's call out the heavy artillery and throw that pencil away. Don't worry,...it's there anytime you want on that tool menu. Remember, what I'm trying to do here is show what all these buttons do, where they are, and how to manipulate them to your advantage. WHAT you do with them is entirely up to you, and is called 'art'. Let's go from a pencil to a brush so we can cover huge swaths easily and fill this in. Go (obviously) to that 'brush' button. This gives us almost everything from pin-stripe brush to something to paint a house with. Uuuuuhhh, remember the 'undo' button again? I've learned to paint in little swipes to keep from having to constantly touch things up, but go on......have some fun!

-
Feel free to doodle to your hearts content, and do things as they come to you. Yeah, we're going to make a huge pile of scribble, and you're going to be cussing a storm trying to manage that mouse to draw what you want....but that's OK. If ya ain't cussing, ya ain't trying, right?! Remember the 'undo' feature, it's your friend. I'll be showing ya'll how to go about cleaning up this mess in a bit. Here's what I ended up with.

-
You can also draw diagonal lines, which is a lot of fun. Here's a view of my 'chicken-pecking' method of using my 'pencil' to draw offset dots to measure number of pixels to keep everything the same width and distance apart on my 'strategically placed' center lines and whatever it was I put those other ones are there are for. They look cool though, eh?!

-
Now, after 3 pages we finally get to draw something! Hey!, Somebody take those crayons outta Derek's mouth....ggggrrrrfff, no telling where those things have been. OK, if we're going to draw we need a pencil. Nobody panic! We're not going to let Derek have anything sharp and pointy.....this pencil is only virtual and uses your mouse to draw what you will. It only draws in one pixel lines or dots, and is quite handy. I'm going to outline my number with a different color (which you can choose on the color palette at the bottom) just for clarity.

