

ruzlkampf
-
Posts
3,126 -
Joined
-
Last visited
-
Days Won
4
Content Type
Profiles
Forums
Events
Posts posted by ruzlkampf
-
-
Whoochee, lah lah!
 This kit has had me pinned in the 'Cuban head-lock & Pinch of death' for the last few days Alfonso! Doesn't happen often,...but I just had to walk away from it for awhile, until I acquired some different 'special weapons and tactics' to confront it with. Darn kit defies everything I can throw at it and just sits there with a scoffing smile....mocking me. Grrrrrrrr.
  Time for some voodoo incantations, and my shuffly finger-snapping dance to cast the demons outta the plastic.
Bahahaha! I don't know about dedication Phil, more like being onery and stubborn as an old army mule!
 It will succumb to my demands.....,eventually....even if I have to encase it in a protective layer of putty to contain it's evil. I'm trying to handle it as little as possible in case something weird rubs off on me and I start growing hair where none has ever been(or supposed to be) and I start howling at the moon. Or sumthin.
Oh yeah! Revell DID have a kit of an early F-16 didn't they Derek?! I can't remember who made it in red/white/blue prototype markings, as that was when the dinosaurs ruled the earth and I was still grunting for my food. Think I could've scratch-built an F-16 for all the effort I've already put into this particular kit. Making an Australian F-16XL is still within the realm of possibility if this continues it's transgressions.

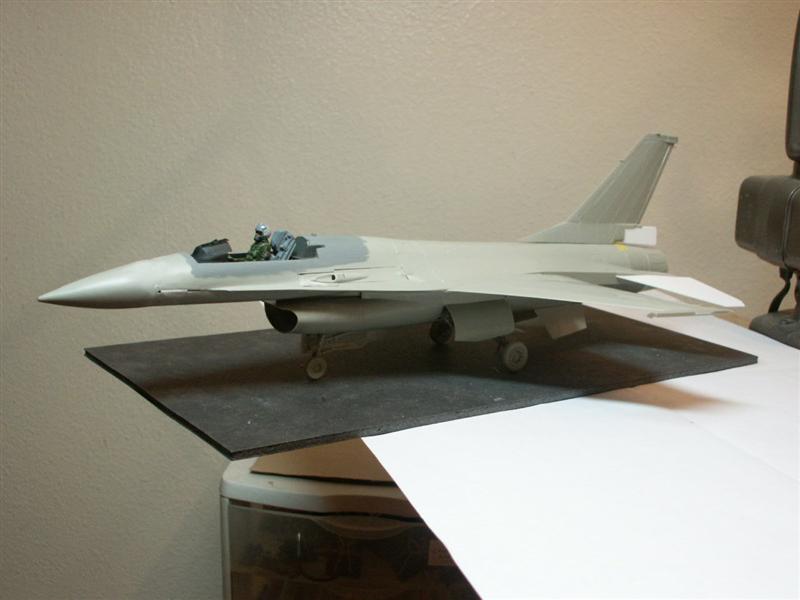
But i digress; Got the front of the nose re-sawed and shimmed to mate up to the radome more or less. Did the same for the wings, and a plethora of other items, so I could get everything glued up. Finished off re-sizing the elevators, installing the ventral fins, and got the beginnings of an extended parachute-pack under the rudder. It's now ready for putty.
Nose shim-job;

Pretty far along on the cockpit, as I'll have to have it closed up for applying putty around the canopy edges. That didn't fit too hot either.
-
Gone about as far as I can with the kit supplied pieces, and it's basically looking somewhat like an F-16A now. Time to start doing some mods to bring things up to snuff and figure out what changes I need to make this look more like I have envisioned. I'm planning on having this knocked out before the end of next week, so it's time to get moving. More pics as things progress!
Later, Russ
-
Geeez, see how the canopy distorts the pilot? Looks like an egg-head from that angle.
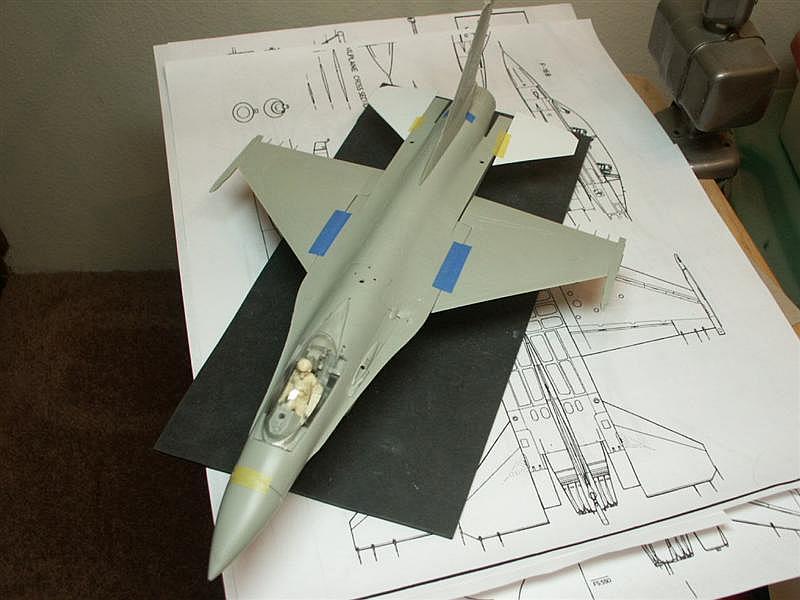
 I'm always mentioning the poor fit and how I have to massage every piece; here's an example. Look at the gap at the trailing edge of the left wing,.....and the corresponding gap at the LEADING edge of the right wing. I'll get it all whupped into shape eventually. I'm even starting to enjoy my little forays into carving on things,.....the plastic on this kit is soft as soap, and whittles/glues nicely.
-
View from the front. I got the cannon bay covers tweaked just enough to dribble some dissolved putty into the gaps to smooth things out.(well, as much as they're ever going to be anyway)
-
Wow Harv! You mean this kit actually has something recognizable?
 Interesting. I'm thinkin this kit also must have an original style wheel hub pattern also, cuz it doesn't match up with the pics I showed. DRAT! Makes sense they'd upgrade though with the escalating weights during it's service life. I understand these Norwegian F-16's originally had the black radome and smaller elevators of the early Block 5(?) batches. I get bleary when I go thru all the batch sequences, and haven't got them straight yet. Think I read where they were built by Fokker in the Neatherlands for the European consortium, which is pretty neat. Thanks for the generous and kindly offer of the seat buddy. Much appreciated, but I'm trying to slide by with as little effort and modifications as possible just to get this done and out the door! heh heh.
OK, that almost went up in flames tonight when I couldn't find one of the wings.
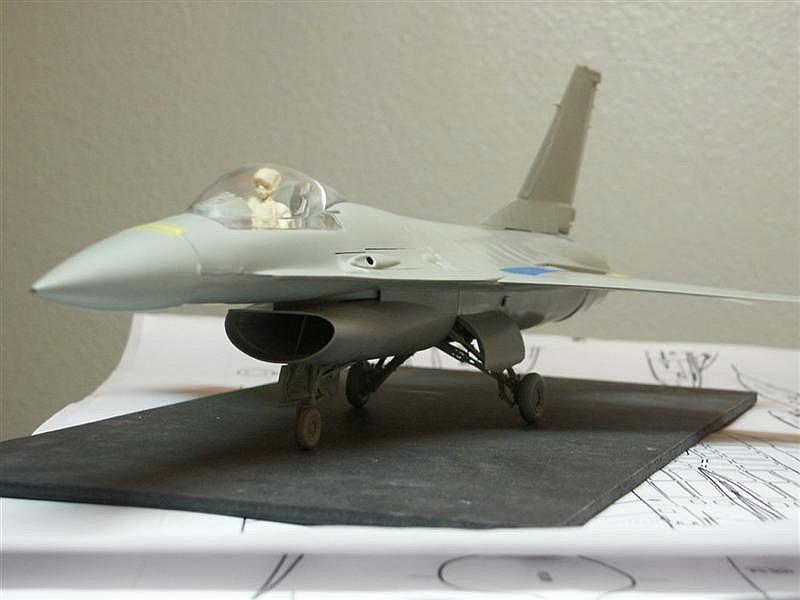
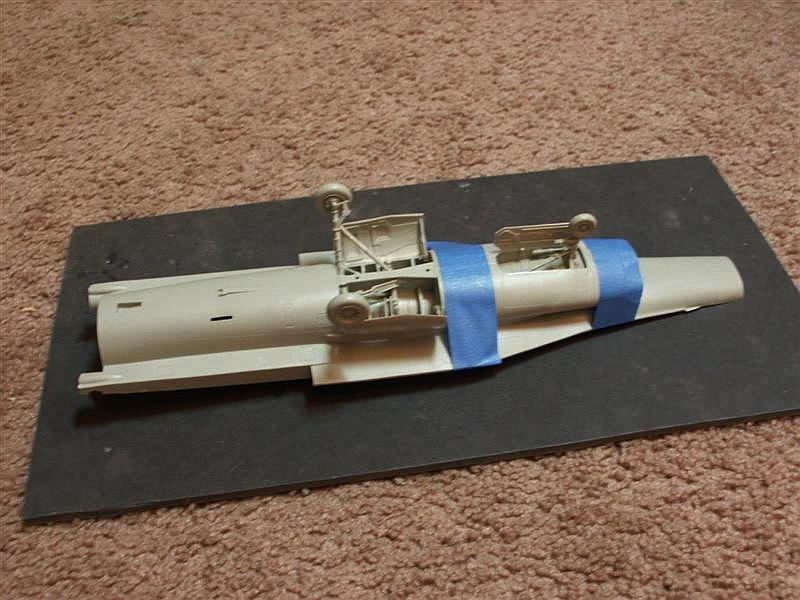
 This came VERY close to morphing into an Australian F-16XL wanna-be, woulda-coulda-shoulda kinda build. Whuf, fortunately I found the wing in an ME-109 box. After taking all the clamps, tape, and rubber bands off the fuse after glueing everything up,....I taped up the wings and pseudo-elevators to get my first 'sitting on it's wheels mock-up' looksy. Whoohoo! I'm 'gettin er done'! Here's where I'm at;
Liberal clamping closed that unsightly gap between the fuse and intake into within putty territory. Uhmmm, the radome is about 1-1/2 mm too tall. Sigh, par for the course.
-
OMG,.....I want 24 red bombs!
There's not a yellow stripe in sight,.....hmmmm may have to acquire another Phantom kit methinks? Yup, think I saw a pic of a Marine F-4 operating out of Da Nang doing short hops 'in-country' around the airbase against viet cong with 'only' 22-500 pdrs. Couldn't fit the other 2 because of interference with the main landing gear, or sumthin like that. Sure wouldn't have much range or maneuverability.....but what a cool load-out. Great pic Phil! Sorry for the interruption Karl; We'll let you get back to building your model now.

-
Wheehuweee! Lotsa great ideas here for sure!
Did some drawing tonight to put my dollar-two-ninety five into the collective think tank going on here. Doesn't require adding a lip, or beveling a bulkhead to conform to a tapering inside shape, or even cutting a fancy bulkhead to fit 4 tubes. Uses the kit rocket motor to hold the bulkhead in place and prevent it from 'pushing thru' while trying to glue it in place. Uses a light to trace around whatever size/shape opening happens to be at the nozzle end of the fuse, and if you don't have any styrene tubing the correct diameter laying around.....lets you use the kit nozzles in a wider 'spread' to fit the larger new bulkhead.(after cutting them off the kit rear bulkhead of course) Some xtra notes for sketch #'s;#1-Killing 2 birds with one stone here. Creating a lip while thinning the edges of the rear opening. If sanded/shaved at this angle,....the thicker the plastic is, the more of a flat area for that bulkhead to glue to....so no need to bevel the new piece.
#2-Might add a few whisps of glue to hold the styrene in place while tracing around the opening.
#5-You can see how the new rear opening would be flat. Using the kit engine to attach the bulkhead eases handling/positioning/ and keeps it from 'pushing in' once installed. Allows you to use a fuse half to position things easier.
Because I'm lazy, and in a hurry,...here's how I'd do this operation;
A piece of PVC tubing with a scrap sheet of styrene tacked onto it held up to a light to show how easy it would be to trace around any irregularly shaped opening. Hope this helps Kevin, good luck!
-
Aaaaaaah-haaaah.
I got a simple slick way of doing this that doesn't require any special talents or a lot of fancy cutting Kev! One more question; Is the rocket motor already glued inside the fuse? What I'm wondering,... is there a bulkhead in front of it that which wouldn't allow you to shine a light (or held up to a light source) to shine thru the fuse from the cockpit opening aft?It would be easier for me to draw a pic, scan it, then post it here on how to do this. You could even use your original rocket nozzles(but not the bulkhead) if you don't have any styrene tubing the correct size. A very simple inexpensive 'farm boy fix' to get your rear bulkhead with a lip around the edge using your existing pieces. Except one small scrap piece of sheet styrene (the thinner the better) that's a wee bit bigger than your rear opening. I'll post it tomorrow when I get back on. Later dude!
-
Wheeeeew! Nice project Karl! Bet you're glad to get back into jets?!
 Always wanted to do a Phantom with as many 500 pound bombs as could be slung under it. Hmmmmm, with multiple ejector racks outboard and under the centerline, and with TER's on the inner pylons that'd be what? 24?! That's a lot of yellow lines.....uhmmm, maybe later.
 -
I needed to get a start on my pilot for fit purposes because the fuse will be zipped up tomorrow. Check out those snazzy side consoles! When I first got this kit, and I built up the ejection seat....I couldn't make heads or tails outta which way most of the parts fit. Some of them might be upside down?
dunno. This will probably progress no further than 'squint-scale' from 2 feet away. The canopy is so thick, it makes everything distorted like some kind of 'funhouse mirrors' anyway. I'll make a vain attempt. I'm in 'get er done mode' and just want this model to go away like a bad habit.Updates tomorrow should see this with the fuse glued together and the wings on. AND hopefully sitting on it's gear. Whoohoo! More pics as things progress;

-
-
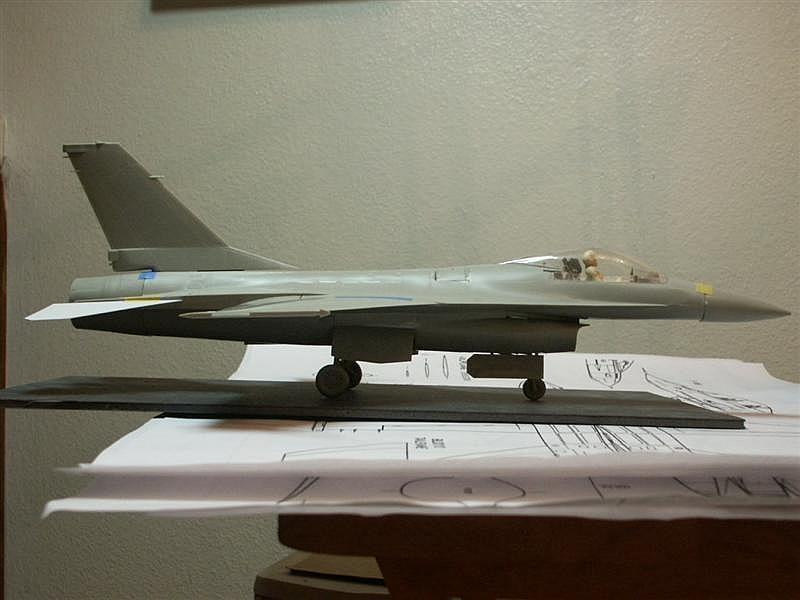
Dunno how 'correct' the gear is. There were no locater pins/marks/depressions or nuthin. I just let everything fall where it did and glued it. Used my enlarged plans to get the gear door angles as close to right as I could. I'll be closing up the fuse tomorrow, which will entail a ton of tape and clamps to get everything to warp to shape. Wanted to see if the canopy was even 1/2 way close, and after some creative carving (I don't think it's designed to be closed) got it within putty range. Unfortunately the clear parts weren't in a plastic baggy, so they're scratched and abraded badly. I started some preliminary polishing to get it presentable for these pics. I'm going to break down and get some Future to dip these in (I've never used it before ) and try to salvage what I have.
-
-
Ha ha!
 I don't know about that Phil, building this kit is like trying to swim in a bog carrying a sack of bricks. I didn't think there was such a thing as an 'unbuildable kit'....but this comes as close as a big wet smack on the cheek to being one. I actually found ONE piece that fit tonight!!! Whoohoo! The front landing gear strut went right into the slot in the nose-gear bay. I was stunned.
Wow, great links Graham! This is the only F-16 I've ever built, hence only wanting to spend $45 to get my feet wet. The only references I'm using are the pics I posted in the beginning of the thread and the plans I enlarged. I keep noticing more and more little bits that have been added from my earliest version. Once I get the basic model together, I'll decide which era to add all the new widgets. Noticed they moved the landing lights from the main gear to the nose gear door, and the antennas are completely different amongst other things. Probably do mine in the early-mid 80's. Maybe have that blue lightning flash that 301sq (?) had on the forward fuse? Those tiger meet markings you've got are the bomb, VERY nice.
OK, can't say that I got the landing gear 'assembled' and put on.....more like a gross exaggeration of what/where I think everything is supposed to go. Had to build it completely because the poor fit and directions made this the only way to know if it lined up. Got some major tape action going on while lining everything up to keep everything torqued and twisted more or less correctly. These last 2 pieces of tape will be taken off tomorrow after things solidify.
-
Wheeeeew, very nice.....and very interesting!
Looking great Perry, looking forward to seeing where you're going to take this build. -
-
Cool Graham!
What a thrill watching this go together, keep it going dude!! Looking forward to what you come up with next. Later buddy, Russ -
Hey Kevin! Is that rear bulkhead the nozzles attach to recessed, or flush with the aft airframe?
-
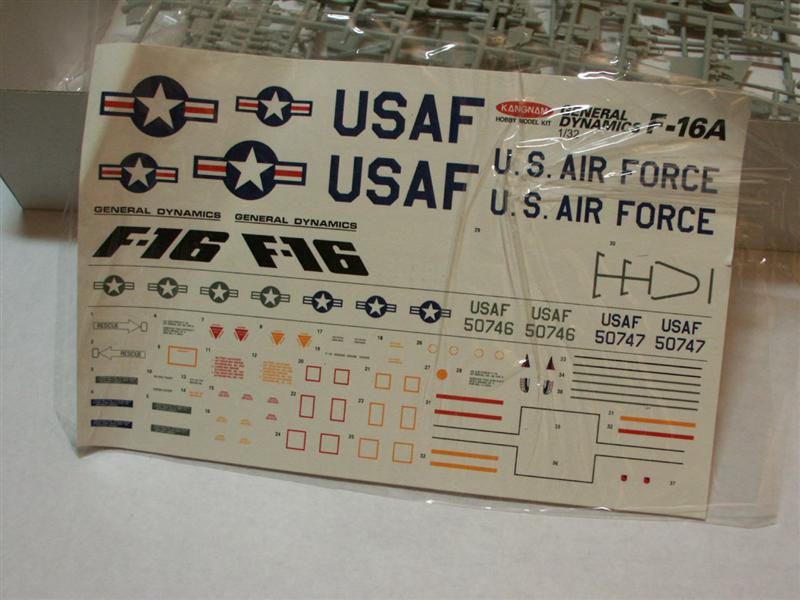
Here's the decal sheet that came with the kit. Came with way more markings than I anticipated. I thought it would just have the red/white/blue prototype stuff. Don't know if this kit justifies an after-market sheet or not, I'll wait and see if these explode on contact with water or not. Hmmmm, I could use a good laugh before I go to bed,....maybe I'll see how the canopy fits tonight?

More pics as things 'progress'? Bwhahahahah! Later, Russ
-
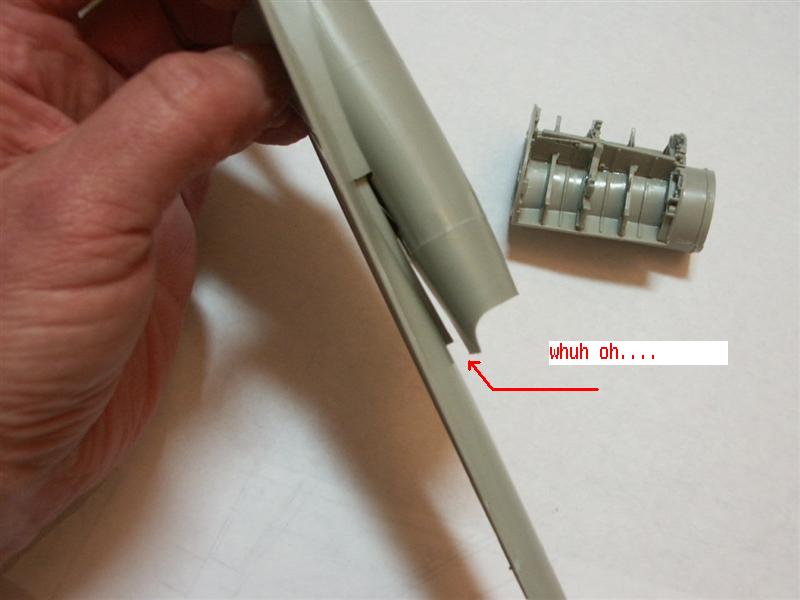
Now that the mounting points for the landing gear are lined up, I decided to mock the gear itself up to see how it was even going to attach at those points. Whuh oh,....maybe not. It's going to take awhile to get all the parts cleaned up for assembly. Here's an example of what most of the parts look like before carving and whittling,.....the others are worse.

Got out the sprues with the ordnance and drop tanks 'n such to see what I could do with those.

-
After much hacking and Cuban slang words,....I got the main landing gear bay lined up to where the wheels would also be level with the ground.

Flipped over to show that the intake trunk was twisted and at the wrong angle swooping down into the front scoop. At least my landing gear won't be at some wonky angles now. Damage control on the intake won't be too awful bad, but my trust in how this kit is going to go together is now about as far as I can throw a '57 Chevy.

-
Whaaaaaaahh!
 Now THAT'S a pile of cool stuff Graham! Oooooh, I'm green with envy.....didn't even know this kit existed. All I could find available were 'C' models. Are there Norwegian markings on that Nordic Viper' decal sheet? Check out my 'comprehensive' decal sheet that came with this kit at the end of this update. You'll get a good snicker.
Thanks for filling in the blanks on the origins of this kit Harv and Karl! 'Knock-off' kit just about describes things perfectly. Interesting mix of raised panel lines and recessed 'detail' had me scratching my noggin. I still haven't found a piece that fits correctly yet.
But I digress; Speaking of things not fitting,....even after chewing and whittling on the intake for hours getting the pieces on both ends to fit, it was all for naught as the entire assembly is twisted/warped anyway! Gaaaaah!
Because the front and rear landing gear are attached to this intake trunk, even a cursory looksy was enough to show they would be noticably skewed. Time to get out the chain-saw. 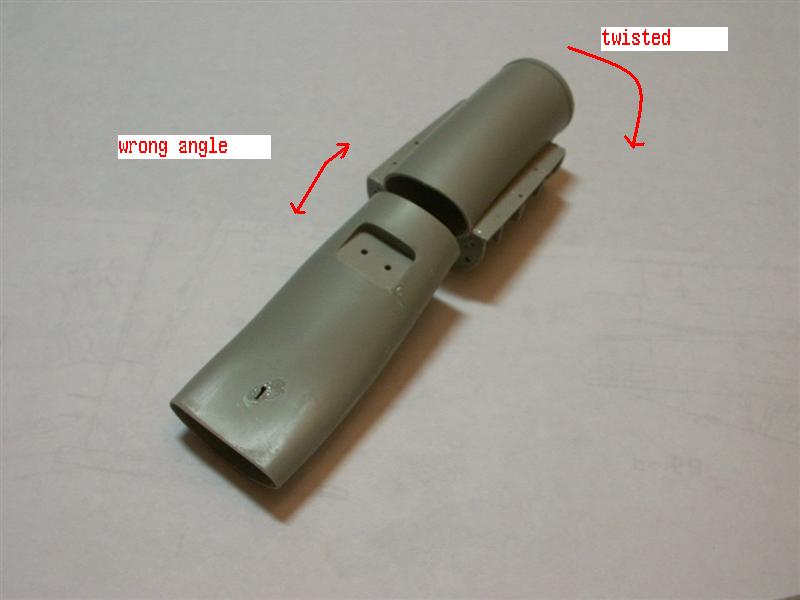
Then slid the front of the intake into the now assembled bottom 'scoop' (I won't even go into detail about the needle-nose plier action it took to get this to line up) to make sure my nose-gear was at least vertical.

Which highlighted yet another fit problem. There isn't supposed to be a gap between it and the lower fuse. Sigh.
-
Gaaaaahhh, You busted me 'richter111'!!! This thread was placed all the way back at the bottom of page 3 in the hopes nobody would see it until I got thru casting all my wheels.
Man, I sure wish I had one of those 1/48th kits, they had the killer decal sheet with all the markings. I'm probably going to miss a few as I could only acquire the 1/72nd Hasegawa kit (for $44!!! ) just to use it for a reference for markings. Don't know why i started on the F-16 before this one,.....I thought it'd be 'easier'.
Woulda been easier to throw it in the trash! Updates on this project soon buddy, very soon. -
Taking 2-3mm's section out of the intake, along with some careful carving and shaping allowed me to actually slide the intake mouth over the end of the intake trunk finally without any protruding lips or unsightly huge gaps. I'm within a small amount of putty, and pouring white latex housepaint to smooth things out to have a smooth intake now. Whuf, I cannot believe the original Hasegawa boxing of this kit was this far off,.....but the original kit is pretty old and maybe that's just how it was? Dunno.

OK, major accomplishment getting the intake lip in place, and actually being able to fit that circular compressor face onto the back of this assembly! Landing gear bay actually fits inside the fuse now,...sooo it's time to glue all this together and start smoothing things out. Wait until you see how this assembly slides into the fuse, and the rest of the outside intake housing go together.
After many dry-fits and twisting with my needle-nose pliers....I think I have a 'sequence of events' for assembling this conglomeration with a minimal of filler? More pics as things progress! 

Norwegian F-16A
in Clear the Bench! Group Build
Posted
Closer view of the extended parachute housing. This gets putty troweled all over it for final shaping.