

Archimedes
-
Posts
1,185 -
Joined
-
Last visited
-
Days Won
4
Content Type
Profiles
Forums
Events
Posts posted by Archimedes
-
-
-
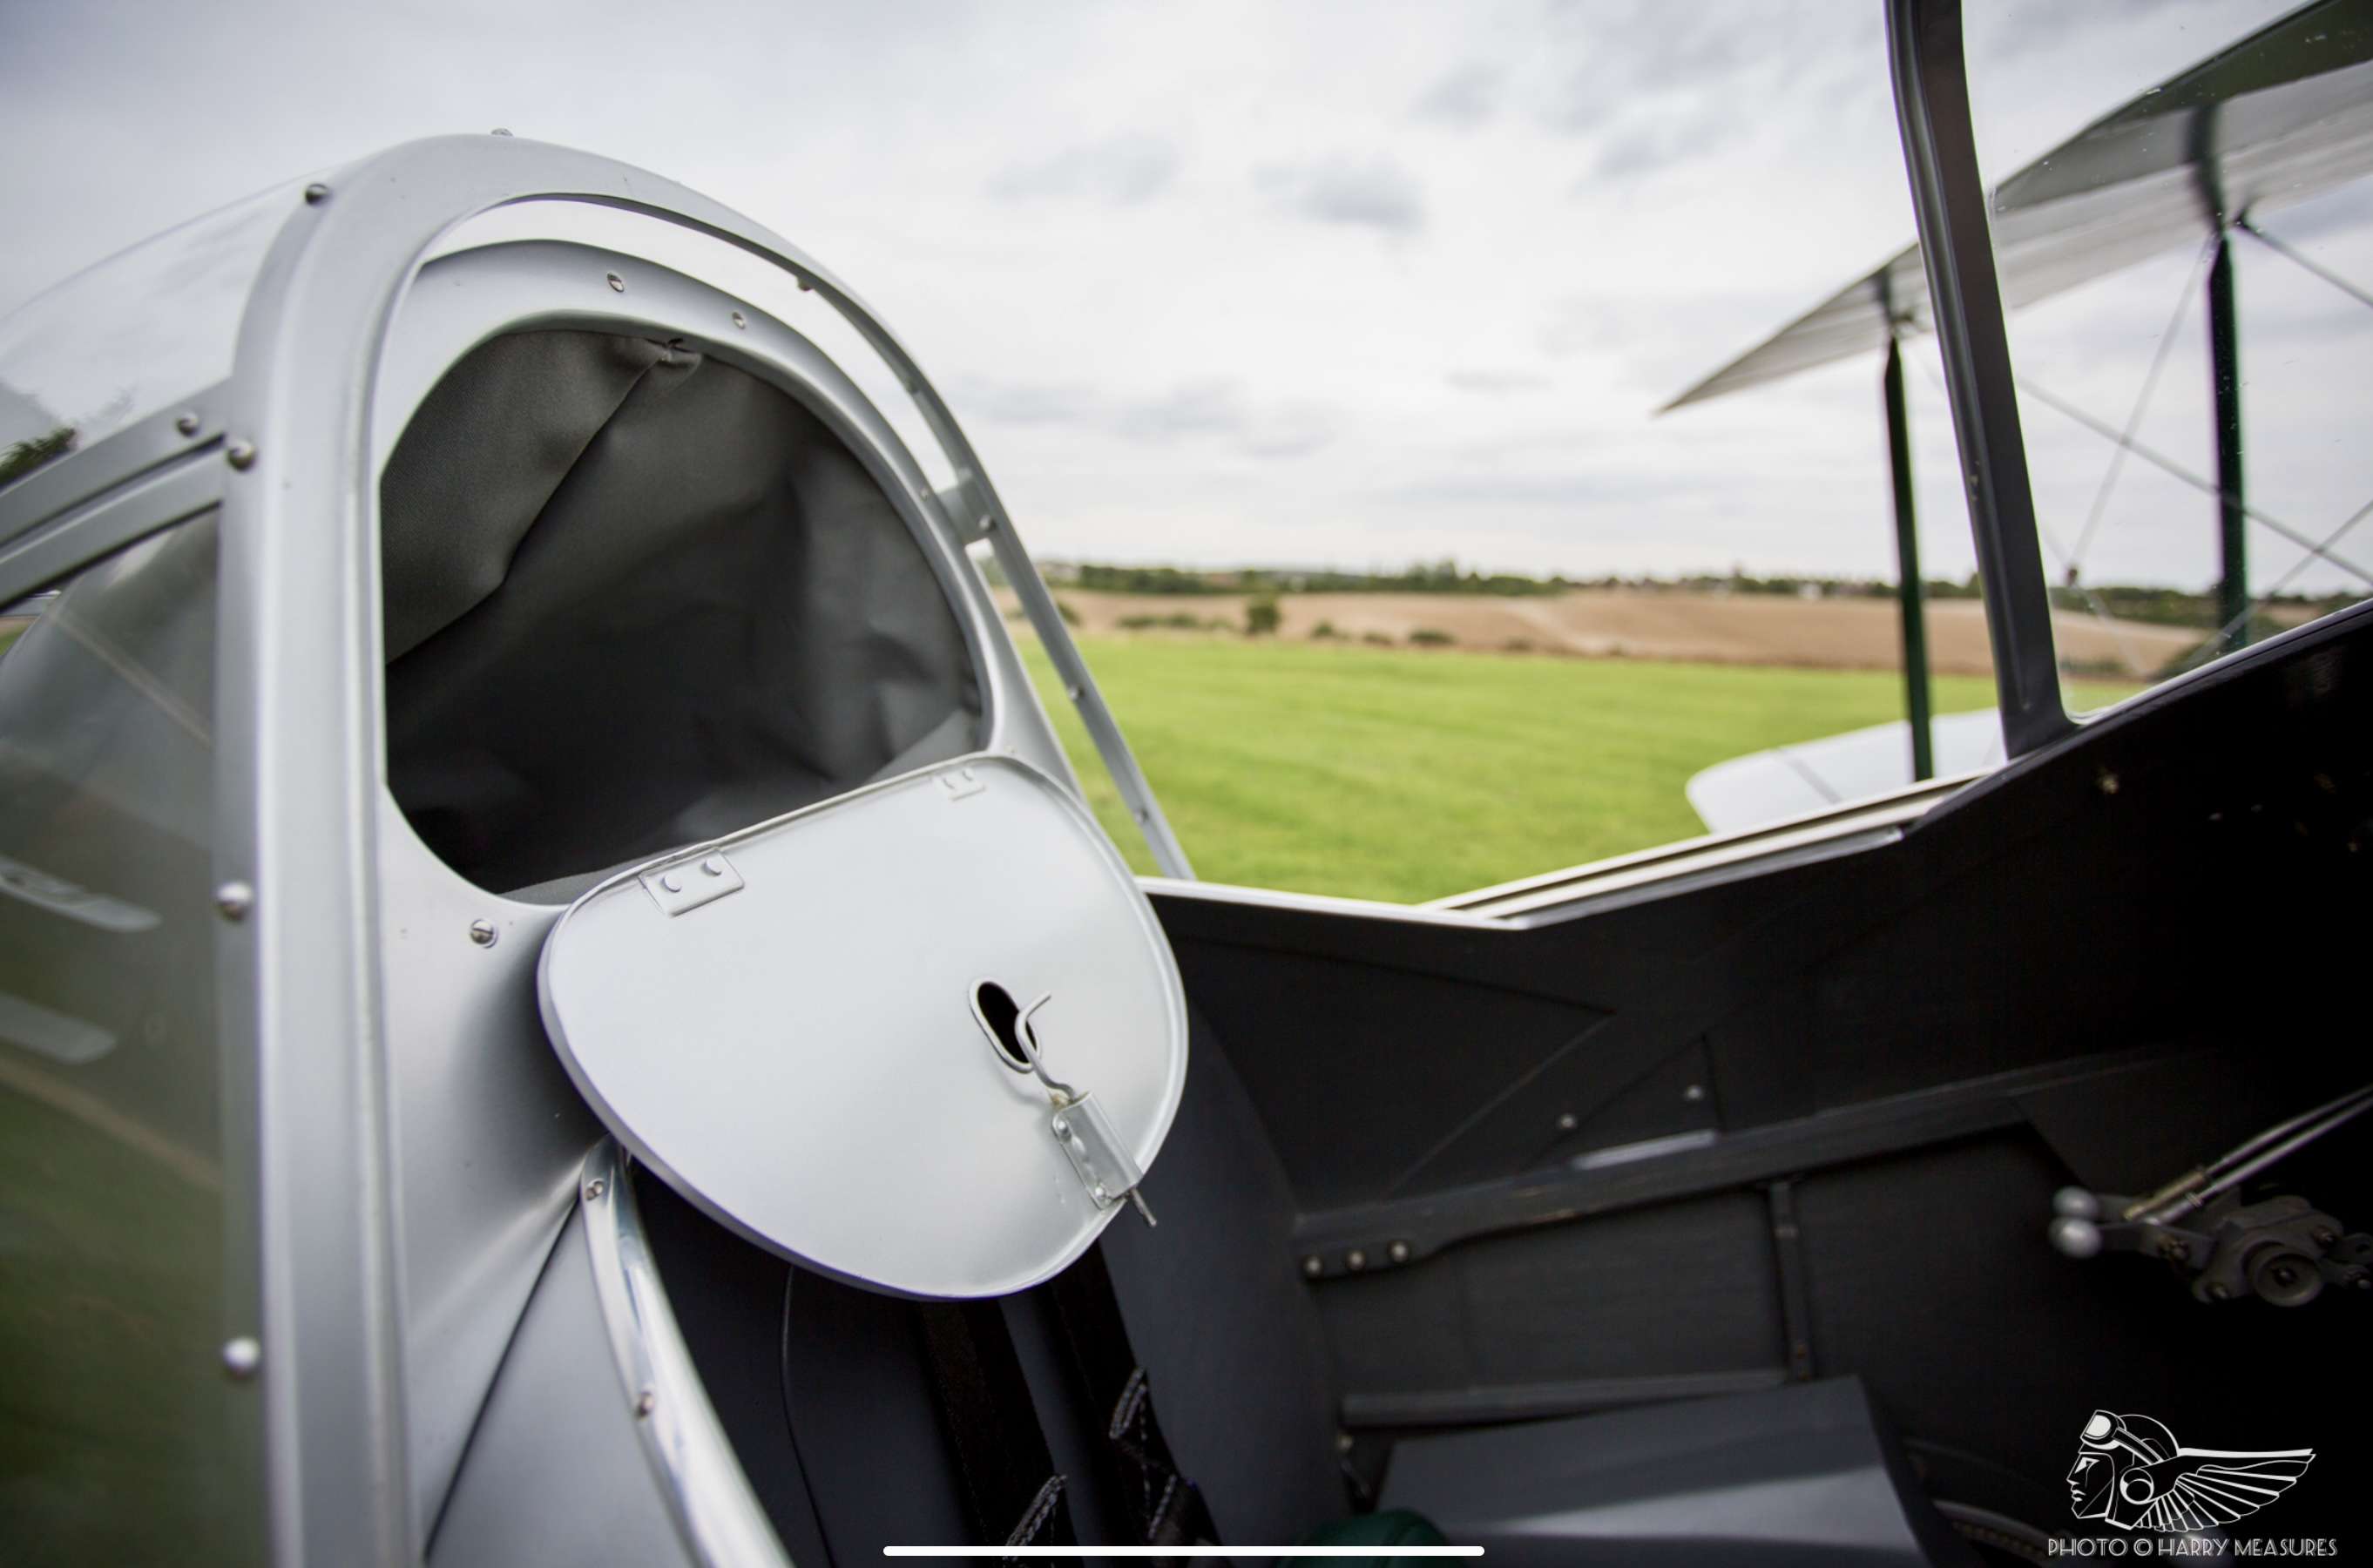
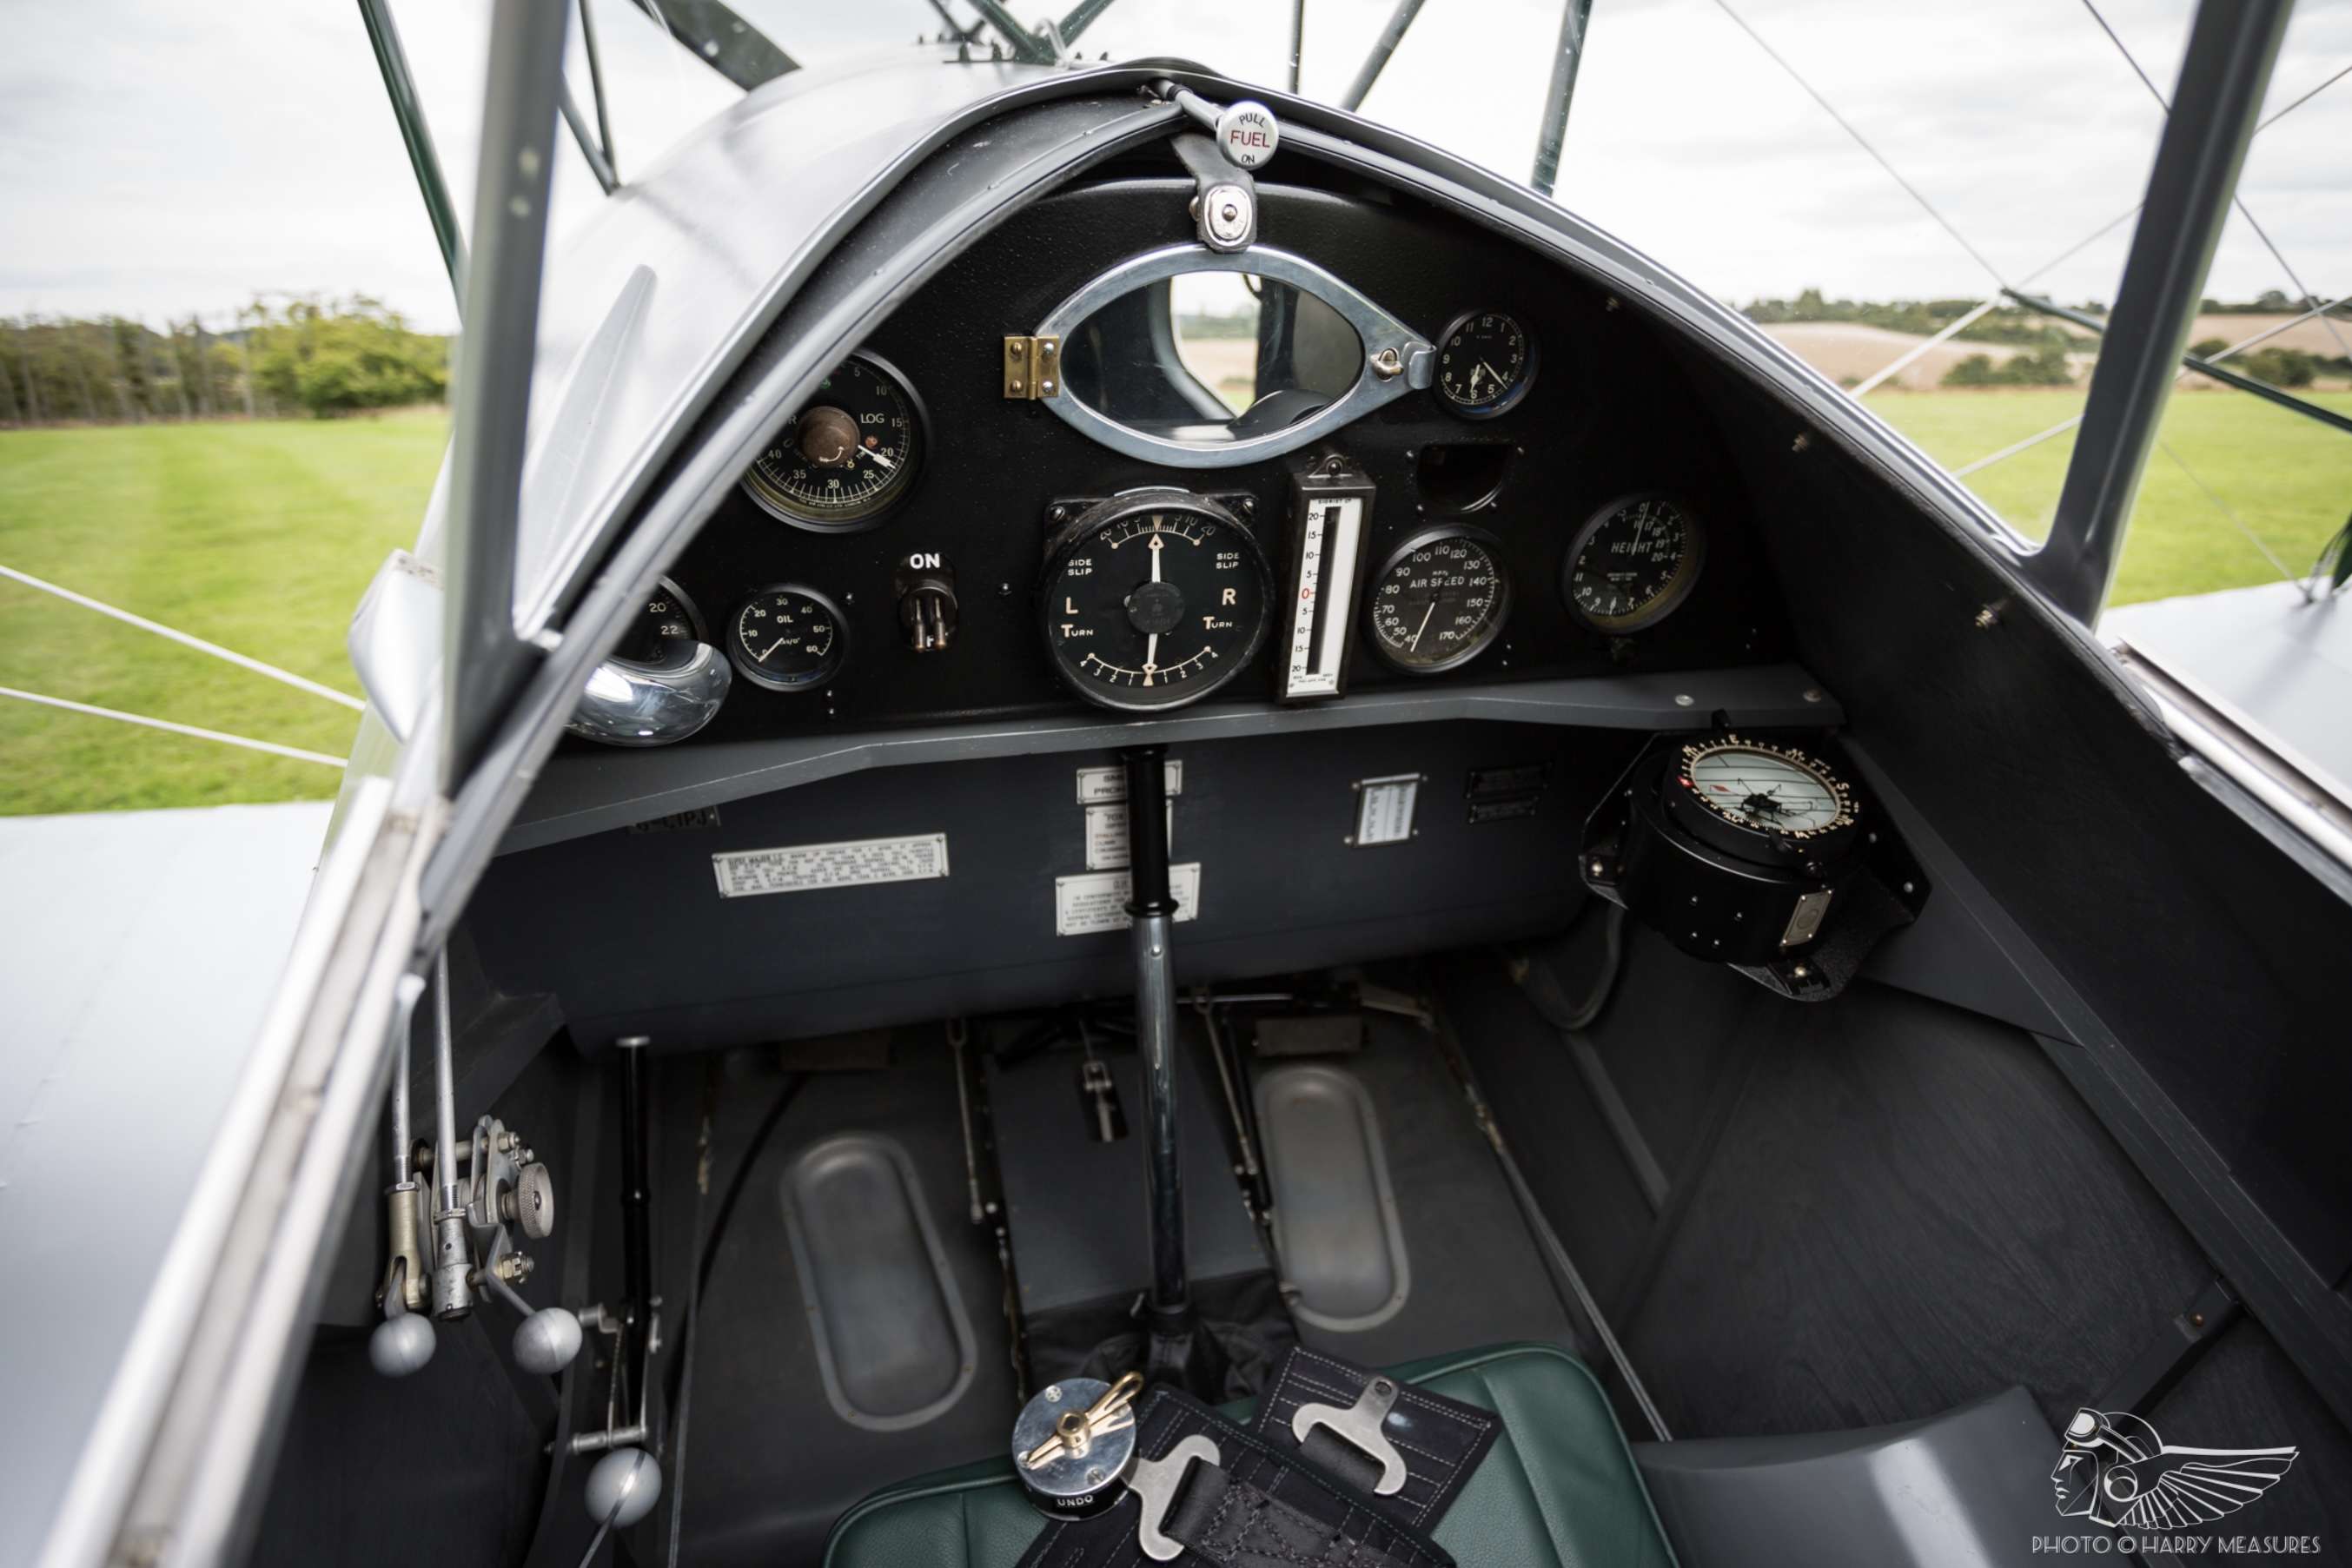
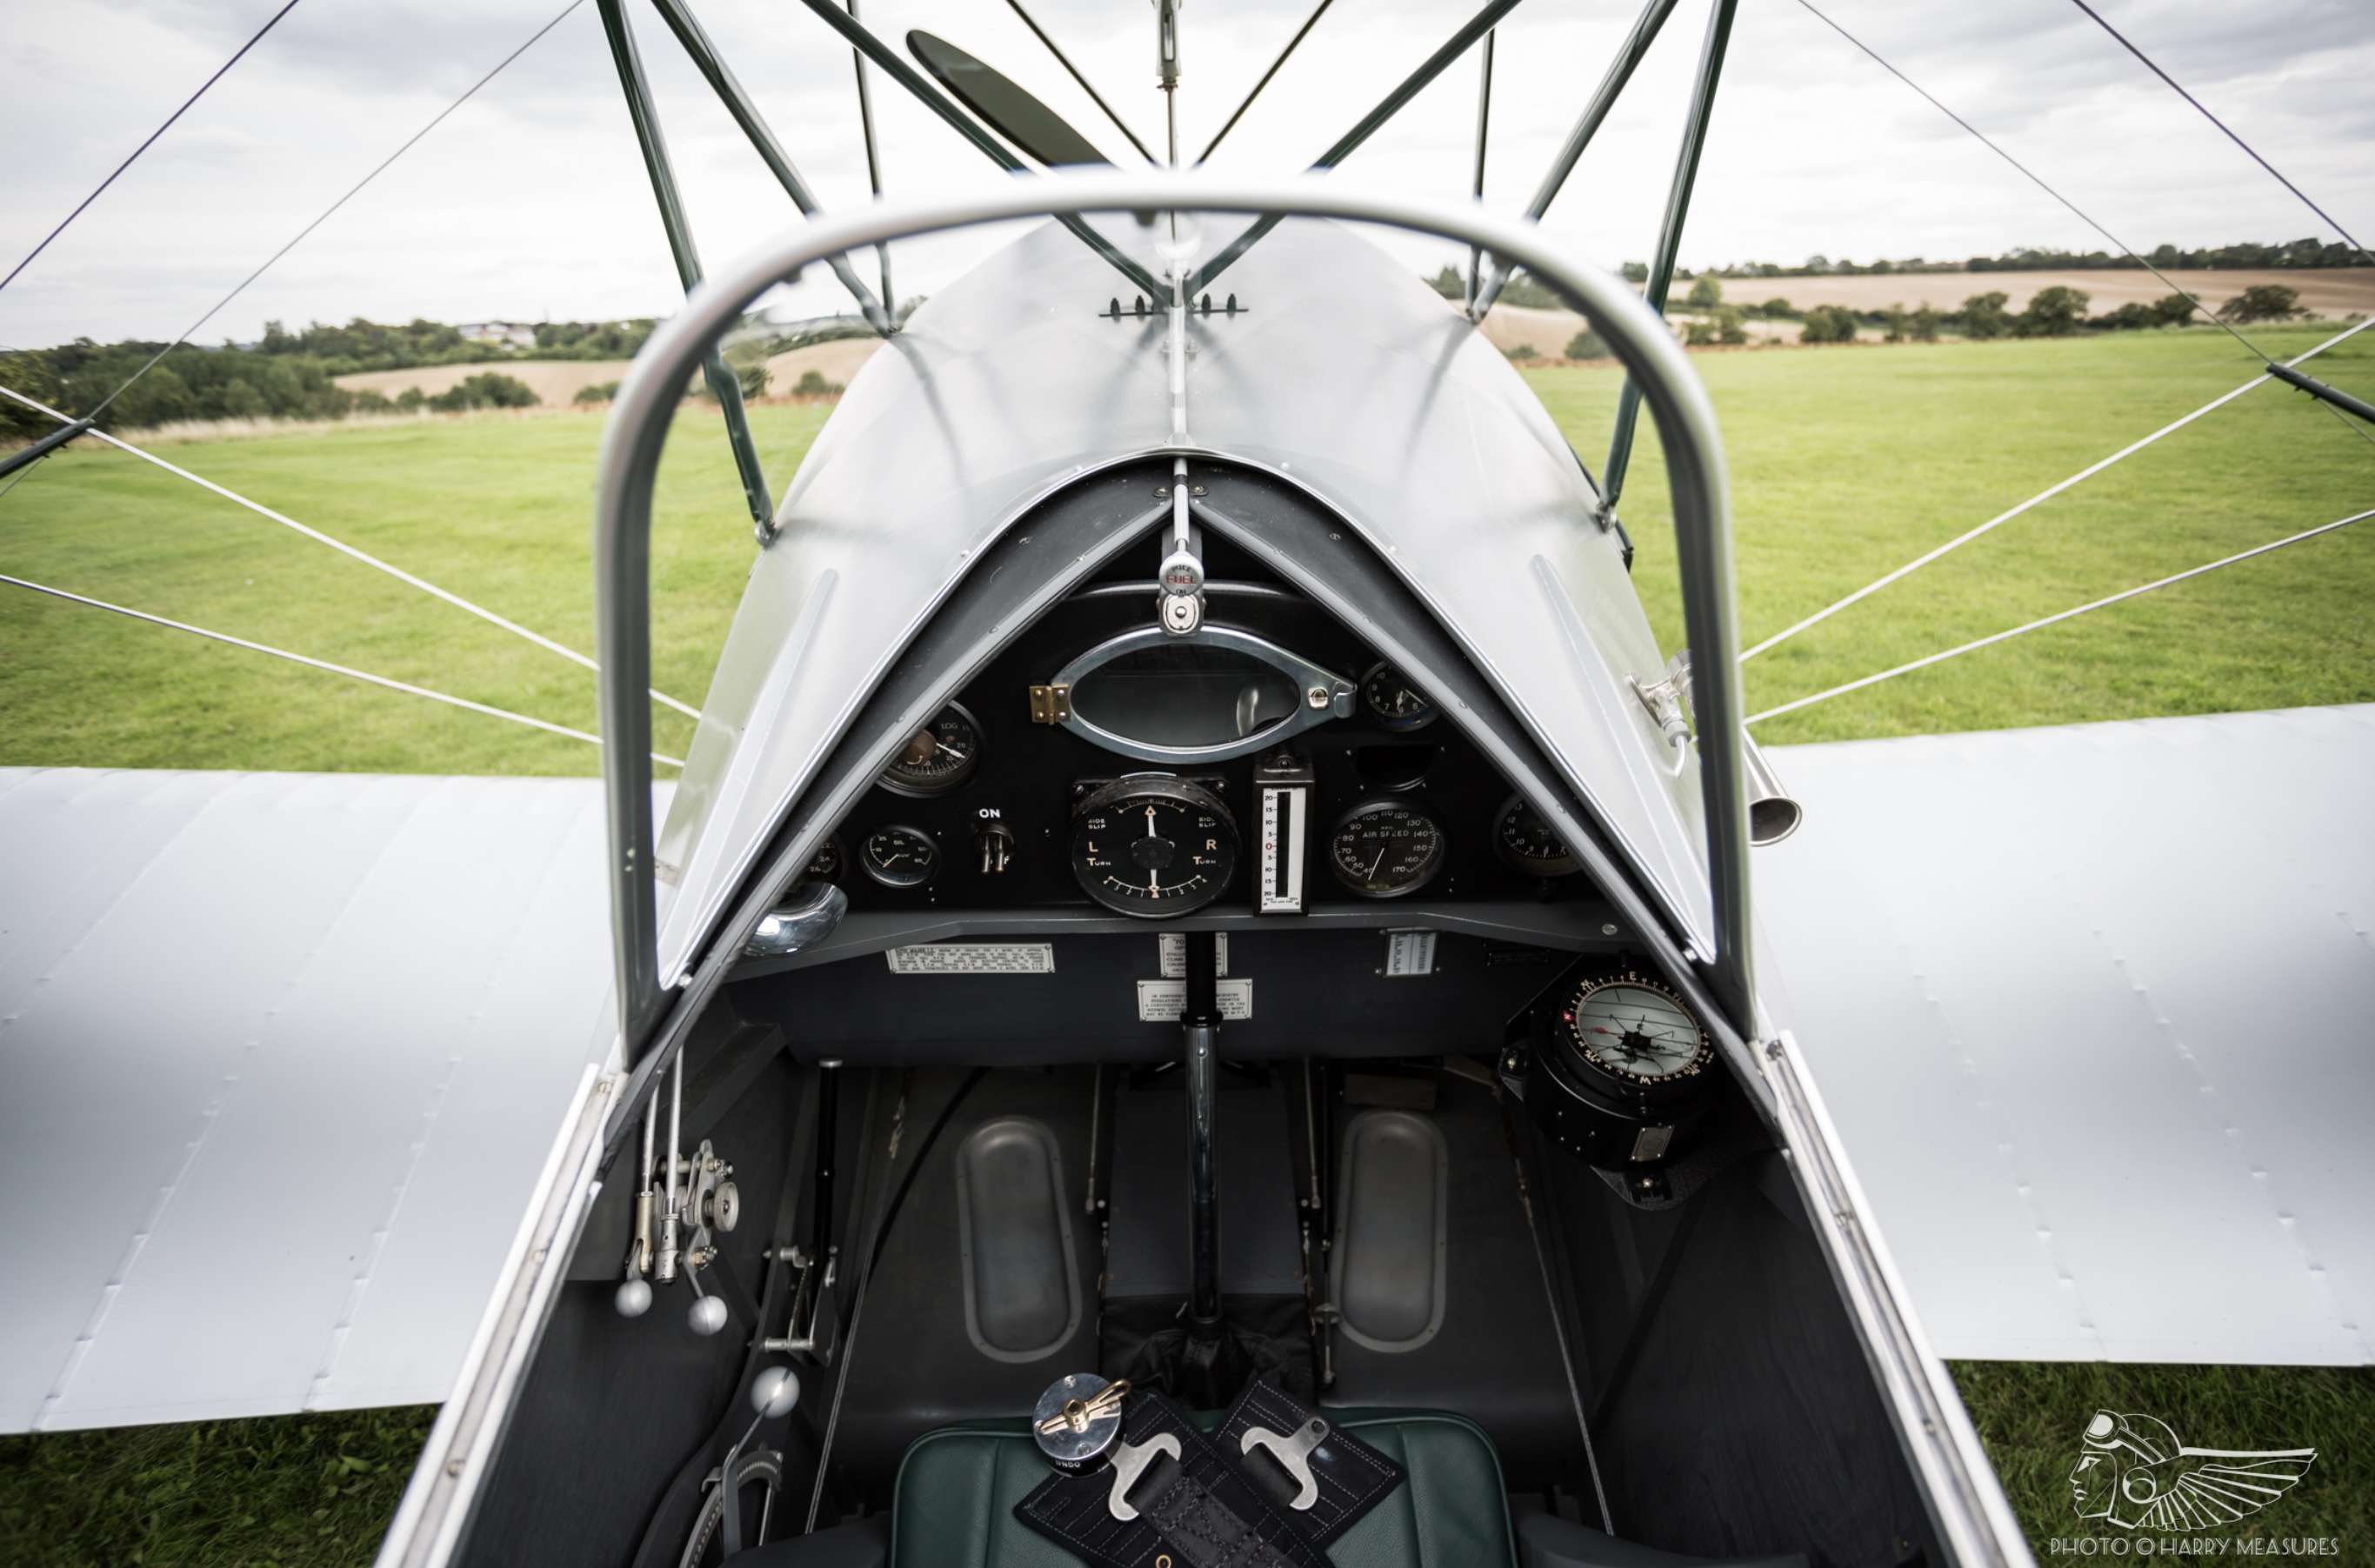
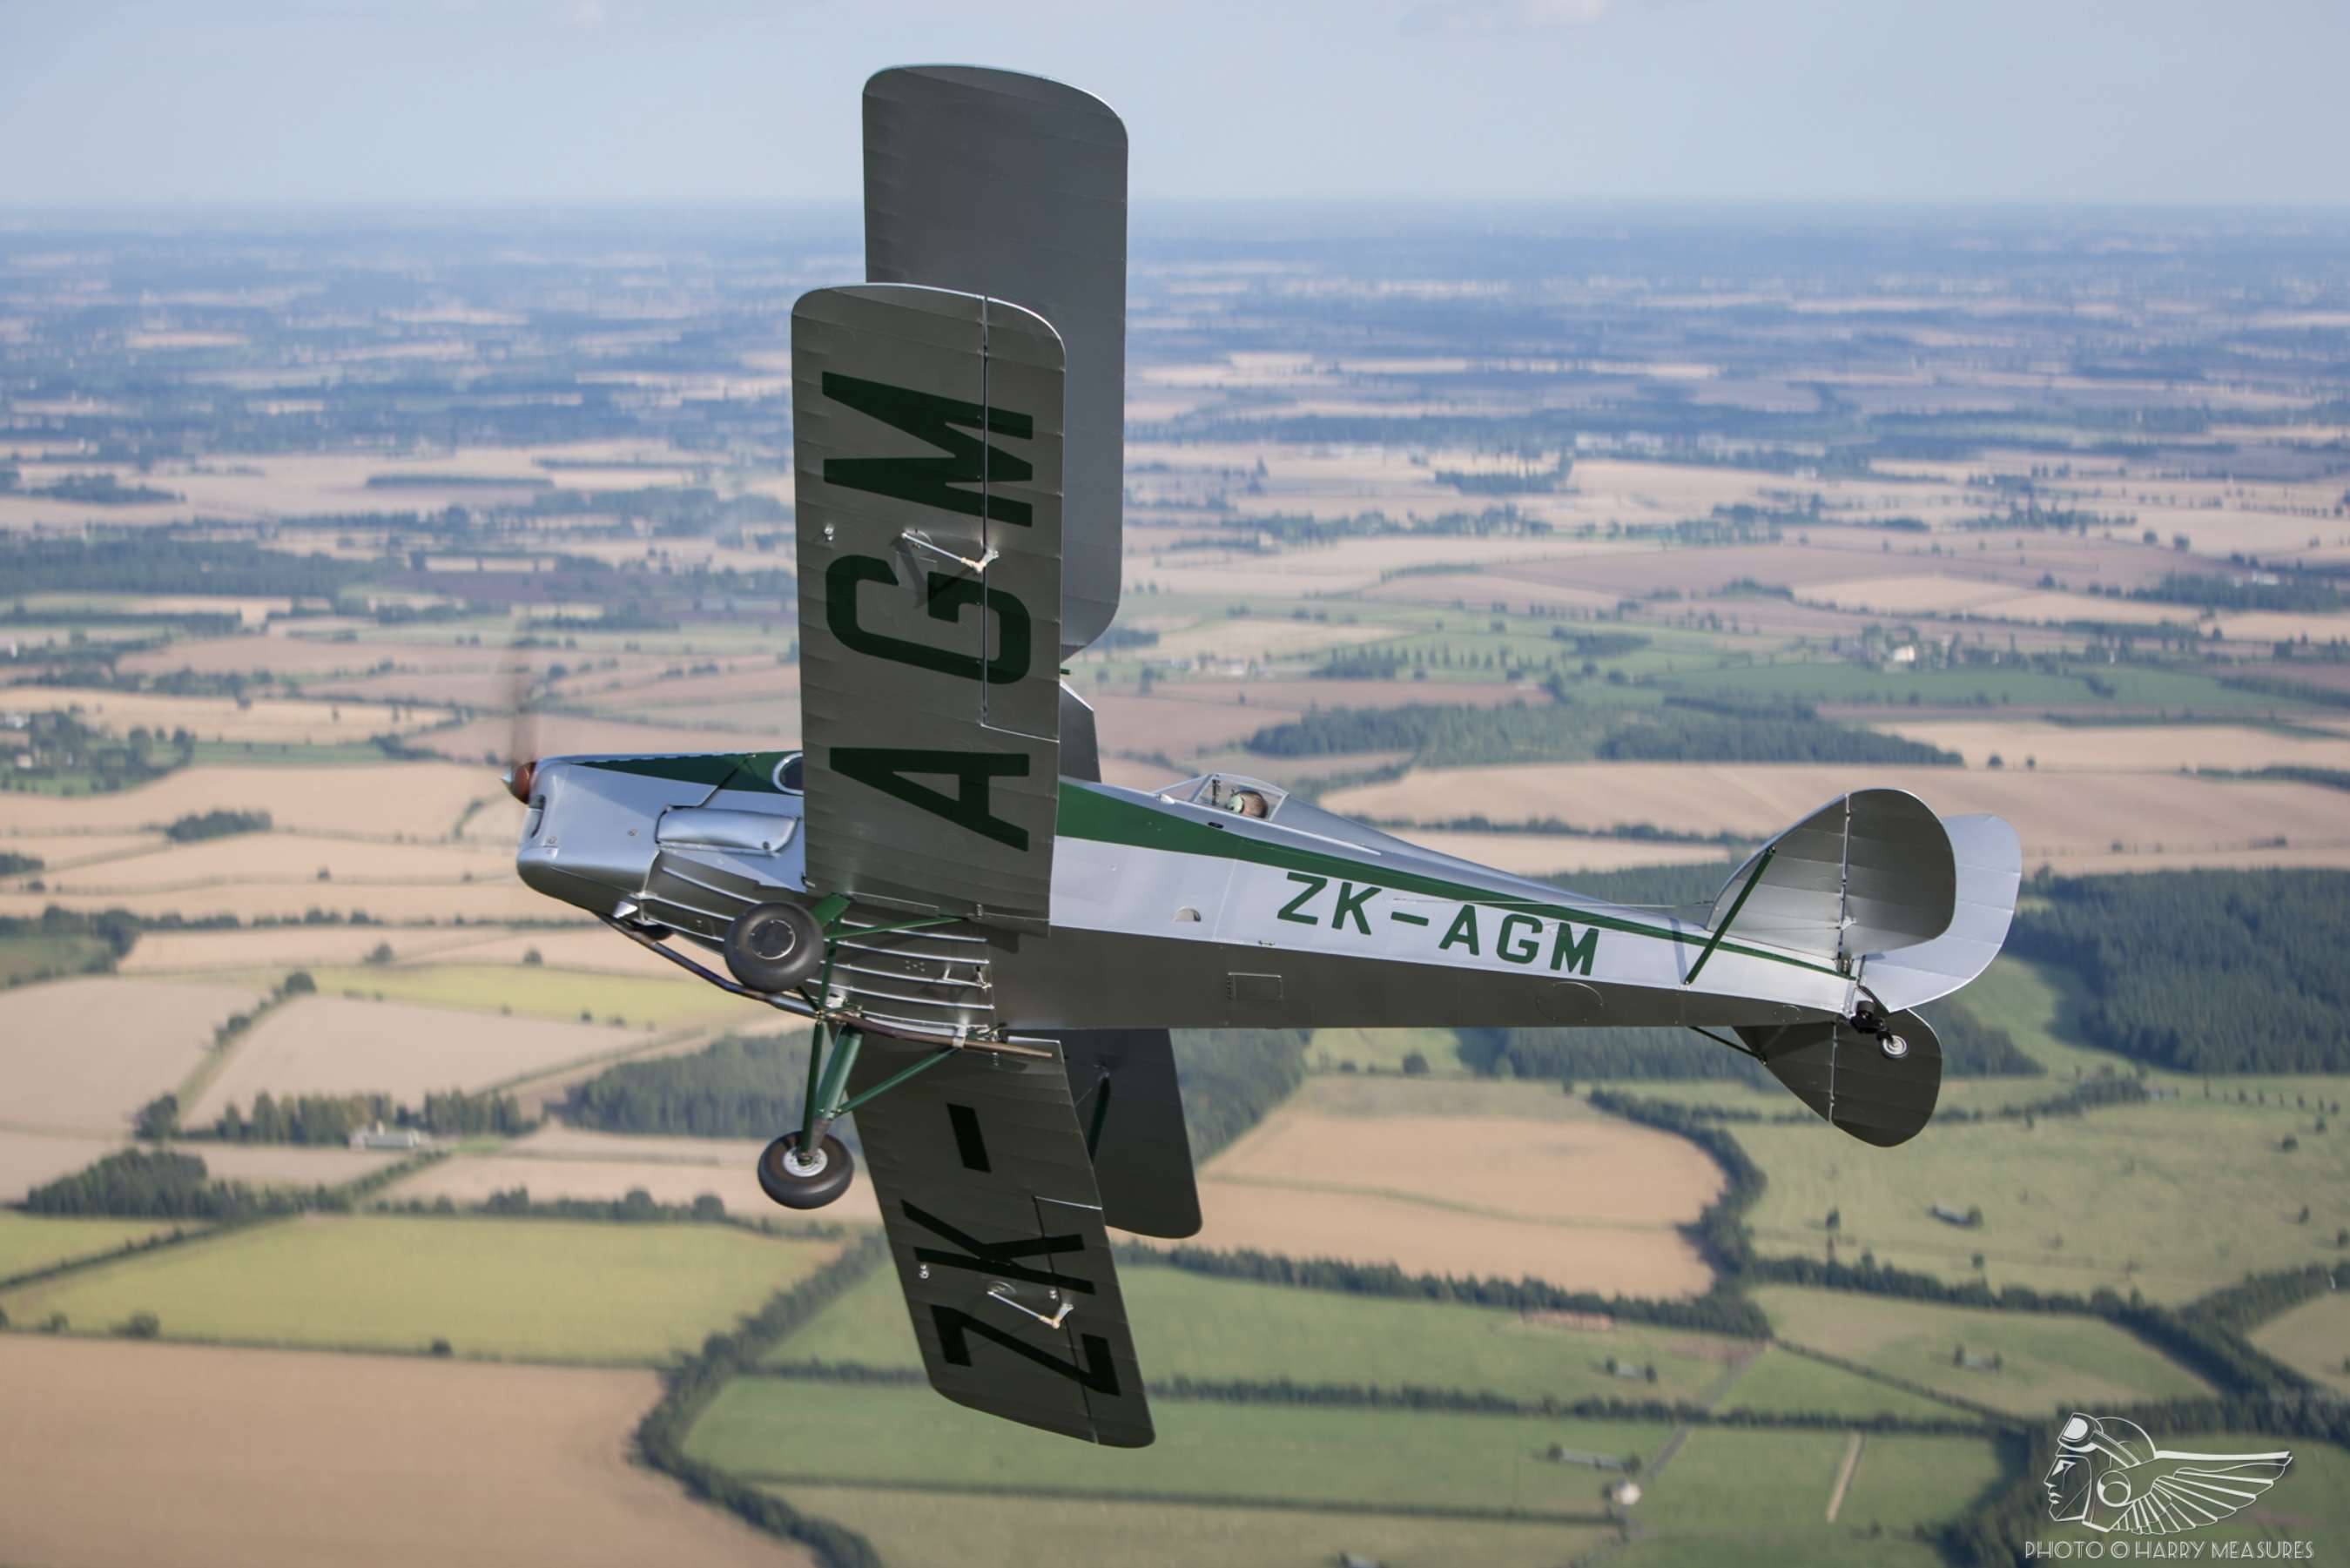
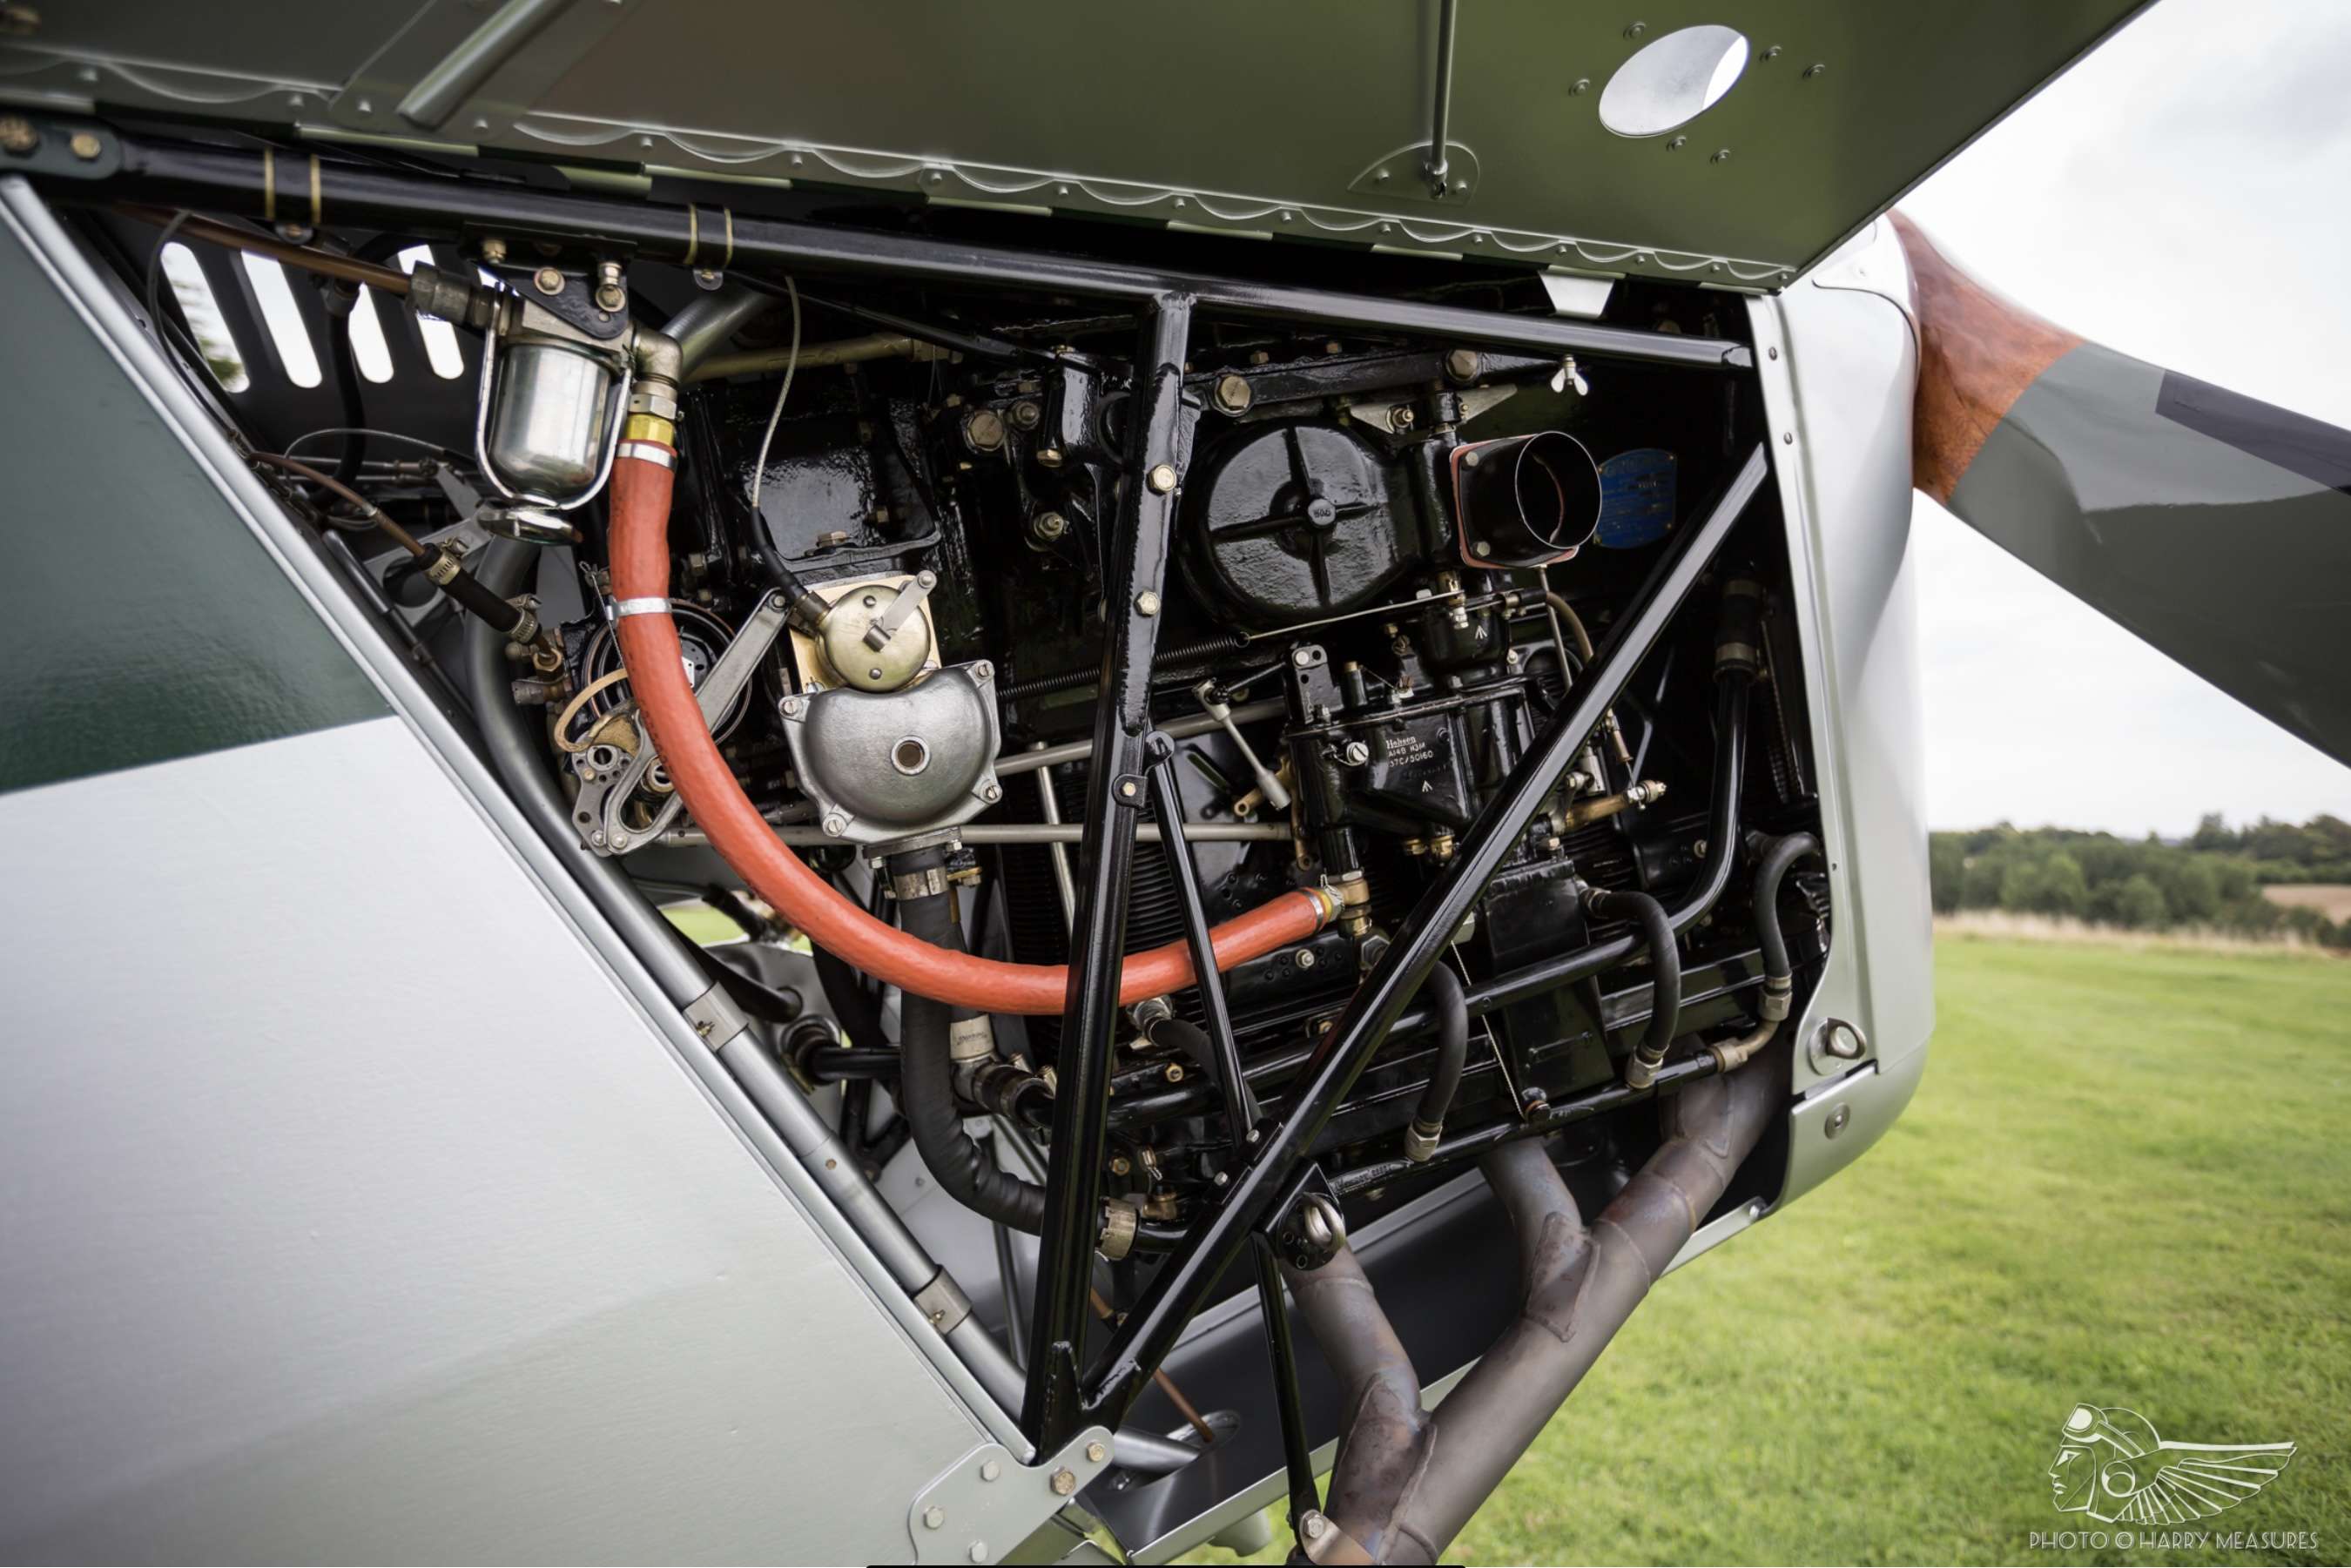
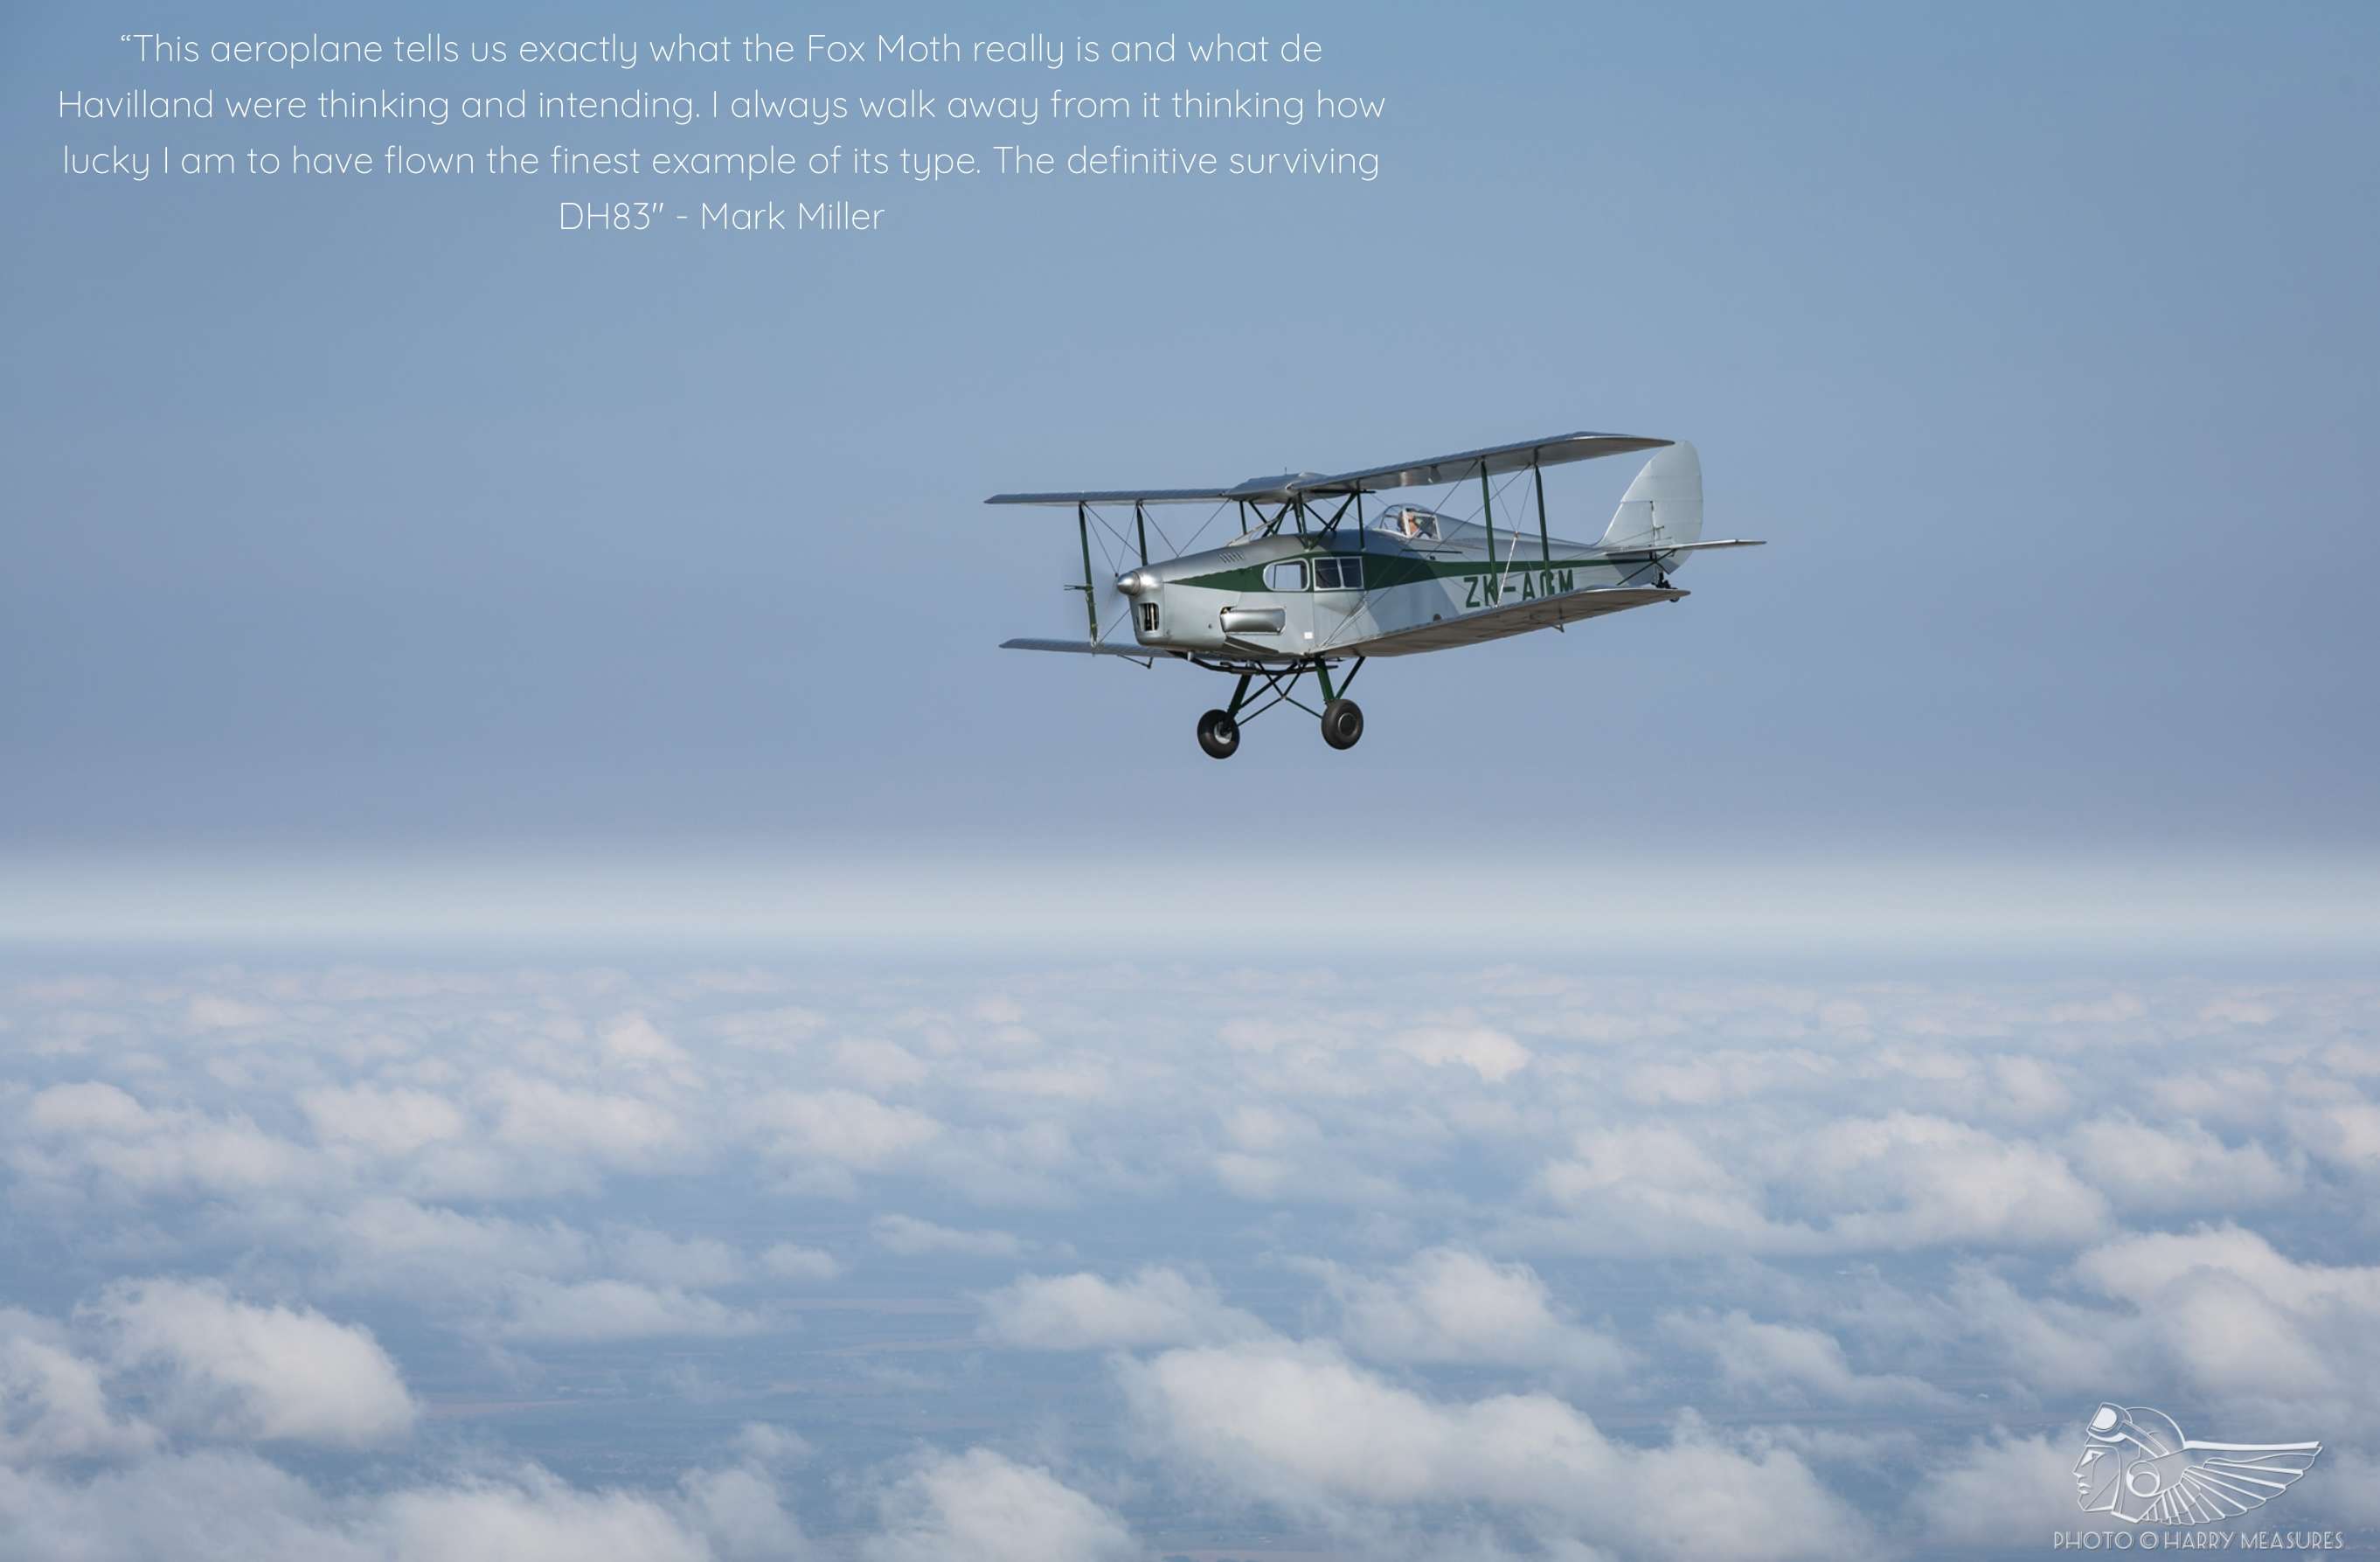
11 hours ago, Christa said:
Appreciated Paul, some elegant and helpful images.
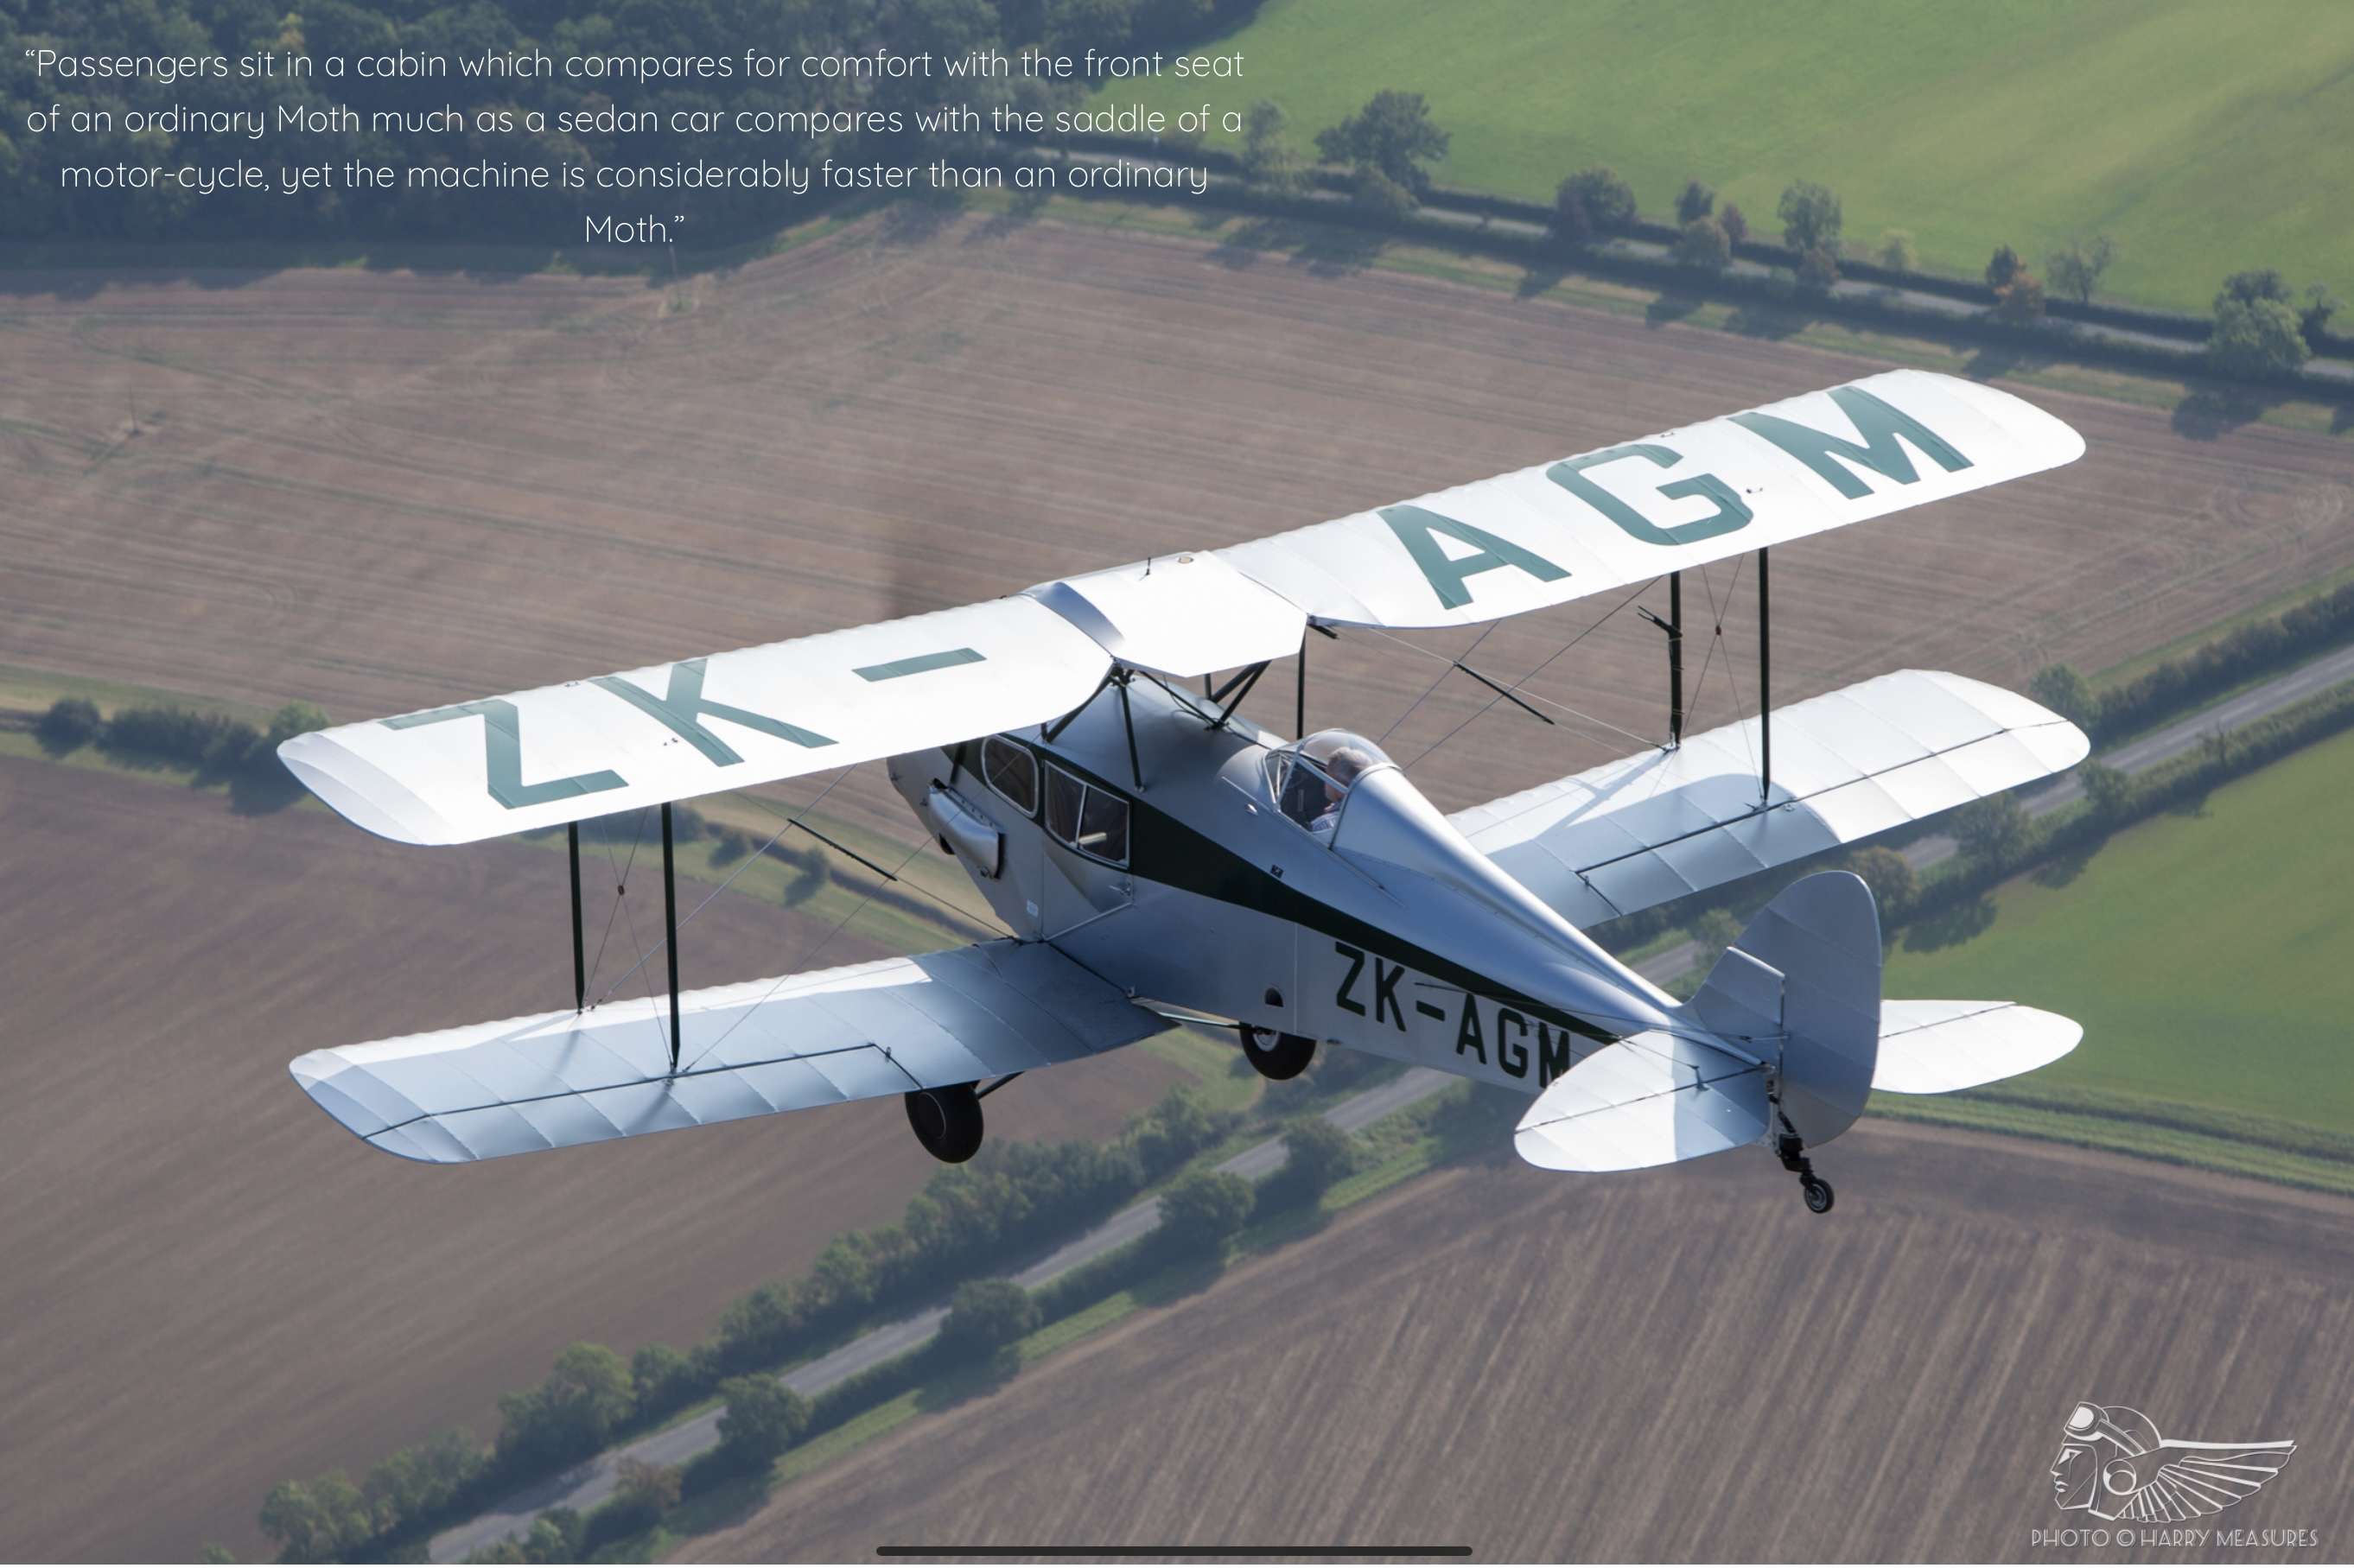
Surprised that The Fox Moth was quicker than the Tiger Moth, I understand that better streamlining trumped slightly heavier, assuming higher speeds to have been reported by pilots flying solo.
Hi Chris,
I liked the underside shot as it banks away in particular and the cockpit and engine shots should be useful. Weight doesn’t affect speed but drag does so presumably the DH83 was a cleaner shape overall?
Kind regards,
Paul
-
-
-
2 minutes ago, MikeMaben said:
I think I could fit any of these categories , but not at the same time. Does #5 refer to those who scratch build entire models
or 'some' of the components ? I guess I would be a 5/B because I can cut stencils and/or make my own decals. I could also
I could also be a 1,2,3,4/B at various times, depending on my level of inspiration.

Nobody said that we can’t all move around any of those classifications from project to project
 . #5 was intended to be for the ‘scratch builds entire models’ types. If you are scratching up components I guess that would make you a #3 or #4 but you have no obligation to be classified Mike
 ") . Btw I really like your pragmatic approach to builds.
. Btw I really like your pragmatic approach to builds.
Kind regards,
Paul
-
That is a very convincing piece of work Max! Your weathering is superb both on the airframe and the ordnance.
Kind regards,
Paul
-
2 hours ago, seiran01 said:
You know me, I love the odd WWI monsters. The wheels should be the same as used on the Gotha, AEG and Friedrichshafen G-type bombers, just more of them to distribute the weight. There were only a few sizes of wheels and tires used throughout the war.
Thanks Mike. I’ll check the scale size of the WnW AEG and Gotha G.IV wheels and, just maybe, can use them for casting….
Kind regards,
Paul
-
Dunkirk - the last patrols: Morning, 1st June 1940 - 4 June 1940.
“Nieuport slowly appeared beneath my wings, and I turned to run back down the coast. I had just turned again at Dunkirk, and was heading back once more, when something moving on my left fought my eye. I looked round in time to see an aircraft diving down toward the shipping off the harbour. Coming hard round I dived after it, the rest of the squadron chasing after me, The aircraft flattened out over a destroyer for a moment and then turned, climbing toward the coast. As I followed there was a terrific flash below and a huge fountain of water was flung high into the air, to fall slowly back into the sea. as the disturbance subsided I saw tht the destroyer had completely disappeared. So the aircraft in front of me was a hun. A blind fury gripped me.”
Brian Lane ‘Spitfire!’
‘Pit Progress.
Almost all of the decals for the cockpit have been applied and the detail painting completed. I also put a wash over the cockpit to add to the chipping I had put on it to give the feel of a working cockpit in an operational aircraft.
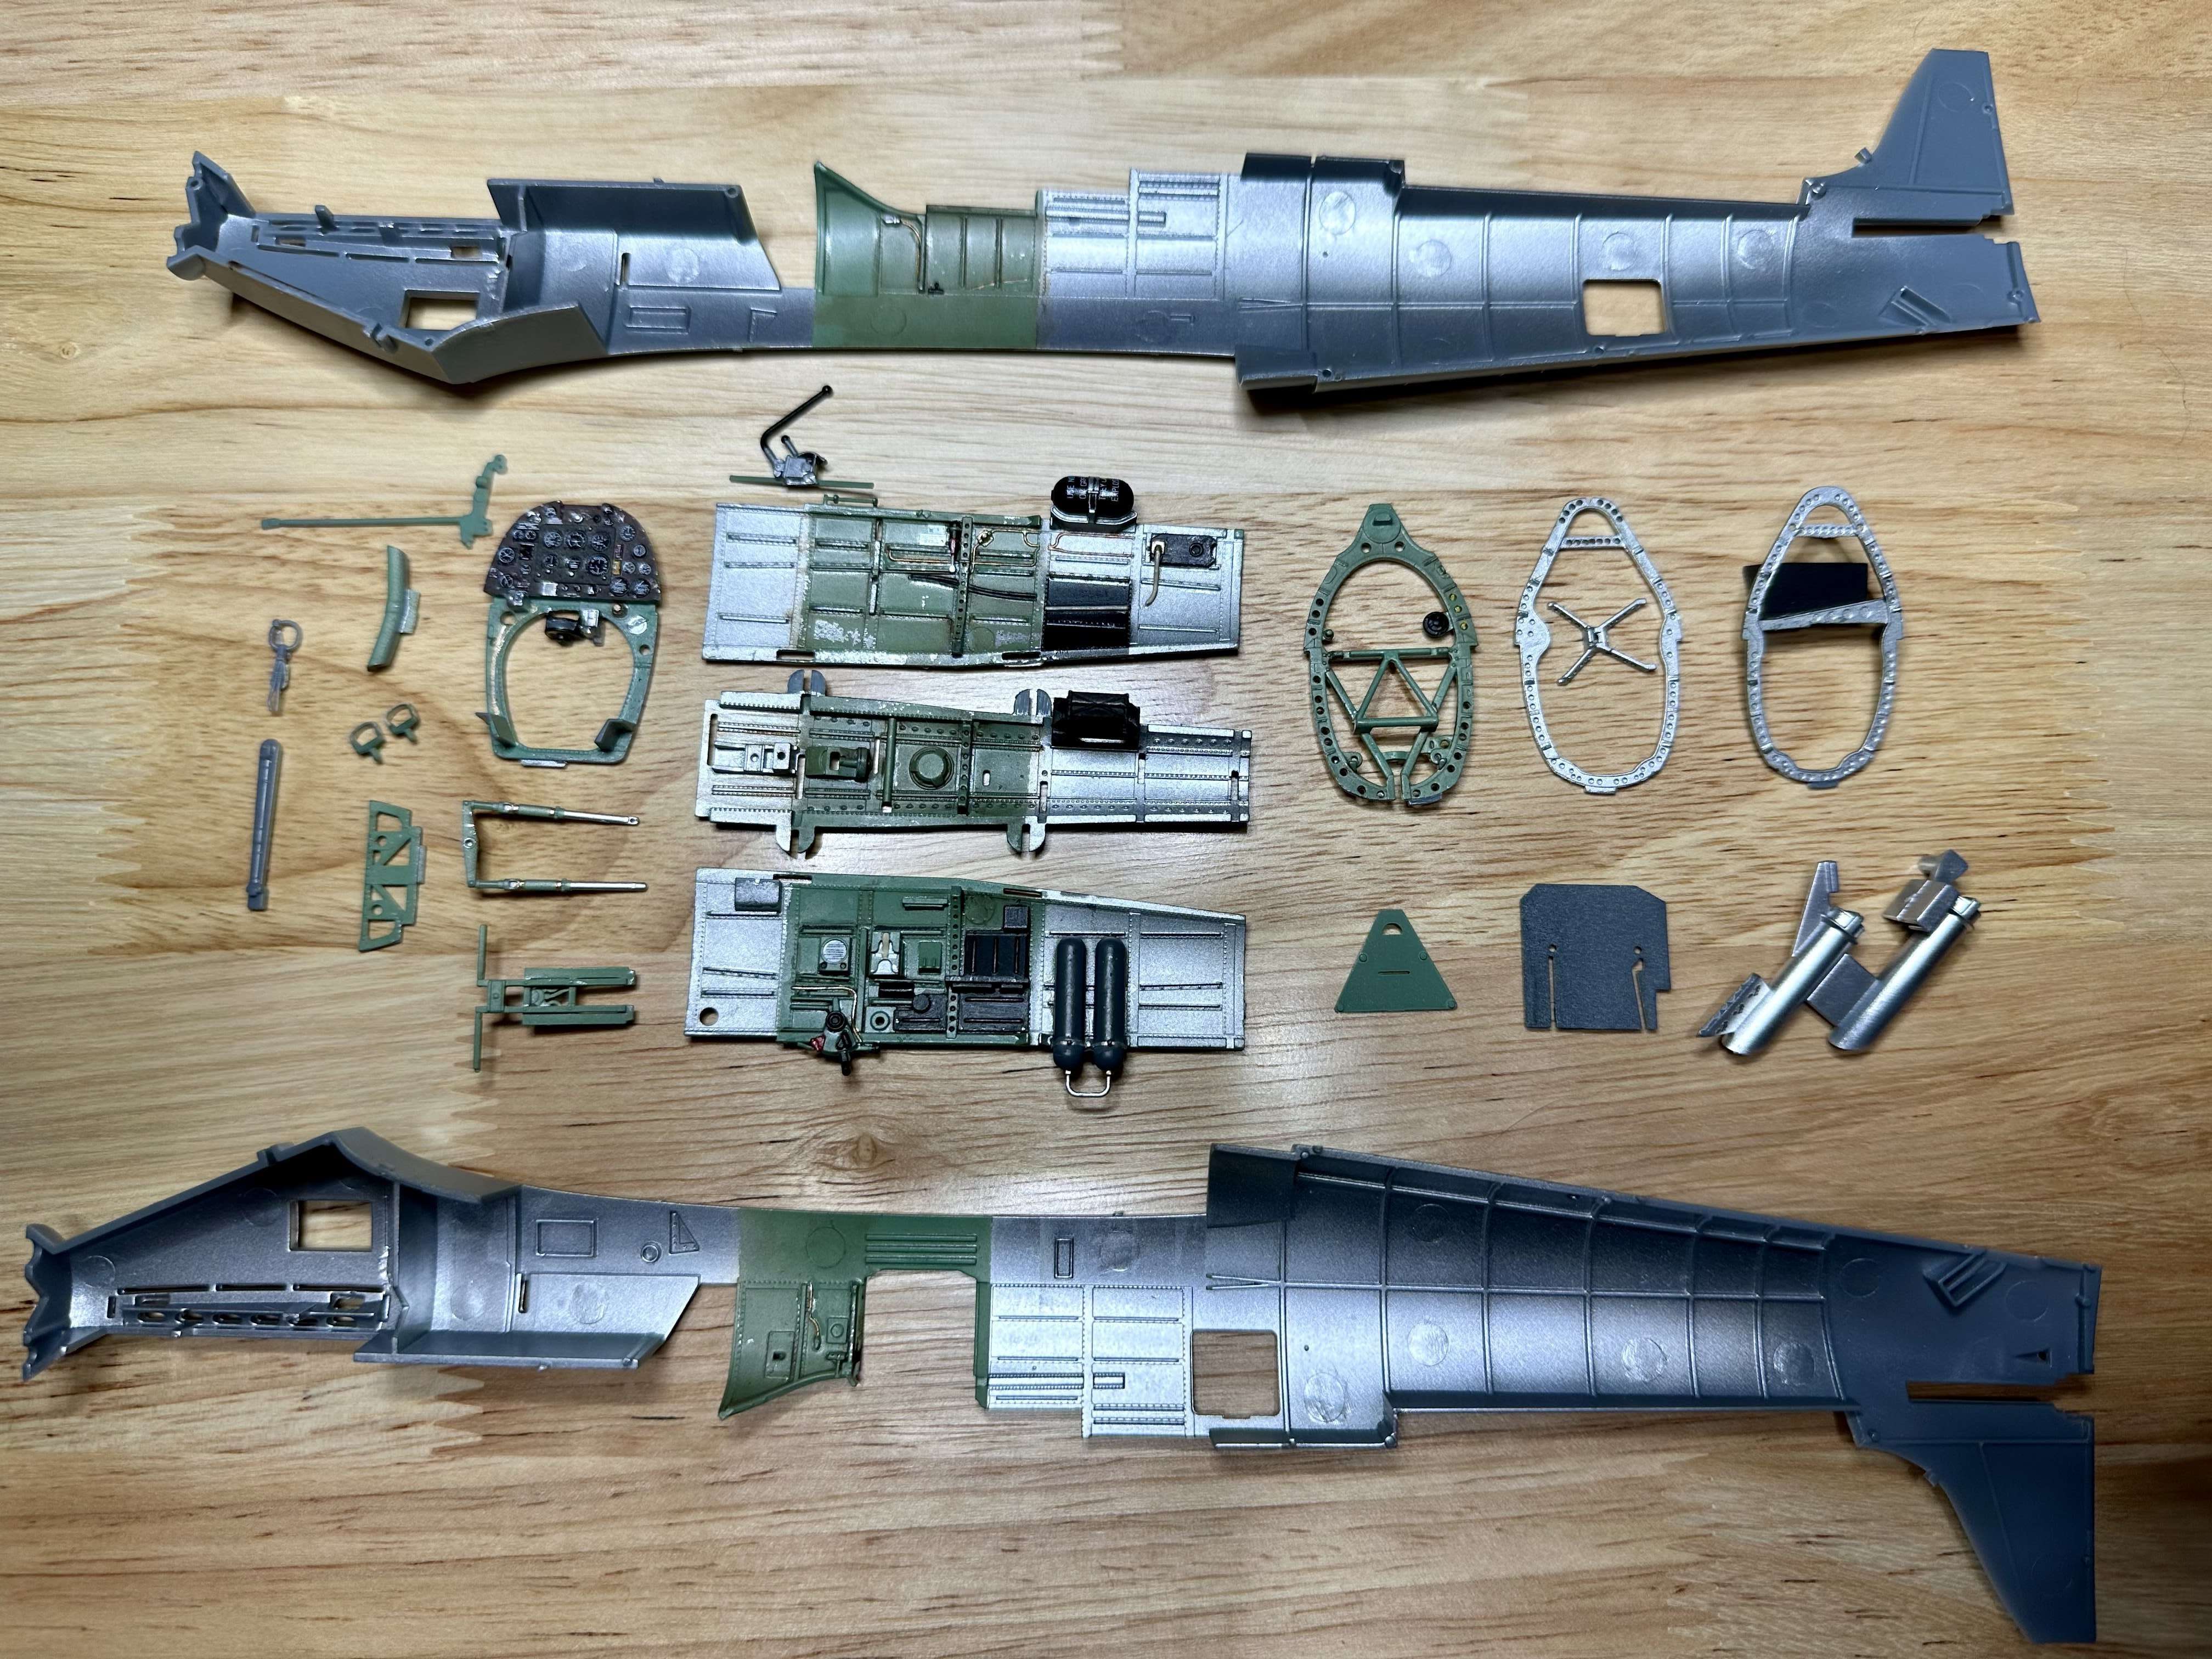
I had sprayed the cockpit in ‘Supermarine green’ and once that was completely dry I put a layer of clear acrylic floor finish over the top. It is claimed to be very glossy on the bottle but I found it dried to a nice satin sheen. I mixed up some sienna brown and black oil paints, suitably thinned with enamel thinner and got to work with the wash. Wherever it was too much I reduced the wash with a cotton earbud swab. I put the detail painting over this. Again I used enamel but only after it had dried thorough and only a very thin coat of enamel at that.
I had repainted the instrument panel three times before I was happy but then came time to decal it. There are 37 separate decals for the Kotare IP: I enjoy de calling so got on with it with my trusty bottles of Microset and Microsol close at hand. The Cartograph decals set down well and I thought I’d done a bang up job until i looked at the IP later on and found I misaligned two of the instruments. The Eagle of Eyed amongst our august company will note that the Rev Counter is on upside down! Bugger! What to do about it? @airscale decals will come to the rescue and I will put one of theirs on over the top. Likewise with the other instruments I misaligned.

Here is the thing: I had not realised just how good these decals are. I hadn’t appreciated just how readable they are until i started taking photos of the IP and zoomed in on the images.

It’s nothing that can’t be fixed though. I know there are some touch ups needed for the Supermarine green too. To those building this kit: do yourself a favour and get some proper magnification to bear when decalling the IP. - you won’t regret it.
I decalled the rest of the cockpit and below you can see a dry-fit of the starboard side of the ‘pit
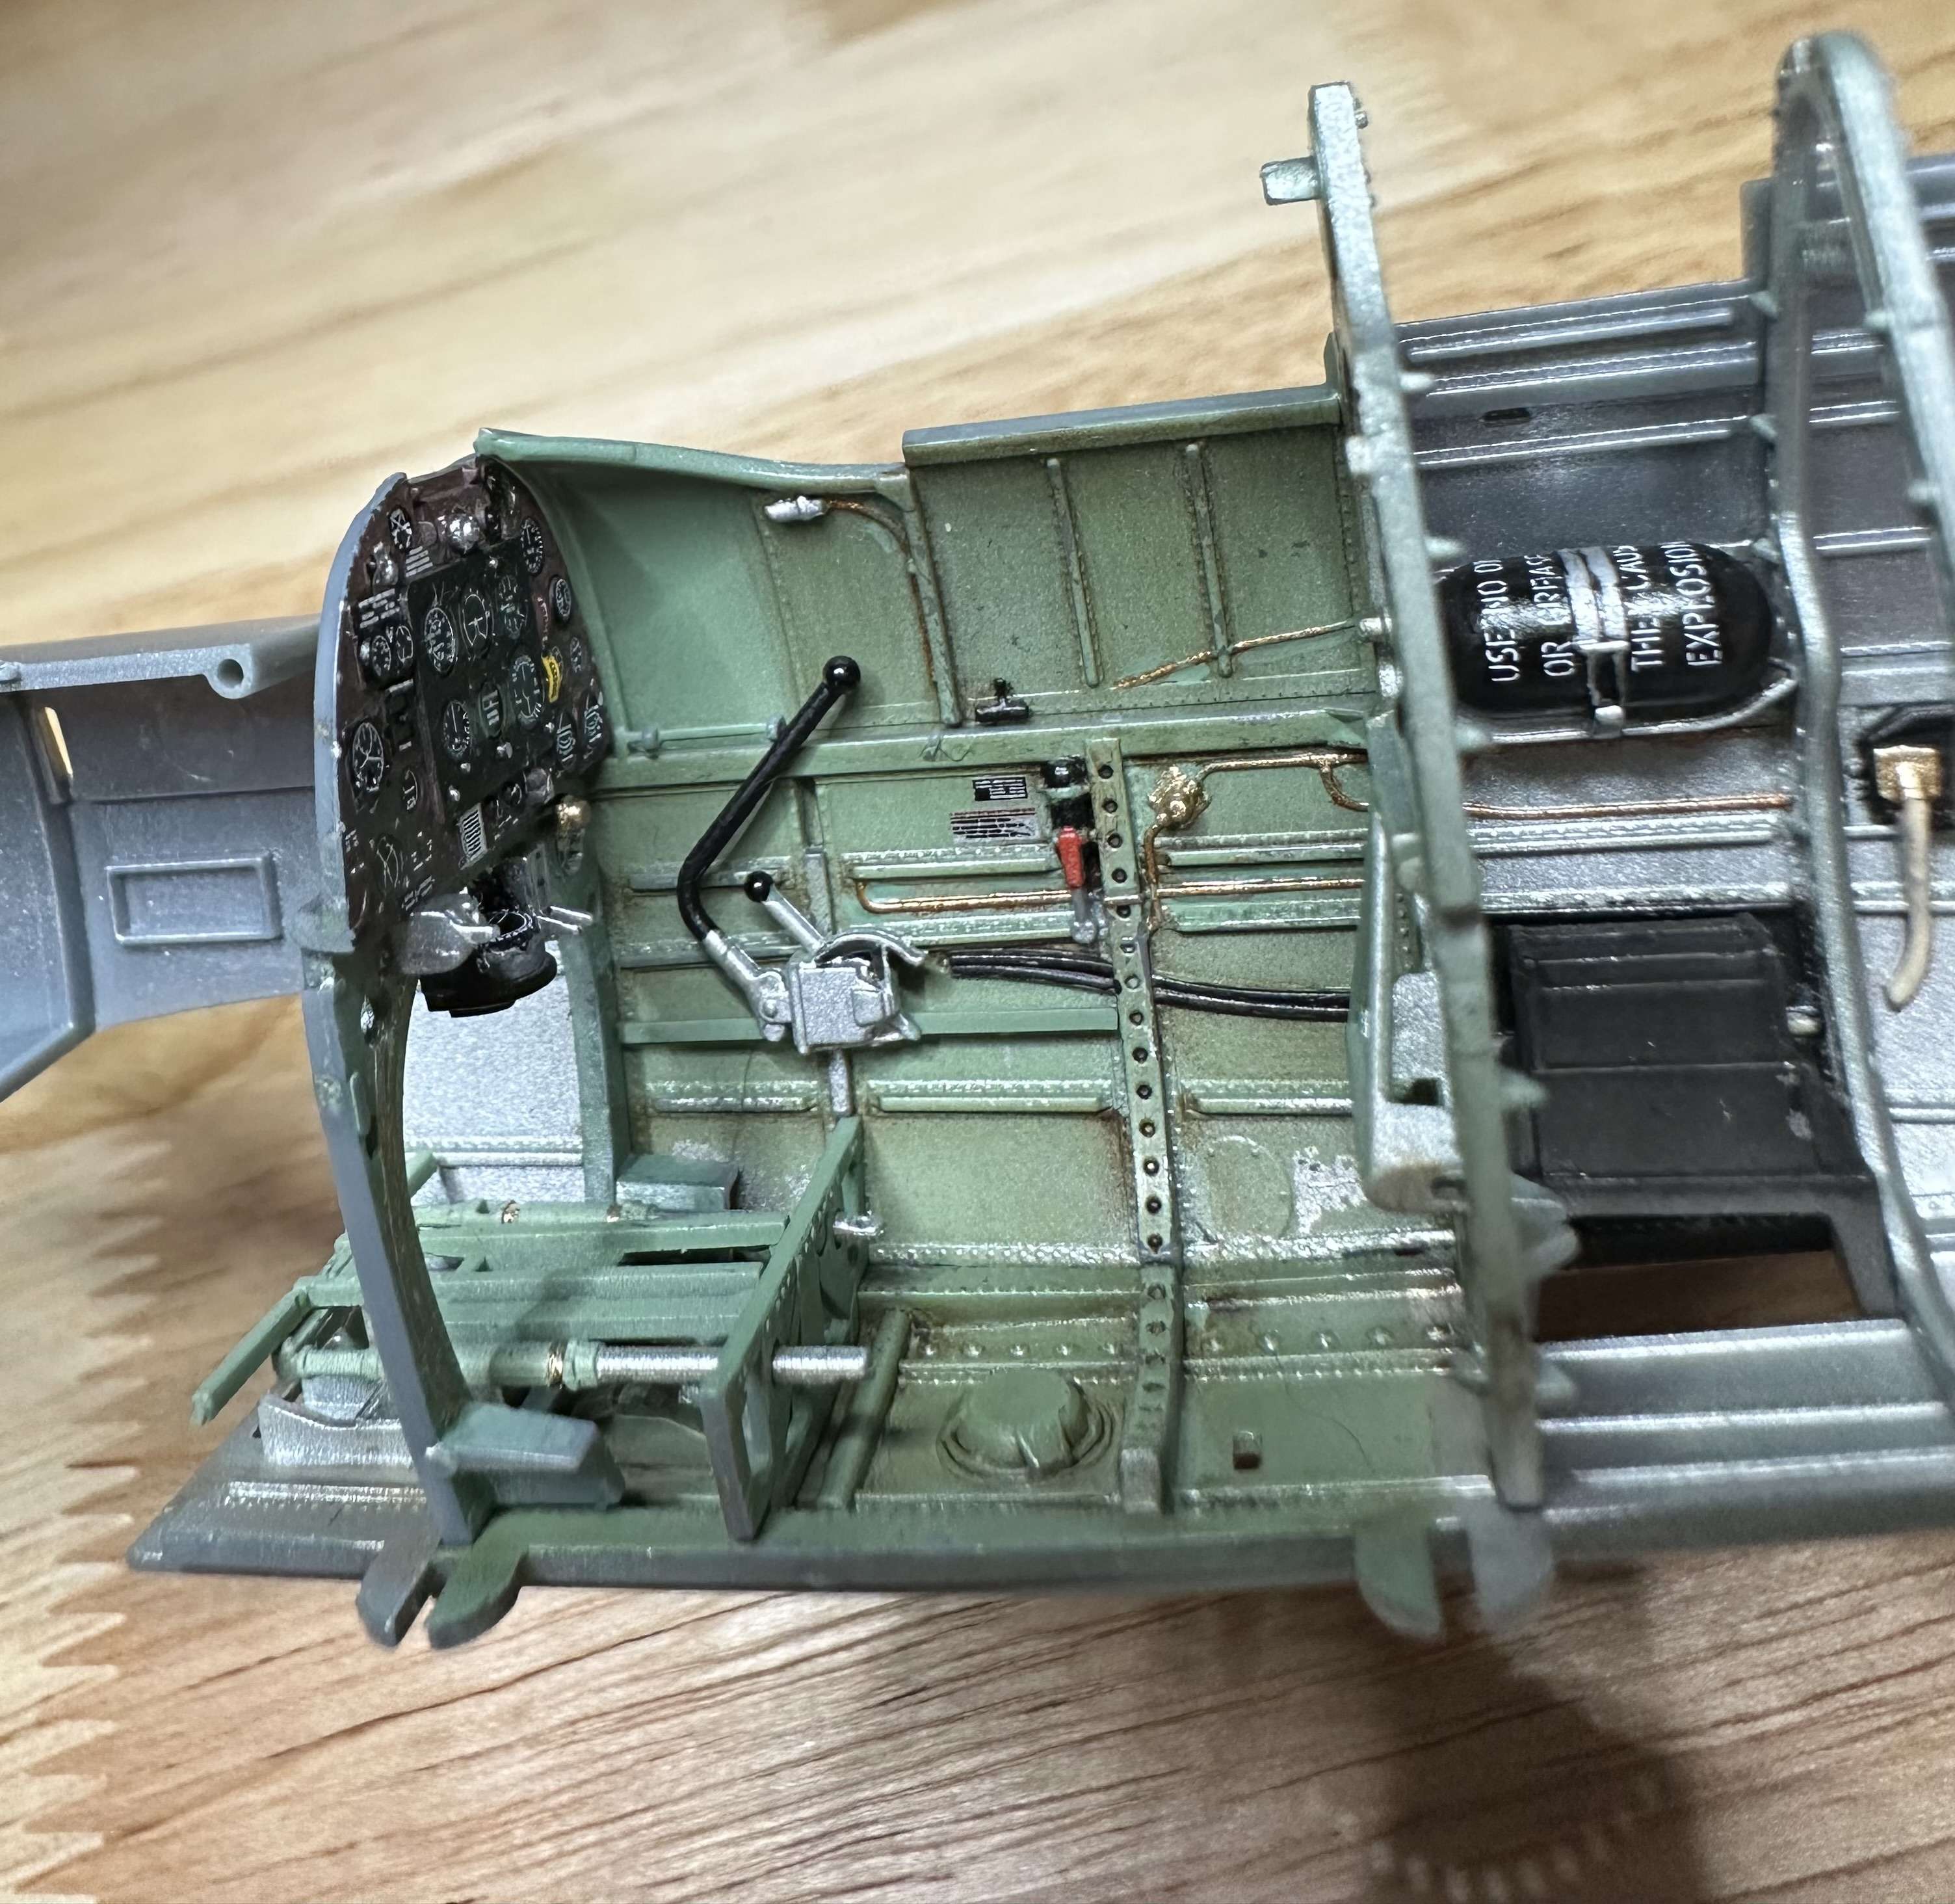
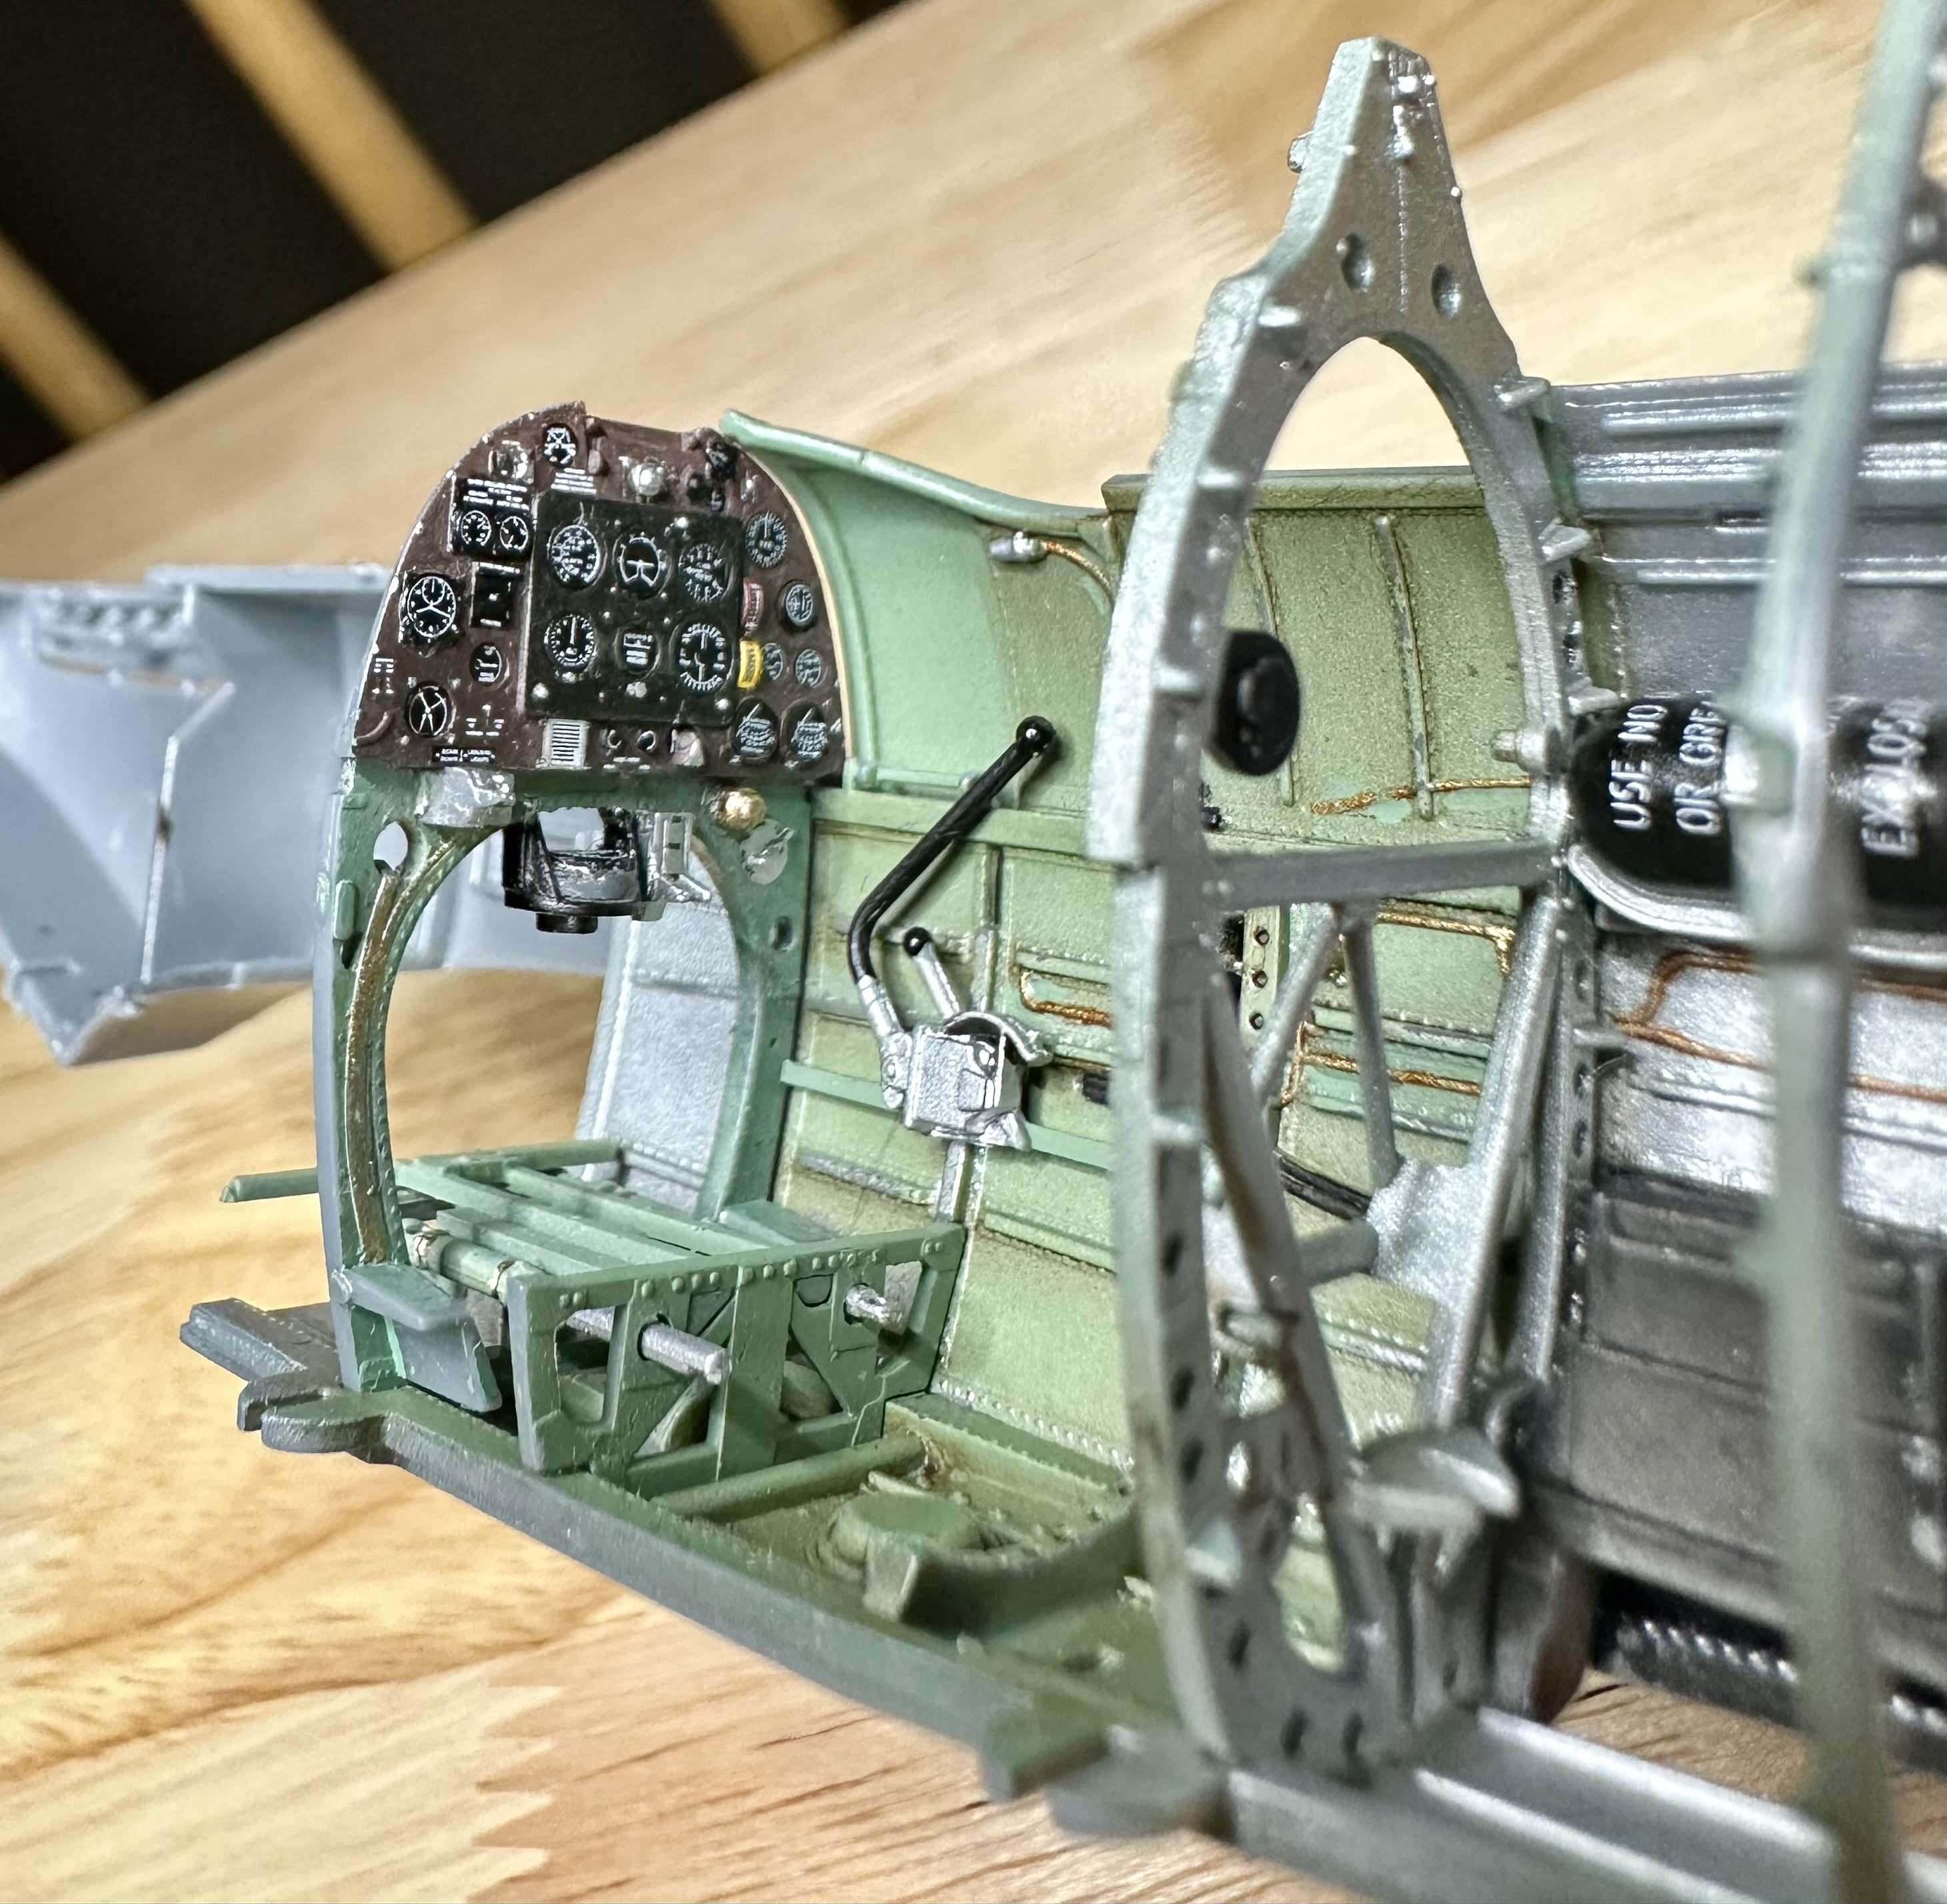
the two images above are, as before, a dry fit: not a single drop of glue has been used. The seat will be the next focus, followed by the control column and the small amount of rigging needed. And then, I am at the point of actually glueing something together! Heady stuff!
The two takeaways from this phase of the build are 1. using magnification for the IP (I’m going to try using my ipad on a stand with the screen in zoom mode) and 2. Scrape every mating surface very carefully: all parts are a tight, precise fit and even a thin layer of paint can spoil components’ fit if the paint overspray is not removed.
Overall then I am pleased to make progress. I know I don’t have the finesse of some of you guys yet but I’ll get there. Until next time folks!
Kind regards,
Paul
-
-
“The development cycle of the Staaken R-Planes reached its first plateau with the introduction of the Staaken R.VI. This aircraft was not only the largest aircraft to go into quantity production during World War I but it was also the best known of all the German R-Planes.”
George W. Haddow & Peter M. Gross ‘The German Giants.’
A year goes by and…life and other builds got in the way. I changed company and moved halfway across America, Pete completed another of his wonderful Triumph TR6 builds and wound down his business. Suffice to say, we’ve collectively had lots of stuff going on but not forgotten this build.
So, where are we now? We now know a lot more about these birds than before. Great sources of information have included:
Grosz P.M. & Haddow G.W., ‘The German Giants’, Putnam & Co Ltd, 1969 (2nd Edition) ISBN 370-00037-4
Grosz P.M., Windsock Datafile 95 ‘Staaken R.VI’ , Albatros Productions, 2002, ISBN No. 1-902207-50-5
Rimell R. Windsock Datafile 123 ‘Staaken at War’, Albatros Productions, 2007, ISBN No. 1-902207-92 0
Herris J., Zeppelin-Staaken Aircraft of WWI: Volume 1: VGO.I/ R.VI R.29/16 (Great War Aviation Centennial Series)
ISBN No 9781935881759
Herris J., Zeppelin-Staaken Aircraft of WWI: Volume 2: R.VI R.30/16 – E.4/20 (Great War Aviation Centennial Series) ISBN No 9781935881766
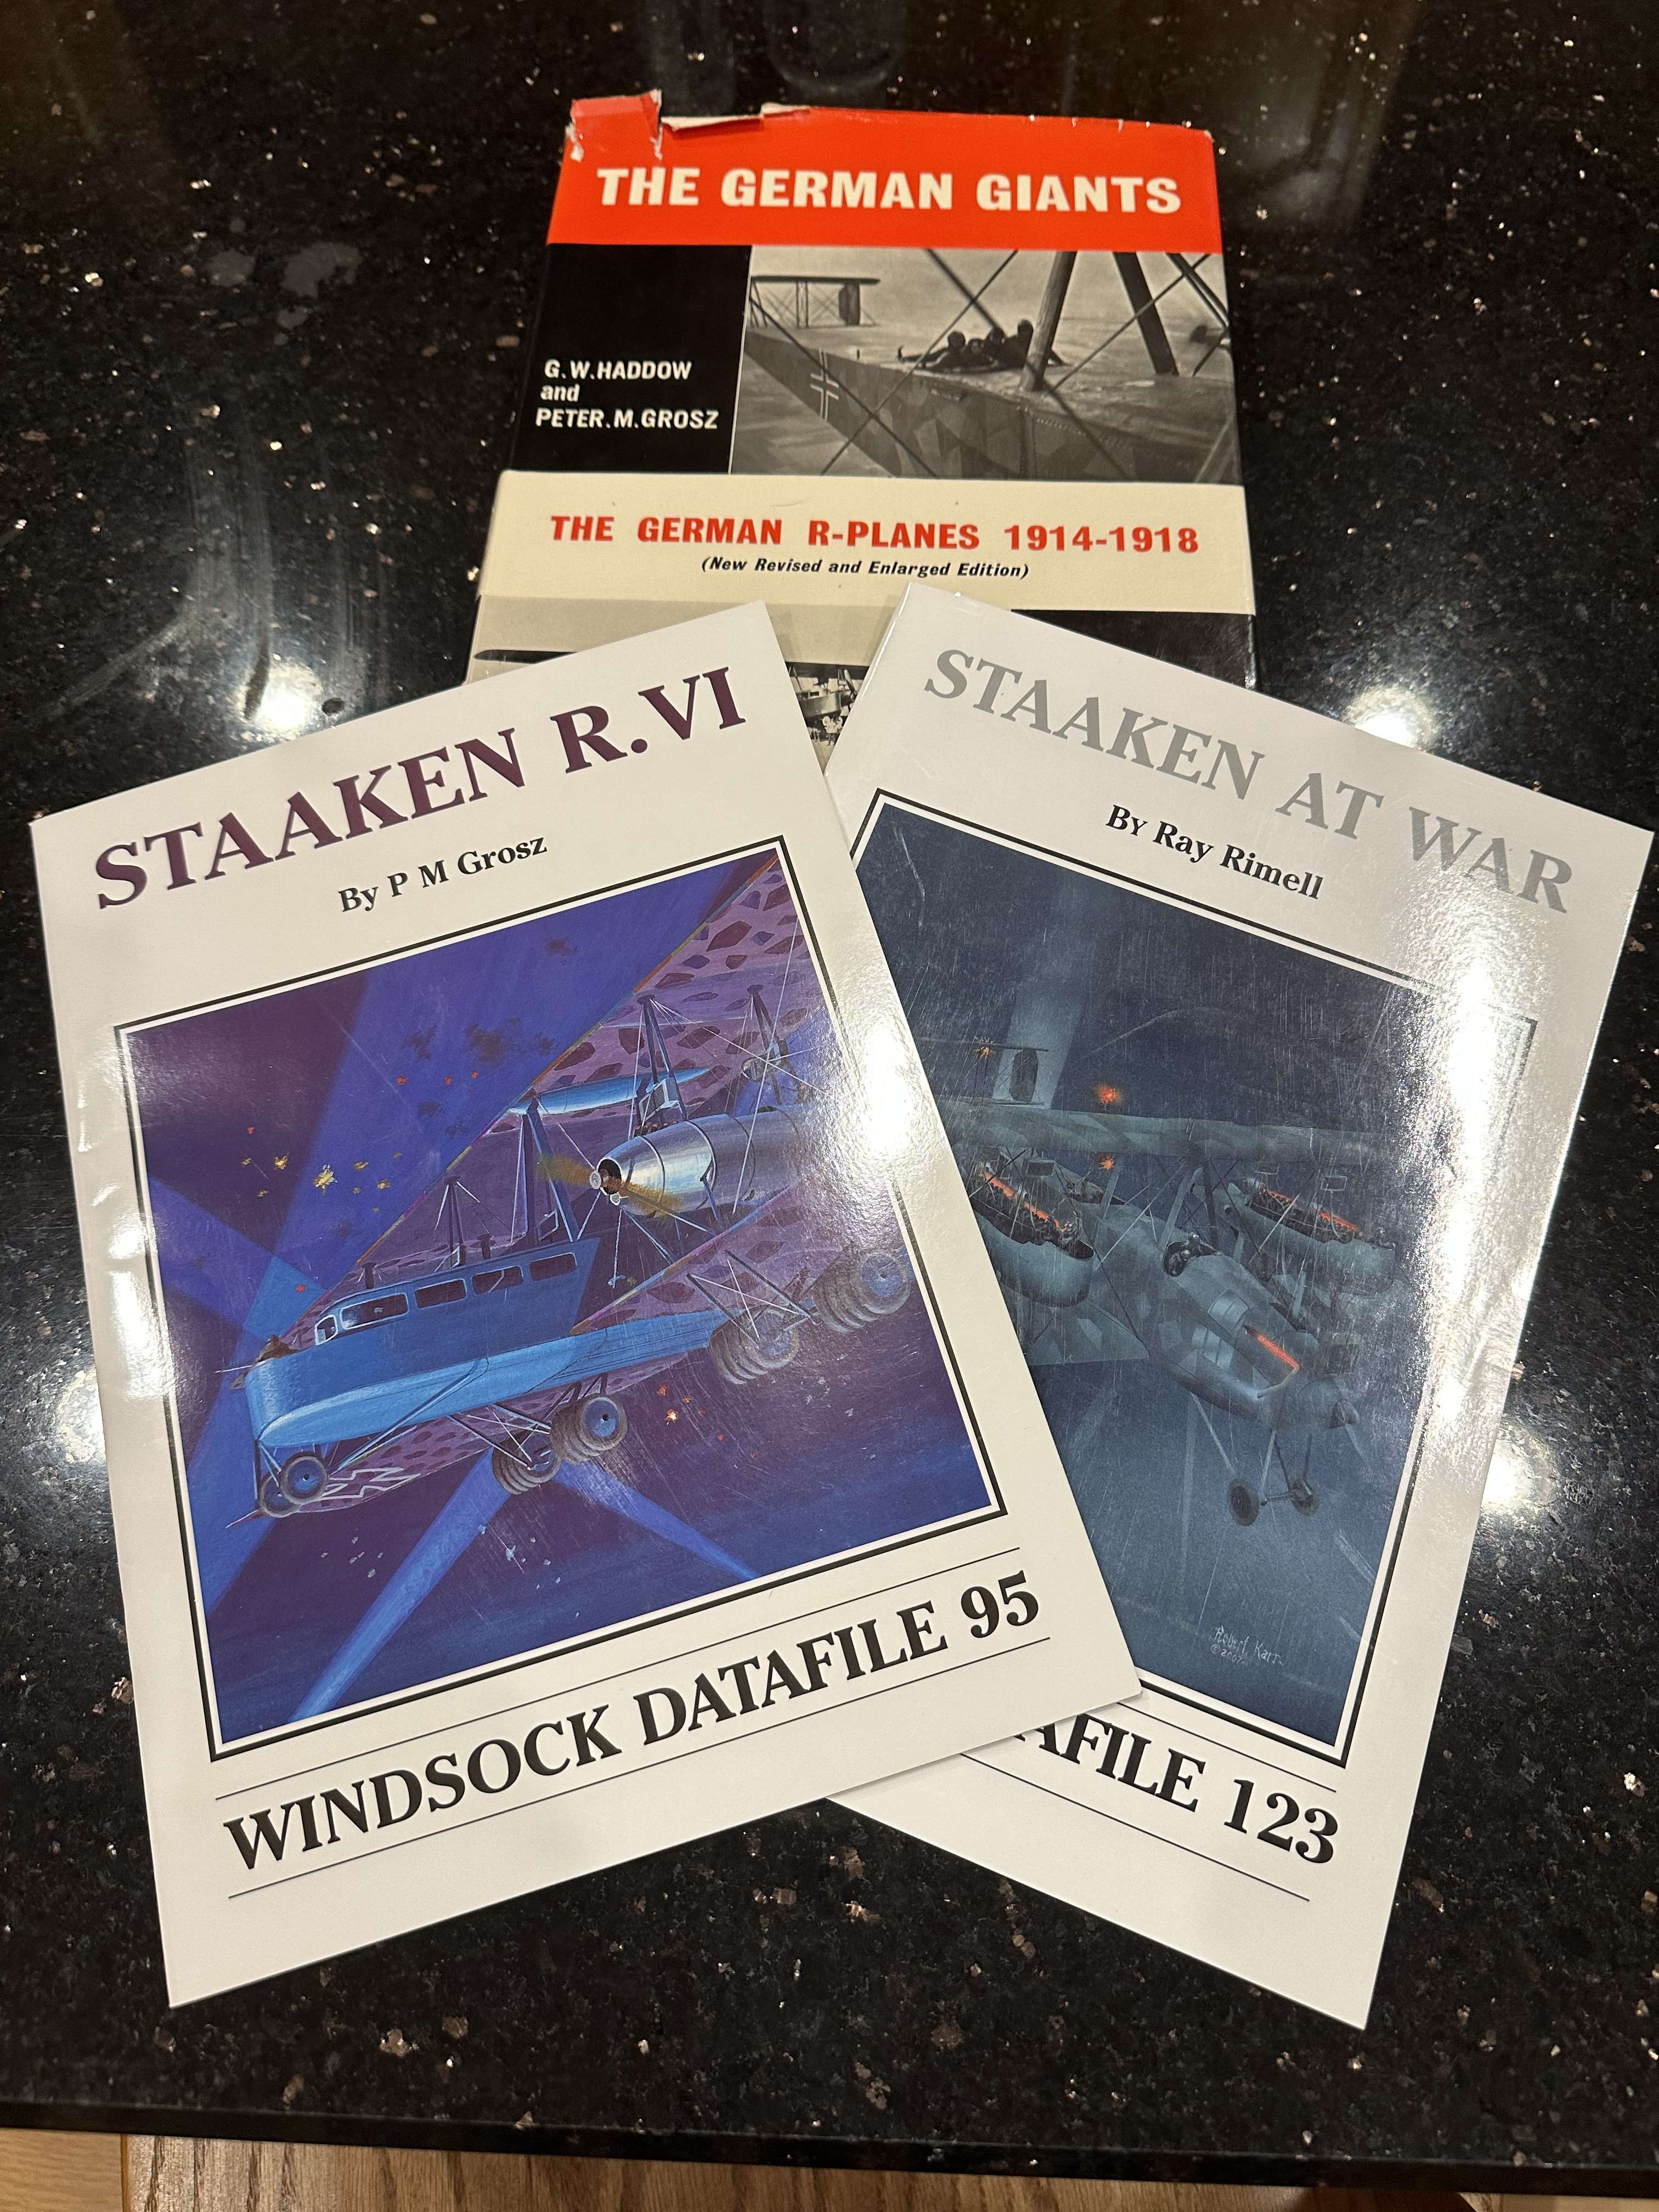
The five books listed are essential source texts if one is to attempt one of these beasts. But we have also roamed far and wide over ‘t’interweb’ and found several people who have created CAD models of the R.VI, one who has done a dynamic finite element analysis on the R.VI stability in various flight conditions, a 1920 allied report on the Mercedes D.IVa engine’s performance and a host of other sites that each have a piece of the jigsaw puzzle necessary to make it.
We now know which airframes we will choose not to make: We’ve ruled out any of the Maybach Mb.IV engined airframes and the single Basse und Selve powered machine. The table below shows which airframes were powered by the Mercedes D.IVa, the Maybach Mb.IV and the sole airframe with the underpowered and unreliable Basse und Selve type engine. This table rules out five of the airframes from the get go as we will only be building Mercedes powered birds: R.28, R.32, R.39 and the Aviatik built R.52, R.53, R.54 machines are non-starters.
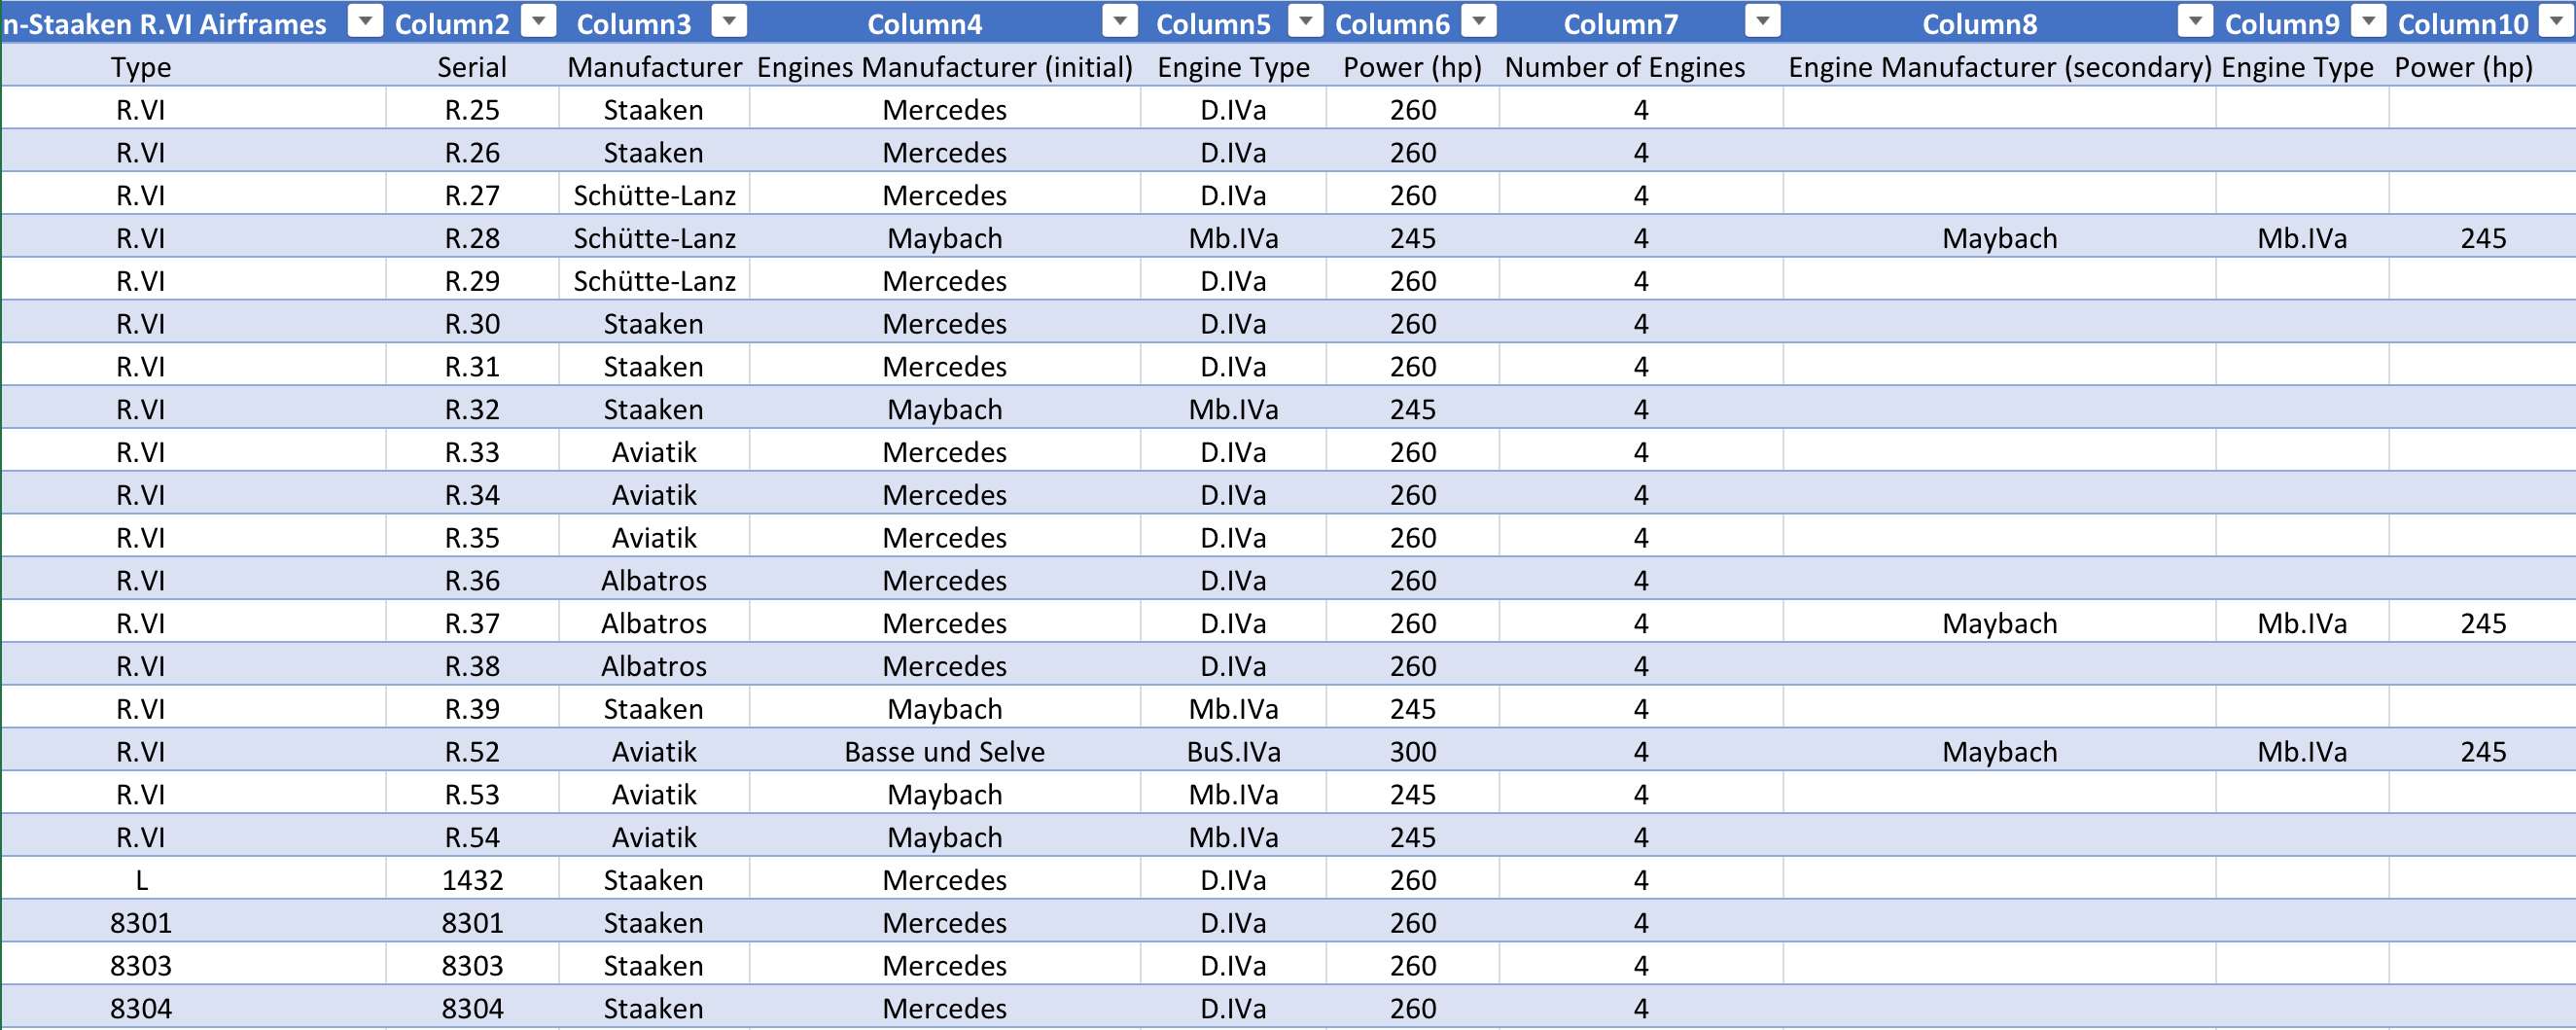
It has been with some relief that Pete and I have read some epic build logs that have taken a decade and more on this site (e.g. the B-17 ‘Sweating the Metal’ thread) but we have not been totally idle in practical matters though: Pete has been busy assembling kits of parts of brass tube for the fuselage and wing spars, and aerodynamic section tube for the interplane struts.
I have broken out my AEG G.IV kit and have begun the process of learning how to resin cast the Mercedes D.IVa Engine from the injection molded parts. Pete and I intended to build one of these each but there may be a third (right @seiran01??
). The WnW D.IVa engines are very nice and crisp in form but could use a bit of help with spark plugs, wiring etc so we’ll look into what Taurus or others may have for them and what we can fabricate ourselves.

I am responsible for fabricating the wheels also. it looks like the main wheels were 3'4" diameter and 6" wide at the tyre and the nose wheels were 2'6" dia, and 4" wide at the tyre on the full size machines. So we are delving into whether there is any already exiting suitably sized wheels from another kit we can buy and take casts of (doubtful but you never know) or I need to make these bad boys from scratch. For each airframe there will need to be 18 wheels (yes in true U.S. style the R.VI is an ‘18 wheeler’). So, in total, we will need to be a minimum of 54 finished and usable wheels if nobody goes for a floatplane version and a minimum of 12 cast engines (and more likely 16 to allow for muck-ups). Gulp.
We have both got the necessary 1/32 scale general arrangement drawings set up and so are basically ready to move ahead with some basic construction. Onward.
Kind regards,
Paul & Peter.
- LSP_Kevin, blackbetty, Madmax and 5 others
-
 8
8
-
17 hours ago, europapete said:
Hi Guys, A while ago I ordered a wooden propeller and 3D seat for my CSM Caudron G3. They arrived in good time ( considering they had to be made to order and then add on Ukraine's situation) over here to the U.S. Shipping was around two weeks. Not bad as Hannants takes 8-10 days with no war zone issues, which is all down to the Post Office, NOT Hannants.
What can I say. Proper Plane has done an AWESOME job with this. The propeller is very well made. An ultra smooth finnish, a nice satin varnish, the blades are even, equal, no variation between them. The wood grain is tiny, not overscale.
I have bought other props from them before, ( Gotha G4, AEG G4) Oh, yes, on the AEG set ( two props) The set I ordered represents the well known photo with the whales mouth decor. This plane has two different props fitted. Proper Plane represents this perfectly. Two accurately different props. Just look at the photos, then look at the props. 'Nuff said.
If you need a propeller for your WW1 masterpiece, just do it.
On the seat, same accolades. Way better than CSM's kit seat. (and that is good!)
The reason to upgrade an already good kit seat is that the rear seat that this represents is very open to view and is wicker built. The Proper Plane version represents the wicker construction much better/finer than the kit seat, is thinner in the walls, and much better defined.
No, this is not an advert. Just a happy customer letting you all know about a good supplier.
Regards, Pete in RI
Spot on Pete. Proper Plane make very fine additions for our models indeed.
Kind regards,
Paul
-
9 minutes ago, Iain said:
Seconded - really worthwhile reads - and from a source/eye I trust!Iain
@thierry laurent and @Iain we have a quorum!
Kind regards,
Paul
- Iain, thierry laurent and MikeC
-
3
-
There are so many wonderful posts on this thread already! I’ll try to contribute a little something worthwhile.
Salvador Dali once famously said “Don’t worry about perfection, you’ll never reach it” and the same could be said for ‘accuracy’ because even if one is building an exact 1:1 replica of the real thing, some compromises will be inevitable. As we get smaller in scale the compromises we all have to make get ever bigger. But whatever compromises we make: what we do should always be enjoyable or else why are we doing it?
There is a continuum or hierarchy of model making which is usually dictated by experience (and before anyone gets upset there is nothing wrong with being in any of these groups):
1. Those who are working to assemble a kit they bought without a major mess-up and get it painted and decalled according to the manufacturer’s instructions.
2. Those who are working to assemble a kit and have it painted and decalled according to some of their secondary source research.
3. Those who work to build a kit and modify it somewhat according to their primary and secondary source research. This is to further approach a more accurate representation of the overall shape and details of a chosen aircraft type. They then have it painted, decalled and weathered according to their research.
4. Those who are willing and able to wholesale modify a kit to get a particular kit to model a particular airframe at a particular time and who will do a great deal of primary and secondary source research to enable them to paint, decal and weather their chosen subject.
5. Scratch builders who do extensive, independent primary source research, who experiment with many methods and materials in creating a one-off and who can create components in a variety of media and can paint, decal, weather their subject in an entirely controlled manner to achieve the result they want.
Every one of these groups is represented here. The great thing about LSP is that each group tends to help the others: Group 1 to remind the other four to ‘Just put a model together and have fun like you did when you were a kid!’ Group 4 to help people in groups 1,2 and 3 how they overcame problems when they were less experienced. Group 5 to show to everyone the art of the possible. I won’t list all possible combinations but you get the picture.
There are two schools that work within those groups (and the Venn diagram that represents these two groups has a healthy overlap).
A. ‘Realists’: Fidelity to the real original is all: This group would be likely to match colours to chip samples using RLM or Federal Standards. Everyone from group 2 on through 5 could belong here. Modellers like Paul Budzik tend to reside in this space.
B. ‘Artists’: Creating the right impression is all. This group would be likely to simply choose colours from a palette because they simulated particular light conditions or took account of scale or wanted to create an impression of a deeper cockpit opening. The ‘Spanish School’ tend to reside in this group.
I mostly belong in groups 1 and 2 and occasionally I venture into 3. Like @mozart I try to get it ‘as accurate as I can’ and like @Stokey Pete I try to have fun while I do that. I get my ambition from @airscale (wow) and sense of perspective and new subjects to research from @Christa (thank you buddy), my hope that I too can do more challenging work from @tomprobert , collaboration from @europapete and awareness of what the industry does and how to correct what they don’t do well from @thierry laurent. And I thank the moderators who keep here the best modelling site on the planet.
Are my models ‘accurate’? Nope. But each is as well made as I can do it at the time and I enjoy every minute of it. That is not only due to the building and painting process itself but also down to the great community here. Thank you all.
Kind regards,
Paul.
-
-
My hobbies are soaring, cabinetmaking and modelmaking.
Modelmaking is comfortably the least expensive of that group. I am not complaining about the prices of kits per se. My original post was simply to say: caveat emptor and for anyone to shop around before we choose to buy a kit. That way we get the most value for our limited hobby budgets.
In this particular case I have saved $128.99 on what I could have paid. That amount pays for a day of flying at my local glider club or some useful bits for my wood shop.
Kind regards,
Paul
- chrish, thierry laurent and Christa
-
3
-
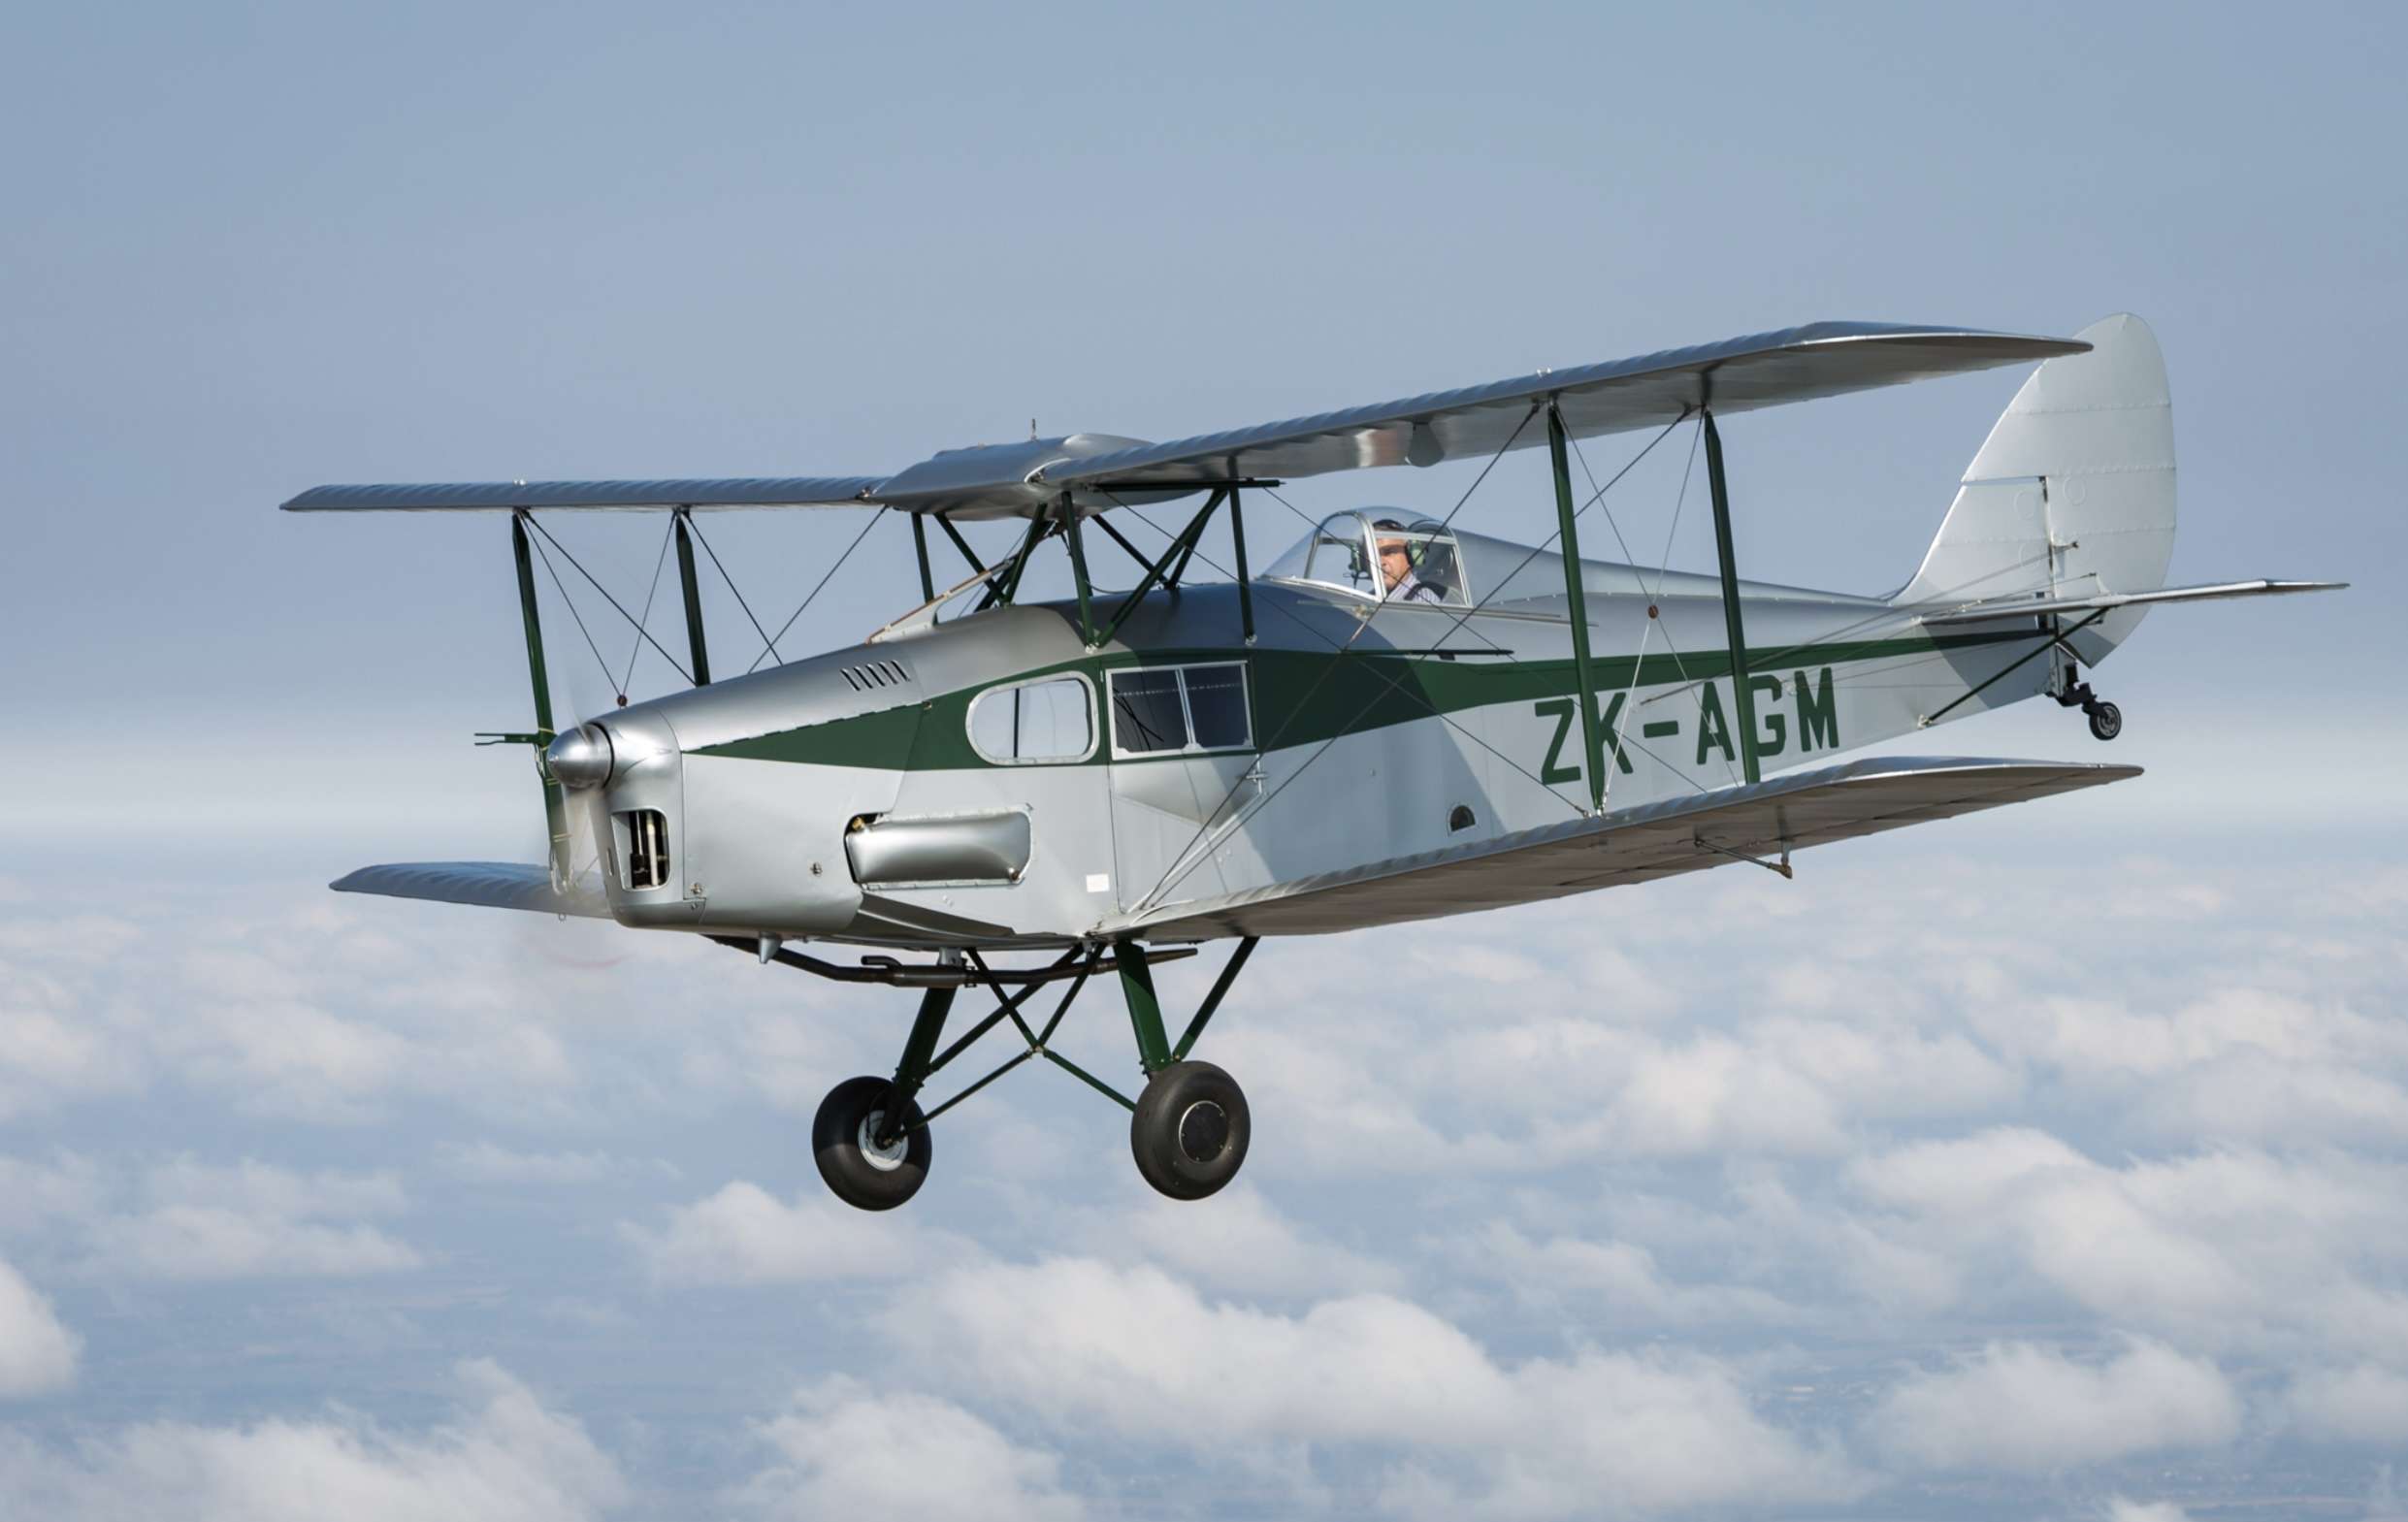
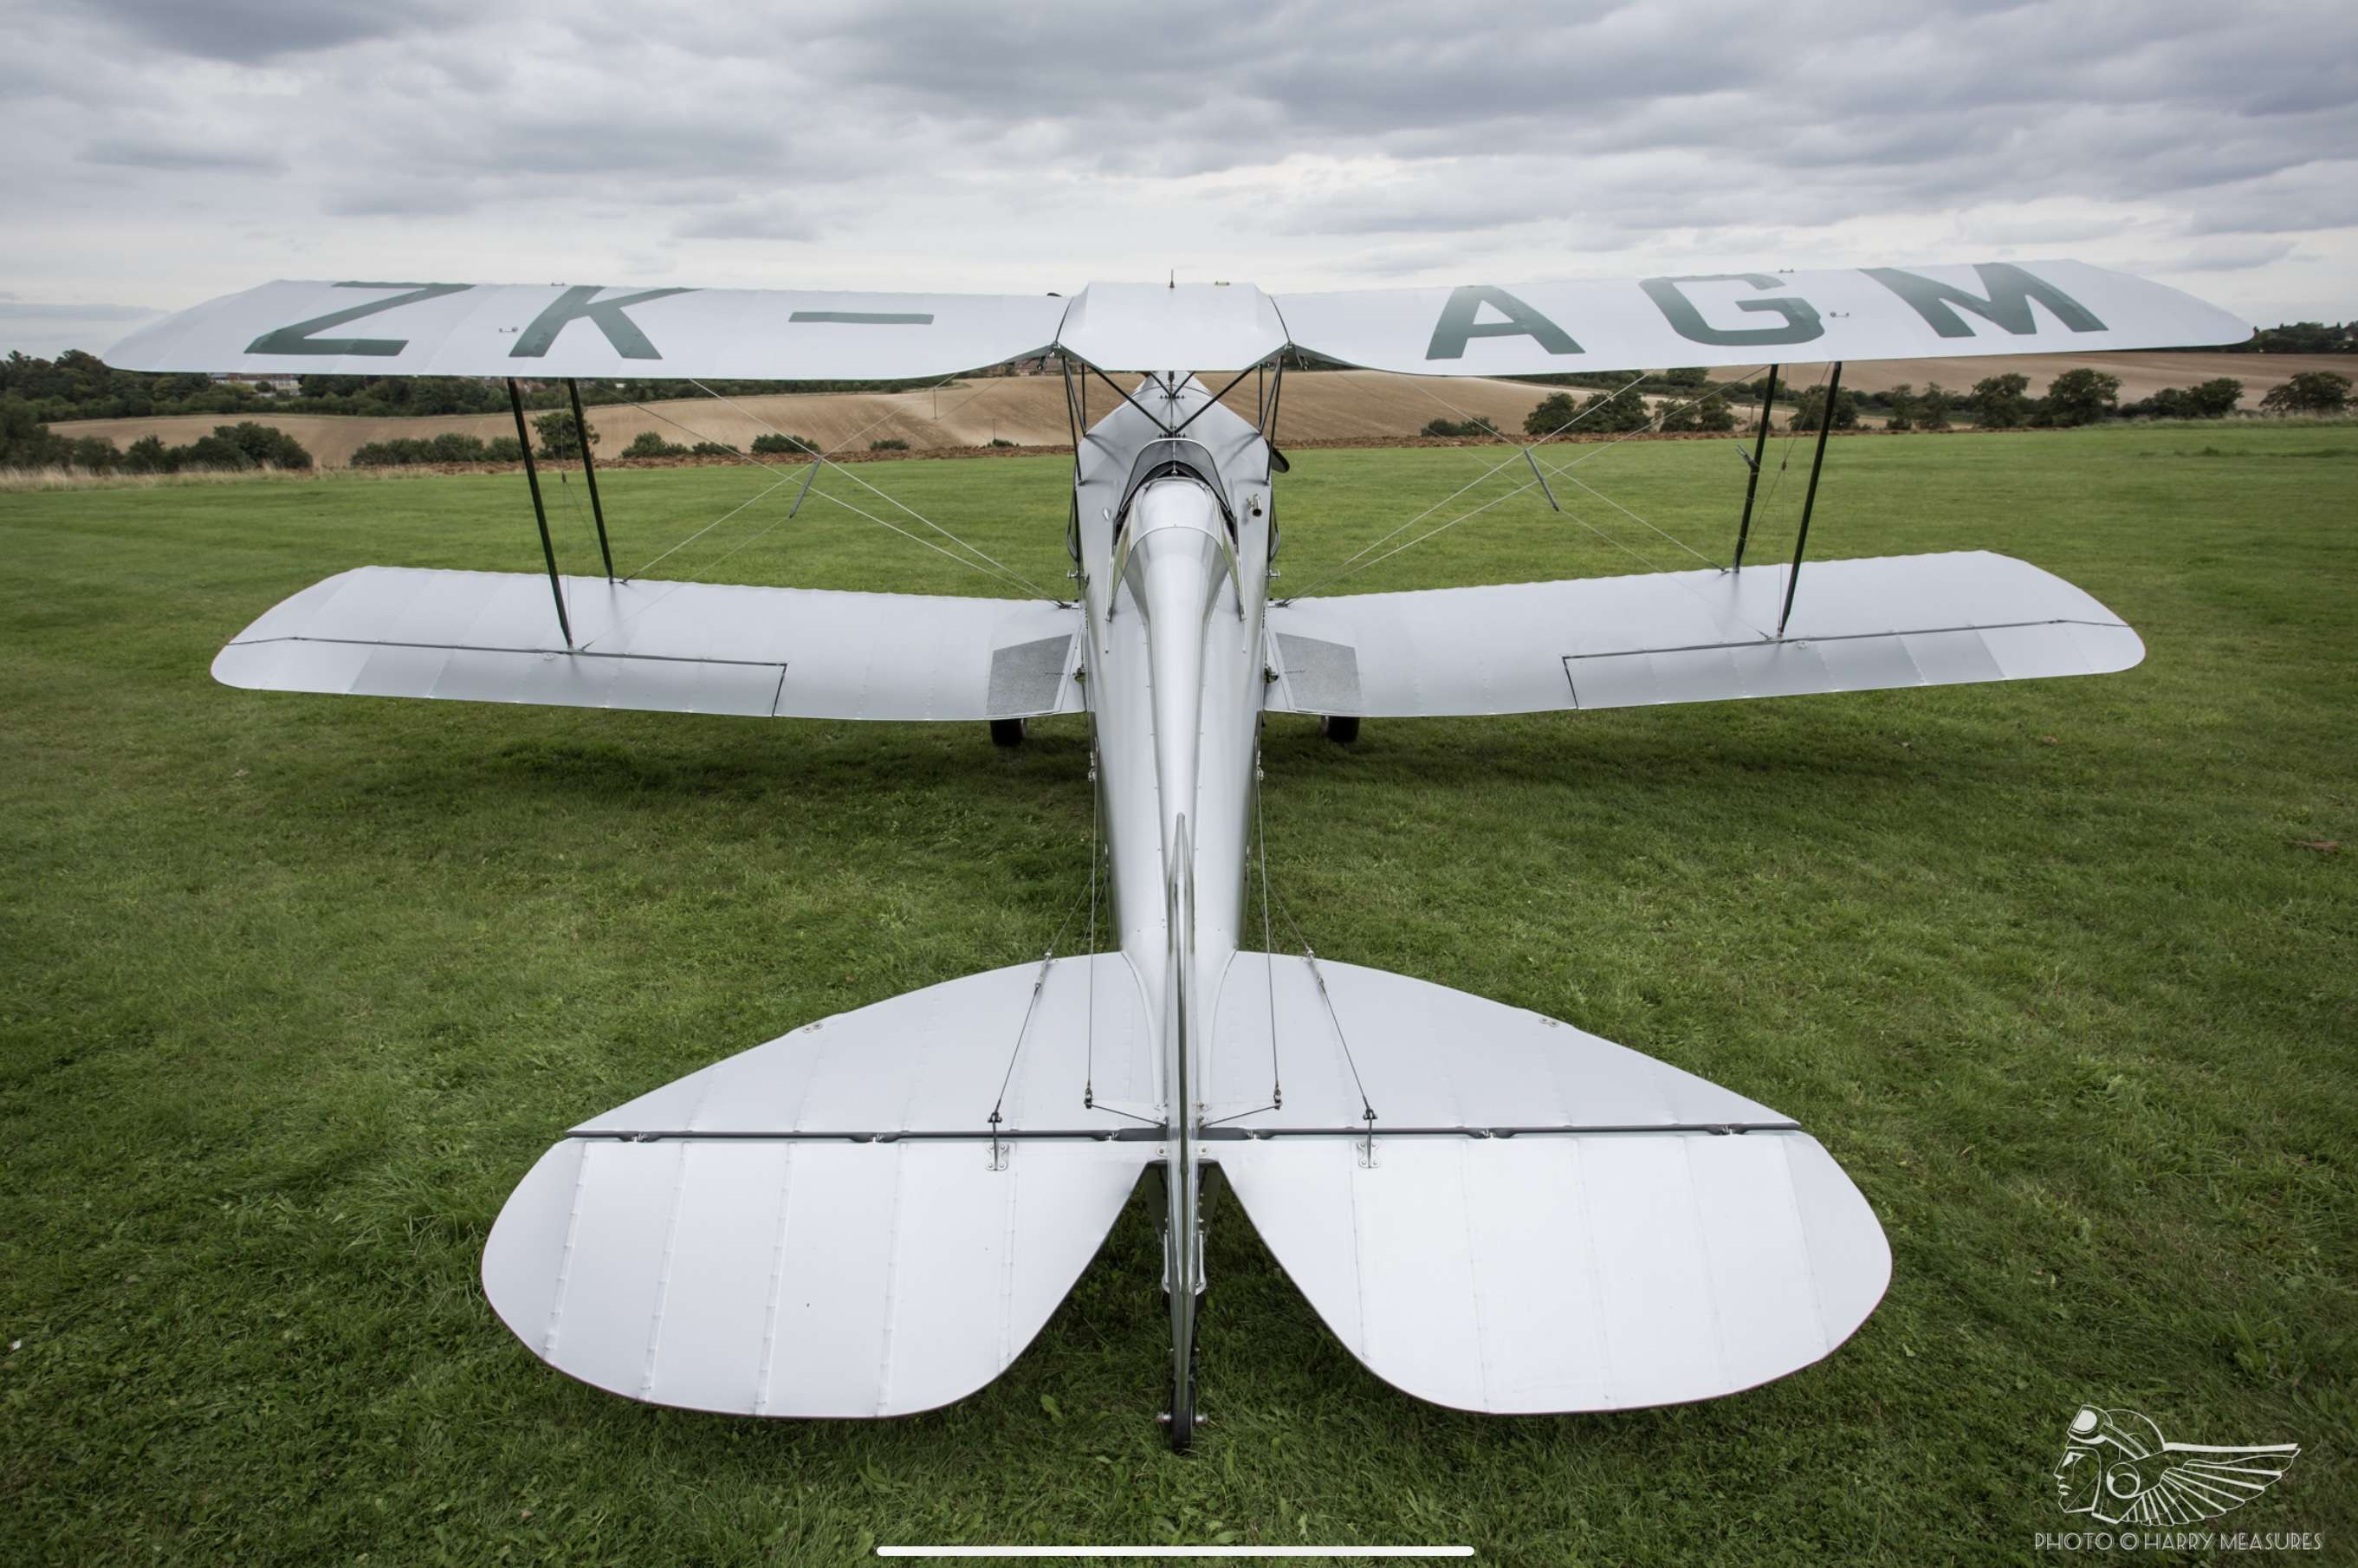
Travels far and wide across t’internet revealed this lovely page filled with DHC photos…
Useful!
Kind regards,
Paul
-
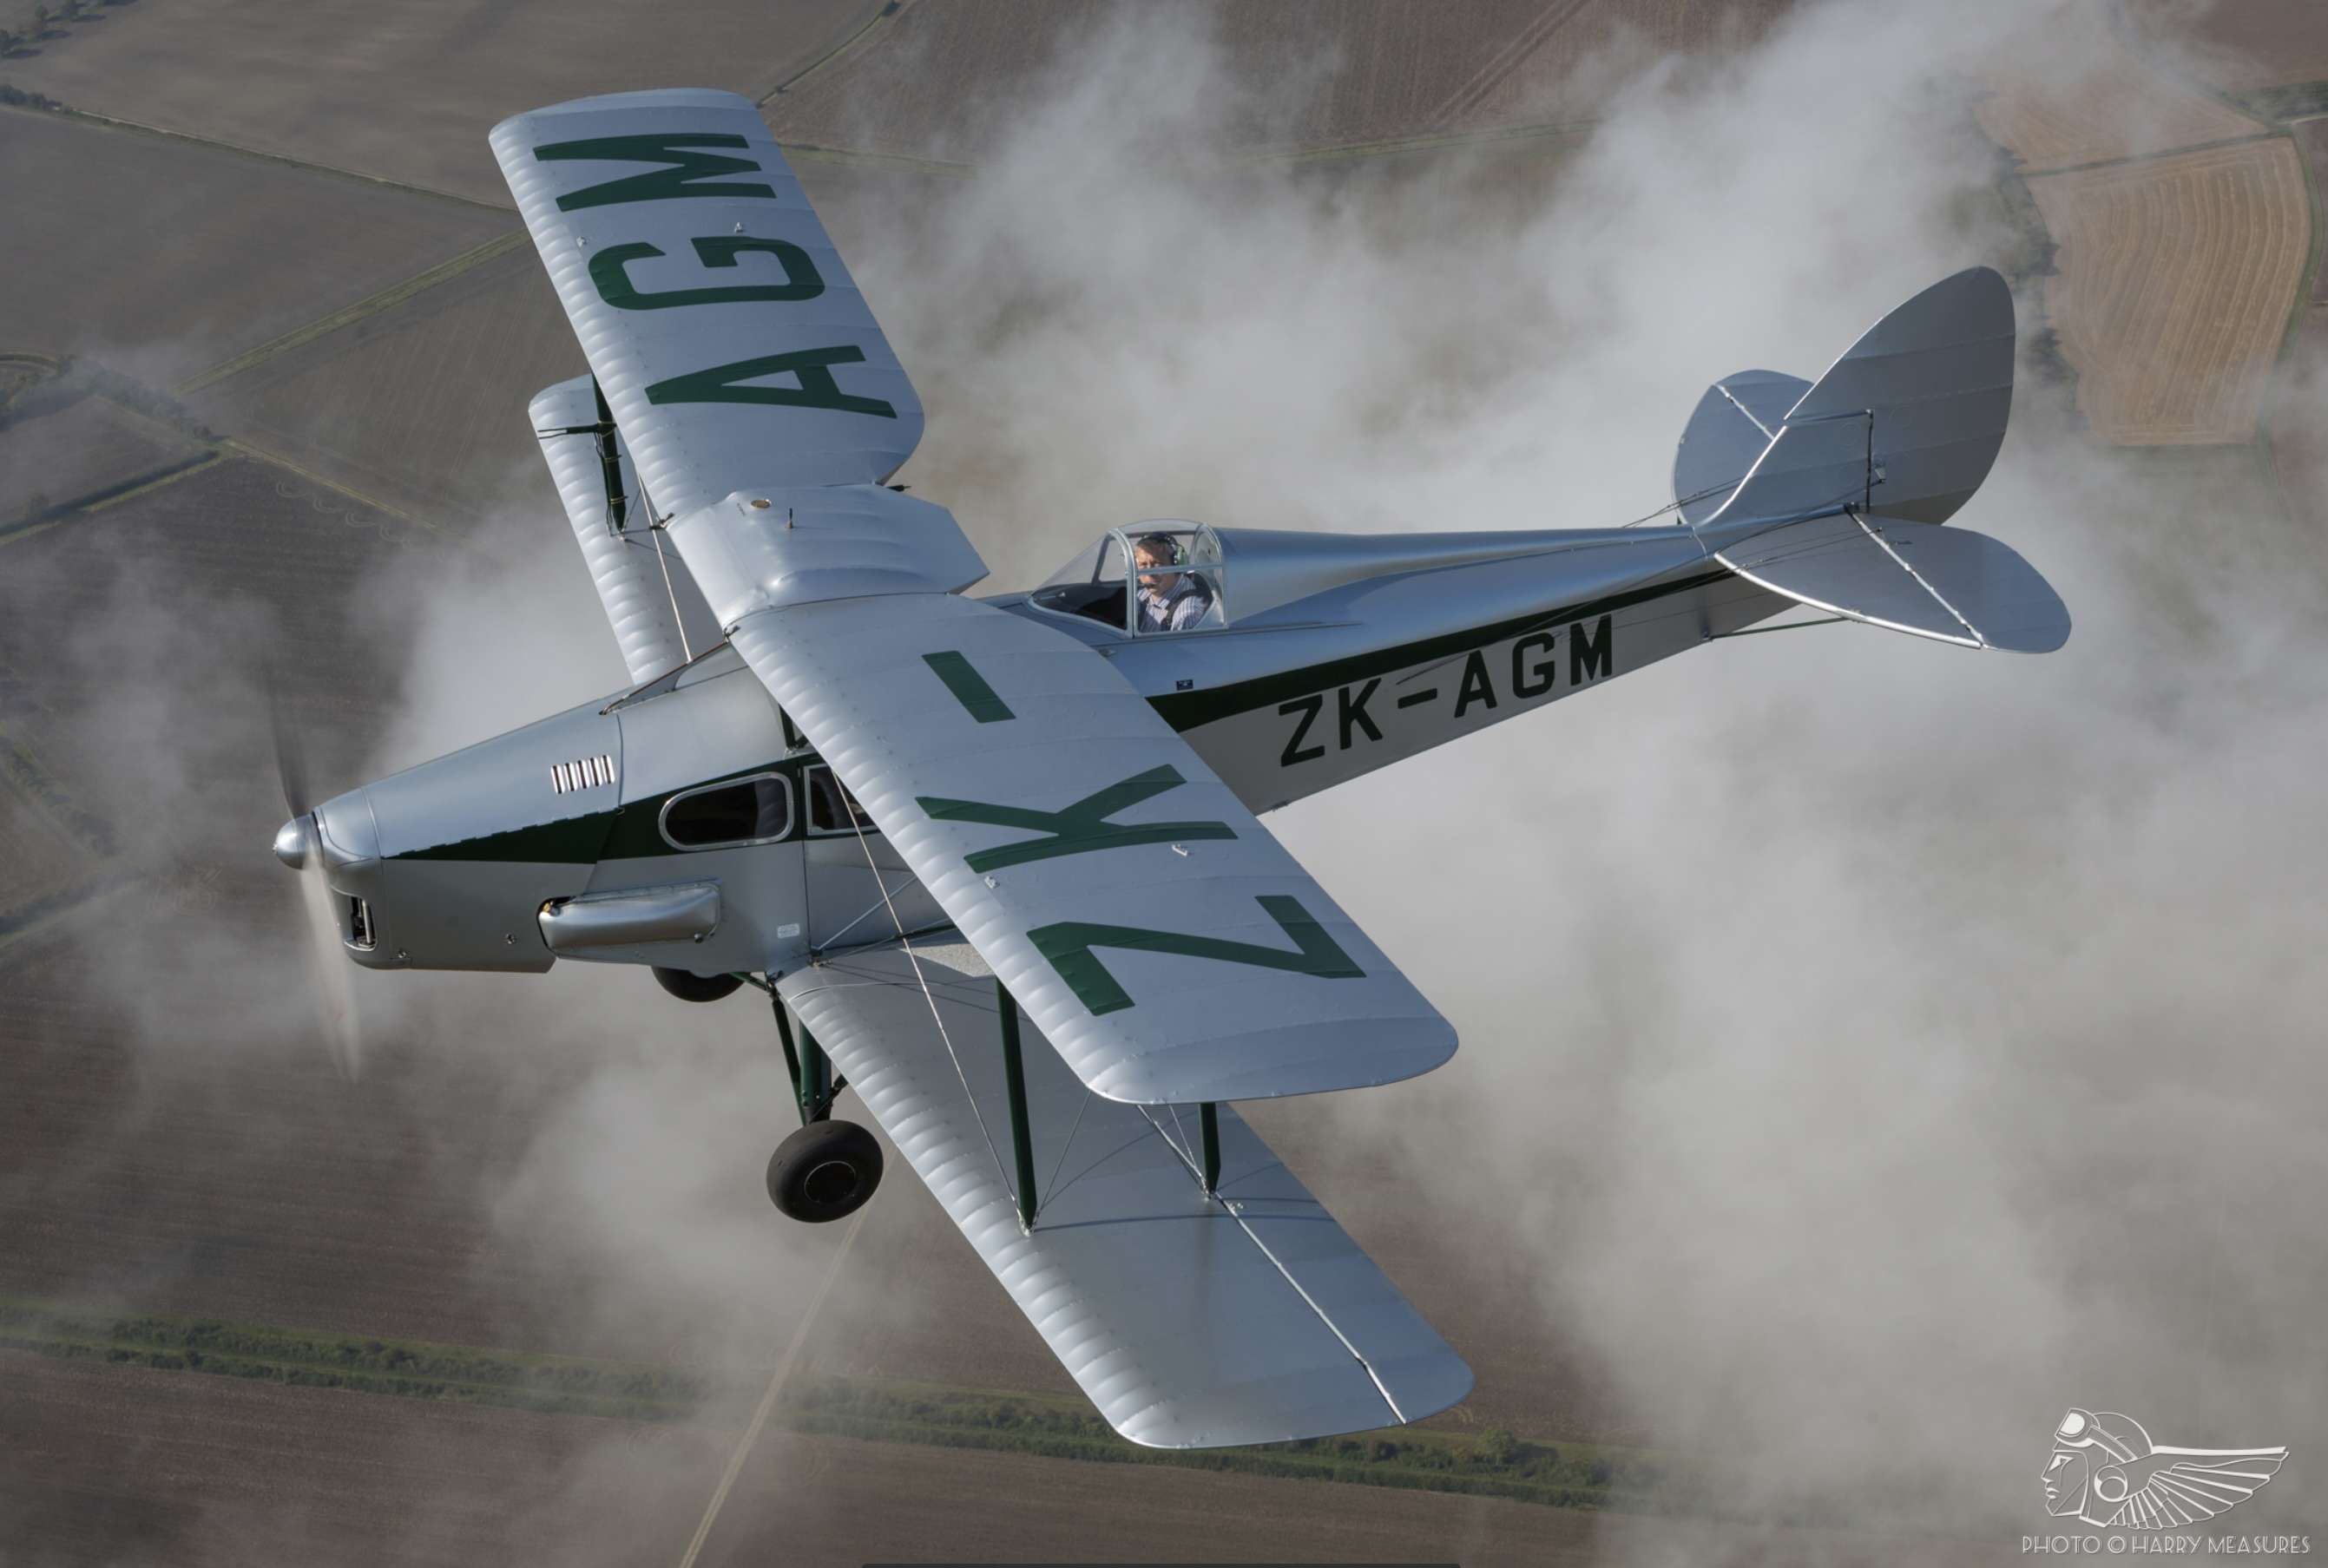
Very nice indeed….
…..so near to done!
Kind regards,
Paul
-
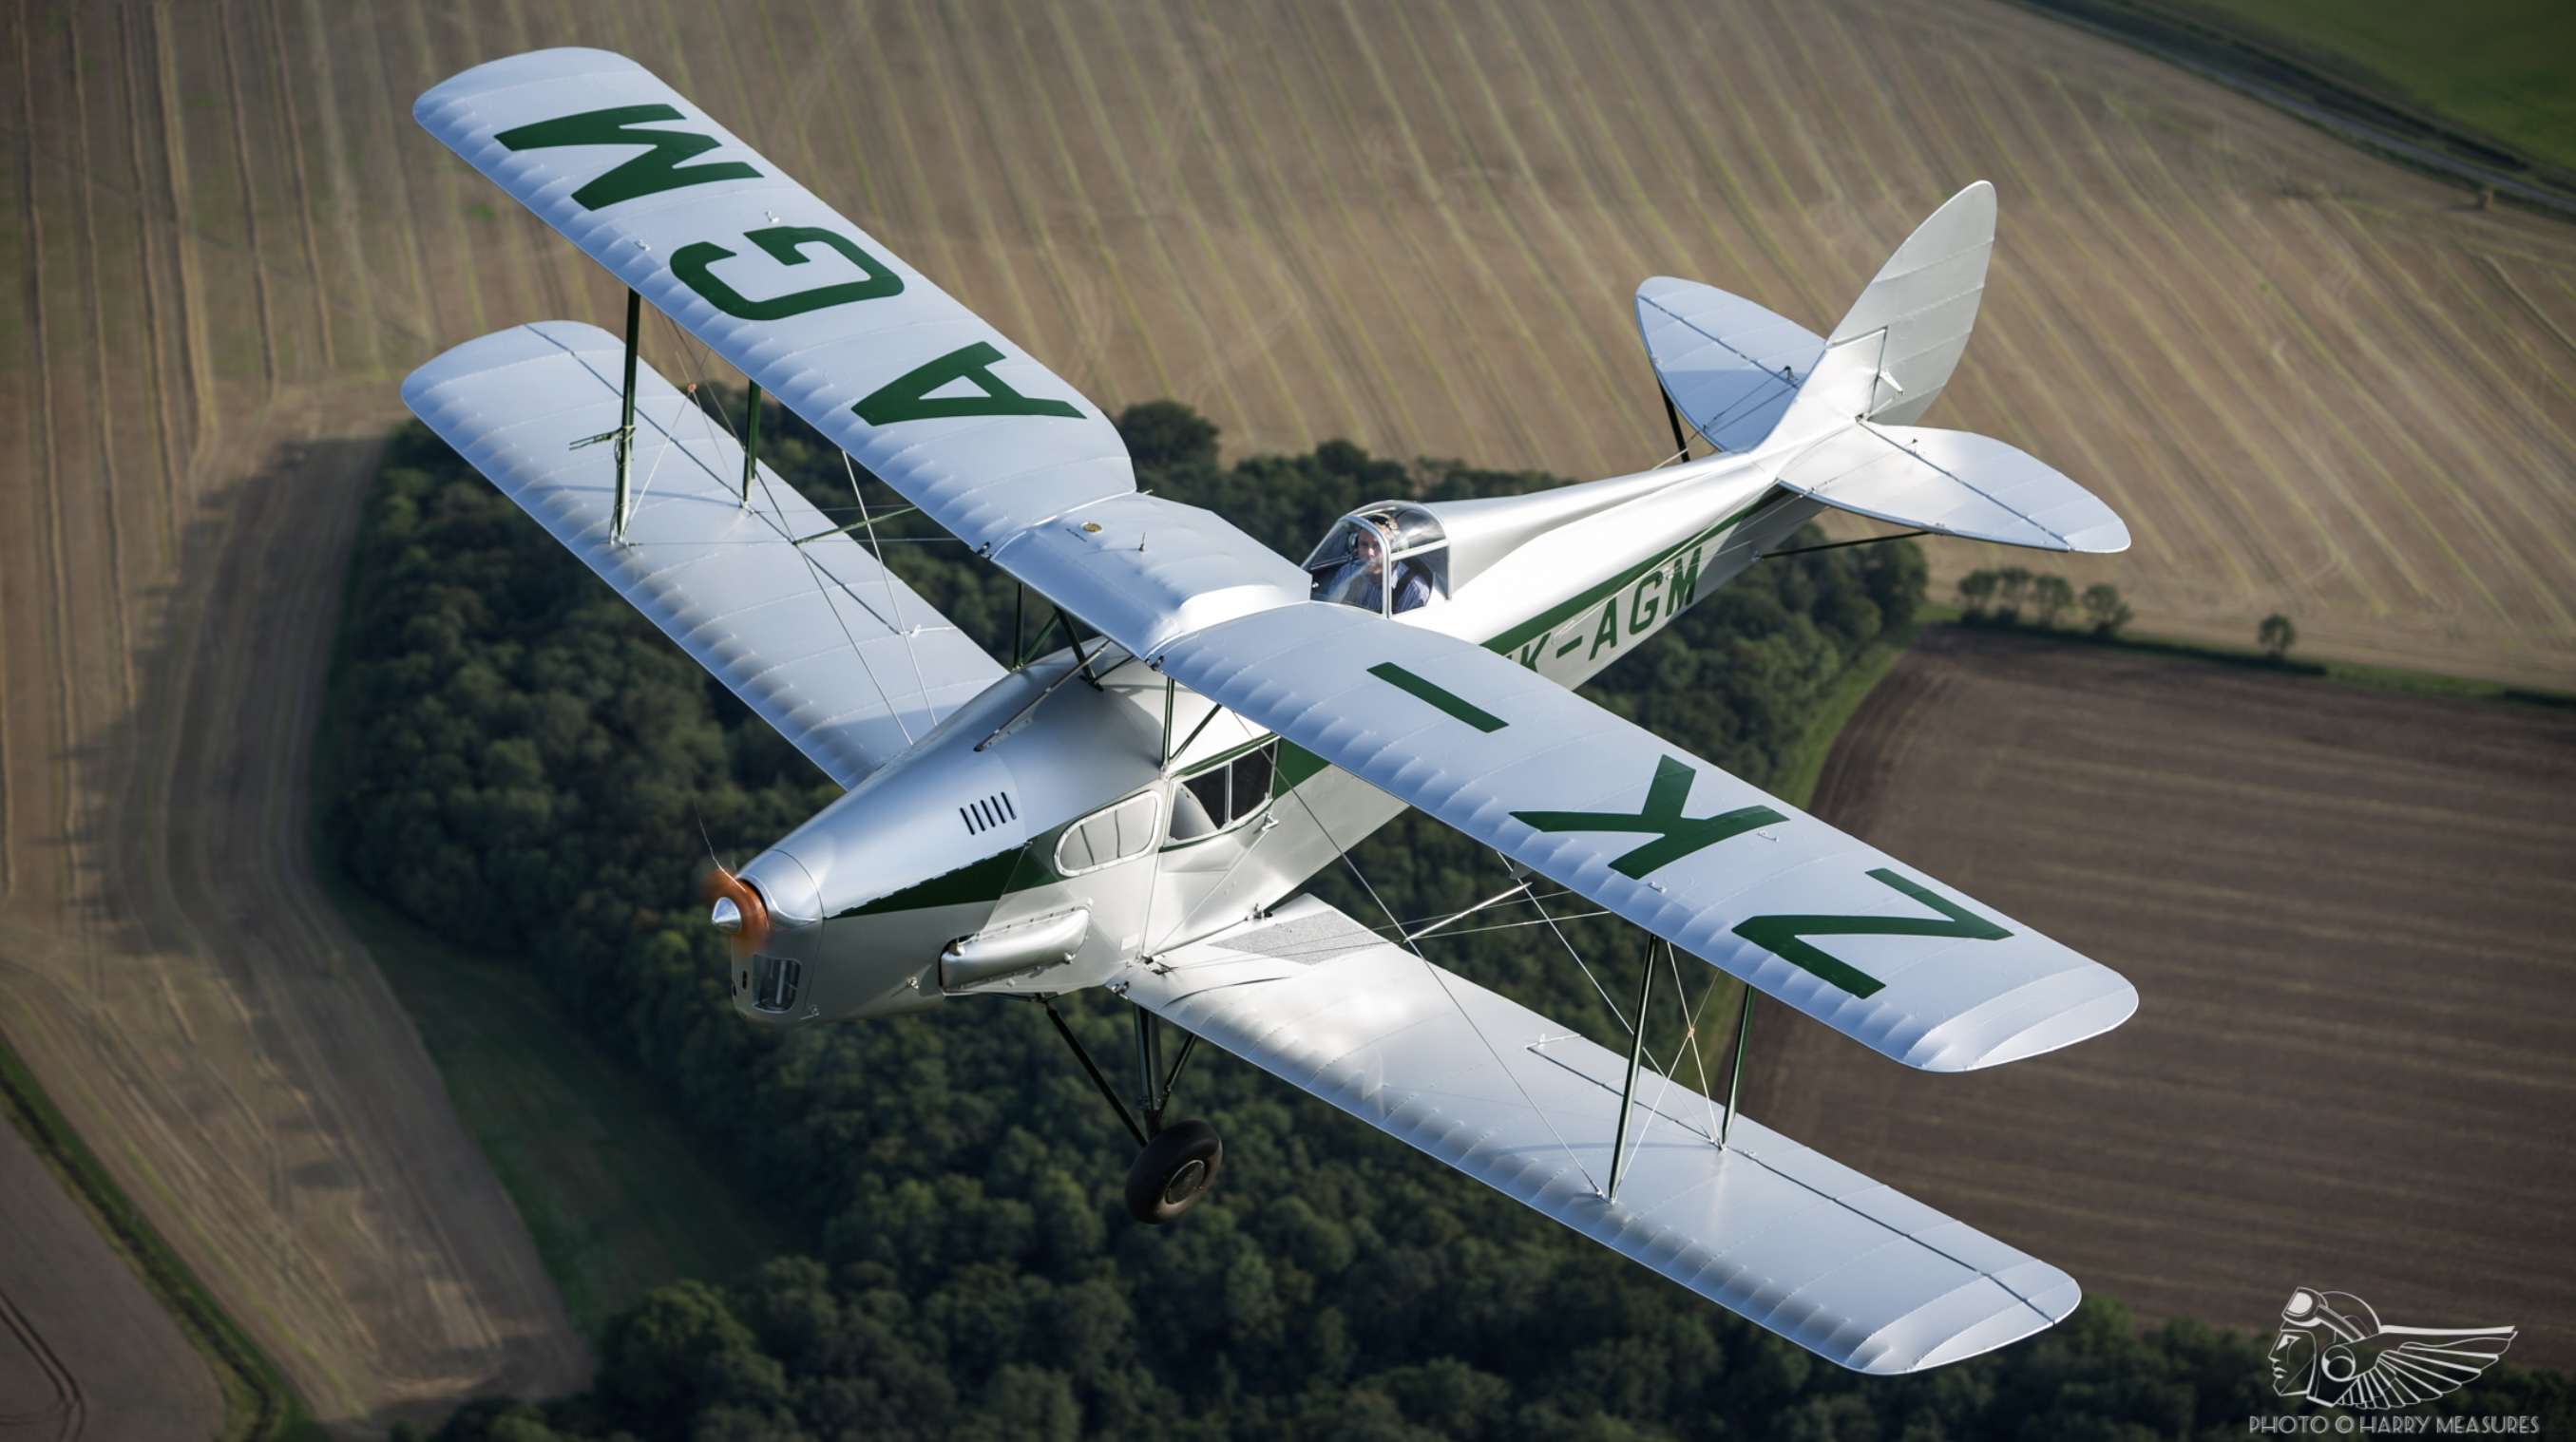
Hi guys,
There has been some discussion as to whether Fox Moths had Handley Page Slats present. The reason being is that folklore has it that the DH83 uses DH82 Tiger Moth wings. But images belie this (at least for the top wing because i cannot find a single image where the DH83 has slats). This is particularly true of the float plane version.
This rather lovely image of a post-war Wardair DH83 shows clearly no slats (but added canoe…)
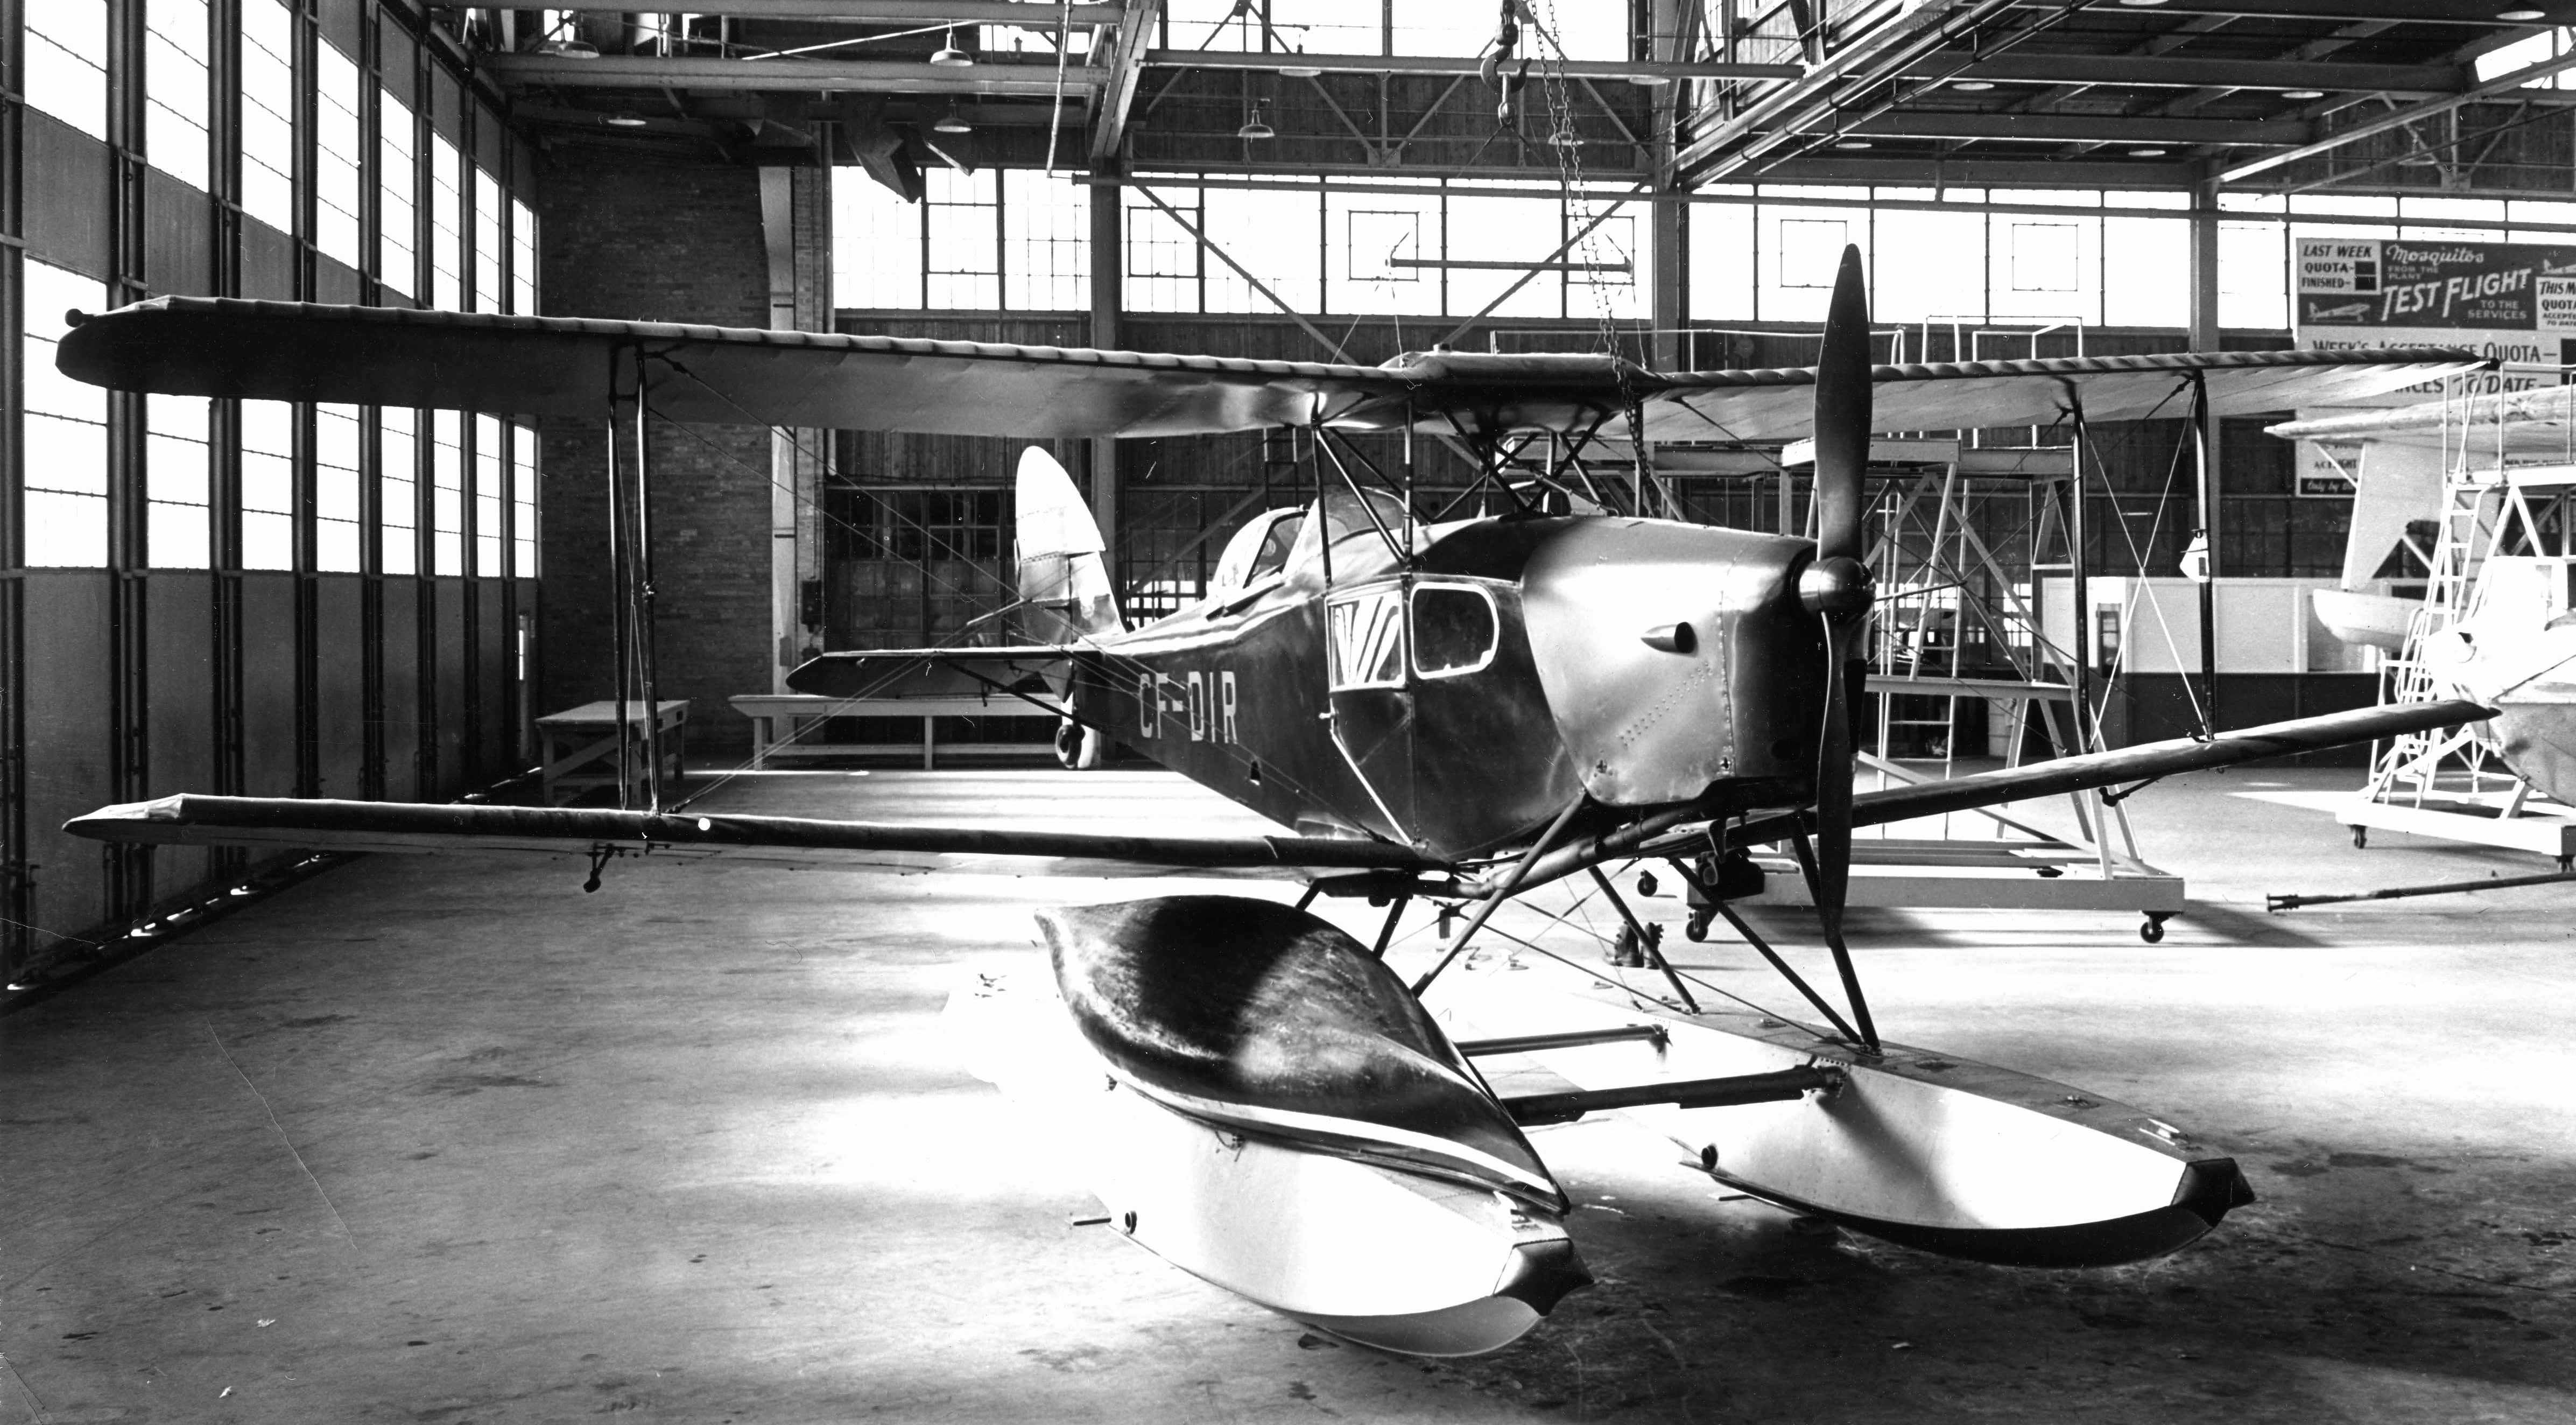
Kind regards,
Paul
-
Curiouser and curiouser…..
Thanks for the responses guys.
Kind regards,
Paul
-
1 hour ago, CRAZY IVAN5 said:
Indeed! That's a heck of a price difference to be sure! Then on top of it all You'll have to do some of the corrections to the fuselage in front of the cockpit[ if you so desire].
I have no problem that the fuselage corrections need to be done whomever I buy the kit from, I just don’t want me nor anyone to overpay for this kit.
Kind regards,
Paul -
Riddle me this Batman regarding the HK models B-17F 01E029 kit…
Sprue Brothers $417.00
Kitlinx $464.00
Andy’s HHQ. $289.00 (Admittedly in a sale but had it up at $319.00 at normal price)
$128.00 difference…now why would that be? Wow.
As Smokey Robinson and the Miracles said; “You’d Better Shop Around”…
Kind regards,
Paul
-
Wow!
Every step of this is fantastic! It is great to know that the structure performs in miniature just as the full sized one does.
Kind regards,
Paul
-
2 hours ago, Bobs Buckles said:
Thanks for the concern, chaps!
I'm back at the bench making buckles again.
It got a little scary at times, but I came through in the end.
The only thing I'm recovering from at the moment is my pride and some sore ribs. I hit the tarmac this morning while out riding and fell flat on my side, bruising my ribs and cutting open my left eye. Live and learn!
Onward and upwards.
Cheers,
Bob
Great you are back! Sorry to hear about your fall! I wish you a speedy recovery!
Kind regards,
Paul
-


Biggest quantity of one particular kit in the stash?
in General Discussion
Posted · Edited by Archimedes
Sh!t Well thank YOU very much! ….and three Tiger Moths…. Bugger, bugger, bugger….