
Greg W
-
Posts
1,147 -
Joined
-
Last visited
-
Days Won
5
Reputation Activity
-

 Greg W reacted to JayW in 1/18 Scale P-51B 3D Print Build
I have updates. My plan the last few weeks has been to finish up the "blue noser" painting, out of fear that the paint would degrade over time, and it will take a long amount of time to finish the fuselage to a point where the paint would ordinarily be applied. To do that, I wanted to finish up the windshield surround and instrument panel assembly prior to painting, in order to minimize handling the (fragile) painted surface.
Last we visited the IP and windshield surround was Feb 1, where I posted this picture:
Now, I have this:
Added is a bunch of stuff below the IP:
Armament switch panel
Pilot's center switch box
Fuel shutoff bracket and handle
Fuel selector panel and handle
Hydraulic pressure gauge and bracket
Landing gear door emergency release handle
A close-up:
My stuff is never perfect, like some modelers on this site somehow accomplish, but this is the best I have done so far. I'm good with it. All these items should be familiar to the P-51 enthusiast. All parts (with just a couple of minor exceptions) were 3D printed from the drawings, like usual. The switch covers, turn knobs, handles and such were done separately and then bonded onto the panels, brackets, and boxes. And, I will say again because it deserves repeating - Peter Castle is reponsible for the outstanding decals. It must have taken him months to work it all out and have them printed.
Also, there were a couple of items added to the RH windshield frame:
They are:
Type C-5 fluorescent lamp
Recognition light switch box
Also 3D printed. Very difficult and delicate installations with small parts. I might add - this is the first of my 1/18 scale models where I have decent thumb switches. Up til this point I have cut off bits of wire to do them, which is OK until you look closely. Then not so much. These however are 3D printed. And as long as I am careful not to break them, they are fine. MUCH better. I will also add that upon studying for the upcoming Malcolm hood drive mechanism, I found that part of the field mod was to relocate the recognition light switch box further forward - the very same part that I worked so hard installing! Grrr. Wish I had noticed that earlier. The reason - the box interferes with the opening/closing hand crank for the hood. This:
I will have to follow suit and break off and relocate the switch box.
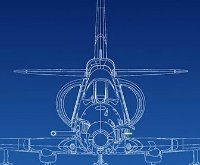
And then, it was time for the blue paint. Assemble the forward fuselage with engine cowl onto the jig, and mask the critical paint boundary:
Here she is:
The masks for the white crosses are from Thunnus - provided to me quite a while back. Thanks John!
Here is what it is all going to look like:
I might add a semigloss coat to the new paint. I think that's what I did with the engine cowl, and it should better the match. BTW - the paint showed zero signs of degradation. I guess I didn't have to go out of sequence, but I also would have fretted about it. Now I don't have to.
Lastly for this update - the Shapeways rear windows came in the mail:
"Diamonds in the rough". And a bit pricey. They will polish up very nicely I guarantee. Recall the ones I printed off myself didn't fit very well; these fit perfectly:
It is going to be a while before you see that crown part of the fuselage in action. First will be the lower radio floor and fuselage tank, and then the upper radio rack and the SCR-522 radio equipment and the battery. All in future installments.
I believe the next step should be the Malcolm hood drive mechanism. It will be all guesswork - whatever I can glean from the photographs I have. I'm excited about it. And hope to have a great update in a couple weeks. Take care all, and thanks for tuning in.
-
Greg W reacted to JayW in 1/18 Scale P-51B 3D Print Build
I have for the better part of the day been studying pictures of cockpits with the Malcolm hood modification. As you are probably aware by now, the hood travels on rollers that are attached to a rather prominent rail on either side of the fuselage exterior. To drive the hood back and forth, there are two sets of chains and sprockets in the inside of the cockpit, nested between flanges on the upper longerons. And driven by a hand crank handle. Like so:
What a challenge to properly represent all that clap trap. Already I have learned that the recongition light switch box must be relocated to clear the handle crank on the RH side. Now, I have discovered something else very curious. Take a look at these two pictures.
One -
Those are outlet ducts for the pilots' heating system, right at the pilot's shoulders peaking out from behind teh armor plate (armor plate and seat not in this picture). They are attached to the upper longerons and the sta 146 frame. This is taken from the Lope's Hope P-51C resto - which does NOT have a Malcolm hood.
Two -
This shows the aft end of the Malcolm hood chain drive, with a small sprocket and a connector shaft to the other side and teh other chain. The support fitting is mounted on the upper longeron, and is directly in front of the sta 146 frame. This is taken from a resto with a Malcolm hood, and in process.
Both items are in the same place! What gives? Were these ducts relocated in some fashion? Anybody know? Some of my period pictures suggest maybe they were just removed and the holes plugged. If so - what a penalty. Cold pilots.
-
Greg W reacted to JayW in 1/18 Scale P-51B 3D Print Build
The heater outlets are defined on drawings - they are part of the production airplane. The Malcolm hood mod however is just that - a mod. And no drawings are available.
But wait! I think I have it solved, and the solution was in my pictures all along:
LH side, the flex tube is attached to a convenient fuselage frame further forward. RH side, the flex tube is routed under the map case forward to an empty spot on a radio mounting bracket. I can do that!
This is from a modern resto, so I am going to have to hope it fairly well represents what was actually done back when. I am going to declare the mystery solved though.
-
Greg W reacted to JayW in 1/18 Scale P-51B 3D Print Build
Oh cool pic indeed! Thank you Antonio. Some things to notice:
1. Relocated recognition light electrical box (a few inches forward) seen through the side window windshield glass (with what appears to be a natural metal finish bracket)
2. Some dark colored strip of putty or something along the periphery of the aft enclosure cutout - clearly meant to seal the gap between the hood and the fuselage crown when hood is closed. First I have seen that - I wonder if that was common...
3. There are five sets of rollers exposed with the hood open. All other pictures I have seen either period or modern have six sets. Mine too. Hmmm... Is the hood in this pic not fully open? Or, were more rollers added at some point to address a service issue.....
4. You can see a portion of the round outboard end of the crank handle / forward sprocket support bracket peaking out from behind the roller rail just aft of the windshield. You'll see that on mine too pretty soon.
4. The girl is very hot.
I hear you on modern restos. However I am very confident that the cranking system is accurately represented. All are consistent, and anything that can be gleaned from period photos seem to be in acordance.
As for escape - the Malcolm has an emergency jettison mechanism, including a red pull handle not unlike what we see on all production Mustangs whether greenhouse or bubble top canopy. You will see that on mine soon.
Upon your suggestion, I sent in a querie to the Imperial War Museum in GB, since the British back in the day modified practically every one of their many P-51B's (or Mustang Mk 3's as they called them), to have the Malcolm hood. We'll see if they respond or have anything. Hope they hurry - I am not waiting.
-
Greg W reacted to JayW in 1/18 Scale P-51B 3D Print Build
Getting back onto the subject at hand - the Malcolm Hood drive and emergency release mechanisms, I have finally got Rhino 3D representations of the parts (13 in all) that I will 3D print. It was a bit of an integration nightmare, as alot of stuff gets crammed in between the flanges of the upper longerons. And my longeron flanges are thicker than the real thing by a good bit (scaled of course). Also my longerons are not quite as wide as the real thing, to account for my skin gages, which are also thicker than the real thing (scaled). This all works against me shrinking the space to work with. Neverthless here are some hard won details that I hope will look representative once painted and assembled (assuming they print up OK):
Yup - you are looking at a 3D printed chain (with sprockets). I measure, from the pictures I have, a 1/2 inch pitch and about 1/2 inch wide. Scale to 1/18, and the links are much smaller than I could scratch build (something I managed to do on the Corsair tail wheel door mechanism a while back - but the chain was a bit larger). It is alot to ask of my printer - we shall see. You also see other details that have had a whole lot of artistic license applied to them.
Shortly I hope to show you the actual parts installed into the fuselage side panels. Stay tuned!
-
Greg W reacted to JayW in 1/18 Scale P-51B 3D Print Build
It was quite a ride, but I have a Malcolm Hood mechanism to show you. This is what I am trying to represent:
The chains, the emergency release pushrods, the sprocket support fittings, the crank handle, the emergency release handle, and the black cover plates. Not the cross-tube. That comes later.
First, just as what happened so many times back in the 1940's when -B's and -C's were getting their hoods, I had to relocate the recognition light switch box on the windshield frame. From here:
To here:
Had to be done to clear the new crank handle.
All the parts printed up pretty well. There is alot of small detail, especially the chain itself, so I went with the 30 micron thickness setting on the printer (I normally use 50 micron). After careful removal of supports, and carefully painting, I got this collection of details:
And I had to be exceedingly careful at all stages of preparation - the long thin parts are so very fragile. The black plates are not 3D printed - just old fashion scratch build with styrene sheet and Meng nuts.
Ok that was the easy part. Installing these details into the airplane was the hard part - a most stressful and "stimulating" experience, trying to pry into a small space all these parts without breaking anything. I broke one of the chains, but had a spare and used it. Everything else worked out OK, sort of. Pictures:
The 3D printed chains are a success, I am happy to announce.
Let's see the finished mechanism in the fuselage jig:
I need to do a better job painting up the rollers - I know. But that comes later. Glad to put this sub-project in the rear view mirror!
Next I believe is a bit of miscellaneous clean-up chores, and then the lower radio floor and the fuselage tank. I've been waiting forever to get started on that. Hope you like the chain drive! Later.
-
Greg W reacted to mc65 in 1/32 Fi 156D1 Hasegawa-Revell
Sometimes they come back!
in the last few days I have been busy examining the shelf of doom trying to save from oblivion the works that were briefly incomplete.
in this case, after countless attempts to make a frozen puddle I gave up and was pleased (well, more or less) with the last attempt.
to begin with, some photos of the plane complete with the last missing details: doors, controls for folding the wings, air intakes. I added a little mud from below, without exaggerating.
the engine has the possibility of being partially - or completely - exposed, thanks to the magnets embedded in the thickness of the cowling.
and to conclude the whole story, some photos of the completed diorama, puddle or no puddle.
the officer won a scarf out of order
and all the other insignia, ranks and various insignia by Alliance Model Works decals, splendid.
and I fixed one... some other updates coming soon! Cheers everyone and thanks for participating, Paolo
-
Greg W reacted to mc65 in 1/32 Fi 156D1 Hasegawa-Revell
thank you for the attention!
sure I won't try to move the undercarriage legs for any reason, it seems to me a miracle that it seats on these without troubles!
well, it's time to arrange a decent base for the scene I have in mind. assembled a simple "mc-standard" wooden flat base, I tried different elements configurations, this one seems to be the winner:
the area on the right of the airplane remains a little bit empty, but that's it. the focus of the action is on the stretcher bearers, so I drew an imaginary line on the stretcher's axle toward the two standing men near the cockpit, letting the left wing and fuselage lines working as orthogonal lines to force if not the prospective, at least the observer's view. well, more or less.
wanting to give a title to the diorama, one could be "back home ticket", I guess...
ok, I think this is the best arrangement with the available elements, I'm not enthusiast about that, there isn't any of the pathos of the bundesarchiv's image, may be more dinamic posture of the figures should work better, but I'm not a sculptor, no way about that.
so, I'm trying some kinds of materials and effects to cover the base, this is something closer I want to obtain: a sligthly, wind blown, dry snow covered terrain.
to be continued...
cheers, Paolo
-
Greg W reacted to mc65 in 1/32 Fi 156D1 Hasegawa-Revell
here I am, I checked the wheel track, and as you may see, it's 112mm, considering the centre wheel as datum. that means a difference of +20cm in the real aircraft, a difference I can deal with, considering the excursion of the whole landing gear structure and the presence on board of two stretchers and a man.
either, is possible to adjust it (not in this phase, obviously) bending the metal core of the legs and adjusting these in the holes drilled in the lower parts of the undercarriage, an operation that I wouldn't try, definetly.
here we say "don't wake up the sleeping dog", you know...
cheers, Paolo
-
Greg W reacted to monthebiff in Revell/ AIMS 1/32 Junkers Ju-188 E-1 Z6+DM II/KG66
Some more done and needed to fit the cowl rings to the engine nacelles but to do that I needed a basic prop/ backplate/ fan assembly so I could glue the cowl ring in place and be able to remove and re-fit without fouling the cowl ring.
And both completed and fitted in place
Time next to look at the aileron extensions as definitely some serious work seeded
The R/H has already been started on but as you can see from the L/H part much careful sanding and reshaping is needed.
Regards. Andy
-
Greg W reacted to monthebiff in Revell/ AIMS 1/32 Junkers Ju-188 E-1 Z6+DM II/KG66
With the engines painted it was time to move on to one of the really tricky parts of this conversion which is getting the nacelles mounted to the wing as there are no positive attachment points at all.
I've been pondering this issue for such a long time now (Erm, just the 7 years) and after painting up the engines at the weekend realised it's a pretty simple and clean solution to the problem!
With the engine secure inside the nacelle I then carefully taped it into the correct position on the wing and ran a drill down through the centre of the engine into the rear engine bulkhead
And with a suitable piece of aluminium tubing inserted I was then able to slide the nacelle in to place and all nicely aligned
I then cut the tube to the correct length as this will also then act as a nice positive location for the propeller
Pretty happy how that's worked out so far, next up I will build up the prop hub and fan so I can get good alignment of the cowl ring before gluing in to place.
Regards. Andy
-
Greg W reacted to monthebiff in Revell/ AIMS 1/32 Junkers Ju-188 E-1 Z6+DM II/KG66
So it's been a while but suddenly decided the 188 needed working on again. I decided to ease myself in gently and work on the engines. I'm not using the AIMS supplied resin parts but instead a couple of Revell Fw-190 engines instead as these although not 100% accurate allow a lot more surface detail when painted
and propellers will be from Eduard
The Eduard prop set is so good, I've used one before on my F-8 build and is super nice to work with.
I've several issues to deal with on the wings but felt getting the engines completed was a good starting point.
Regards. Andy
-
Greg W reacted to Tolga ULGUR in 1/32 Dragon Bf-109E-3 "Dr Erich Mix"
Well,
The canopy mask has arrived. And I used it. Windscreen painted and installed.
Emil is ready to be painted.
-
-
-
Greg W reacted to Tolga ULGUR in 1/32 Dragon Bf-109E-3 "Dr Erich Mix"
Some progress;
Wings are ready
-
Greg W reacted to Tolga ULGUR in 1/32 Dragon Bf-109E-3 "Dr Erich Mix"
Hi Gilles
Not too much, the trickiest part of the model is the cowling section.
For this reason, I did not follow the construction guide and placed it in the fuselage after building the engine section. A small amount of sanding was required.
-
-
-
-
Greg W reacted to Tolga ULGUR in 1/32 Dragon Bf-109E-3 "Dr Erich Mix"
After some more research, I decided to continue with the colors in this scheme. Those who object to this, please make yourself known before the groom kisses the bride.
-
Greg W reacted to Tolga ULGUR in 1/32 Dragon Bf-109E-3 "Dr Erich Mix"
Upper surfaces;
First step RLM71 from Gunze.
-
Greg W reacted to Tolga ULGUR in 1/32 Dragon Bf-109E-3 "Dr Erich Mix"
Finally the painting has started
The first step is the lower surfaces. They were painted with Gunze acrylic RLM65.
-
Greg W reacted to Tolga ULGUR in 1/32 Dragon Bf-109E-3 "Dr Erich Mix"
Decalling terminated.
Stencils are from EagleCals set and the swastikas from Xtradecal set.
Next step is airbrushing a coat of X22 ( while I am sleeping as Mike said )
-
Greg W reacted to Tolga ULGUR in 1/32 Dragon Bf-109E-3 "Dr Erich Mix"
Decals started to be placed.
The Balkenkreuzs on the wings are from the kit decals. The ones on the fuselage are from my spare box.
sqd decals were made as customized years ago
Thanks to Pastor John @Pastor John for his confirmation regarding the upper wings decals.