
ChuckD
-
Posts
908 -
Joined
-
Last visited
-
Days Won
9
Reputation Activity
-

 ChuckD reacted to TimW in A-20G Havoc "STINKY" of the 3rd Bomb Group, 12th Bomb Squadron, New Guinea
Absolutely beautiful work! I love it!
-

 ChuckD got a reaction from Lud13 in A-20G Havoc "STINKY" of the 3rd Bomb Group, 12th Bomb Squadron, New Guinea
Hello, everyone. If you've been following along the build thread, you're well aware that I was nearing the finish line on Hong Kong Models' new A-20G Havoc kit after starting it the day it arrived in June. If you haven't been following the build thread, but want a painfully verbose treatise on the inner workings of this brand new kit, feel free to dive into it and its ~350 photos. If you'd just like to see the photos, here's the gallery.
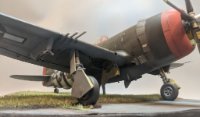
Anyhoo, as I've stated in a number of other threads, I'm fascinated by the SW Pacific campaigns in the early-mid war years. I'm also a fan of big twins in attack configurations. Thus, when I heard that HKM was coming out with an all new A-20G Havoc in gunship configuration, I was excited to say the least. Unfortunately for me, their boxing was strictly marked and built for the European theater. Not to be deterred, I decided to embark on a bit of a journey. For this build, I'd be doing several firsts. To make a Pacific bird, I'd have to scratch build wing bomb racks and teach myself the art of printing my own decals. I'd also push the idea of masking farther than I had ever done before, so that was fun too.
In the end, I'm very happy with the results and they feel pretty close to the original. The photos turned out a little weird, unfortunately; I suspect that's due to my camera trying to compensate for the failing evening light. So, things like the speckling on the nacelles and the dust pigments on the wings are much more pronounced than they are in real life. I found a few close up pictures of A-20s with extensive oil spatter all along their fuselage and nacelles aft of the engine, so that was the inspiration there.
Anyway, here's "STINKY" of the 3rd BG, 12th BS in New Guinea. According to Michael Claringbould in Pacific Profiles vol. 3, this aircraft survived hostilities and was scrapped in situ after the war. The photo below is one of two taken of her supposedly while she was in Sydney, Australia.
The squadron insignia and serial number were the first decals I ever printed for myself. The nose art was done with a mask. I painted the dark drop shadow, then moved the mask to the 10 o'clock position and painted the yellow. Turned out pretty sharp.
For grins, I got my SW Pacific fleet out for a photo op, largely because I wanted to see exactly how the B-25 and A-20 compare in size.
-
ChuckD reacted to Greif8 in A-20G Havoc "STINKY" of the 3rd Bomb Group, 12th Bomb Squadron, New Guinea
Magnificent Havoc Chuck! Great work all around! I like the small collection of builds at the end as well; all constructed to very high standards of workmanship.
Ernest
-
ChuckD reacted to 19squadron in A-20G Havoc "STINKY" of the 3rd Bomb Group, 12th Bomb Squadron, New Guinea
This is beautifully rendered, love the underwing detailing!
-
ChuckD reacted to Steve Eagle in A-20G Havoc "STINKY" of the 3rd Bomb Group, 12th Bomb Squadron, New Guinea
Wonderful work on the weathering. This kit is worth the investment, folks. I bit after viewing this build and reviews
-
 ChuckD got a reaction from D.B. Andrus in A-20G Havoc "STINKY" of the 3rd Bomb Group, 12th Bomb Squadron, New Guinea
Hello, everyone. If you've been following along the build thread, you're well aware that I was nearing the finish line on Hong Kong Models' new A-20G Havoc kit after starting it the day it arrived in June. If you haven't been following the build thread, but want a painfully verbose treatise on the inner workings of this brand new kit, feel free to dive into it and its ~350 photos. If you'd just like to see the photos, here's the gallery.
Anyhoo, as I've stated in a number of other threads, I'm fascinated by the SW Pacific campaigns in the early-mid war years. I'm also a fan of big twins in attack configurations. Thus, when I heard that HKM was coming out with an all new A-20G Havoc in gunship configuration, I was excited to say the least. Unfortunately for me, their boxing was strictly marked and built for the European theater. Not to be deterred, I decided to embark on a bit of a journey. For this build, I'd be doing several firsts. To make a Pacific bird, I'd have to scratch build wing bomb racks and teach myself the art of printing my own decals. I'd also push the idea of masking farther than I had ever done before, so that was fun too.
In the end, I'm very happy with the results and they feel pretty close to the original. The photos turned out a little weird, unfortunately; I suspect that's due to my camera trying to compensate for the failing evening light. So, things like the speckling on the nacelles and the dust pigments on the wings are much more pronounced than they are in real life. I found a few close up pictures of A-20s with extensive oil spatter all along their fuselage and nacelles aft of the engine, so that was the inspiration there.
Anyway, here's "STINKY" of the 3rd BG, 12th BS in New Guinea. According to Michael Claringbould in Pacific Profiles vol. 3, this aircraft survived hostilities and was scrapped in situ after the war. The photo below is one of two taken of her supposedly while she was in Sydney, Australia.
The squadron insignia and serial number were the first decals I ever printed for myself. The nose art was done with a mask. I painted the dark drop shadow, then moved the mask to the 10 o'clock position and painted the yellow. Turned out pretty sharp.
For grins, I got my SW Pacific fleet out for a photo op, largely because I wanted to see exactly how the B-25 and A-20 compare in size.
-
 ChuckD got a reaction from Cicciuzzo in A-20G Havoc "STINKY" of the 3rd Bomb Group, 12th Bomb Squadron, New Guinea
Hello, everyone. If you've been following along the build thread, you're well aware that I was nearing the finish line on Hong Kong Models' new A-20G Havoc kit after starting it the day it arrived in June. If you haven't been following the build thread, but want a painfully verbose treatise on the inner workings of this brand new kit, feel free to dive into it and its ~350 photos. If you'd just like to see the photos, here's the gallery.
Anyhoo, as I've stated in a number of other threads, I'm fascinated by the SW Pacific campaigns in the early-mid war years. I'm also a fan of big twins in attack configurations. Thus, when I heard that HKM was coming out with an all new A-20G Havoc in gunship configuration, I was excited to say the least. Unfortunately for me, their boxing was strictly marked and built for the European theater. Not to be deterred, I decided to embark on a bit of a journey. For this build, I'd be doing several firsts. To make a Pacific bird, I'd have to scratch build wing bomb racks and teach myself the art of printing my own decals. I'd also push the idea of masking farther than I had ever done before, so that was fun too.
In the end, I'm very happy with the results and they feel pretty close to the original. The photos turned out a little weird, unfortunately; I suspect that's due to my camera trying to compensate for the failing evening light. So, things like the speckling on the nacelles and the dust pigments on the wings are much more pronounced than they are in real life. I found a few close up pictures of A-20s with extensive oil spatter all along their fuselage and nacelles aft of the engine, so that was the inspiration there.
Anyway, here's "STINKY" of the 3rd BG, 12th BS in New Guinea. According to Michael Claringbould in Pacific Profiles vol. 3, this aircraft survived hostilities and was scrapped in situ after the war. The photo below is one of two taken of her supposedly while she was in Sydney, Australia.
The squadron insignia and serial number were the first decals I ever printed for myself. The nose art was done with a mask. I painted the dark drop shadow, then moved the mask to the 10 o'clock position and painted the yellow. Turned out pretty sharp.
For grins, I got my SW Pacific fleet out for a photo op, largely because I wanted to see exactly how the B-25 and A-20 compare in size.
-
 ChuckD got a reaction from Greg W in A Birdcage in Turtle Bay - An F4U-1 Diorama
Couldn't agree more. <3
And with palm tree #2 complete...
The vegetation is done!
Next to move on to tidying up the base and getting some texturing and painting done.
-
ChuckD got a reaction from Greg W in A Birdcage in Turtle Bay - An F4U-1 Diorama
Success!
Left hand sculpted successfully! It really wasn't as bad as I thought it would be and now I really want to try my hand at more challenging sculpts. As if I need another skill to build. Inspiration is a hell of a thing.
In any case, you can now see that Lt. Ray is using his left hand's fingertips to steady himself as he jumps down onto the wing from the cockpit.
He fits the scene perfectly now. While not a perfect match for the reference photo, I think this is pretty darn good.
Guys, I gotta admit, I'm really happy with these results and I expected the hand work to be much more difficult. I know they're not perfect, but as a beginner, I'm about as happy as can be.
Now on to the other palm tree.
-
 ChuckD got a reaction from Madmax in A Birdcage in Turtle Bay - An F4U-1 Diorama
Couldn't agree more. <3
And with palm tree #2 complete...
The vegetation is done!
Next to move on to tidying up the base and getting some texturing and painting done.
-
 ChuckD got a reaction from Out2gtcha in A Birdcage in Turtle Bay - An F4U-1 Diorama
Success!
Left hand sculpted successfully! It really wasn't as bad as I thought it would be and now I really want to try my hand at more challenging sculpts. As if I need another skill to build. Inspiration is a hell of a thing.
In any case, you can now see that Lt. Ray is using his left hand's fingertips to steady himself as he jumps down onto the wing from the cockpit.
He fits the scene perfectly now. While not a perfect match for the reference photo, I think this is pretty darn good.
Guys, I gotta admit, I'm really happy with these results and I expected the hand work to be much more difficult. I know they're not perfect, but as a beginner, I'm about as happy as can be.
Now on to the other palm tree.
-
 ChuckD got a reaction from Maxim61 in HpH news - 1/32 Kate, Marauder, Ventura and 1/48 B-47
Meh. I'll buy another HKM A-20 for that price. Much better value.
-
 ChuckD got a reaction from Fanes in HpH news - 1/32 Kate, Marauder, Ventura and 1/48 B-47
Meh. I'll buy another HKM A-20 for that price. Much better value.
-
ChuckD got a reaction from Madmax in A Birdcage in Turtle Bay - An F4U-1 Diorama
Success!
Left hand sculpted successfully! It really wasn't as bad as I thought it would be and now I really want to try my hand at more challenging sculpts. As if I need another skill to build. Inspiration is a hell of a thing.
In any case, you can now see that Lt. Ray is using his left hand's fingertips to steady himself as he jumps down onto the wing from the cockpit.
He fits the scene perfectly now. While not a perfect match for the reference photo, I think this is pretty darn good.
Guys, I gotta admit, I'm really happy with these results and I expected the hand work to be much more difficult. I know they're not perfect, but as a beginner, I'm about as happy as can be.
Now on to the other palm tree.
-
ChuckD got a reaction from Greg W in A Birdcage in Turtle Bay - An F4U-1 Diorama
Hello, all. Back with another small update.
After watching some tutorials on YouTube and doing a few practice pieces, I was able to sculpt a right hand in the pose I needed. It looks a little rough in close up photos, but I think with a coat of paint it'll look great. For a first "production" effort, I'm really happy with it and I've found myself consumed with videos of how to sculpt figures from scratch. God help me...
As you can see, he's now grasping the canopy rail naturally as you would as you're heaving yourself down to the wing.
So with that tackled, now it's just a matter of posing the left arm and sculpting another hand. As the above photos show (at least to some degree) the left arm is now far too bent. It needs to be straightened out so that the left hand will fall naturally on the fuselage just forward of the canopy.
So, I took out a razor saw and cut a small slit in the crook of the left elbow, held the figure under a hair dryer for ~20 seconds, bent the arm to where I needed it, and let it cool. Much better.
A little filling with magic sculpt and it looks quite nice.
With the foot on the fuselage canopy rail, the right hand on the canopy itself, I believe the left hand will be open with fingers splayed a bit just to help him guide himself as he drops from the cockpit to the wing.
I'm hoping that I can finish up the other hand tomorrow morning, then, once the putty cures, get it mounted and get the figures primed, cleaned up, and ready for paint.
-
ChuckD got a reaction from Out2gtcha in HpH news - 1/32 Kate, Marauder, Ventura and 1/48 B-47
Meh. I'll buy another HKM A-20 for that price. Much better value.
-
 ChuckD got a reaction from Dany Boy in A Birdcage in Turtle Bay - An F4U-1 Diorama
Years ago, I was on a road trip with some buddies of mine when we got stuck in an hours-long traffic jam in Chicago. We crept forward, inch by inch, baking in the hot July sun. Inevitably, we started bitching and complaining when one guy, the driver, piped up and said something that stuck with me all these years later. "Hey, as long as we're moving, we're making progress."
And so it is.
We are moving and, thus, are making progress. Though, I'll admit, we're not exactly headed the direction I was thinking we were. I guess I should know better than to say things like "I'm just about done with the figures!" (to paraphrase)
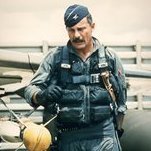
As I started to get serious about placing the figures, I realized that I'd originally placed the pilot too far aft when roughing him in. I think the general consensus here is that these photos were taken just after Lt. Ray returned from a flight, not as he's boarding up to leave. He taxied up, popped off his chute harness, and - probably to the benefit of the camera men - clambered down left side of the aircraft.
You can see his right foot is almost directly behind the forward canopy and his left hand is on the weirdly-painted patch on the fuselage.
While my resin figure isn't bent over at quite the angle Lt. Ray was, it still actually fits pretty closely in the more correct position...
... all except for the hands. The hands will make or break a figure, in my opinion. So, off they go. I chopped them off with a fine razor saw and recessed the area inside the cuff with a rotary tool. This will hopefully allow me to sculpt fairly realistic hands that appear to be coming out of a sleeve, rather than butting up against it.
I drilled out a small hole and added some wire. I'll use this to rough in the angle I need for proper hand placement, then as a base for the putty to grab on to. I've never tried to sculpt hands before so this could get really interesting. I'll work on that slowly over the course of the week. I'm back to work now (boo), so modeling time is catch-as-catch-can.
I also got annoyed with the fact that the angle of the feet on the crew chief wouldn't allow for him to stand upright on the wing roughly where the chief was in the photo. Given the angle of the wing while on the ground, the figure kept falling over and to place him such that he stayed put required me to put him in weird places. Sure, in the end, I could probably have super glued him to the wing and wiped my hands of it, but he would have likely had a perpetual Michael Jackson-esque forward lean to him and that would have looked bad.
So, out came the trusty sword of exact zero and off went the feet. Same deal here, holes, wire, proper angles aaaand...
Ta-da! He stays nicely in place on his own two feet (no super glue required) and he's more or less where the crew chief was in the reference photo.
What I haven't mentioned yet is that I burned an entire new year's eve day (and a blade on my cutter) building a couple palm trees and prepping the base. Here's a teaser shot of the work in progress. I've got more work to do on the pictured tree and whole second tree in the works too.
That's it for now, but stay tuned for all the fun and excitement of the adventures to come. Join us as we explore:
Irrevocable f-ups in hand sculpting! "Did the Marines really accept pilots with 11 fingers?" Figure painting from your nightmares! "His eye appears to be running down his cheek. " Palm trees that apparently can't support their own weight! "It fell on the plane again." And more!
-
 ChuckD got a reaction from CRAZY IVAN5 in HpH news - 1/32 Kate, Marauder, Ventura and 1/48 B-47
Meh. I'll buy another HKM A-20 for that price. Much better value.
-
ChuckD got a reaction from Greg W in A Birdcage in Turtle Bay - An F4U-1 Diorama
Thanks, Thierry. It looks like the most of the Airfix and Verlinden stuff is out of production. Not rare necessarily, but catch-as-catch-can on ebay and the sorts. Thank you to you and @mc65 for the lead. Regarding the academic figure and posable mannequins, in David Parker's book "Crew School," which is all about sculpting figures in our scales, he has exactly the thing I'm looking for. (Great book, by the way. Highly recommend.) However, it's a custom creation of his and I believe is/was 3D printed. I haven't pulled the trigger on a 3D printer yet (yet another skill for my brain to try to build and keep sharp), but stuff like this pushes me ever closer. Ugh. I can't find any references on Preiser's site regarding the multipose figures (google is coming up short too). Do you have any links?
Anyway, today was a productive day at the bench, and I'm more or less done with the sculpting, I think.
First, an unexpected detour back to the pilot as I decided to address what, to my eyes, was the most glaring inaccuracy... his boots. As mentioned above, the figure was intended for the ETO and would be considered a bit overdressed for the PTO. So, I started by shaving off most of the lower legs.
This was to allow room to sculpt straight pant legs over the remaining material. Without removing that material, I suspect he would've looked like a man who never skipped leg day.
The general process for me is pretty straight forward. Wet down some Green Stuff and roll it fairly flat, then stick in position.
\
Then, using silicone brushes, spatulas, toothpicks, and just about anything else, start shaping folds and creases into the material.
Lastly, I use a sharpened toothpick to add a gap between the cuff and the figure. I had to pop the figure off the wine cork that I'd attached it to for painting and a bit got left over. So, that's not in-scale dog poo on his foot.
There will be a little bit of filling and sanding required at the meeting of the putty and the figure, but I think it'll turn out well. In the end, I'm pretty pleased with these results. The rest of the inaccuracies of this figure will have to be addressed via squinting.
And I finished up the crew chief as well. I added pockets to the front of his jacket, as in the source material, he's got something big and heavy in his right front pocket. I also added collar and the patch for his rank insignia. It's out of scale, sure, but I feel it gives it some visual interest. Once these cure overnight, I'll prime them and clean up any rough spots, then get them with a coat of paint.
I cleaned up the collar near the neck well a bit after this shot, so it's a lot cleaner now.
-
ChuckD reacted to Panzerwomble in A Birdcage in Turtle Bay - An F4U-1 Diorama
I tend to roll with "inspired by" rather than "actual scale replica" these days ...tooo many rabbit holes which suck the joy away in my humble opinion . I did a lot of recreating Battle of the Bulge famous pictures , but most of them, apart from that "one camera angle" , I found don't make great models / dioramas. I wouldn't get too hung up.
-
ChuckD reacted to Dpgsbody55 in A Birdcage in Turtle Bay - An F4U-1 Diorama
Impressive looking.
Cheers,
Michael
-
 ChuckD got a reaction from Memphis in A Birdcage in Turtle Bay - An F4U-1 Diorama
Couldn't agree more. <3
And with palm tree #2 complete...
The vegetation is done!
Next to move on to tidying up the base and getting some texturing and painting done.
-
 ChuckD got a reaction from JeepsGunsTanks in A Birdcage in Turtle Bay - An F4U-1 Diorama
Success!
Left hand sculpted successfully! It really wasn't as bad as I thought it would be and now I really want to try my hand at more challenging sculpts. As if I need another skill to build. Inspiration is a hell of a thing.
In any case, you can now see that Lt. Ray is using his left hand's fingertips to steady himself as he jumps down onto the wing from the cockpit.
He fits the scene perfectly now. While not a perfect match for the reference photo, I think this is pretty darn good.
Guys, I gotta admit, I'm really happy with these results and I expected the hand work to be much more difficult. I know they're not perfect, but as a beginner, I'm about as happy as can be.
Now on to the other palm tree.
-
ChuckD got a reaction from JeepsGunsTanks in A Birdcage in Turtle Bay - An F4U-1 Diorama
Couldn't agree more. <3
And with palm tree #2 complete...
The vegetation is done!
Next to move on to tidying up the base and getting some texturing and painting done.
-
 ChuckD got a reaction from Brett M in A Birdcage in Turtle Bay - An F4U-1 Diorama
Couldn't agree more. <3
And with palm tree #2 complete...
The vegetation is done!
Next to move on to tidying up the base and getting some texturing and painting done.