

Fvdm
-
Posts
530 -
Joined
-
Last visited
Reputation Activity
-

 Fvdm got a reaction from Martinnfb in Trumpeter P-38 early conversion - update March 18!!
I think a flying dutchman is always a good idea.
-
 Fvdm got a reaction from kkarlsen in Aeromarine 75/Curtiss F-5-L (Finished)
Great woodwork. I can imagine that the wood was high gloss. After all, flying was luxery. But a semi gloss will do the job I think.
-

-
 Fvdm got a reaction from BiggTim in Trumpeter P-38 early conversion - update March 18!!
I think a flying dutchman is always a good idea.
-
Fvdm got a reaction from Martinnfb in Trumpeter Swordfish 1:32
I decided not to cut out the ailerons so I went on with the wings. I cut away the brackets at the rigging because these were more then 0.5mm thick which is way overscaled. I will replace these with 0.25mm styreen. Also the holes were filled en I will make smaller holes because Trumpeter made a mistake with the rigging. In the picture below you will see that Trumpeter wants you to place PE1, PE2 and PE3. In all my references I can't find these and Thomas Lund also warned me about this.
I decided to glue the rightwings and leftwings but I'll glue these to the fuselage when everything is sprayed in color
The handle for folding the wings is replaced with PE
When you glue everything together (without the rigging that is) it looks like this
A litlle putty is still needed.
Upper center wing with some PE
The fuselage after priming. The oilcooler is till dryfit. This wil also be glued after spraying.
At last a dryfit because i want to place the rigging with everything in place. Just to prefent some misallignment.
I also had a little setback. I wanted to make the torpedo but when I wanted to take the sprue out of the box I noticed there wasn't any sprue P. I looked very carefully, I searched my hole room but I couldn't find it. Bummer. I went to the LHS and told the problem. They will contact the importer to see if they can get a replacement sprue. I also contacted the customerservice of Trumpeter. I don't have high hopes but you never know. So, if you own this kit please check if sprue P is present before you are going to build it.
I will check the net for measurements and will try to make a torpedo from scratch because i really want a torpedo under the plane.
Thanks for watching
-
-
Fvdm reacted to mark31 in Trumpeter Swordfish 1:32
very nice work
love to see more
and yes thats a bumer that the spreu is missing
I wait for next update
Mark
-
 Fvdm got a reaction from Tolga ULGUR in Finished..... 1/32 Tamiya P-51D Mustang "Old Crow"
Nice, another mustang. Have fun with it.
-
 Fvdm got a reaction from Model_Monkey in Trumpeter Swordfish 1:32
I decided not to cut out the ailerons so I went on with the wings. I cut away the brackets at the rigging because these were more then 0.5mm thick which is way overscaled. I will replace these with 0.25mm styreen. Also the holes were filled en I will make smaller holes because Trumpeter made a mistake with the rigging. In the picture below you will see that Trumpeter wants you to place PE1, PE2 and PE3. In all my references I can't find these and Thomas Lund also warned me about this.
I decided to glue the rightwings and leftwings but I'll glue these to the fuselage when everything is sprayed in color
The handle for folding the wings is replaced with PE
When you glue everything together (without the rigging that is) it looks like this
A litlle putty is still needed.
Upper center wing with some PE
The fuselage after priming. The oilcooler is till dryfit. This wil also be glued after spraying.
At last a dryfit because i want to place the rigging with everything in place. Just to prefent some misallignment.
I also had a little setback. I wanted to make the torpedo but when I wanted to take the sprue out of the box I noticed there wasn't any sprue P. I looked very carefully, I searched my hole room but I couldn't find it. Bummer. I went to the LHS and told the problem. They will contact the importer to see if they can get a replacement sprue. I also contacted the customerservice of Trumpeter. I don't have high hopes but you never know. So, if you own this kit please check if sprue P is present before you are going to build it.
I will check the net for measurements and will try to make a torpedo from scratch because i really want a torpedo under the plane.
Thanks for watching
-
 Fvdm got a reaction from D.B. Andrus in Trumpeter Swordfish 1:32
I decided not to cut out the ailerons so I went on with the wings. I cut away the brackets at the rigging because these were more then 0.5mm thick which is way overscaled. I will replace these with 0.25mm styreen. Also the holes were filled en I will make smaller holes because Trumpeter made a mistake with the rigging. In the picture below you will see that Trumpeter wants you to place PE1, PE2 and PE3. In all my references I can't find these and Thomas Lund also warned me about this.
I decided to glue the rightwings and leftwings but I'll glue these to the fuselage when everything is sprayed in color
The handle for folding the wings is replaced with PE
When you glue everything together (without the rigging that is) it looks like this
A litlle putty is still needed.
Upper center wing with some PE
The fuselage after priming. The oilcooler is till dryfit. This wil also be glued after spraying.
At last a dryfit because i want to place the rigging with everything in place. Just to prefent some misallignment.
I also had a little setback. I wanted to make the torpedo but when I wanted to take the sprue out of the box I noticed there wasn't any sprue P. I looked very carefully, I searched my hole room but I couldn't find it. Bummer. I went to the LHS and told the problem. They will contact the importer to see if they can get a replacement sprue. I also contacted the customerservice of Trumpeter. I don't have high hopes but you never know. So, if you own this kit please check if sprue P is present before you are going to build it.
I will check the net for measurements and will try to make a torpedo from scratch because i really want a torpedo under the plane.
Thanks for watching
-
Fvdm got a reaction from Tolga ULGUR in Trumpeter Swordfish 1:32
I decided not to cut out the ailerons so I went on with the wings. I cut away the brackets at the rigging because these were more then 0.5mm thick which is way overscaled. I will replace these with 0.25mm styreen. Also the holes were filled en I will make smaller holes because Trumpeter made a mistake with the rigging. In the picture below you will see that Trumpeter wants you to place PE1, PE2 and PE3. In all my references I can't find these and Thomas Lund also warned me about this.
I decided to glue the rightwings and leftwings but I'll glue these to the fuselage when everything is sprayed in color
The handle for folding the wings is replaced with PE
When you glue everything together (without the rigging that is) it looks like this
A litlle putty is still needed.
Upper center wing with some PE
The fuselage after priming. The oilcooler is till dryfit. This wil also be glued after spraying.
At last a dryfit because i want to place the rigging with everything in place. Just to prefent some misallignment.
I also had a little setback. I wanted to make the torpedo but when I wanted to take the sprue out of the box I noticed there wasn't any sprue P. I looked very carefully, I searched my hole room but I couldn't find it. Bummer. I went to the LHS and told the problem. They will contact the importer to see if they can get a replacement sprue. I also contacted the customerservice of Trumpeter. I don't have high hopes but you never know. So, if you own this kit please check if sprue P is present before you are going to build it.
I will check the net for measurements and will try to make a torpedo from scratch because i really want a torpedo under the plane.
Thanks for watching
-
 Fvdm got a reaction from Sir Spendalot in Trumpeter Swordfish 1:32
Last week I spent my time spraying, painting and wheatering and I think the cockpit is ready. Wel, almost then because I now see that the pilots seatbelts needs to be wheatered .
Here are the pics whitout further explanation.
All critics and tips are welcome.
Happy Hollidays and til the next update
-
 Fvdm got a reaction from MikeC in Trumpeter Swordfish 1:32
I decided not to cut out the ailerons so I went on with the wings. I cut away the brackets at the rigging because these were more then 0.5mm thick which is way overscaled. I will replace these with 0.25mm styreen. Also the holes were filled en I will make smaller holes because Trumpeter made a mistake with the rigging. In the picture below you will see that Trumpeter wants you to place PE1, PE2 and PE3. In all my references I can't find these and Thomas Lund also warned me about this.
I decided to glue the rightwings and leftwings but I'll glue these to the fuselage when everything is sprayed in color
The handle for folding the wings is replaced with PE
When you glue everything together (without the rigging that is) it looks like this
A litlle putty is still needed.
Upper center wing with some PE
The fuselage after priming. The oilcooler is till dryfit. This wil also be glued after spraying.
At last a dryfit because i want to place the rigging with everything in place. Just to prefent some misallignment.
I also had a little setback. I wanted to make the torpedo but when I wanted to take the sprue out of the box I noticed there wasn't any sprue P. I looked very carefully, I searched my hole room but I couldn't find it. Bummer. I went to the LHS and told the problem. They will contact the importer to see if they can get a replacement sprue. I also contacted the customerservice of Trumpeter. I don't have high hopes but you never know. So, if you own this kit please check if sprue P is present before you are going to build it.
I will check the net for measurements and will try to make a torpedo from scratch because i really want a torpedo under the plane.
Thanks for watching
-
Fvdm reacted to Trak-Tor in Trumpeter Swordfish 1:32
Wow, that looks nice!
Excellent pictures, thanks for the effort.
Juraj
-
 Fvdm got a reaction from Jan_G in Trumpeter Swordfish 1:32
I decided not to cut out the ailerons so I went on with the wings. I cut away the brackets at the rigging because these were more then 0.5mm thick which is way overscaled. I will replace these with 0.25mm styreen. Also the holes were filled en I will make smaller holes because Trumpeter made a mistake with the rigging. In the picture below you will see that Trumpeter wants you to place PE1, PE2 and PE3. In all my references I can't find these and Thomas Lund also warned me about this.
I decided to glue the rightwings and leftwings but I'll glue these to the fuselage when everything is sprayed in color
The handle for folding the wings is replaced with PE
When you glue everything together (without the rigging that is) it looks like this
A litlle putty is still needed.
Upper center wing with some PE
The fuselage after priming. The oilcooler is till dryfit. This wil also be glued after spraying.
At last a dryfit because i want to place the rigging with everything in place. Just to prefent some misallignment.
I also had a little setback. I wanted to make the torpedo but when I wanted to take the sprue out of the box I noticed there wasn't any sprue P. I looked very carefully, I searched my hole room but I couldn't find it. Bummer. I went to the LHS and told the problem. They will contact the importer to see if they can get a replacement sprue. I also contacted the customerservice of Trumpeter. I don't have high hopes but you never know. So, if you own this kit please check if sprue P is present before you are going to build it.
I will check the net for measurements and will try to make a torpedo from scratch because i really want a torpedo under the plane.
Thanks for watching
-
Fvdm reacted to kkarlsen in Aeromarine 75/Curtiss F-5-L (Finished)
The last couple of days I've been working on the interior wood.
The task is to imitate the mahogany interior panels...
I haven't done wood grain on a larger scale before. I had the idea of using Radu's stencils to give the large interior surfaces a basic wooden structure with acrylics.
When dry, I continued with three different shades of oil colors...
With this technique it does not take long before all the interior walls had become 'wooden'.
The famous blue carpets of the Aeromarine's was done using several blue grey 'mixtures'.
Masking tape is off...
I think it resembles a wooden 'cigar box' a bit, but I'm quite happy with the result.
Cheers: Kent
-
Fvdm reacted to Tolga ULGUR in Finished..... 1/32 Tamiya P-51D Mustang "Old Crow"
Another Mustang project...
This will be finished with the markings of "Old Crow"
-
Fvdm reacted to chuck540z3 in 1/32 Kitty Hawk F-5E Kicked Up A Notch. Oct 3/19. Finished!
Then installed Parts C9 & C14 and glued the gear well together.
Next, I cut off the rectangular tabs on the sides of the gear leg and cut a groove in it’s place that would fit a small drill bit, being careful to keep the angle of the groove the same as the tab, which is about 15-20 degrees.
I then cut one short drill bit for the bottom and a longer one for the upper pin with a Dremel tool with a cut-off wheel.
Then after opening the bottom hole slightly, I slipped the bottom pin in place. This pin is necessarily shorter than the top pin, because it gets in the way of the bottom fuselage parts, which have a triangular tab at this very location. By cutting off the tab slightly, everything will fit later.
Thankfully with the gun doors closed, the top pin can be any length, so I left it a bit longer for strength.
Now the front gear leg can be glued to the pins at the end of the build, just like I plan for the main landing gear, so I can set the gear leg aside until I do the other two. Mission 2 accomplished.
Next up is final installation of the cockpit and IP. Fingers crossed that this all goes well.
Cheers,
Chuck
-
Fvdm reacted to patricksparks in 1:18 Hobbyboss AV-8B Harrier
Had to add material to the kit supplied intake liners, for what ever reason they decided to leave them short of the fuselage sides, I also will have to add small fillets where they meet up to the fuselage sides. Got the fairing in front of the main fan, it's not quite as long as it should be, this goes back to dimensional errors, I had to cut about a 1/4" off the front of the engine(second molded in ring) in order to create a larger gap between the fan face and the back of the nose gear bay. I'm not sure where the error is, I don't have drawings, it may be in the overall length of the fuselage, the front landing gear seems to be in the proper place in relationship to the intakes, so I'm just going to go with smoke and mirrors from here out, I really like the way it's starting to look !!!
-
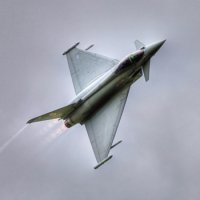
Fvdm reacted to tomprobert in Airfix's big Typhoon
Just added the finishing touches to Airfix's 1/24th Hawker Typhoon MkIb this week: a project I've had on the bench for the last 6 months or so. Admittedly I've picked it up and put it down as and when I've felt like it, but regardless this kit is most definitely a long-term investment in regard to time and effort.
I found it an absolute joy to build and thoroughly enjoyed every minute. Fit was exceptional but you must follow the instructions to the letter, especially where the engine and its piping is concerned, as tolerances are very tight. The only after-market was a set of Eduard seat belts - everything else was OOB.
PIC 9 by Thomas Probert, on Flickr
PIC 8 by Thomas Probert, on Flickr
PIC 7 by Thomas Probert, on Flickr
PIC 6 by Thomas Probert, on Flickr
PIC 5 by Thomas Probert, on Flickr
PIC 4 by Thomas Probert, on Flickr
PIC 3 by Thomas Probert, on Flickr
PIC 2 by Thomas Probert, on Flickr
PIC 1 by Thomas Probert, on Flickr
PIC 10 by Thomas Probert, on Flickr
I opted for the post-war scheme so other than some tonal variation to the paint, I kept the weathering restrained. Paints were Xtracolour enamels with Humbrol flat as a top coat. Decals were from the kit and were excellent, bedding down well over the recessed/raised details without any problems. All in all, a fantastic kit - roll on the big Hellcat!
Best regards,
Tom
-
 Fvdm got a reaction from Anthony in NZ in Trumpeter 1/32 RNZAF A-4K "Kahu Upgrade"
This tank looks real nice. Great welds.
-
Fvdm reacted to JayW in Heavy Mod - 1/18 21st Century Toys P-47D Razorback
Hello master modelers - life got in the way, and my work on the Thunderbolt has been interrupted alot. But I do have a modest update if for no other reason than to let you know I am alive. So on the wing, the flaps are next up. Something has to attach to these links:
Recall I had started on the flaps a while ago, attempting to salvage the existing parts:
And I still might. But to get the spans just right, and get the leading edges right with the attach fittings, is going to be a little sloppy. Besides, scratch building control surfaces or high lift surfaces like flaps, can be great fun. So that is what I am doing. If it turns out badly, I will revert to plan "A".
I am at work making skin panels (with many hundred drill starts for rivet patterns), the spar, and quite a few ribs:
These parts will make up the main body of the flap, and are all 0.020 inch thick plastic sheet. After that is done, I will tackle the more difficult leading edge, with its attach fittings and heavily curved skin panels. Sorta like the real thing! You may be wondering "why does he bother with lightening holes?" Here's why - glue together a thin sided closed box with no way for it to breath, and the plastic skins will soften and sag or otherwise deform due to the fumes from the glue. I found that out the hard way on Miss Velma a few years ago, where I completed a flap box only to see it deformed overnight. The holes really solve that problem.
Here is a shot at the mostly complete main body:
There are 9 ribs including the end ribs. I have also put stiffeners in between the ribs (the actual flap has full ribs in those locations too - I didn't want to make that many ribs).
This shows the end ribs:
They are two layers of 0.01 inch thick plastic sheet, meant to show the hydro-formed stiffening features on the real thing. Since these ribs are visible, I needed to do that. Note also I put in some .03 x .03 rod as a stringer, just to split up the bays and minimize any sagging of the skins. Finally, note the inboard end rib has a heavy (20 deg) cant to it. The real flap has this too.
Next post you should see a completed main body for the RH flap, and perhaps some work on the attach fittings. My near term goal is to complete those fittings and test fit the flap on the wing. Hopefully the flap fittings will line up well with the linkage on the wing, and position the flap properly in a flaps down position. Fun. Stay tuned!
-
Fvdm reacted to Anthony in NZ in Trumpeter 1/32 RNZAF A-4K "Kahu Upgrade"
Ok tank is all welded up and this is fresh off a coat of Mr Surfacer
I am really happy how this turned out! Perfect welds with Archer Panel Lines, such a great product
And sooooo easy to do. A couple of little jobs to finish off and the 400 gal tank and pylon is done.
Cheers Anthony
-
Fvdm reacted to Bil in Scratch-built 1/24 Scale Fokker E.III
Thanks fellas.
I have discovered that laying a part flat as you suggest tends to make the print soft and you lose detail... maybe it has something to do with the way the resin is deposited, but if you tilt your part slightly (around 20-25 degrees) the detail is sharper and the print is overall more likely to be successful. I also never print without some sort of support. most of the time I just let the program add auto-supports, but sometimes, when I want to ensure the supports don't get in the way of the detail I will manually add them or adjust them by deleting and adding supports as required. At times I have added supports manually in my 3D program, but not often.
Here is an example (from my Stearman project) showing my wing rib print tests.. one was printed flat while the other was tilted slightly.. the difference in quality and ease of clean up was night and day... though I found the tilted rib needed some supports at the top to help maintain that detail. These were printed with auto-supports added in the slicer program...
The detail is clearer when printed in gray (these are 100% scale, in thickness and component part size).. this print was with supports added in my 3D program making contact at the reinforcement locations on the back side of the rib:
The ribs clean up rather quickly.. there are several supports for each, along the bottom edge and along the back side... but they snip off easily and from there are rather simple to finish. I use the lightest supports for delicate parts as they leave a very small contact point.
Hope that helped.
-
Fvdm reacted to Garage21 in 1917 Sopwith Camel by Model Airways
While the first coat of stain gasses out on the wooden spars, I'm getting to work on the turnbuckles. The first step was to pre-drill each center jacket for the safety wire. This was much easier to do before sectioning off each individual piece. I very small end mill made drilling out the hole pretty simple. The jackets will be filed and cleaned up and the first two-dozen turnbuckles should be done tonight.
Stay tuned.