
Dpgsbody55
-
Posts
2,300 -
Joined
-
Last visited
-
Days Won
2
Content Type
Profiles
Forums
Events
Everything posted by Dpgsbody55
-

Hawker Hurricane MkIIc Nightfighter - Finished
Dpgsbody55 replied to Dpgsbody55's topic in Nocturnal Activities
I've been working on the guns, right side escape panel, control surfaces and a couple of other bits over the last few days. As well as filling and filing. In this next picture, you can see ailerons and elevators fitted after filling. The rudder will go on after paint. I've also fitted the lower engine cowling. The side cowlings are taped into place to help with the positioning of the lower cowling as it's fitment is very vague but also won't go on until after paint. Flaps are in place, closed. You can also see the cannon stubs in place. These are fitted with metal parts by Master. Fitting the metal ends required 2mm to be removed from the front of each stub, then the holed drilled out to 3.5mm. The tape on the right wing root shows where some filling was needed, and some more filler was needed around the tail planes on both upper and lower sides. the nose was the worst area to fill, as there's a small step between left and right halves here. This took a couple of applications of putty followed by Mr Surfacer followed by filing and sanding to get it right. After that, I got busy with the scriber and rivet wheel to try to restore the surface detail to some passable standard. Next, the right side cockpit escape hatch needed to be finished and fitted. I'd previously painted this, and now realised that some etch details needed to go on before painting. . Also attached was the etch map holder and an etch release lever. I also picked out the releasing links. In place. I'm going to make the canopy slide properly rather than just sit in place, so each side of the fuselage behind the cockpit were filed out to take 1.5mm stock channel. Trumpeters kit is lacking here as the canopy rails are quite clear in photographs and no attempt has been made to mold them in. I've also started work on the radiator, although this is not fitted yet. I used the kit parts rather than the Trumpy etch bits as I thought I could get a better result. So the front and back faces were painted flat black then dry brushed aluminium. This needs a little work to sit in place properly as the wing surface is not flat where the rad attaches, but the radiator is flat left to right, so some work is needed here. I shall paint the wing surface before attaching the radiator. I'm presently working on the gunsight. Once this is finished and in place, I shall fit the windscreen and canopy. Then I can fit lights and a few other details and begin the painting process. Cheers, Michael -
Looking more closely at both of the pictures of FZ-L you can make out the plane's serial number K9906. The picture I posted is clearer and it may be that the 5 character number on the tail fin is this same serial number. Whether the number was painted over in service or scrubbed out by the official censor I have no idea. Incidentally, consulting my books again, I find that K9906 had quite a long life. It was first flown on 21st Marck 1939, issued to 65 Squadronj on 24th March 1939, then moved to 64 Squadron on 17th April 1940. Next, it went to 7 OTU on 11th October 1940 then withdrawn on 18th October 1941 for conversion to PRIII standard and issued to 1 PRU at Benson. On 26th February 1942 it suffered a category E flying accident and subsequently repaired. On 18th March it was issued to 8 OTU before beingf sent to Scottish Aviation on 29th November 1942. It seems that by late May 1943 it was on Royal Navy stocks, but was struck off charge almost immediately. At the time this picture was taken, the paint scheme on Spitfires was fairly standard. IE; green and dark earth disruptive camouflage on the upper surfaces and aluminium lower surfaces. By the time of Dunkirk, lower surfaces were usually Sky Type S, though Supermarine's interpretation of that colour was usually a more blue shade than any other's. As you say, during the Battle of France, a lot of ideas were tried out to aid aircraft recognition, and given the individual unit variations, the period is very confusing for us modellers. Many such variations were still about during the Battle of Britain, so more confusion. Tuck's Hurricane V6864 (257 Squadron) still had port black/starboard white lower wings in November 1940. Cheers, Michael
-
I haven't seen that pic in years, and seeing it again has disappointed me. So I started some research. Like you, I remember being very inspired by that picture too. When I turned 13, a friend gave me a biography of Robert Stanford Tuck with a picture of him leading a flight of Spitfires. The picture was taken in May of 1939 when he was attached to 65 Squadron. This is that picture. I can't make out the aircraft serial number, but likely it's the same plane. Both your picture and this also clearly show the plane has been refitted with the blown canopy and a DeHavilland three blade bracket prop. I wanted to do a Kotare Spitfire MkI in this scheme, and this pic was my inspiration. DISAPPOINTED!!!! Very few Spitfires actually had the flat canopy. Spitfire production got off to a very slow start. By 31st December 1938, only 49 Spitfires had been produced, and the blown canopy had started to be fitted by August 1938, as this picture of 19 Squadron aircraft shows. These planes have the two blade Watts prop, and probably had Merlin II's fitted. One more point. These pictures above all show the early windscreen. The bullet proof windscreens did not start to to be retrofitted in the field until May of 1940. Tuck's Spitfire was fitted with one right at the start of his first op over Dunkirk on 23rd May. So it will be possible to build a Watts prop flat canopy model, but the choice of markings would be very limited. Kotare could offer such a model, but hopefully they'll also give the modeller a choice of three blade DH prop, Watts two blade prop, as well as a choice of canopy so we could build any early MkI. Cheers, Michael PS. I still have that biography, fifty four years later. It's one of my most treasured books.
-
Of which I am also one. The normal MkI or MkIa is OK, but I've never built a two blade Watts prop/flat canopy Spitfire, so that's the one I will put my money towards. If they also do a MkVc, I'll be in on that one too and do it in RAAF 1943 defense of Darwin colours. Cheers, Michael
-
Hobby 2000 Messerschmitt BF-109E-3 - Finished
Dpgsbody55 replied to Dpgsbody55's topic in Works in Progress
Look what I got yesterday!! The downside is that the part fits as badly as reports have suggested... As the saying goes, you can't have your cake and eat it. I'll worry about this later and investigate a fix once I've finished my present Hurricane build. But at least I can see how I'm going to finish this model. Cheers, Michael -
1/32 Hasegawa Fw 190D-9 - Hans Dortenmann's Black 1
Dpgsbody55 replied to Hoss FL's topic in Ready for Inspection
Wonderful build, and very well photographed too. Cheers, Michael -
Very good, indeed. I like your gentle weathering on this, as well as the bullet holes. Cheers, Michael
-
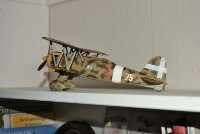
ICM Fiat CR.42 CN from 377 squadriliga - completed
Dpgsbody55 replied to Fanes's topic in Nocturnal Activities
Sweet looking model. I really enjoyed doing mine, but you're making me want to do another!! Cheers, Michael -
Hawker Hurricane MkIIc Nightfighter - Finished
Dpgsbody55 replied to Dpgsbody55's topic in Nocturnal Activities
Thanks Dennis. I always had a liking for this old work horse. It's a plane that doesn't get enough recognition for it's achievements, and deserves a really good LSP kit too. Cheers, Michael -
Making good progress with this. Cheers, Michael
- 86 replies
-
- 1
-

-
- regia
- camouflage
- (and 5 more)
-
1/32 ZM Messerschmitt Bf109 G-14 7/JG.3 "Yellow 18"
Dpgsbody55 replied to monthebiff's topic in Works in Progress
Another one to watch. I have the Eduard/Z-M etch set on it's way to me now, which has the seat belts included. Hoping to start mine once I've finished the two projects currently on my modelling bench. Cheers, Michael -
Those guns look very nice. Cheers, Michael
-
Zoukei Moura Bf-109 G-14 a Non-Hartmann Build 1/32 Scale
Dpgsbody55 replied to Gazzas's topic in Works in Progress
Me 4 . BTW, I've seen pics recently that suggest those exhaust shields were attached to the engine, as depicted in this kit. Cheers, Michael -
Hawker Hurricane MkIIc Nightfighter - Finished
Dpgsbody55 replied to Dpgsbody55's topic in Nocturnal Activities
Ok. Next thrilling installment. The scratch built rear wing spar, as mentioned above, was duly detached from the cockpit floor by the simple expedient of a few drops of Tamiya liquid thin glue to the joint and gently prising apart. The tubing to the rear fuselage was cut and the spar re-positioned a couple of milimetres back and the two fuselage braces shortened and glued back. This was then repainted to cover up my bungle. While previously airbrushing interior green/grey on the fuselage halves, I also sprayed the lower wing after having glued the gun compartments into each half of the wing. So my next step was to dawb some paint onto the wing tanks and set them in place. Next, I finished off the undercarriage bay. A length of 0.5mm wire was used to replace the cast in pipe, holes cut for the windows that showed the pilot the U/C was up, and the hydraulic tank glued in place. Then the guns were assembled and painted, and set in place on the left side only. I've been searching the net for images of the Hurricane's cannon installation, and only found two rather unhelpful pics. Lots of shots of the 303 machine gun installation, but sweet nothing for cannons. Same result when looking through all my Hurricane books. The 20mm Hispano seems to have two connections to fire the guns, so holes were drilled to take wire for the hoses. No idea where they go other than somewhere into the airframe and likely connect to the firing button and a compressed air source. Since the pics were black and white, they were not a lot of help with colour other than to see that the bay was likely interior green/grey and the drum and feed a colour that was tonally similar. So I went with steel paint, painted my wire hoses white and added the guns to the model, then closed up the left wing. I'm sure I'm totally wrong in what I've done, but it's a best guess. My next step, once this was glued and said glue dry, was to glue in the wheel well and the right hand guns. This was also allowed to dry and was then set onto the fuselage. The rear wing spar had to be longer than the width of the fuselage as it and the inside edge of the fuel tanks can be seen if you look carefully into the cockpit, and that length meant this was the only method to put the wings into place. Having carefully set the wing assembly into place, the right side wing top was added immediately and also set carefully in place, checking fit and dihedral as I went. Again, this was all taped into place and left. You'll notice that the drums have not been glued onto the cannons yet. These have locating pins into the guns, but also the drums have a locating tab underneath to connect to the feed mechanism that is set into the top wing half. It's possible that the feed will dislodge the drums, so once I take off the tape, these will be added. I'd previously built up the tail planes, so this morning these were added. Trumpeter provide interlocking tabs that go all the way through the rear fuselage, but these are just a little too long and were filed down first to allow best possible fit of the tail planes. This was also checked to ensure proper alignment against the main planes, but not tape was needed to hold in place. However, there is a small gap which will need filler. Now it looks like a recognisable Hurricane. My next job will be to finish up the cannons with the exception of the protruding gun barrels, clean up the seams, then start adding all the other bits needed before I can start painting. Cheers for now, Michael -
Nice work there. Cheers, Michael
-
Very nice work so far. The colour variations on the Italian planes was quite amazing, as I found when I did my CR-42. I came across this colour chart, which may help you a little. However, if you want a definition of masochism, I'd look no further than the chains on the seat belts on this thing. If faced with a crash landing situation, I'd have got out before landing. Not sure I could walk away from crash landing one of these, and no possibility of continuing the family line afterwards. Cheers, Michael
- 86 replies
-
- 1
-

-
- regia
- camouflage
- (and 5 more)
-
You're making good progress on this. I like your scratch building here and giving me ideas for mine, when I eventually take it out of the stash. Cheers, Michael
-
A Spanish Adventure - Around the world in Microsoft FS2020
Dpgsbody55 replied to ChuckD's topic in General Discussion
That's another issue with this sim. What idiot scenery designer put 50ft trees right before the touch down point?? Anyway, glad you're having fun with the Twin Beech. I don't have that one right now. I still miss Milton Shupe's Twin Beech's as they were heaps better than any payware offerings at that time. Might give this one a try, if I can stop spending money on all the new LSP releases right now...... Cheers, Michael -
Upcoming Japanese Model Show - New Tamiya Releases?
Dpgsbody55 replied to John1's topic in LSP Discussion
I might just have a go at this, as much as I despise social media. We need to make our opinions heard, and in this day and age, bookface etc seems to be the way to go. It's been pointed out here that the Mossie's possible lack of sales is the reason Tamiya don't do any more 1/32 planes. If so, then wishing for a P-38 might be a stretch for them. It's also been pointed out that Japanese model makers are conservative, and that wouldn't surprise me in the least. So no Beaufighter or Macchi C-202/205 either. But there's still plenty of mainstream models they could do and these would be (relatively) big sellers. How about a couple of P-40E, F, K, L, M or N and razorback plus bubble top P-47's for starters?? Or a Wildcat and Hellcat?? There's a few years worth of releases alone. Then they could do some BMW powered FW-190 and Jumo powered FW-190D and lets not forget a 109E, F, G or K. There's about a decade of releases. As an example of a lesser modelled plane, but just as famous, we could also hope for a Hurricane. There isn't a good LSP kit of this on the market, so I suspect that would be a good seller too. Further, could we dare hope for an Oscar or Tony?? It is very disappointing that Tamiya haven't released anything new in so long as their kits are some of the very best to build. But they are in danger of becoming just a footnote in LSP history given all the newer good quality kits released by others since the Mossie. So I think we should give them a bit of a push. Cheers, Michael -
Looking forward to see how your build progresses. This is one of my favourite kits. Cheers, Michael
- 86 replies
-
- 1
-
-
- regia
- camouflage
- (and 5 more)
-
Thankfully neither of mine have this issue, and my T7 is even heavier as it has two resin engines, the Fisher resin nose, the stock kit nose weight, and a bit more weight for good luck. I was tempted to use the metal legs that are available for it when I built this one, but no need yet. Sorry to see yours in a crash landing state. Hope you can fix it. Cheers, Michael
-
Nice work. One of my favourite planes, and as you say, not well represented in LSP. Cheers, Michael
-
Hawker Hurricane MkIIc Nightfighter - Finished
Dpgsbody55 replied to Dpgsbody55's topic in Nocturnal Activities
Not quite. After starting on the wings, I've found that I've installed that rear wing spar about 3mm too far forward. It fowls the wing tanks. Thankfully an easy fix to move it back. Simply shortening it isn't a goer as it will make the ends visible. Cheers, Michael -
Thank you. I'm enjoying working on the cockpit on this one, though I don't hold the kit in any sort of high regard. I was trying to fit the Airfix engine to this, but the shape of the nose makes it a non starter. The Trumpy kit engine is rubbish, so that has been installed only to hold the propeller on. Cheers, Michael
-
Nice subject. The Macchi C202 is one of those subjects that has been ignored too long in LSP. Cheers, Michael
