
Thunnus
-
Posts
3,205 -
Joined
-
Last visited
-
Days Won
272
Reputation Activity
-

 Thunnus reacted to scvrobeson in Infinity Models 1/32 Aichi D3A1 Type 99
Looks great. I think that the AK shade with a touch of fading could definitely be the ticket. It just looks a bit richer than the Gunze mix.
Matt
-
 Thunnus got a reaction from Tolga ULGUR in *** Finished *** 1/32 Revell Hawker Hurricane Mk.IIb
Beautiful work, Tolga! I love the finish! It looks like the Revell Hurricane is a solid kit.
-
 Thunnus got a reaction from AlexM in Infinity Models 1/32 Aichi D3A1 Type 99
Thanks Kev! I thought about using a thin sheet of brass but I thought this might be easier.
Thank you so much Peter! I like when my builds look a bit different from everyone else's but this is an extreme example.
Testing out some exterior colors for the D3A1. On the left hand side of the wing is AK Real Colors IJN Amber Grey (RC 303) and on the right is a 50/50 mix of Mr Hobby Aqueous RLM 02 (H70) and Hemp (H336).
I scanned the Infinity decal sheet so that I can create as many paint masks for the markings. I wanted to test the aircraft code of the machine that I'll be building. The decal scan was traced in AutoCAD, exported to a DXF file and printed out as a mask on the Silhouette Portrait cutter. Mr Color IJN Markings Red (C385) was used.
Infinity molds the prop spinner in three separate parts but it is still overly simplified.
Using photo references, I dressed up the hub a bit.
-
 Thunnus got a reaction from JayW in Infinity Models 1/32 Aichi D3A1 Type 99
Thanks Kev! I thought about using a thin sheet of brass but I thought this might be easier.
Thank you so much Peter! I like when my builds look a bit different from everyone else's but this is an extreme example.
Testing out some exterior colors for the D3A1. On the left hand side of the wing is AK Real Colors IJN Amber Grey (RC 303) and on the right is a 50/50 mix of Mr Hobby Aqueous RLM 02 (H70) and Hemp (H336).
I scanned the Infinity decal sheet so that I can create as many paint masks for the markings. I wanted to test the aircraft code of the machine that I'll be building. The decal scan was traced in AutoCAD, exported to a DXF file and printed out as a mask on the Silhouette Portrait cutter. Mr Color IJN Markings Red (C385) was used.
Infinity molds the prop spinner in three separate parts but it is still overly simplified.
Using photo references, I dressed up the hub a bit.
-
Thunnus got a reaction from JayW in Infinity Models 1/32 Aichi D3A1 Type 99
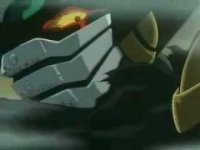
Thanks Matt! The exhaust pipes were airbrushed. A mixture of Alclad Steel and Polished Aluminum for the main body of the exhaust structure. The ends were highlighted with Alclad Exhaust Manifold. Black was sprayed into the hollow end as well as the outer tips to finish the look.
There was something that I noticed on the archive photo of the Pearl Harbor D3A1 that I wanted to address. Note the two square hatches on the top of the fuselage behind the engine.
Compare with the photo of the Pearl Harbor D3A1...
It's obviously a single rectangular hatch with rounded corners and not two square ones. Big raised rivets on it too. I don't know enough about this aircraft to know if there was any variation in these hatches but the photo is clear. I decided to try and convert the double hatches to a single one. It's trickier than a normal scribed panel because panel is slightly raised. I had scribed the outline of the two squares previously. First, I drilled out the hole in front of the hatch, which is also noticeable in the photo. I think it is a vent for the cowling gun.
Plastic is pretty thick here so I thinned the plastic around the hole with a rotary tool.
The vertical boundary of the hatch was marked off using tape. I used black CA glue to fill the gap between the two square hatches. It is viscous enough to retain its height and I don't have to deal with the waiting and shrinkage issues if I used a liquid putty like Mr Surfacer.
An oscillating sander like the D400 is helpful in leveling off the black CA glue after I've zapped it with activator.
The tape is removed and the final sanding is done by hand.
A scribing template and needle was used to round off the corners of the hatch. The Infinity plastic is very soft and it's possible that the plastic can be pushed during the corner scribing and closing the sharp corner without further work. I got lucky on a few corners but had to fill the others with micro applications of Mr Surfacer.
To top off the hatch, I applied raised rivet decals from Archers.
A coat of Mr Primer Surfacer 1000 to reveal the finished hatch. This work is being repeated on the other side.
A few more views of the finished engine. Some of the ignition wiring and exhaust manifold pipe connections needed to be touched up with fresh paint.
Engine is kinda shiny... I may shoot with a bit more flat.
-
Thunnus got a reaction from AlexM in Infinity Models 1/32 Aichi D3A1 Type 99
That's exactly what I'm doing. I'm taking a Trumpeter kit and turning it into a Hasegawa molding! Looking at the pillowed look, I get the feeling that it may been unintentional on Infinity's part. It looks a lot like the Italeri F-86 wings and I've read that the pillowed look on those wings were a result of insufficient molding pressure?
Yes, it's a very sharp and revealing photo and I was struck by the integrity of the fuselage panels compared to what is presented in the Infinity moldings. It gave me the idea to try something different with this build than I normally do. Cuz I'm the guy who is usually ADDING rivets to my aircraft!
Yeah, it's tiresome but I'm liking the result so I'll try to keep going!
The BSI works really well... I think you'll like it Kevin!
Jumping over to the engine, I've painted the components separately.
The main shades were airbrushed and then details were picked out with brush painting. The parts were covered with a clear gloss, given a pastel wash and then sealed with a flat coat.
Before I assemble the engine, I use short strands of lead wire for the ignition wires. These will be painted brown and then oriented to the back of the cylinders. Since the view is blocked, I won't go through the trouble of connecting the terminal ends to the ignition ring in the rear of the engine.
The engine components are glued together. It took a bit of futzing to get the exhaust tubing to attach to the back of the cylinders but the glue joints were soft enough to gently adjust the stems to fit.
I want to check the position of the engine to the fuselage. It looks ok so far but care will be need to taken when gluing the engine in place since orientation is not rock solid. I plan on gluing the engine after the painting stage.
The engine cowling attaches to the bottom of the fuselage so I checked that fit as well. Luckily, the exhaust stubs exit in the correct location.
The cowling opening is very big so there is a nice view into the engine compartment from the front.
-
 Thunnus got a reaction from MikeMaben in Infinity Models 1/32 Aichi D3A1 Type 99
Thanks Kev! I thought about using a thin sheet of brass but I thought this might be easier.
Thank you so much Peter! I like when my builds look a bit different from everyone else's but this is an extreme example.
Testing out some exterior colors for the D3A1. On the left hand side of the wing is AK Real Colors IJN Amber Grey (RC 303) and on the right is a 50/50 mix of Mr Hobby Aqueous RLM 02 (H70) and Hemp (H336).
I scanned the Infinity decal sheet so that I can create as many paint masks for the markings. I wanted to test the aircraft code of the machine that I'll be building. The decal scan was traced in AutoCAD, exported to a DXF file and printed out as a mask on the Silhouette Portrait cutter. Mr Color IJN Markings Red (C385) was used.
Infinity molds the prop spinner in three separate parts but it is still overly simplified.
Using photo references, I dressed up the hub a bit.
-
 Thunnus got a reaction from Derek B in 1/18 Airacobra 1 - AH601
Wow! Such sublime work on the instruments. The passion behind the technique is what takes your work to that next level. Bravo Peter!
-
 Thunnus got a reaction from Volksjager in Infinity Models 1/32 Aichi D3A1 Type 99
Thanks Kev! I thought about using a thin sheet of brass but I thought this might be easier.
Thank you so much Peter! I like when my builds look a bit different from everyone else's but this is an extreme example.
Testing out some exterior colors for the D3A1. On the left hand side of the wing is AK Real Colors IJN Amber Grey (RC 303) and on the right is a 50/50 mix of Mr Hobby Aqueous RLM 02 (H70) and Hemp (H336).
I scanned the Infinity decal sheet so that I can create as many paint masks for the markings. I wanted to test the aircraft code of the machine that I'll be building. The decal scan was traced in AutoCAD, exported to a DXF file and printed out as a mask on the Silhouette Portrait cutter. Mr Color IJN Markings Red (C385) was used.
Infinity molds the prop spinner in three separate parts but it is still overly simplified.
Using photo references, I dressed up the hub a bit.
-
 Thunnus got a reaction from TAG in Infinity Models 1/32 Aichi D3A1 Type 99
Thanks Kev! I thought about using a thin sheet of brass but I thought this might be easier.
Thank you so much Peter! I like when my builds look a bit different from everyone else's but this is an extreme example.
Testing out some exterior colors for the D3A1. On the left hand side of the wing is AK Real Colors IJN Amber Grey (RC 303) and on the right is a 50/50 mix of Mr Hobby Aqueous RLM 02 (H70) and Hemp (H336).
I scanned the Infinity decal sheet so that I can create as many paint masks for the markings. I wanted to test the aircraft code of the machine that I'll be building. The decal scan was traced in AutoCAD, exported to a DXF file and printed out as a mask on the Silhouette Portrait cutter. Mr Color IJN Markings Red (C385) was used.
Infinity molds the prop spinner in three separate parts but it is still overly simplified.
Using photo references, I dressed up the hub a bit.
-
 Thunnus got a reaction from Rocat in Infinity Models 1/32 Aichi D3A1 Type 99
Thanks Kev! I thought about using a thin sheet of brass but I thought this might be easier.
Thank you so much Peter! I like when my builds look a bit different from everyone else's but this is an extreme example.
Testing out some exterior colors for the D3A1. On the left hand side of the wing is AK Real Colors IJN Amber Grey (RC 303) and on the right is a 50/50 mix of Mr Hobby Aqueous RLM 02 (H70) and Hemp (H336).
I scanned the Infinity decal sheet so that I can create as many paint masks for the markings. I wanted to test the aircraft code of the machine that I'll be building. The decal scan was traced in AutoCAD, exported to a DXF file and printed out as a mask on the Silhouette Portrait cutter. Mr Color IJN Markings Red (C385) was used.
Infinity molds the prop spinner in three separate parts but it is still overly simplified.
Using photo references, I dressed up the hub a bit.
-
 Thunnus got a reaction from denders in Infinity Models 1/32 Aichi D3A1 Type 99
Thanks Kev! I thought about using a thin sheet of brass but I thought this might be easier.
Thank you so much Peter! I like when my builds look a bit different from everyone else's but this is an extreme example.
Testing out some exterior colors for the D3A1. On the left hand side of the wing is AK Real Colors IJN Amber Grey (RC 303) and on the right is a 50/50 mix of Mr Hobby Aqueous RLM 02 (H70) and Hemp (H336).
I scanned the Infinity decal sheet so that I can create as many paint masks for the markings. I wanted to test the aircraft code of the machine that I'll be building. The decal scan was traced in AutoCAD, exported to a DXF file and printed out as a mask on the Silhouette Portrait cutter. Mr Color IJN Markings Red (C385) was used.
Infinity molds the prop spinner in three separate parts but it is still overly simplified.
Using photo references, I dressed up the hub a bit.
-
Thunnus got a reaction from Volksjager in Infinity Models 1/32 Aichi D3A1 Type 99
Thanks Matt! The exhaust pipes were airbrushed. A mixture of Alclad Steel and Polished Aluminum for the main body of the exhaust structure. The ends were highlighted with Alclad Exhaust Manifold. Black was sprayed into the hollow end as well as the outer tips to finish the look.
There was something that I noticed on the archive photo of the Pearl Harbor D3A1 that I wanted to address. Note the two square hatches on the top of the fuselage behind the engine.
Compare with the photo of the Pearl Harbor D3A1...
It's obviously a single rectangular hatch with rounded corners and not two square ones. Big raised rivets on it too. I don't know enough about this aircraft to know if there was any variation in these hatches but the photo is clear. I decided to try and convert the double hatches to a single one. It's trickier than a normal scribed panel because panel is slightly raised. I had scribed the outline of the two squares previously. First, I drilled out the hole in front of the hatch, which is also noticeable in the photo. I think it is a vent for the cowling gun.
Plastic is pretty thick here so I thinned the plastic around the hole with a rotary tool.
The vertical boundary of the hatch was marked off using tape. I used black CA glue to fill the gap between the two square hatches. It is viscous enough to retain its height and I don't have to deal with the waiting and shrinkage issues if I used a liquid putty like Mr Surfacer.
An oscillating sander like the D400 is helpful in leveling off the black CA glue after I've zapped it with activator.
The tape is removed and the final sanding is done by hand.
A scribing template and needle was used to round off the corners of the hatch. The Infinity plastic is very soft and it's possible that the plastic can be pushed during the corner scribing and closing the sharp corner without further work. I got lucky on a few corners but had to fill the others with micro applications of Mr Surfacer.
To top off the hatch, I applied raised rivet decals from Archers.
A coat of Mr Primer Surfacer 1000 to reveal the finished hatch. This work is being repeated on the other side.
A few more views of the finished engine. Some of the ignition wiring and exhaust manifold pipe connections needed to be touched up with fresh paint.
Engine is kinda shiny... I may shoot with a bit more flat.
-
Thunnus got a reaction from JayW in Infinity Models 1/32 Aichi D3A1 Type 99
That's exactly what I'm doing. I'm taking a Trumpeter kit and turning it into a Hasegawa molding! Looking at the pillowed look, I get the feeling that it may been unintentional on Infinity's part. It looks a lot like the Italeri F-86 wings and I've read that the pillowed look on those wings were a result of insufficient molding pressure?
Yes, it's a very sharp and revealing photo and I was struck by the integrity of the fuselage panels compared to what is presented in the Infinity moldings. It gave me the idea to try something different with this build than I normally do. Cuz I'm the guy who is usually ADDING rivets to my aircraft!
Yeah, it's tiresome but I'm liking the result so I'll try to keep going!
The BSI works really well... I think you'll like it Kevin!
Jumping over to the engine, I've painted the components separately.
The main shades were airbrushed and then details were picked out with brush painting. The parts were covered with a clear gloss, given a pastel wash and then sealed with a flat coat.
Before I assemble the engine, I use short strands of lead wire for the ignition wires. These will be painted brown and then oriented to the back of the cylinders. Since the view is blocked, I won't go through the trouble of connecting the terminal ends to the ignition ring in the rear of the engine.
The engine components are glued together. It took a bit of futzing to get the exhaust tubing to attach to the back of the cylinders but the glue joints were soft enough to gently adjust the stems to fit.
I want to check the position of the engine to the fuselage. It looks ok so far but care will be need to taken when gluing the engine in place since orientation is not rock solid. I plan on gluing the engine after the painting stage.
The engine cowling attaches to the bottom of the fuselage so I checked that fit as well. Luckily, the exhaust stubs exit in the correct location.
The cowling opening is very big so there is a nice view into the engine compartment from the front.
-
 Thunnus got a reaction from patricksparks in Infinity Models 1/32 Aichi D3A1 Type 99
Thanks Kev! I thought about using a thin sheet of brass but I thought this might be easier.
Thank you so much Peter! I like when my builds look a bit different from everyone else's but this is an extreme example.
Testing out some exterior colors for the D3A1. On the left hand side of the wing is AK Real Colors IJN Amber Grey (RC 303) and on the right is a 50/50 mix of Mr Hobby Aqueous RLM 02 (H70) and Hemp (H336).
I scanned the Infinity decal sheet so that I can create as many paint masks for the markings. I wanted to test the aircraft code of the machine that I'll be building. The decal scan was traced in AutoCAD, exported to a DXF file and printed out as a mask on the Silhouette Portrait cutter. Mr Color IJN Markings Red (C385) was used.
Infinity molds the prop spinner in three separate parts but it is still overly simplified.
Using photo references, I dressed up the hub a bit.
-
 Thunnus got a reaction from chukw in Infinity Models 1/32 Aichi D3A1 Type 99
Thanks Kev! I thought about using a thin sheet of brass but I thought this might be easier.
Thank you so much Peter! I like when my builds look a bit different from everyone else's but this is an extreme example.
Testing out some exterior colors for the D3A1. On the left hand side of the wing is AK Real Colors IJN Amber Grey (RC 303) and on the right is a 50/50 mix of Mr Hobby Aqueous RLM 02 (H70) and Hemp (H336).
I scanned the Infinity decal sheet so that I can create as many paint masks for the markings. I wanted to test the aircraft code of the machine that I'll be building. The decal scan was traced in AutoCAD, exported to a DXF file and printed out as a mask on the Silhouette Portrait cutter. Mr Color IJN Markings Red (C385) was used.
Infinity molds the prop spinner in three separate parts but it is still overly simplified.
Using photo references, I dressed up the hub a bit.
-
 Thunnus got a reaction from HB252 in Infinity Models 1/32 Aichi D3A1 Type 99
Thanks Kev! I thought about using a thin sheet of brass but I thought this might be easier.
Thank you so much Peter! I like when my builds look a bit different from everyone else's but this is an extreme example.
Testing out some exterior colors for the D3A1. On the left hand side of the wing is AK Real Colors IJN Amber Grey (RC 303) and on the right is a 50/50 mix of Mr Hobby Aqueous RLM 02 (H70) and Hemp (H336).
I scanned the Infinity decal sheet so that I can create as many paint masks for the markings. I wanted to test the aircraft code of the machine that I'll be building. The decal scan was traced in AutoCAD, exported to a DXF file and printed out as a mask on the Silhouette Portrait cutter. Mr Color IJN Markings Red (C385) was used.
Infinity molds the prop spinner in three separate parts but it is still overly simplified.
Using photo references, I dressed up the hub a bit.
-
 Thunnus got a reaction from Landrotten Highlander in Infinity Models 1/32 Aichi D3A1 Type 99
Thanks Kev! I thought about using a thin sheet of brass but I thought this might be easier.
Thank you so much Peter! I like when my builds look a bit different from everyone else's but this is an extreme example.
Testing out some exterior colors for the D3A1. On the left hand side of the wing is AK Real Colors IJN Amber Grey (RC 303) and on the right is a 50/50 mix of Mr Hobby Aqueous RLM 02 (H70) and Hemp (H336).
I scanned the Infinity decal sheet so that I can create as many paint masks for the markings. I wanted to test the aircraft code of the machine that I'll be building. The decal scan was traced in AutoCAD, exported to a DXF file and printed out as a mask on the Silhouette Portrait cutter. Mr Color IJN Markings Red (C385) was used.
Infinity molds the prop spinner in three separate parts but it is still overly simplified.
Using photo references, I dressed up the hub a bit.
-
 Thunnus got a reaction from Shoggz in Infinity Models 1/32 Aichi D3A1 Type 99
Thanks Kev! I thought about using a thin sheet of brass but I thought this might be easier.
Thank you so much Peter! I like when my builds look a bit different from everyone else's but this is an extreme example.
Testing out some exterior colors for the D3A1. On the left hand side of the wing is AK Real Colors IJN Amber Grey (RC 303) and on the right is a 50/50 mix of Mr Hobby Aqueous RLM 02 (H70) and Hemp (H336).
I scanned the Infinity decal sheet so that I can create as many paint masks for the markings. I wanted to test the aircraft code of the machine that I'll be building. The decal scan was traced in AutoCAD, exported to a DXF file and printed out as a mask on the Silhouette Portrait cutter. Mr Color IJN Markings Red (C385) was used.
Infinity molds the prop spinner in three separate parts but it is still overly simplified.
Using photo references, I dressed up the hub a bit.
-
Thunnus got a reaction from chukw in Infinity Models 1/32 Aichi D3A1 Type 99
Thanks Matt! The exhaust pipes were airbrushed. A mixture of Alclad Steel and Polished Aluminum for the main body of the exhaust structure. The ends were highlighted with Alclad Exhaust Manifold. Black was sprayed into the hollow end as well as the outer tips to finish the look.
There was something that I noticed on the archive photo of the Pearl Harbor D3A1 that I wanted to address. Note the two square hatches on the top of the fuselage behind the engine.
Compare with the photo of the Pearl Harbor D3A1...
It's obviously a single rectangular hatch with rounded corners and not two square ones. Big raised rivets on it too. I don't know enough about this aircraft to know if there was any variation in these hatches but the photo is clear. I decided to try and convert the double hatches to a single one. It's trickier than a normal scribed panel because panel is slightly raised. I had scribed the outline of the two squares previously. First, I drilled out the hole in front of the hatch, which is also noticeable in the photo. I think it is a vent for the cowling gun.
Plastic is pretty thick here so I thinned the plastic around the hole with a rotary tool.
The vertical boundary of the hatch was marked off using tape. I used black CA glue to fill the gap between the two square hatches. It is viscous enough to retain its height and I don't have to deal with the waiting and shrinkage issues if I used a liquid putty like Mr Surfacer.
An oscillating sander like the D400 is helpful in leveling off the black CA glue after I've zapped it with activator.
The tape is removed and the final sanding is done by hand.
A scribing template and needle was used to round off the corners of the hatch. The Infinity plastic is very soft and it's possible that the plastic can be pushed during the corner scribing and closing the sharp corner without further work. I got lucky on a few corners but had to fill the others with micro applications of Mr Surfacer.
To top off the hatch, I applied raised rivet decals from Archers.
A coat of Mr Primer Surfacer 1000 to reveal the finished hatch. This work is being repeated on the other side.
A few more views of the finished engine. Some of the ignition wiring and exhaust manifold pipe connections needed to be touched up with fresh paint.
Engine is kinda shiny... I may shoot with a bit more flat.
-
Thunnus got a reaction from MikeMaben in Infinity Models 1/32 Aichi D3A1 Type 99
Thanks Matt! The exhaust pipes were airbrushed. A mixture of Alclad Steel and Polished Aluminum for the main body of the exhaust structure. The ends were highlighted with Alclad Exhaust Manifold. Black was sprayed into the hollow end as well as the outer tips to finish the look.
There was something that I noticed on the archive photo of the Pearl Harbor D3A1 that I wanted to address. Note the two square hatches on the top of the fuselage behind the engine.
Compare with the photo of the Pearl Harbor D3A1...
It's obviously a single rectangular hatch with rounded corners and not two square ones. Big raised rivets on it too. I don't know enough about this aircraft to know if there was any variation in these hatches but the photo is clear. I decided to try and convert the double hatches to a single one. It's trickier than a normal scribed panel because panel is slightly raised. I had scribed the outline of the two squares previously. First, I drilled out the hole in front of the hatch, which is also noticeable in the photo. I think it is a vent for the cowling gun.
Plastic is pretty thick here so I thinned the plastic around the hole with a rotary tool.
The vertical boundary of the hatch was marked off using tape. I used black CA glue to fill the gap between the two square hatches. It is viscous enough to retain its height and I don't have to deal with the waiting and shrinkage issues if I used a liquid putty like Mr Surfacer.
An oscillating sander like the D400 is helpful in leveling off the black CA glue after I've zapped it with activator.
The tape is removed and the final sanding is done by hand.
A scribing template and needle was used to round off the corners of the hatch. The Infinity plastic is very soft and it's possible that the plastic can be pushed during the corner scribing and closing the sharp corner without further work. I got lucky on a few corners but had to fill the others with micro applications of Mr Surfacer.
To top off the hatch, I applied raised rivet decals from Archers.
A coat of Mr Primer Surfacer 1000 to reveal the finished hatch. This work is being repeated on the other side.
A few more views of the finished engine. Some of the ignition wiring and exhaust manifold pipe connections needed to be touched up with fresh paint.
Engine is kinda shiny... I may shoot with a bit more flat.
-
 Thunnus got a reaction from Hartmann52 in Infinity Models 1/32 Aichi D3A1 Type 99
Thanks Kev! I thought about using a thin sheet of brass but I thought this might be easier.
Thank you so much Peter! I like when my builds look a bit different from everyone else's but this is an extreme example.
Testing out some exterior colors for the D3A1. On the left hand side of the wing is AK Real Colors IJN Amber Grey (RC 303) and on the right is a 50/50 mix of Mr Hobby Aqueous RLM 02 (H70) and Hemp (H336).
I scanned the Infinity decal sheet so that I can create as many paint masks for the markings. I wanted to test the aircraft code of the machine that I'll be building. The decal scan was traced in AutoCAD, exported to a DXF file and printed out as a mask on the Silhouette Portrait cutter. Mr Color IJN Markings Red (C385) was used.
Infinity molds the prop spinner in three separate parts but it is still overly simplified.
Using photo references, I dressed up the hub a bit.
-
 Thunnus got a reaction from D.B. Andrus in Infinity Models 1/32 Aichi D3A1 Type 99
Thanks Kev! I thought about using a thin sheet of brass but I thought this might be easier.
Thank you so much Peter! I like when my builds look a bit different from everyone else's but this is an extreme example.
Testing out some exterior colors for the D3A1. On the left hand side of the wing is AK Real Colors IJN Amber Grey (RC 303) and on the right is a 50/50 mix of Mr Hobby Aqueous RLM 02 (H70) and Hemp (H336).
I scanned the Infinity decal sheet so that I can create as many paint masks for the markings. I wanted to test the aircraft code of the machine that I'll be building. The decal scan was traced in AutoCAD, exported to a DXF file and printed out as a mask on the Silhouette Portrait cutter. Mr Color IJN Markings Red (C385) was used.
Infinity molds the prop spinner in three separate parts but it is still overly simplified.
Using photo references, I dressed up the hub a bit.
-
Thunnus got a reaction from denders in Infinity Models 1/32 Aichi D3A1 Type 99
That's exactly what I'm doing. I'm taking a Trumpeter kit and turning it into a Hasegawa molding! Looking at the pillowed look, I get the feeling that it may been unintentional on Infinity's part. It looks a lot like the Italeri F-86 wings and I've read that the pillowed look on those wings were a result of insufficient molding pressure?
Yes, it's a very sharp and revealing photo and I was struck by the integrity of the fuselage panels compared to what is presented in the Infinity moldings. It gave me the idea to try something different with this build than I normally do. Cuz I'm the guy who is usually ADDING rivets to my aircraft!
Yeah, it's tiresome but I'm liking the result so I'll try to keep going!
The BSI works really well... I think you'll like it Kevin!
Jumping over to the engine, I've painted the components separately.
The main shades were airbrushed and then details were picked out with brush painting. The parts were covered with a clear gloss, given a pastel wash and then sealed with a flat coat.
Before I assemble the engine, I use short strands of lead wire for the ignition wires. These will be painted brown and then oriented to the back of the cylinders. Since the view is blocked, I won't go through the trouble of connecting the terminal ends to the ignition ring in the rear of the engine.
The engine components are glued together. It took a bit of futzing to get the exhaust tubing to attach to the back of the cylinders but the glue joints were soft enough to gently adjust the stems to fit.
I want to check the position of the engine to the fuselage. It looks ok so far but care will be need to taken when gluing the engine in place since orientation is not rock solid. I plan on gluing the engine after the painting stage.
The engine cowling attaches to the bottom of the fuselage so I checked that fit as well. Luckily, the exhaust stubs exit in the correct location.
The cowling opening is very big so there is a nice view into the engine compartment from the front.
-
 Thunnus got a reaction from Elger in Infinity Models 1/32 Aichi D3A1 Type 99
Thanks Matt! The exhaust pipes were airbrushed. A mixture of Alclad Steel and Polished Aluminum for the main body of the exhaust structure. The ends were highlighted with Alclad Exhaust Manifold. Black was sprayed into the hollow end as well as the outer tips to finish the look.
There was something that I noticed on the archive photo of the Pearl Harbor D3A1 that I wanted to address. Note the two square hatches on the top of the fuselage behind the engine.
Compare with the photo of the Pearl Harbor D3A1...
It's obviously a single rectangular hatch with rounded corners and not two square ones. Big raised rivets on it too. I don't know enough about this aircraft to know if there was any variation in these hatches but the photo is clear. I decided to try and convert the double hatches to a single one. It's trickier than a normal scribed panel because panel is slightly raised. I had scribed the outline of the two squares previously. First, I drilled out the hole in front of the hatch, which is also noticeable in the photo. I think it is a vent for the cowling gun.
Plastic is pretty thick here so I thinned the plastic around the hole with a rotary tool.
The vertical boundary of the hatch was marked off using tape. I used black CA glue to fill the gap between the two square hatches. It is viscous enough to retain its height and I don't have to deal with the waiting and shrinkage issues if I used a liquid putty like Mr Surfacer.
An oscillating sander like the D400 is helpful in leveling off the black CA glue after I've zapped it with activator.
The tape is removed and the final sanding is done by hand.
A scribing template and needle was used to round off the corners of the hatch. The Infinity plastic is very soft and it's possible that the plastic can be pushed during the corner scribing and closing the sharp corner without further work. I got lucky on a few corners but had to fill the others with micro applications of Mr Surfacer.
To top off the hatch, I applied raised rivet decals from Archers.
A coat of Mr Primer Surfacer 1000 to reveal the finished hatch. This work is being repeated on the other side.
A few more views of the finished engine. Some of the ignition wiring and exhaust manifold pipe connections needed to be touched up with fresh paint.
Engine is kinda shiny... I may shoot with a bit more flat.