

RichieB
-
Posts
212 -
Joined
-
Last visited
Reputation Activity
-

 RichieB got a reaction from Uilleann in 1/32 F-16C 'Flogger' - In flight and lit up
Well here we go again, this time I'm indulging in a Tamiya kit. Much as I like the challenge of upgrading the delights of Revell's offerings, sometimes you just want something a little less demanding. Such as the Tamiya F-16C which judging by all the accounts I've read, is a superb kit. Squirrelled away in my stash is the Thunderbirds offering which allows an earlier Blk32 aircraft which differs from the mainstream Blk50 kit by having the P&W engine, normal (small) shock inlet, lightweight gear with the original wheels and flat MLG doors. However, as it is the Thunderbirds kit it also does not come with weapons and some of the pylon details which I will need for my chosen subject.
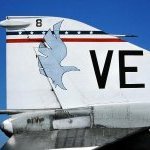
I've always liked aggressor schemes (who doesn't!), in fact anything that gets away from monotone (grey) colour schemes and there is no doubting that the 64AGRS based out of Nellis has some of the most interesting schemes around. I'm pretty much a fan of all the schemes but for this one I've plumbed for the 'Flogger' scheme as pictured on the lead aircraft below. Crucially, the Thunderbirds kit comes with early sidewinder rails which is right for the era I'm looking at i.e. pre-AMRAAM.
(USAF)
Now I don't want to make it too easy so this will be an in-flight display and I will be adding lights to this one as well but most of the kit will be out of the box. Except for the engine exhaust which comes courtesy of ResKit (love their stuff). Oh and some ResKit winders, will probably need an ALQ-188 and ACMI pod as well. Maybe some cockpit enhancements from Quinta and might treat myself to some goodies from Kopecky who does loads of goodies for the F-16. Yeah, pretty much out of the box.
Right, so where do we start.
With the intake of course. That's the thing with adding lights, you can't build it in the order Tamiya would like you to. Because you need to add things like wires and batteries you also need to plan the layout of how you will connect it altogether noting that once you close a section up, that's it - no more access. The F-16 has some nav lights on each side of the intake. These can be added by drilling out a small hole and adding a very small LED. To avoid light overspill (a real problem with bright LEDs) a silver foil backing is used. The outside will be first painted black to kill light overspill. Luckily the actual intake has a small enough gap for the wires to go past and feed back into the fuselage.
Another tight spot for lighting is the tail where the F-16 has a large anti-col beacon at the top and a smaller light at the base. Again, a small white LED was used with silver foil to limit overspill. The clear part sits on top of the LED and the wires run down the back of the rudder. I had to do this as this was a second hand kit and the tail had already been glued together.
In addition, the started kit had also had the base of the fin cut off in anticipation of reworking to an F-16A by the previous owner. I therefore needed to reinstate the original base using a thick piece of card as a strut to provide some strength. In addition to the wire, a thin fibre optic wire was run from the LED light down the base of the rudder and out of the base of the tail.
Interestingly, I'm pretty sure Tamiya had plans to add their own lighting kit to this model. The wing tip photo below shows a groove carved into the inside of the wing which leads to the point where the wing nav lights are and the design of that clear part is definitely with lighting in mind. I know because I was going to do the same to fit the lighting I had in mind. Thank you Tamiya for making that part of the kit construction slightly easier!
Well its a start. I should point out that progress is inversely proportional to the many demands of family and life in general so please be patient. We will get there in the end.
-
 RichieB got a reaction from Martinnfb in 1/32 F-16C 'Flogger' - In flight and lit up
Well here we go again, this time I'm indulging in a Tamiya kit. Much as I like the challenge of upgrading the delights of Revell's offerings, sometimes you just want something a little less demanding. Such as the Tamiya F-16C which judging by all the accounts I've read, is a superb kit. Squirrelled away in my stash is the Thunderbirds offering which allows an earlier Blk32 aircraft which differs from the mainstream Blk50 kit by having the P&W engine, normal (small) shock inlet, lightweight gear with the original wheels and flat MLG doors. However, as it is the Thunderbirds kit it also does not come with weapons and some of the pylon details which I will need for my chosen subject.
I've always liked aggressor schemes (who doesn't!), in fact anything that gets away from monotone (grey) colour schemes and there is no doubting that the 64AGRS based out of Nellis has some of the most interesting schemes around. I'm pretty much a fan of all the schemes but for this one I've plumbed for the 'Flogger' scheme as pictured on the lead aircraft below. Crucially, the Thunderbirds kit comes with early sidewinder rails which is right for the era I'm looking at i.e. pre-AMRAAM.
(USAF)
Now I don't want to make it too easy so this will be an in-flight display and I will be adding lights to this one as well but most of the kit will be out of the box. Except for the engine exhaust which comes courtesy of ResKit (love their stuff). Oh and some ResKit winders, will probably need an ALQ-188 and ACMI pod as well. Maybe some cockpit enhancements from Quinta and might treat myself to some goodies from Kopecky who does loads of goodies for the F-16. Yeah, pretty much out of the box.
Right, so where do we start.
With the intake of course. That's the thing with adding lights, you can't build it in the order Tamiya would like you to. Because you need to add things like wires and batteries you also need to plan the layout of how you will connect it altogether noting that once you close a section up, that's it - no more access. The F-16 has some nav lights on each side of the intake. These can be added by drilling out a small hole and adding a very small LED. To avoid light overspill (a real problem with bright LEDs) a silver foil backing is used. The outside will be first painted black to kill light overspill. Luckily the actual intake has a small enough gap for the wires to go past and feed back into the fuselage.
Another tight spot for lighting is the tail where the F-16 has a large anti-col beacon at the top and a smaller light at the base. Again, a small white LED was used with silver foil to limit overspill. The clear part sits on top of the LED and the wires run down the back of the rudder. I had to do this as this was a second hand kit and the tail had already been glued together.
In addition, the started kit had also had the base of the fin cut off in anticipation of reworking to an F-16A by the previous owner. I therefore needed to reinstate the original base using a thick piece of card as a strut to provide some strength. In addition to the wire, a thin fibre optic wire was run from the LED light down the base of the rudder and out of the base of the tail.
Interestingly, I'm pretty sure Tamiya had plans to add their own lighting kit to this model. The wing tip photo below shows a groove carved into the inside of the wing which leads to the point where the wing nav lights are and the design of that clear part is definitely with lighting in mind. I know because I was going to do the same to fit the lighting I had in mind. Thank you Tamiya for making that part of the kit construction slightly easier!
Well its a start. I should point out that progress is inversely proportional to the many demands of family and life in general so please be patient. We will get there in the end.
-
 RichieB got a reaction from Landrotten Highlander in 1/32 F-16C 'Flogger' - In flight and lit up
Well here we go again, this time I'm indulging in a Tamiya kit. Much as I like the challenge of upgrading the delights of Revell's offerings, sometimes you just want something a little less demanding. Such as the Tamiya F-16C which judging by all the accounts I've read, is a superb kit. Squirrelled away in my stash is the Thunderbirds offering which allows an earlier Blk32 aircraft which differs from the mainstream Blk50 kit by having the P&W engine, normal (small) shock inlet, lightweight gear with the original wheels and flat MLG doors. However, as it is the Thunderbirds kit it also does not come with weapons and some of the pylon details which I will need for my chosen subject.
I've always liked aggressor schemes (who doesn't!), in fact anything that gets away from monotone (grey) colour schemes and there is no doubting that the 64AGRS based out of Nellis has some of the most interesting schemes around. I'm pretty much a fan of all the schemes but for this one I've plumbed for the 'Flogger' scheme as pictured on the lead aircraft below. Crucially, the Thunderbirds kit comes with early sidewinder rails which is right for the era I'm looking at i.e. pre-AMRAAM.
(USAF)
Now I don't want to make it too easy so this will be an in-flight display and I will be adding lights to this one as well but most of the kit will be out of the box. Except for the engine exhaust which comes courtesy of ResKit (love their stuff). Oh and some ResKit winders, will probably need an ALQ-188 and ACMI pod as well. Maybe some cockpit enhancements from Quinta and might treat myself to some goodies from Kopecky who does loads of goodies for the F-16. Yeah, pretty much out of the box.
Right, so where do we start.
With the intake of course. That's the thing with adding lights, you can't build it in the order Tamiya would like you to. Because you need to add things like wires and batteries you also need to plan the layout of how you will connect it altogether noting that once you close a section up, that's it - no more access. The F-16 has some nav lights on each side of the intake. These can be added by drilling out a small hole and adding a very small LED. To avoid light overspill (a real problem with bright LEDs) a silver foil backing is used. The outside will be first painted black to kill light overspill. Luckily the actual intake has a small enough gap for the wires to go past and feed back into the fuselage.
Another tight spot for lighting is the tail where the F-16 has a large anti-col beacon at the top and a smaller light at the base. Again, a small white LED was used with silver foil to limit overspill. The clear part sits on top of the LED and the wires run down the back of the rudder. I had to do this as this was a second hand kit and the tail had already been glued together.
In addition, the started kit had also had the base of the fin cut off in anticipation of reworking to an F-16A by the previous owner. I therefore needed to reinstate the original base using a thick piece of card as a strut to provide some strength. In addition to the wire, a thin fibre optic wire was run from the LED light down the base of the rudder and out of the base of the tail.
Interestingly, I'm pretty sure Tamiya had plans to add their own lighting kit to this model. The wing tip photo below shows a groove carved into the inside of the wing which leads to the point where the wing nav lights are and the design of that clear part is definitely with lighting in mind. I know because I was going to do the same to fit the lighting I had in mind. Thank you Tamiya for making that part of the kit construction slightly easier!
Well its a start. I should point out that progress is inversely proportional to the many demands of family and life in general so please be patient. We will get there in the end.
-
 RichieB got a reaction from matt_1185 in 1/32 F-16C 'Flogger' - In flight and lit up
Well here we go again, this time I'm indulging in a Tamiya kit. Much as I like the challenge of upgrading the delights of Revell's offerings, sometimes you just want something a little less demanding. Such as the Tamiya F-16C which judging by all the accounts I've read, is a superb kit. Squirrelled away in my stash is the Thunderbirds offering which allows an earlier Blk32 aircraft which differs from the mainstream Blk50 kit by having the P&W engine, normal (small) shock inlet, lightweight gear with the original wheels and flat MLG doors. However, as it is the Thunderbirds kit it also does not come with weapons and some of the pylon details which I will need for my chosen subject.
I've always liked aggressor schemes (who doesn't!), in fact anything that gets away from monotone (grey) colour schemes and there is no doubting that the 64AGRS based out of Nellis has some of the most interesting schemes around. I'm pretty much a fan of all the schemes but for this one I've plumbed for the 'Flogger' scheme as pictured on the lead aircraft below. Crucially, the Thunderbirds kit comes with early sidewinder rails which is right for the era I'm looking at i.e. pre-AMRAAM.
(USAF)
Now I don't want to make it too easy so this will be an in-flight display and I will be adding lights to this one as well but most of the kit will be out of the box. Except for the engine exhaust which comes courtesy of ResKit (love their stuff). Oh and some ResKit winders, will probably need an ALQ-188 and ACMI pod as well. Maybe some cockpit enhancements from Quinta and might treat myself to some goodies from Kopecky who does loads of goodies for the F-16. Yeah, pretty much out of the box.
Right, so where do we start.
With the intake of course. That's the thing with adding lights, you can't build it in the order Tamiya would like you to. Because you need to add things like wires and batteries you also need to plan the layout of how you will connect it altogether noting that once you close a section up, that's it - no more access. The F-16 has some nav lights on each side of the intake. These can be added by drilling out a small hole and adding a very small LED. To avoid light overspill (a real problem with bright LEDs) a silver foil backing is used. The outside will be first painted black to kill light overspill. Luckily the actual intake has a small enough gap for the wires to go past and feed back into the fuselage.
Another tight spot for lighting is the tail where the F-16 has a large anti-col beacon at the top and a smaller light at the base. Again, a small white LED was used with silver foil to limit overspill. The clear part sits on top of the LED and the wires run down the back of the rudder. I had to do this as this was a second hand kit and the tail had already been glued together.
In addition, the started kit had also had the base of the fin cut off in anticipation of reworking to an F-16A by the previous owner. I therefore needed to reinstate the original base using a thick piece of card as a strut to provide some strength. In addition to the wire, a thin fibre optic wire was run from the LED light down the base of the rudder and out of the base of the tail.
Interestingly, I'm pretty sure Tamiya had plans to add their own lighting kit to this model. The wing tip photo below shows a groove carved into the inside of the wing which leads to the point where the wing nav lights are and the design of that clear part is definitely with lighting in mind. I know because I was going to do the same to fit the lighting I had in mind. Thank you Tamiya for making that part of the kit construction slightly easier!
Well its a start. I should point out that progress is inversely proportional to the many demands of family and life in general so please be patient. We will get there in the end.
-
 RichieB got a reaction from JayBee in 1/32 F-16C 'Flogger' - In flight and lit up
Well here we go again, this time I'm indulging in a Tamiya kit. Much as I like the challenge of upgrading the delights of Revell's offerings, sometimes you just want something a little less demanding. Such as the Tamiya F-16C which judging by all the accounts I've read, is a superb kit. Squirrelled away in my stash is the Thunderbirds offering which allows an earlier Blk32 aircraft which differs from the mainstream Blk50 kit by having the P&W engine, normal (small) shock inlet, lightweight gear with the original wheels and flat MLG doors. However, as it is the Thunderbirds kit it also does not come with weapons and some of the pylon details which I will need for my chosen subject.
I've always liked aggressor schemes (who doesn't!), in fact anything that gets away from monotone (grey) colour schemes and there is no doubting that the 64AGRS based out of Nellis has some of the most interesting schemes around. I'm pretty much a fan of all the schemes but for this one I've plumbed for the 'Flogger' scheme as pictured on the lead aircraft below. Crucially, the Thunderbirds kit comes with early sidewinder rails which is right for the era I'm looking at i.e. pre-AMRAAM.
(USAF)
Now I don't want to make it too easy so this will be an in-flight display and I will be adding lights to this one as well but most of the kit will be out of the box. Except for the engine exhaust which comes courtesy of ResKit (love their stuff). Oh and some ResKit winders, will probably need an ALQ-188 and ACMI pod as well. Maybe some cockpit enhancements from Quinta and might treat myself to some goodies from Kopecky who does loads of goodies for the F-16. Yeah, pretty much out of the box.
Right, so where do we start.
With the intake of course. That's the thing with adding lights, you can't build it in the order Tamiya would like you to. Because you need to add things like wires and batteries you also need to plan the layout of how you will connect it altogether noting that once you close a section up, that's it - no more access. The F-16 has some nav lights on each side of the intake. These can be added by drilling out a small hole and adding a very small LED. To avoid light overspill (a real problem with bright LEDs) a silver foil backing is used. The outside will be first painted black to kill light overspill. Luckily the actual intake has a small enough gap for the wires to go past and feed back into the fuselage.
Another tight spot for lighting is the tail where the F-16 has a large anti-col beacon at the top and a smaller light at the base. Again, a small white LED was used with silver foil to limit overspill. The clear part sits on top of the LED and the wires run down the back of the rudder. I had to do this as this was a second hand kit and the tail had already been glued together.
In addition, the started kit had also had the base of the fin cut off in anticipation of reworking to an F-16A by the previous owner. I therefore needed to reinstate the original base using a thick piece of card as a strut to provide some strength. In addition to the wire, a thin fibre optic wire was run from the LED light down the base of the rudder and out of the base of the tail.
Interestingly, I'm pretty sure Tamiya had plans to add their own lighting kit to this model. The wing tip photo below shows a groove carved into the inside of the wing which leads to the point where the wing nav lights are and the design of that clear part is definitely with lighting in mind. I know because I was going to do the same to fit the lighting I had in mind. Thank you Tamiya for making that part of the kit construction slightly easier!
Well its a start. I should point out that progress is inversely proportional to the many demands of family and life in general so please be patient. We will get there in the end.
-
 RichieB got a reaction from themongoose in 1/32 F-16C 'Flogger' - In flight and lit up
Well here we go again, this time I'm indulging in a Tamiya kit. Much as I like the challenge of upgrading the delights of Revell's offerings, sometimes you just want something a little less demanding. Such as the Tamiya F-16C which judging by all the accounts I've read, is a superb kit. Squirrelled away in my stash is the Thunderbirds offering which allows an earlier Blk32 aircraft which differs from the mainstream Blk50 kit by having the P&W engine, normal (small) shock inlet, lightweight gear with the original wheels and flat MLG doors. However, as it is the Thunderbirds kit it also does not come with weapons and some of the pylon details which I will need for my chosen subject.
I've always liked aggressor schemes (who doesn't!), in fact anything that gets away from monotone (grey) colour schemes and there is no doubting that the 64AGRS based out of Nellis has some of the most interesting schemes around. I'm pretty much a fan of all the schemes but for this one I've plumbed for the 'Flogger' scheme as pictured on the lead aircraft below. Crucially, the Thunderbirds kit comes with early sidewinder rails which is right for the era I'm looking at i.e. pre-AMRAAM.
(USAF)
Now I don't want to make it too easy so this will be an in-flight display and I will be adding lights to this one as well but most of the kit will be out of the box. Except for the engine exhaust which comes courtesy of ResKit (love their stuff). Oh and some ResKit winders, will probably need an ALQ-188 and ACMI pod as well. Maybe some cockpit enhancements from Quinta and might treat myself to some goodies from Kopecky who does loads of goodies for the F-16. Yeah, pretty much out of the box.
Right, so where do we start.
With the intake of course. That's the thing with adding lights, you can't build it in the order Tamiya would like you to. Because you need to add things like wires and batteries you also need to plan the layout of how you will connect it altogether noting that once you close a section up, that's it - no more access. The F-16 has some nav lights on each side of the intake. These can be added by drilling out a small hole and adding a very small LED. To avoid light overspill (a real problem with bright LEDs) a silver foil backing is used. The outside will be first painted black to kill light overspill. Luckily the actual intake has a small enough gap for the wires to go past and feed back into the fuselage.
Another tight spot for lighting is the tail where the F-16 has a large anti-col beacon at the top and a smaller light at the base. Again, a small white LED was used with silver foil to limit overspill. The clear part sits on top of the LED and the wires run down the back of the rudder. I had to do this as this was a second hand kit and the tail had already been glued together.
In addition, the started kit had also had the base of the fin cut off in anticipation of reworking to an F-16A by the previous owner. I therefore needed to reinstate the original base using a thick piece of card as a strut to provide some strength. In addition to the wire, a thin fibre optic wire was run from the LED light down the base of the rudder and out of the base of the tail.
Interestingly, I'm pretty sure Tamiya had plans to add their own lighting kit to this model. The wing tip photo below shows a groove carved into the inside of the wing which leads to the point where the wing nav lights are and the design of that clear part is definitely with lighting in mind. I know because I was going to do the same to fit the lighting I had in mind. Thank you Tamiya for making that part of the kit construction slightly easier!
Well its a start. I should point out that progress is inversely proportional to the many demands of family and life in general so please be patient. We will get there in the end.
-
 RichieB got a reaction from A-10LOADER in 1/32 F-16C 'Flogger' - In flight and lit up
Well here we go again, this time I'm indulging in a Tamiya kit. Much as I like the challenge of upgrading the delights of Revell's offerings, sometimes you just want something a little less demanding. Such as the Tamiya F-16C which judging by all the accounts I've read, is a superb kit. Squirrelled away in my stash is the Thunderbirds offering which allows an earlier Blk32 aircraft which differs from the mainstream Blk50 kit by having the P&W engine, normal (small) shock inlet, lightweight gear with the original wheels and flat MLG doors. However, as it is the Thunderbirds kit it also does not come with weapons and some of the pylon details which I will need for my chosen subject.
I've always liked aggressor schemes (who doesn't!), in fact anything that gets away from monotone (grey) colour schemes and there is no doubting that the 64AGRS based out of Nellis has some of the most interesting schemes around. I'm pretty much a fan of all the schemes but for this one I've plumbed for the 'Flogger' scheme as pictured on the lead aircraft below. Crucially, the Thunderbirds kit comes with early sidewinder rails which is right for the era I'm looking at i.e. pre-AMRAAM.
(USAF)
Now I don't want to make it too easy so this will be an in-flight display and I will be adding lights to this one as well but most of the kit will be out of the box. Except for the engine exhaust which comes courtesy of ResKit (love their stuff). Oh and some ResKit winders, will probably need an ALQ-188 and ACMI pod as well. Maybe some cockpit enhancements from Quinta and might treat myself to some goodies from Kopecky who does loads of goodies for the F-16. Yeah, pretty much out of the box.
Right, so where do we start.
With the intake of course. That's the thing with adding lights, you can't build it in the order Tamiya would like you to. Because you need to add things like wires and batteries you also need to plan the layout of how you will connect it altogether noting that once you close a section up, that's it - no more access. The F-16 has some nav lights on each side of the intake. These can be added by drilling out a small hole and adding a very small LED. To avoid light overspill (a real problem with bright LEDs) a silver foil backing is used. The outside will be first painted black to kill light overspill. Luckily the actual intake has a small enough gap for the wires to go past and feed back into the fuselage.
Another tight spot for lighting is the tail where the F-16 has a large anti-col beacon at the top and a smaller light at the base. Again, a small white LED was used with silver foil to limit overspill. The clear part sits on top of the LED and the wires run down the back of the rudder. I had to do this as this was a second hand kit and the tail had already been glued together.
In addition, the started kit had also had the base of the fin cut off in anticipation of reworking to an F-16A by the previous owner. I therefore needed to reinstate the original base using a thick piece of card as a strut to provide some strength. In addition to the wire, a thin fibre optic wire was run from the LED light down the base of the rudder and out of the base of the tail.
Interestingly, I'm pretty sure Tamiya had plans to add their own lighting kit to this model. The wing tip photo below shows a groove carved into the inside of the wing which leads to the point where the wing nav lights are and the design of that clear part is definitely with lighting in mind. I know because I was going to do the same to fit the lighting I had in mind. Thank you Tamiya for making that part of the kit construction slightly easier!
Well its a start. I should point out that progress is inversely proportional to the many demands of family and life in general so please be patient. We will get there in the end.
-
 RichieB got a reaction from VintageEagle in 1/32 F-16C 'Flogger' - In flight and lit up
Well here we go again, this time I'm indulging in a Tamiya kit. Much as I like the challenge of upgrading the delights of Revell's offerings, sometimes you just want something a little less demanding. Such as the Tamiya F-16C which judging by all the accounts I've read, is a superb kit. Squirrelled away in my stash is the Thunderbirds offering which allows an earlier Blk32 aircraft which differs from the mainstream Blk50 kit by having the P&W engine, normal (small) shock inlet, lightweight gear with the original wheels and flat MLG doors. However, as it is the Thunderbirds kit it also does not come with weapons and some of the pylon details which I will need for my chosen subject.
I've always liked aggressor schemes (who doesn't!), in fact anything that gets away from monotone (grey) colour schemes and there is no doubting that the 64AGRS based out of Nellis has some of the most interesting schemes around. I'm pretty much a fan of all the schemes but for this one I've plumbed for the 'Flogger' scheme as pictured on the lead aircraft below. Crucially, the Thunderbirds kit comes with early sidewinder rails which is right for the era I'm looking at i.e. pre-AMRAAM.
(USAF)
Now I don't want to make it too easy so this will be an in-flight display and I will be adding lights to this one as well but most of the kit will be out of the box. Except for the engine exhaust which comes courtesy of ResKit (love their stuff). Oh and some ResKit winders, will probably need an ALQ-188 and ACMI pod as well. Maybe some cockpit enhancements from Quinta and might treat myself to some goodies from Kopecky who does loads of goodies for the F-16. Yeah, pretty much out of the box.
Right, so where do we start.
With the intake of course. That's the thing with adding lights, you can't build it in the order Tamiya would like you to. Because you need to add things like wires and batteries you also need to plan the layout of how you will connect it altogether noting that once you close a section up, that's it - no more access. The F-16 has some nav lights on each side of the intake. These can be added by drilling out a small hole and adding a very small LED. To avoid light overspill (a real problem with bright LEDs) a silver foil backing is used. The outside will be first painted black to kill light overspill. Luckily the actual intake has a small enough gap for the wires to go past and feed back into the fuselage.
Another tight spot for lighting is the tail where the F-16 has a large anti-col beacon at the top and a smaller light at the base. Again, a small white LED was used with silver foil to limit overspill. The clear part sits on top of the LED and the wires run down the back of the rudder. I had to do this as this was a second hand kit and the tail had already been glued together.
In addition, the started kit had also had the base of the fin cut off in anticipation of reworking to an F-16A by the previous owner. I therefore needed to reinstate the original base using a thick piece of card as a strut to provide some strength. In addition to the wire, a thin fibre optic wire was run from the LED light down the base of the rudder and out of the base of the tail.
Interestingly, I'm pretty sure Tamiya had plans to add their own lighting kit to this model. The wing tip photo below shows a groove carved into the inside of the wing which leads to the point where the wing nav lights are and the design of that clear part is definitely with lighting in mind. I know because I was going to do the same to fit the lighting I had in mind. Thank you Tamiya for making that part of the kit construction slightly easier!
Well its a start. I should point out that progress is inversely proportional to the many demands of family and life in general so please be patient. We will get there in the end.
-
 RichieB got a reaction from Alain Gadbois in 1/32 F-16C 'Flogger' - In flight and lit up
Well here we go again, this time I'm indulging in a Tamiya kit. Much as I like the challenge of upgrading the delights of Revell's offerings, sometimes you just want something a little less demanding. Such as the Tamiya F-16C which judging by all the accounts I've read, is a superb kit. Squirrelled away in my stash is the Thunderbirds offering which allows an earlier Blk32 aircraft which differs from the mainstream Blk50 kit by having the P&W engine, normal (small) shock inlet, lightweight gear with the original wheels and flat MLG doors. However, as it is the Thunderbirds kit it also does not come with weapons and some of the pylon details which I will need for my chosen subject.
I've always liked aggressor schemes (who doesn't!), in fact anything that gets away from monotone (grey) colour schemes and there is no doubting that the 64AGRS based out of Nellis has some of the most interesting schemes around. I'm pretty much a fan of all the schemes but for this one I've plumbed for the 'Flogger' scheme as pictured on the lead aircraft below. Crucially, the Thunderbirds kit comes with early sidewinder rails which is right for the era I'm looking at i.e. pre-AMRAAM.
(USAF)
Now I don't want to make it too easy so this will be an in-flight display and I will be adding lights to this one as well but most of the kit will be out of the box. Except for the engine exhaust which comes courtesy of ResKit (love their stuff). Oh and some ResKit winders, will probably need an ALQ-188 and ACMI pod as well. Maybe some cockpit enhancements from Quinta and might treat myself to some goodies from Kopecky who does loads of goodies for the F-16. Yeah, pretty much out of the box.
Right, so where do we start.
With the intake of course. That's the thing with adding lights, you can't build it in the order Tamiya would like you to. Because you need to add things like wires and batteries you also need to plan the layout of how you will connect it altogether noting that once you close a section up, that's it - no more access. The F-16 has some nav lights on each side of the intake. These can be added by drilling out a small hole and adding a very small LED. To avoid light overspill (a real problem with bright LEDs) a silver foil backing is used. The outside will be first painted black to kill light overspill. Luckily the actual intake has a small enough gap for the wires to go past and feed back into the fuselage.
Another tight spot for lighting is the tail where the F-16 has a large anti-col beacon at the top and a smaller light at the base. Again, a small white LED was used with silver foil to limit overspill. The clear part sits on top of the LED and the wires run down the back of the rudder. I had to do this as this was a second hand kit and the tail had already been glued together.
In addition, the started kit had also had the base of the fin cut off in anticipation of reworking to an F-16A by the previous owner. I therefore needed to reinstate the original base using a thick piece of card as a strut to provide some strength. In addition to the wire, a thin fibre optic wire was run from the LED light down the base of the rudder and out of the base of the tail.
Interestingly, I'm pretty sure Tamiya had plans to add their own lighting kit to this model. The wing tip photo below shows a groove carved into the inside of the wing which leads to the point where the wing nav lights are and the design of that clear part is definitely with lighting in mind. I know because I was going to do the same to fit the lighting I had in mind. Thank you Tamiya for making that part of the kit construction slightly easier!
Well its a start. I should point out that progress is inversely proportional to the many demands of family and life in general so please be patient. We will get there in the end.
-
RichieB reacted to Zola25 in 1/32 F-16AM "Dannebrog" Viper
Hi All
Yes, another F-16 - I cannot help it..
This is the Royal Danish Airforce F-16AM E-191 - otherwise known as "The Mighty Dannebrog Viper".
E-191 was painted like the Danish flag "Dannebrog" in 2019 to celebrate the 800th anniversary of the Danish flag. It is the oldest unaltered flag in the world and something that we Danes are mighty proud of. Not every country use their flag for celebrations but in Denmark it is used in abundance to celebrate anything and everything so this paintjob turned out to be rather popular. People who have no interest in aviation at all seemed to all know of the existence of this Viper. Because of its popularity, it was decided to leave her in this livery until it was to be retired or sold as the F-35´s would make their way into service, and it has flown in this paint job ever since. Both as an airshow display Viper and on active duty on QRA. You have to wonder what the Russian pilots think when they are intercepted over the Baltic Sea by this F-16...
I managed to get myself an invitation to the recent ceremony marking the first F-35´s arriving in Denmark. "Dannebrog" was on static display along with the display pilot "TEO". He let slip that it would be the last time that we would be able to see her in these colors as it was scheduled to be repainted in Grey. Someone asked if it was because the aircraft would be donated to Ukraine and the reply was just a polite smile..
The model is the Tamiya Thunderbird kit converted to an F-16AM. I used a few other aftermarket items to complete the build:
PWMP Tail conversion Cross Delta strengthening plates Reed Oak Pilot Quickboost Old Style stabilators Reskit Sidewinders Phase Hangar Resin JHMCS Sensor Custom Masks in cooperation with DN Models
I reached out to DN Models @Eagle Driver to see if they could help me design a paint mask set. I cannot thank them enough for dropping everything else to make this happen. Within a week of emailing back and forth with test designs we had a complete set of masks that worked. How cool is that!!
It is not the easiest thing to work with bright colors like Red and White and keep some tonal variation without ending up with that "toy look", but I think it turned out ok in the end. I am super happy to have this iconic Viper on display on the shelf. I hope you like it too..
The Dannebrog Display Team have a facebook site if you want to see more of this aircraft and what they are up to: F16 Solo Display
/Niels
PS: The canopy is not glued into place which is why it sits a little proud in some photos
-
RichieB reacted to Ali62 in Scale Model World 2023 and the future plans
Just a short note here, to say and make my customers aware that I have taken the decision NOT to attend the show.
I took the decision a few weeks ago and notified the organisers. It was a difficult decision to make but in many ways I am glad that I did. The stress of keeping the orders rolling and trying to develop and release new sets in conjunction of trying to prepare for the show, all single handed was placing me under extreme pressure and stress, something that I am trying to avoid.
I am hoping now that this is clearing the way for me to bring out some of the long promised projects that I keep putting off and letting many of you down on. Not all may happen that fast , but I am certainly trying to work through them as best as I can. Added to this there are some fantastic new unannounced projects that are being worked on.
Here are the some of the projects that have been long promised, that I am still hoping to finish off as soon as I am able to.
1/24 scale Hellcat conversion for the Airix kit, to back date it to the -3, this will happen as I have had decal sheets printed and laying waiting for 2 years…… how bad is that.
1/32 scale engine and canopy upgrades for the Revell Beaufighter
1/32 A-7 Corsair stuff even though Reskit have announced and already are being out bits and pieces, I hope to still produce a few sets.
Added to this still hope to add more parts to sets for 1/32 Phantoms and BAC Lightnings.
There are many more sets and ideas that are in the background across scales so there will be new items across the main aircraft scales but there could be some surprises even down to 1/144 scale .
As many you would have seen from some of the new products Chad Summers (Flying S Models) is supporting and helping me to develop brand new products. (thanks Chad) I have already launched some of his products and although some are quite unique and more esoteric, they are being well received, and we are only pleased enough to bring more unusual sets to the modellers.
However Chad and I are working on a couple of brand new full kit ideas, the one is fairly well progressed, and this will be made announced in the next month or so. Once again we have ideas across the scales, and some projects may appear in more than on scale.
Well that is enough for now, please keep following my blog and the new releases as alway shared here on LSP.
cheers Ali
-
RichieB reacted to Jarda_Hajecek in 1/32 F-16D Hellenic Air Force, Academy
Happy to present recently completed Academy 1/32 F-16D of the Hellenic Air Force. One has to love the dirty Greek birds.
This was buddy/cooperation build with my friend fellow modeler Karim Bibi. Karim built the fuselage and few other bits and then a large box showed up from Beirut, Lebanon in my office and I completed the build, painting and weathering.
The base is Academy Sufa kit that in all fairness fits great and is a pleasure to build.
Aftermarket used:
Aires Wheel Wells
Reskit wheels and Exhaust Nozzle
Eduard photo etch seatbelts and few bits and bobs
Markings: roundels, tail number and some stencils are painted using cut masks and Eduard photo etched stencils. What could not be painted was done using kit decals and stencil sheet from ProCal in Greece.
Paints: Vallejo Model Air, AMMO, Mission Models
Weathering: Flory Models Wash, AMMO washes and Oilbrushers, AK Washes and Weathering Pencils
All in all a very pleasant build.
-
 RichieB got a reaction from Anthony in NZ in 1/32 Revell F-4E 50TFW - In-Flight and Lit Up
Hi everyone,
This is the Revell 1/32 F-4E kit with some aftermarket help from GT Resin in the form of exhausts, belly strap and intakes, new nose from Sierra Hotel, Aim-9Js from Cutting Edge and a cockpit from Legend. The aim was to depict a late 70's USAFE jet from the 50TFW at Hahn AFB using AirDoc decals, put her in-flight and add some lighting to bring her to life. This was sort of a learning project for me, picking up on the excellent tips found in this forum, trying out some new techniques and learning from my mistakes (of which I made a few - see build for details!). In the end it took 2 and a half years to complete so the ratio of builds to acquires is way out of kilter. Anyway, on to the pics...
And with lights on...
Overall, a challenging but fun build of the impressive Phantom! Build thread is here ...
https://forum.largescaleplanes.com/index.php?/topic/58988-132-revell-f-4e-what-could-possibly-go-wrong/&page=1
Many thanks for looking!
-
 RichieB got a reaction from Cicciuzzo in 1/32 Revell F-4E 50TFW - In-Flight and Lit Up
Hi everyone,
This is the Revell 1/32 F-4E kit with some aftermarket help from GT Resin in the form of exhausts, belly strap and intakes, new nose from Sierra Hotel, Aim-9Js from Cutting Edge and a cockpit from Legend. The aim was to depict a late 70's USAFE jet from the 50TFW at Hahn AFB using AirDoc decals, put her in-flight and add some lighting to bring her to life. This was sort of a learning project for me, picking up on the excellent tips found in this forum, trying out some new techniques and learning from my mistakes (of which I made a few - see build for details!). In the end it took 2 and a half years to complete so the ratio of builds to acquires is way out of kilter. Anyway, on to the pics...
And with lights on...
Overall, a challenging but fun build of the impressive Phantom! Build thread is here ...
https://forum.largescaleplanes.com/index.php?/topic/58988-132-revell-f-4e-what-could-possibly-go-wrong/&page=1
Many thanks for looking!
-
RichieB got a reaction from Alain Gadbois in 1/32 Revell F-4E 50TFW - In-Flight and Lit Up
Hi everyone,
This is the Revell 1/32 F-4E kit with some aftermarket help from GT Resin in the form of exhausts, belly strap and intakes, new nose from Sierra Hotel, Aim-9Js from Cutting Edge and a cockpit from Legend. The aim was to depict a late 70's USAFE jet from the 50TFW at Hahn AFB using AirDoc decals, put her in-flight and add some lighting to bring her to life. This was sort of a learning project for me, picking up on the excellent tips found in this forum, trying out some new techniques and learning from my mistakes (of which I made a few - see build for details!). In the end it took 2 and a half years to complete so the ratio of builds to acquires is way out of kilter. Anyway, on to the pics...
And with lights on...
Overall, a challenging but fun build of the impressive Phantom! Build thread is here ...
https://forum.largescaleplanes.com/index.php?/topic/58988-132-revell-f-4e-what-could-possibly-go-wrong/&page=1
Many thanks for looking!
-
 RichieB got a reaction from Christa in 1/32 Revell F-4E 50TFW - In-Flight and Lit Up
Hi everyone,
This is the Revell 1/32 F-4E kit with some aftermarket help from GT Resin in the form of exhausts, belly strap and intakes, new nose from Sierra Hotel, Aim-9Js from Cutting Edge and a cockpit from Legend. The aim was to depict a late 70's USAFE jet from the 50TFW at Hahn AFB using AirDoc decals, put her in-flight and add some lighting to bring her to life. This was sort of a learning project for me, picking up on the excellent tips found in this forum, trying out some new techniques and learning from my mistakes (of which I made a few - see build for details!). In the end it took 2 and a half years to complete so the ratio of builds to acquires is way out of kilter. Anyway, on to the pics...
And with lights on...
Overall, a challenging but fun build of the impressive Phantom! Build thread is here ...
https://forum.largescaleplanes.com/index.php?/topic/58988-132-revell-f-4e-what-could-possibly-go-wrong/&page=1
Many thanks for looking!
-
 RichieB got a reaction from Sturmbock in 1/32 Revell F-4E 50TFW - In-Flight and Lit Up
Hi everyone,
This is the Revell 1/32 F-4E kit with some aftermarket help from GT Resin in the form of exhausts, belly strap and intakes, new nose from Sierra Hotel, Aim-9Js from Cutting Edge and a cockpit from Legend. The aim was to depict a late 70's USAFE jet from the 50TFW at Hahn AFB using AirDoc decals, put her in-flight and add some lighting to bring her to life. This was sort of a learning project for me, picking up on the excellent tips found in this forum, trying out some new techniques and learning from my mistakes (of which I made a few - see build for details!). In the end it took 2 and a half years to complete so the ratio of builds to acquires is way out of kilter. Anyway, on to the pics...
And with lights on...
Overall, a challenging but fun build of the impressive Phantom! Build thread is here ...
https://forum.largescaleplanes.com/index.php?/topic/58988-132-revell-f-4e-what-could-possibly-go-wrong/&page=1
Many thanks for looking!
-
RichieB got a reaction from Martinnfb in 1/32 Revell F-4E 50TFW - In-Flight and Lit Up
Many thanks for all the very kind comments chaps.
Next up (95% sure!) is an early F-15B.
If anyone knows how to upload video from Flickr (tried the 'share link' method but it just copies the first image) please let me know and I'll post a quick video of the cockpit lighting!
Til next time..
-
RichieB got a reaction from Martinnfb in 1/32 Revell F-4E 50TFW - In-Flight and Lit Up
Many thanks for the very kind comments chaps, they are all greatly appreciated. This forum has been inspirational and informative in equal measure and a great showcase for the masses of talent out there that help make this such a pleasurable hobby. I commend anyone who has yet to start a build thread here to have a go, you will not regret it!
Ivan - love the photo!
Gerhard - The acrylic rods were heated in an oven to about 150 deg C then bent over a large tube. I had to do this over a number of attempts to avoid putting too much pressure on the rods when bending them. You may need a straight edge to straighten the ends so they fit in the holes neatly. Be aware that the rods I used were quite thick (10mm) to support all that weight (lots of resin bits) and they expanded to ~11mm so I had to file them back down at the ends!
-
 RichieB got a reaction from RBrown in 1/32 Revell F-4E 50TFW - In-Flight and Lit Up
Hi everyone,
This is the Revell 1/32 F-4E kit with some aftermarket help from GT Resin in the form of exhausts, belly strap and intakes, new nose from Sierra Hotel, Aim-9Js from Cutting Edge and a cockpit from Legend. The aim was to depict a late 70's USAFE jet from the 50TFW at Hahn AFB using AirDoc decals, put her in-flight and add some lighting to bring her to life. This was sort of a learning project for me, picking up on the excellent tips found in this forum, trying out some new techniques and learning from my mistakes (of which I made a few - see build for details!). In the end it took 2 and a half years to complete so the ratio of builds to acquires is way out of kilter. Anyway, on to the pics...
And with lights on...
Overall, a challenging but fun build of the impressive Phantom! Build thread is here ...
https://forum.largescaleplanes.com/index.php?/topic/58988-132-revell-f-4e-what-could-possibly-go-wrong/&page=1
Many thanks for looking!
-
RichieB got a reaction from Martinnfb in 1/32 Revell F-4E 50TFW - In-Flight and Lit Up
Hi everyone,
This is the Revell 1/32 F-4E kit with some aftermarket help from GT Resin in the form of exhausts, belly strap and intakes, new nose from Sierra Hotel, Aim-9Js from Cutting Edge and a cockpit from Legend. The aim was to depict a late 70's USAFE jet from the 50TFW at Hahn AFB using AirDoc decals, put her in-flight and add some lighting to bring her to life. This was sort of a learning project for me, picking up on the excellent tips found in this forum, trying out some new techniques and learning from my mistakes (of which I made a few - see build for details!). In the end it took 2 and a half years to complete so the ratio of builds to acquires is way out of kilter. Anyway, on to the pics...
And with lights on...
Overall, a challenging but fun build of the impressive Phantom! Build thread is here ...
https://forum.largescaleplanes.com/index.php?/topic/58988-132-revell-f-4e-what-could-possibly-go-wrong/&page=1
Many thanks for looking!
-
 RichieB got a reaction from Alex in 1/32 Revell F-4E 50TFW - In-Flight and Lit Up
Hi everyone,
This is the Revell 1/32 F-4E kit with some aftermarket help from GT Resin in the form of exhausts, belly strap and intakes, new nose from Sierra Hotel, Aim-9Js from Cutting Edge and a cockpit from Legend. The aim was to depict a late 70's USAFE jet from the 50TFW at Hahn AFB using AirDoc decals, put her in-flight and add some lighting to bring her to life. This was sort of a learning project for me, picking up on the excellent tips found in this forum, trying out some new techniques and learning from my mistakes (of which I made a few - see build for details!). In the end it took 2 and a half years to complete so the ratio of builds to acquires is way out of kilter. Anyway, on to the pics...
And with lights on...
Overall, a challenging but fun build of the impressive Phantom! Build thread is here ...
https://forum.largescaleplanes.com/index.php?/topic/58988-132-revell-f-4e-what-could-possibly-go-wrong/&page=1
Many thanks for looking!
-

 RichieB got a reaction from s00ntir in 1/32 Revell F-4E 50TFW - In-Flight and Lit Up
Hi everyone,
This is the Revell 1/32 F-4E kit with some aftermarket help from GT Resin in the form of exhausts, belly strap and intakes, new nose from Sierra Hotel, Aim-9Js from Cutting Edge and a cockpit from Legend. The aim was to depict a late 70's USAFE jet from the 50TFW at Hahn AFB using AirDoc decals, put her in-flight and add some lighting to bring her to life. This was sort of a learning project for me, picking up on the excellent tips found in this forum, trying out some new techniques and learning from my mistakes (of which I made a few - see build for details!). In the end it took 2 and a half years to complete so the ratio of builds to acquires is way out of kilter. Anyway, on to the pics...
And with lights on...
Overall, a challenging but fun build of the impressive Phantom! Build thread is here ...
https://forum.largescaleplanes.com/index.php?/topic/58988-132-revell-f-4e-what-could-possibly-go-wrong/&page=1
Many thanks for looking!
-
 RichieB got a reaction from Michael931080 in 1/32 Revell F-4E 50TFW - In-Flight and Lit Up
Hi everyone,
This is the Revell 1/32 F-4E kit with some aftermarket help from GT Resin in the form of exhausts, belly strap and intakes, new nose from Sierra Hotel, Aim-9Js from Cutting Edge and a cockpit from Legend. The aim was to depict a late 70's USAFE jet from the 50TFW at Hahn AFB using AirDoc decals, put her in-flight and add some lighting to bring her to life. This was sort of a learning project for me, picking up on the excellent tips found in this forum, trying out some new techniques and learning from my mistakes (of which I made a few - see build for details!). In the end it took 2 and a half years to complete so the ratio of builds to acquires is way out of kilter. Anyway, on to the pics...
And with lights on...
Overall, a challenging but fun build of the impressive Phantom! Build thread is here ...
https://forum.largescaleplanes.com/index.php?/topic/58988-132-revell-f-4e-what-could-possibly-go-wrong/&page=1
Many thanks for looking!
-
 RichieB got a reaction from Hartmann352 in 1/32 Revell F-4E 50TFW - In-Flight and Lit Up
Hi everyone,
This is the Revell 1/32 F-4E kit with some aftermarket help from GT Resin in the form of exhausts, belly strap and intakes, new nose from Sierra Hotel, Aim-9Js from Cutting Edge and a cockpit from Legend. The aim was to depict a late 70's USAFE jet from the 50TFW at Hahn AFB using AirDoc decals, put her in-flight and add some lighting to bring her to life. This was sort of a learning project for me, picking up on the excellent tips found in this forum, trying out some new techniques and learning from my mistakes (of which I made a few - see build for details!). In the end it took 2 and a half years to complete so the ratio of builds to acquires is way out of kilter. Anyway, on to the pics...
And with lights on...
Overall, a challenging but fun build of the impressive Phantom! Build thread is here ...
https://forum.largescaleplanes.com/index.php?/topic/58988-132-revell-f-4e-what-could-possibly-go-wrong/&page=1
Many thanks for looking!