-
Posts
906 -
Joined
-
Last visited
-
Days Won
4
Content Type
Profiles
Forums
Events
Everything posted by allthumbs
-
Once again, the Silicon Valley Scale Modelers chapter of IPMS have done us all a huge favor by posting hundreds, perhaps thousands, of images from the 2022 US Nats, including all category winners. Link
-
Any mention yet of the 2024 host city? edit: Madison, WI from another thread
-
Great looking F-15!
-
Many thanks guys for the timely and helpful replies! Rich
-
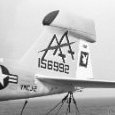
I found this picture on the Internet…no caption or explanatory details. It’s the first TA-4 I’ve seen with “hot dog” antenna atop vertical stab (besides the OA-4M). Seeking additional references: unit information, BuNo, other pics…
-
…and the fuselage halves here. But you might find this approach too cost prohibitive, especially considering the low price you paid for the original kit. Of course there’s the diy scratch building option, creating your own armor appliqués out of thin sheet styrene or soft metal, although this could prove tricky across compound curves and such. Good luck with your Spad project and let us know how it goes. Rich
-
A-1H lower wing section parts available here on US eBay.
-
Filthy good weathering!
-
Epic accomplishment. Congratulations Tom.
- 71 replies
-
- vacform
- tigger models
-
(and 1 more)
Tagged with:
-

Yet another Phantom Question - Inner Pylons
allthumbs replied to John1's topic in Aviation Discussion & Research
Indeed. Eduard produced an “exterior” set for the Tamiya F-4C/D which included pylon and missile launcher detail. Their website indicates it’s discontinued however. As you mention, a 3D printed set would be nice. Phase Hangar Resin did just such a thing in 1/48 recently. It’s a well detailed and accurate set, but hard-to-remove layer lines mar the pylon exterior surfaces. An upside to the Tamiya pylon kit parts is that they’re molded in halves, which makes hollowing out the interior much easier if one wishes to take a DIY approach. -

Yet another Phantom Question - Inner Pylons
allthumbs replied to John1's topic in Aviation Discussion & Research
F-4C at Pima Air Museum… Hope this helps, Rich -
Brilliant!
-

ECM Pod Pictured Here: AN/ALQ-101 or -119?
allthumbs replied to allthumbs's topic in Aviation Discussion & Research
Thanks Zeb for resurrecting this thread with your valuable insights…this helps me out a lot. Rich -

Wingnut Wings Lancaster to be released by Border Model
allthumbs replied to LSP_Kevin's topic in LSP Discussion
Both Border and HobbyEasy replied within 24 hours, the latter indicating they would request a replacement part from the manufacturer and then forward it to my address in the US. The crack carries all the way through the plastic… The clear parts comprise of two medium sized plastic trees, each enclosed in thin foam sleeves. They rest atop the remaining contents. If the box gets turned upside down during the shipping and handling phases - and it almost certainly will - the clear parts must bear the full weight of the kit, which is substantial. A separate inside box or compartment for these delicate and brittle parts (a la Trumpeter, for example) would have been preferable. Nevertheless, I’m encouraged by the quick reply from the retailer and their promise to make good. -

Wingnut Wings Lancaster to be released by Border Model
allthumbs replied to LSP_Kevin's topic in LSP Discussion
Cracked main canopy on mine also…waiting to hear back from Border and HobbyEasy, both of which were notified. -

1/18 P51C Mustang - Lopes Hope 3rd - Finished
allthumbs replied to airscale's topic in Ready for Inspection
Another stunning masterpiece! Beautiful work. Rich -
Patience and perseverance are necessary to see one through a project so involved as this. You also bring considerable talent to the table (bench?). Quite a stunning model to behold. Bravo, Rich
- 1,582 replies
-
- 3d printing
- hk models b-17
-
(and 4 more)
Tagged with:
-
Stunning and dynamic presentation! Congratulations on a suer-impressive build. Rich
- 502 replies
-
- conversion
- prowler
-
(and 1 more)
Tagged with:
-
Scott Wilson, a Phantom maintainer and modeler, has this walkaround spread over on the ARC website. It features several pictures of both crew stations with seats removed. I believe the subject is the F-4E, but most of the bulkhead details differ little between variants.
-
I didn’t see any LSP subjects. Or did I miss something?


