

TaffyMan
-
Posts
779 -
Joined
-
Last visited
-
Days Won
4
Content Type
Profiles
Forums
Events
Posts posted by TaffyMan
-
-
Ohhh most awesome Jan - my two landed end of last week from Hannants. Forgot the seatbelts so will need to place another order - shame huh

Thanks for blasting the way ….. I just need to find time to start mine but will watching so you can catch all the nasties for us - been awaiting a correct sized version of this pretty (in my eyes) plane.
Keep it coming - Taff

-
Aye mate give it a go on a tester - I said the same at the time Mal told me. But then you would do it for a decal! I have definatly had less problems with paint lifting sinse I have started doing it this way.
As said depends on what and how i'm applying the mask - on or over!Taff
-
Hi Max love it mate - this is going to look super cool when it’s all finished.
Answer your question about spraying a light clear under the masks - yes I do but a very thin coat it seems to help the mask to stick and less chance of paint liffting. I also get less bleed along any panel lines. I still warm it with may finger heat and run a toothpick gently along it to make sure. It was a Tip I got from Mal at Miraclemasks. Don’t use it every time Max depends what i’m doing but on a job over camo then yes I would.Happy Days - Taff "D
-
-
Thanks Starfighter - sure will! But if I go much slower I'd be on full stop! never been a fast builder execpt when I was 10 then it would be built, painted and hanging from the celing in a day.
Cheers - Dave
-
Cheers Tom - not sure i’m even making Glacial Speed at the moment.

I have given the wings and tails another squirt of silver - this has thrown up some more surface issues on the tail so more wet and dry and a scrape of filler…… just when I thought I might be able to chuck some paint about!!!
But happy days - stay safe - Taff
-
As I said before - it’s going to look way beyond cool when its all done.
Smoke looks fab and thanks for sharing the technique.
Cheers - Taff
-
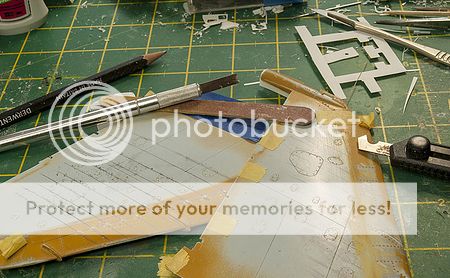
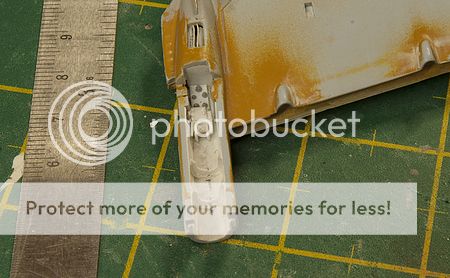
Hi Folks about time I did a bit of an update on these two beasts I am a bit on from this but still in wing hell or is it fun!

These things are nearly beating me for the second time. I know they are old kits but the fit is just about there abouts if you are lucky.You need plenty of superglue, talk sandpaper, files, filler and Mr surface - only got 500 left in my stock now and with no shows allowed at the moment! Not sure when i’ll get a re-supply of the others.
So onward - First remove the kits vortex generators - remember to draw the lines to line them back up.
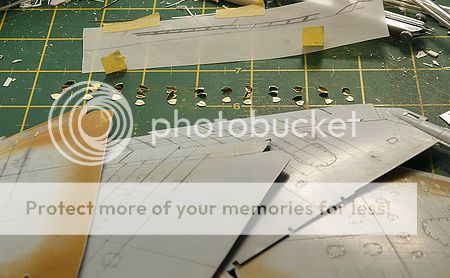
Then lots of brass bits from Flightpath and my home made ones. Loads of cut fold and cleaned up stuck on - and then knocked off and swearing whilst hunted around on hands and knees fighting the carpet monster to give um back and then re stick.
We have all been there!
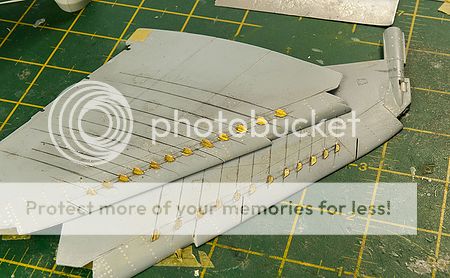
Then the big air guard things on the leading edges - also put the top nav lights on. These where a really bad fit and are defiantly showing their age. Some very carful sanding and then sticking them on to some plastic card helps to keep them on flat. Nice to get some colour on at last.
It is a little victory.

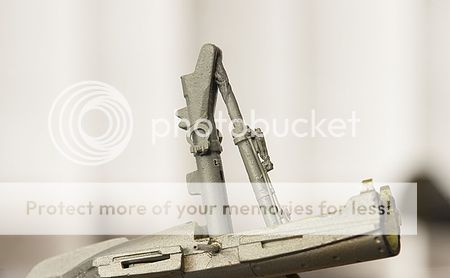
Moving on to the RAF one which will be sitting on its legs. Look at the thick plastic wasn’t going to fight this bit - choosing my battles so just some rough detail you don’t see a lot when the leg is in.
For the leg I cut the mounting lugs off and drilled through so I could paint this bit once the wings where sealed up and then feed a bit of brass tube in to the holes. I have drilled the outside wing aswell to line up - also this will give the outriggers a bit more of solid joint.
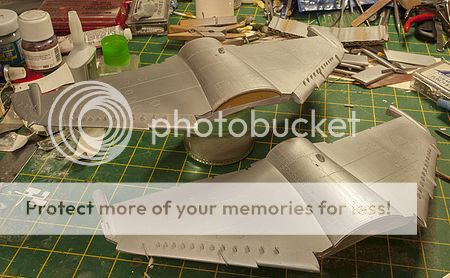
Then a squirt of rattle can aluminium paint to see what it looks like - a few bits to clean up but not bad for two semi finished bat wings - only taken ohhhh er 3 years to get these.

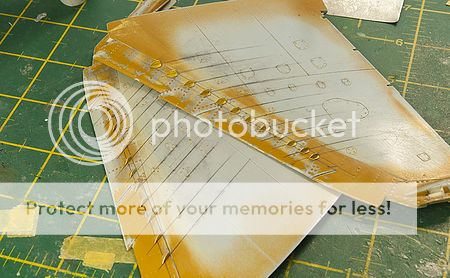
Next up was the wing tips fight number 2 - the fist fight being the USMC one. Learnt some lessons from them. First don’t worry to much about neat yet just whack the plastic card in and lots of thin glue. You get a chance to neaten once it all dry and rubbed back.
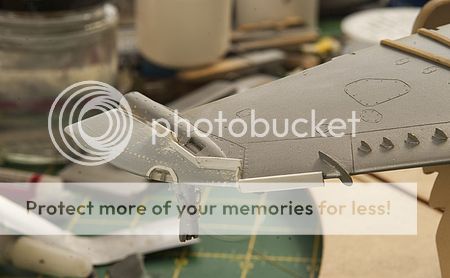
You can see from the Plastic card that these things don’t line up very well. Then on top of that the wings where a bit short shot on the leading edge. Oh the joys huh!
Does show my Nav lights that I have made. the kit ones where moulded to the wings but I think the moulds are definitely showing there senior age as the definition was just about there but very soft. I do like my Silhouette. First time trying to cut plastic with it. Didn’t go through but was enough to run a blade around to cut them out.
So proves that I have been tinkering away at these things for what feels like ages. Not on the SOD yet - been close but I am still just about going. They are a bit further on with the wings just about done. Both tails are started but not finished.
Looking forward to getting some colour down at some point so till next time enjoy everybody and stay safe
Cheers Taff
-
-
Nice base mate - so you use the foam tube. Interesting thought you might have squirted the expanding foam on to get some random organic shapes and them some cotton wool whilst it was still sticky for smoky texture. Looking forward to seeing it how it’s done.
Sorry for the bum-steer on the motor looks like they might be stopping doing them - but still design their big 1/24 stuff to use them.
Well good hunting and hope you find one will defiantly save you some bother
You can really start to see how this is going to finish - nice!!!!!
Taff
-
Love this and the display is going to be way beyond cool looking at the others you have done.
Just incase you didn’t know Airfix do a lecky motor kit to fit their 24th scale kits. If this kit is like the Mossie it is as close to a click fit as is posable especially compared to their older kits
Mail order way better than fighting the masses at the mo!
https://www.airfix.com/uk-en/airfix-electric-motor-1-24.html
Really looking forward to seeing the end of this build - almost tempting me to break into the piggy bank
Cheers - Taff
-
I have had good results in the past by drawing these in a computer. As you are using simple shapes think anything would do. I use Illustrator draw a 3mm circle and a dot - centre H / centre V. Print it out and use it as a template. Bit of white glue to hold it whilst I mark up.
Nice and simple - well to my simple mind
Cheers - Taff
-
Well that’s got my wallet rippling with anticipation

toss-up between this and the Mossie for my favourite WW2 plane. When can I get my mitts on it!!!!! I need it now!!!!!!
Taff
-
Very smart looks supper cool

Doesn’t show any of the fight you said you had. I have the D to build at some point when I feel brave enough to start!!! Is that the kit undercarriage or a replacement?
Very nice job - Taff
-
-
-
Thanks Kev - as long As I get to take some pics today might actual have something to show soon! Trying not to let them break me again!

Looking at the date stamp on the pics I started rubbing these back - 3 years ago now.
Cheers - Taff
- Anthony in NZ and LSP_Kevin
-
 2
2
-
Yes please Kev - at least that will give me the incentive to build - this is going to take a while.
Still stuck in wings trying not to let them beat me!
Happy Days - Taff
-
-
Hi Brad Not for me mate I'm still fighting just the wings on the harriers - think if I get something resembling a plane by Christmas I'll count that as a victory.
Think my ambition out weighed my ability and speed
So if you can lift mine out of the Group Build and put in to the general WIP at least it will give me the incentive to keep bashing away
Thanks - Taff
-
Amazing work as usual Peter - metallurgist workings at its very best!
You been to Ikea then - nice cabinet which one did you go for? Got say really sets of the models!
Happy Days - Taff
-
-
-
Yeah Max - mind numbing - that's why I thought Id stick the landing flaps together. At least look like I have done something other than sand and dig holes - but that just opened another can of worms!!!!
Oh the joys of this hobby huh!!!!!
Ceers - Taff


Airfix Announcement - 1/24 the other one
in LSP Discussion
Posted
Yeahhhhh chears Peter that will save me some work -

You doing the AV8 bits aswell could be doubling up on my order when you make them available.
Taff