
TwoHands
-
Posts
238 -
Joined
-
Last visited
Reputation Activity
-

 TwoHands got a reaction from Woody V in SBD-3 Guadalcanal done, done and..
I bet a simple grit blaster with baking soda would take off the decal film and leave the rivets and a better surface for paint.
-
 TwoHands reacted to Woody V in SBD-3 Guadalcanal done, done and..
Not much to say here other than I finally got this thing completely riveted. I’d say it took me 40 hours all together.
Next up is figuring out how to paint closed flaps.
Thanks for looking.
-
TwoHands got a reaction from Woody V in SBD-3 Guadalcanal done, done and..
GAWD that's a lot of rivets. How many sheet do you think this plane will take?
-
TwoHands reacted to Woody V in SBD-3 Guadalcanal done, done and..
I got the tops of the outboard wings riveted and then had to deal with the infamous uneven wing to fillet gap. Filling this seam, sanding and re-scribing isn't something I'm very comfortable doing, especially the scribing part. I suck at scribing.
A lot is made of this gap flaw and if you’re going for good basic construction, it has to be fixed.
Please note that this is my mule and the rivets that are missing have had to be sanded off.
Quite by accident I discovered that Tamiya white putty won’t stick to clear Scotch tape - the glossy stuff, not the frosted which I haven’t tried. So I put the tape on the fuselage and filled the gap with the Tamiya putty.
I let this set overnight and the next day I flexed the wings down very slightly and the putty popped right off the tape leaving this.
Here’s what I got after sanding the excess putty off the top of the wing. Not much penetration, but enough. After several test fits the putty did not chip. It’s a lot stronger than I thought.
Moving from the mule to my model now, you can see the gap is closed now, and to my eye looks just fine. The gap at the trailing edge closes up when I suspend the model from the wingtips and put a LITTLE weight on the fuselage. Some super-thin and Perfect Plastic putty should finish this off nicely.
Next step will be to glue the wings to the fuselage. Also been trying to figure out how best to mount the dive flaps in the closed position, but pretty sure it shouldn’t be too much of a problem to solve.
Thanks for looking.
-
 TwoHands got a reaction from airscale in 1/18 Focke-Wulf Fw190C V18 'Känguruh'
I don't know where I got it but I have a multi view line drawing if the V18 with captions in Russian. I either got it from you or saved it with you in mind. I don't have a hosting site so no idea how to get it to you.
PS- I sent a message through the Airscale web site.
-
-
TwoHands reacted to JayW in 1/18 Scale Blue Box F4U-1A Corsair Modification
I have quit stalling and have begun work on the exhaust stacks. Lots of trepidation, but geez - it's a model; it's supposed to be fun.
My plan is to use a combination of .125 inch diameter aluminum tube and also .125 inch diameter solder. If perfectly to scale the diameters would be about .14 inch. But I could not find material that size that would suit this application. I will use the solder where I can because it is easier to bend and form. The aluminum tube will be used for the lower portions of the stacks where they exit the fuselage and the ends are exposed. The stacks must be hollow there, obviously. The aluminum tube must be bent and formed as well - and in order to prevent the walls from collapsing I have filled the ID with .093 plastic rod. Then after forming, I can easily drill away the plastic rod from the ends to regain the hollow. I have a variety of tools and fixtures in which to accomplish the bends and accurately locate the ends common to the cylinder exhaust ports - so far so good I guess.
There are three pairs of stacks, each one serving three cylinders. I have started with the middle pair of stacks. What I really need to do this is to mount the engine on the fuselage. But it isn't time to do that yet (far from it), and I don't want to handle the engine a million times in the process (which is what would be required - lots and lots of trial and error here). Also don't you know I would drop the engine on the floor doing untold damage to a 6+ month project. So I made a fixture that simulates the rear portion of the engine and has all 18 exhaust ports accurately located. Here it is with the two almost completed middle stacks:
This thing mounts onto the fuselage "bulkhead" that I am using to mount the engine:
That bulkhead kind of has a counterpart on the real aircraft, kinda doesn't. The real aircraft has something called a diaphragm that provides an aerodynamic surface for air that enters the cowling and passes out the cowl flaps. All radial engine aircraft have such a thing. But it doesn't support the engine nor is it a firewall - it is merely a thin sheet metal surface. The real aircraft has six flexible "Lord" mounts (motor mounts) that attach the engine to a mount ring. While I will model these "Lord" mounts later, they are too weak and fragile to hang onto that engine, so I had to modify the diaphragm and have it support the engine:
I did the same thing on the Thunderbolt. You may also notice the aft fuselage and tail are gone. I have done this on all my 1/18 efforts except the P-38. One, the fuselage is very long and bumps into things. That was painfully apparent while messing around with the exhaust stacks. Two, a staggering amount of work must take place inside the fuselage - cockpit, engine compartment, aft landing gear and empennage. This way all that work can be split up and joining the fuselage halves is easier. I split it at the bulkhead where the pilot seat is hung - along a prominent panel line.
Here is the LH middle stack:
Inspect it just a moment and you will see it has a long single tube, and two short pieces of solder bonded onto it (with copious amounts of 2-part epoxy and a little putty). Those bends are exceedingly difficult to get just right, and were the reason for my trepidation. Although it fits well to the cylinder exhaust ports, and seems to fit well to the fuselage, I still don't know for sure how it will fit with the upper stacks that kind of lay on top of it. And that is going to be next. Wish me luck - this is the most challenging part of the build to date.
-
TwoHands reacted to airscale in 1/18 Focke-Wulf Fw190C V18 'Känguruh'
afternoon my friends
Something arrived in the post this week which has meant I could crack on with my favourite part of any build..
..this stack are the custom decals for the 190 that I had in the corner of a layout sheet for an airscale restock. The good thing is they are super high quality decals, the bad thing is I have 75 copies as that was the sheet order size for one of the layouts… I only need one of any decal on the sheet as I have so many copies and it keeps the sheet size down, plus there are a few bits on there for friends
..anyways, I don’t have any WIP shots, but I have been busy – this is the V15 cockpit I am basing the V18 on..
..and my version..
..upper panel..
panel in front of the control stick..
lower panel..
..and sort of how they go together..
..and that’s that – favourite bit done, it’s all downhill from here
Thanks Sky - appreciate that. You are so right, if you break this all down, it is simple tasks. I still say that if you approach each and every component as a model in itself then the quality of the output goes up
TTFN
Peter
-
TwoHands reacted to airscale in 1/18 Focke-Wulf Fw190C V18 'Känguruh'
Afternoon gentlemen
..thanks for the vote of confidence on the RLM66 colour - I will stick with this one
Some Fw190 bobbins for your entertainment..
..I painted the layers of PE for the instrument panel – there is a backplate (not shown), a layer with just the bezel surrounds and the blanked instrument in black, and the detail layer in RLM66..
The lower panel has some colour coding (thanks Roger) for the instruments that are on their way and should be here next week..
..also made the ‘Ausgleichsgefäss’ that sits under the main panel from many punched discs (the 3D print didn’t really work..)
..and the artificial horizon, now just awaiting instruments & placard decals…
..while waiting I have been readying all the PE I will need for the gear wells and a load of other bits – using lots of pictures like this to map it all out..
Notice the dimples and the raised ribbed panel next to them..
..after many hours of work, here you can see the mainspar, wheelwell roof and some of the wing ribs printed out, stuck to litho and being test fitted..
..I wanted to start with the roof as these won’t be PE anyway, the drawings are just to give me working templates..
..here printed, stuck to a sheet of Perspex and all the centres of all the dimples being marked..
..and my first ever use of my new mini Proxxon milling machine to machine the depressions..
..added the sidewalls and some filler to fair them in as the pressing is curved at the sides and primed to make sure all was well..
..starting to work annealed litho into the female mould… the completed one you can see at the front is the first version I did in a video episode on my Patreon build after which I realised I had made the depressions too big (& therefore the dimples..)
..re-adding a template so I can see the panel outline and start cutting it to shape..
..and the completed parts…
..the ribbed panel was approached in a similar way, just reversed so instead of dimples it makes raised strengthening ribs..
..sticking templates down to mark out where the ribs go..
..ribs added and a wash of thin CA..
..cleaned up, rounded edges and primed..
..litho being worked into shape..
..and the finished panels with the rivets etc added..
..a day’s work…
..and checking for fit..
..happy with how they turned out, and don’t forget, if you want to see how parts like this are made and join me in the ups and downs of this build, please join my Patreon
TTFN
Peter
-
TwoHands reacted to airscale in 1/18 P51C Mustang "Lopes Hope the 3rd"
Hi folks
Eric from Aircorps Aviation who restored the real Lopes Hope 3rd has been in touch asking for some pictures for the current owner – I thought as I had them, I might share them as I haven’t done an RFI post
It’s not actually finished yet as I am waiting for the display case to be built so it can go in there dust free and safe, but there are only a few things to do like aerials, fix the canopy parts properly & detail them, and the drop tanks & mounts
The final pic is with a US aircraft compass to give a sense of scale
TTFN
Peter
-
TwoHands reacted to corsairlada in 1/32 Nakajima A6M2-N RUFE
Very old 1974 TOMY kit plus MDC conversion
color AK Real color , Gunze C,
Yahu Instrument panel
homemade mask - drawn in corel draw, mask which was edited and carved on plotter by my friend Pavel
Shortland floatplane base, Solomons Islands, February 1943, flown by Lt. Keizo Yamazaki
-
TwoHands reacted to airscale in 1/18 Focke-Wulf Fw190C V18 'Känguruh'
Evening all
Not a huge amount to report as only had limited time at the bench in the last few days, but a few more bits done..
First the rudder pedals – here are the main parts from the PE I designed..
..these were folded up and can be seen at the top, while all the other components that make up the complex casting and the two layers of heel stop are below..
..these were assembled so that the main bits were all together..
..and then assembled with some footstraps from lead.. I need to find some better references for the pistons and brackets that these fit to before going any further..
moving to the radiator – you can see on the front face there are some kind of structure at top and bottom, with the upper one having some kind of thing on it – I thought it was maybe an engine logo, but settled on some sort of filler cap.. I sound vague, because this is all I have to go on..
..I painted and added the PE radiator fronts and the spoke type things and made up the upper and lower shapes as best I could from tracings from that photo..
..they look a lighter colour to me so tried to make a sort of anodised / RLM 02 style colour..
..and what they look like on the model..
..and that’s it – told you it wasn’t a lot
TTFN
Peter
-
TwoHands reacted to airscale in 1/18 Focke-Wulf Fw190C V18 'Känguruh'
Hey folks thanks so much for your encouragement - means a great deal to me
Started working on the cowling having sorted the prop out – it’s unpainted NMF and split into four panels…
..before I could do that I needed to form the fairing that goes from the fuselage in behind the radiator, so this was roughed out in litho in two parts..
..then once finessed a bit, I marked the locations of the rods that control the cowl flaps..
..with that done the cowl was temporarily added to mark out the panel lines with cotton and draw them on..
..then the first panel was laid down starting with the flat part at the rear and working the metal forward over the cowl lip..
..that ultimately failed as all the folds & kinks formed on the cowl lip and in sanding them to a reasonable finish it started to get too thin & break up..
So take 2 was to start forming at the lip and work backwards, but this too resulted in too many deep folds and a pretty crap finish..
..the front of the cowl finished up well, so I thought I could maybe do it in two parts, by removing & replacing the rear section where the cowling is flat..
..to repeat this four times for each panel would be a pain so I finally decided to start again but with one forward part for the whole lip and try and get it to conform as far back as possible..
..then once this was trimmed, one sheet was wrapped around the rear…
..it was then burnished down to overlap the cowl nose part…
..then sanded away the overlap getting a near invisible join..
..then the panel lines were marked out again..
..and the panels scored into it and rivets added – here also the cowl flaps are taped in place..
..also test fitted the PE parts for the radiator which fitted beautifully..
..then the nose could be dry fitted for testing looks & fit..
..it was really difficult to skin the cowling and I am not 100% happy with it, but I can’t face doing it all again..
one thing I am not sure about are the internal colours for things like the inside of the cowl – on the P51 it is interior green or zinc chromate, on a 190 I assume it’s RLM66 in the cockpit, but are internal parts either RLM02 or anodised metal? Any thoughts welcome
TTFN
Peter
-
TwoHands reacted to airscale in 1/18 Focke-Wulf Fw190C V18 'Känguruh'
evening ladies
got a good session in over the weekend, so a bit more to show..
the prop blade root rings were laminated & assembled...
..not fixed yet, but slid on for size..
..and what they will look like on the prop..
..the floor parts were prepared, some are laminates and the one in the middle needed the rectangular pressing adding by first making a template and working some annealed litho..
the far left part is the firewall bulkhead..
..the base part for the rear canopy had a brass channel added to the back..
..this was then added and a little bit of P38 filler to just fair it in just right..
.the rough holes in the floor are just that - rough holes in the floor (to allow the proper holes to be see through)
..to make the pressing that is behind the seat and holds the baggage hatch, I made up a buck in thick plastic card so I could form a metal one over it..
..the first stage in forming - this is after a little hammering and pressing with wooden tools..
..and after finessing a bit...
..I actually decided to leave the part on the buck and integrate that into the model - here the floors have been fitted, but the seat bulkhead is just restiung in place..
..it's nice to get going now I have the PE - lots of little projects I can get on with..
TTFN
Peter
-
TwoHands reacted to scvrobeson in 1/18 Focke-Wulf Fw190C V18 'Känguruh'
Just way too cool. Always interesting to see the multiple pieces of foil smooth out completely into one seamless piece.
Matt
-
TwoHands reacted to airscale in 1/18 Focke-Wulf Fw190C V18 'Känguruh'
You are not wrong there Chuck - the costs on this one are already eye watering...
21st Century Toys kit £165
HB kit £100
3D printing £100
PE £90
Books, plans & drawing CDs £120
Paints £30
so I am already over £600...
I have to look at it that it is about £1.50 a day for as long as it will take me to build it otherwise I might give up the hobby!
Peter
-
TwoHands reacted to JefH in 1/32 Hasegawa P-47 "Oh Johnnie"
Hi again.
Made a little more (slow) progress on the P-47. Did a little oil dot filtering, which isn't really showing up in the photos to well and a panel line wash before hitting the model with some Alclad flat clear. I think I will devote some attention to the smaller items while I let the clear set up for a couple days. Then I can hit it with some further weathering. The windscreen and canopy are just being held on by gravity. The gaps will disappear when they're fixed in place.
It kind of a tricky model to weather I've realized mixing a well used fuselage with replacement wings. I'm running the risk of it looking like I forgot to weather the wings when I'm done.
Thanks again for looking.
Jeff
-
TwoHands reacted to JayW in 1/18 Scale Blue Box F4U-1A Corsair Modification
So now I know what "stippling" is - a good way to make a casting really look like a casting. Thank you. I am not sure I will do this - looks like it requires a good bit of practice. Thanks again.
-
 TwoHands got a reaction from JayW in 1/18 Scale Blue Box F4U-1A Corsair Modification
Can I suggest you use Mr. surfacer 500 and stipple the reduction gear case?
-
TwoHands got a reaction from JayW in 1/18 Scale Blue Box F4U-1A Corsair Modification
Start at the 7 minute mark and you will see what I mean.
-

 TwoHands got a reaction from MikeMaben in 1/32 Nakajima Ki-27 - 77th Sentai - Burma 1942
I'm running Firefox and I have to use "view image" and then I can't use the "back" button to get back to LSP. I ended up using "copy image location" opening a new tab and then using "paste and go".
-
TwoHands reacted to JayW in 1/18 Scale Blue Box F4U-1A Corsair Modification
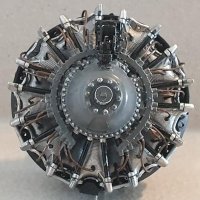
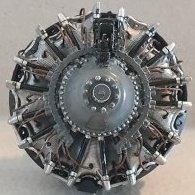
The R-2800, like all radials, has intake pipes for all the cylinders. The R-2800's looks like this:
The finger-like pipes with the 90 deg elbow bends, just aft of the cylinder rows, are the parts in question. Note two pipes emanate from a single hole in the engine blower unit, splitting off like tree branches. One branch goes directly to an aft row cylinder head port. The other connects to an "s" shaped pipe between aft row cylinders, and that pipe goes to a front row cylinder. And there are nine of these pairs.
My intake pipes, as mentioned in a previous post, are made from .125 inch thick solder - fairly easily bent and formed and ground to the right shape. Here is a simple tool I used to form the 90 deg bend, and trim the ends of each piece:
That gives me a consistent .125 inch radius (bending it around a .25 inch tube). It takes a goodly amount of force to make that bend.
After forming and trimming, these parts can be made into a pair and mated up back-to-back and inserted into a thin tube on the blower section:
The black short tubes on the table on the right are the connectors for the forward row "s" shaped pipe.
Finished up it looks like this:
With that milestone passed, the next step is inter-ear deflectors and the deflector ring. This job will be more complicated than the intake pipes, which were actually quite straight forward. I'll post when I can show good progress. Thanks for looking in!
-
TwoHands reacted to JayW in 1/18 Scale Blue Box F4U-1A Corsair Modification
Good question. I actually have a very grandiose plan - to make it like the real thing. That is to have a permanently installed nose cowl attaching to the front row cylinder heads with many many little ribs and links, and a permanently installed cowl flap ring with the flaps attaching to the aft row cylinder heads with many many little links. The large cowl panels between the nose and the flaps will be removable. Also, I intend for the panels over the engine compartment aft of the cowl flaps to be removable. If Tamiya can do it, then by god so can I. With all those removable panels off, the engine will be very exposed.
Really? Much easier said than done. What I have described will be an enormous challenge especially for it have good gaps and other edge matching, without steps, and with good alignment relative to the engine centerline. If things are not working out well, I will have to change the plan accordingly. And if it goes extremely poorly, maybe I throw away teh Corsair and just display the engine!
-
TwoHands reacted to VintageEagle in 1/32 Revell Fw 190 F-8 & A-8: Working on the wheel wells!
Thank you all for your encouraging comments.
nmayhew, I first remembered the same discussion that you mentioned, but could not find it anymore when I looked for it recently. Instead, I found the discussion posted by Damian, which basically states that the kit gear length is correct while Eduard got it wrong. I just compared wartime photos with the Eduard and Revell and Synthetic Ordnance Works legs, and I can definitely say that the Eduard legs (or oleo struts) are too short while the Revell/SOW legs look about right. I haven't taken any measurements, however. Below is a comparison (the scissor links are only loosely placed next to the SOW leg for comparison):
Cheers,
Roger
-
 TwoHands got a reaction from Derek B in 1/18 Scale Blue Box F4U-1A Corsair Modification
I have learned in my own modeling that the limit of my ability extends to the number of times I can get it wrong before I get it right and my sanity. I wish you success!