

DougN
-
Posts
1,951 -
Joined
-
Last visited
-
Days Won
1
Reputation Activity
-
 DougN reacted to MikeMaben in Tamiya's next 1:32 release will be....(your bet goes here)
Shutting posts down for no reason is outright censorship.
If you're not interested in the topic, just stop posting/reading
it yourself and let it end of it's own accord.
I hate censorship
-
 DougN got a reaction from CANicoll in Adolf Galland 109E question
His E4's had the cap, however, note that there are two types of caps. One "factory" looking one that is more pointed, and one "field applied" looking one that is more blunt. I would suggest picking up the Dragon E4 kit for a Galland 109E4 if you can, as it gives you both types of caps (and looks 100 times better IMHO).
-
 DougN got a reaction from BiggTim in Adolf Galland 109E question
His E4's had the cap, however, note that there are two types of caps. One "factory" looking one that is more pointed, and one "field applied" looking one that is more blunt. I would suggest picking up the Dragon E4 kit for a Galland 109E4 if you can, as it gives you both types of caps (and looks 100 times better IMHO).
-
 DougN got a reaction from LSP_K2 in Heinkel He-219
Just an FYI, the ZM kit, while perhaps a little more accurate than the Revell kit, has it's own accuracy issues as well depending on your viewpoint. There was a very lengthy thread here where the pros and cons of each kit compared to photos of the real thing were discussed.
However, both kits look very nice when built, with one having to look really hard to see any differences. So it just comes down to what each modeler prefers as I don't think you could go wrong with either kit.
And, you only need the Barracuda open cowl flaps if you want to pose them open on your kit, otherwise you can use the kit provided closed cowl flaps
-
DougN reacted to dmthamade in F-80C Shooting Star Czech Model kit, i must be nuts.
Progress!! Primed and sprayed the main color last night, used Tamiya primer, then Tamiya AS-17 Gloss aluminum. Always reliable, smooth and covered great. Today i painted the tail tip, radome, and wells. The drop tanks had the front and rear tips painted blue, i used Polly Scale water based paint, Conrail blue to hopefully match the decals. Gear doors are all painted as well, seat is primed and has a coat of interior green. Tonight i hope to spray a glosscoat, will add decals sometime during the week. It'll be in the markings of the Wing Commander's aircraft, Lt. Col Levi Chase, Suwon, Korea, March 1952, it'll be colorful.
Don
-
DougN reacted to 1to1scale in 1/32 Trumpeter P-40B Pearl Harbor build.
I tried to gap everything by sanding before any glue.
This weird little wing root area required the only filler so far.
-
DougN reacted to 1to1scale in 1/32 Trumpeter P-40B Pearl Harbor build.
Ok, I think I figured it out...It don't work from an iPad app! I had to log into the website.
I spent three nights fitting, sanding, and clamping the exhaust stacks until they actually sort of fit together. Well....actually the second night I spent an hour trying to find resin replacements, but no luck, so I went on with it. When they dried I sanded the edges until smooth, carved out the ends, and I used shims to align them perfectly to the fuselage halves. This was the only part of the kit so far that had fit issues, it was like each top and bottom half were intentionally designed not to fit. I painted them black, then a coat of Vallejo Metal jet exhaust, then dusted with rust pigment. Then brushed a little aluminum on the edges of the stacks. I would like to say it was skill, experience, and forethought. In reality, I threw a bunch of crap at it, and it sort of worked out. I may throw a little darker rust pigment at the stacks when it's done.
I had planned to wipe off excess wash when dry, but the effect was perfect when dry. I just used a wet brush to streak it down the insides of the fuselage. I was trying to keep weathering to a minimum and reflect how a fairly new P-40 would have looked on Dec 6, 1941.
I managed to fit the wings by sanding until I had zero gap, so far I have only needed a little filler at the forward wing roots. I also made $1 seat belts by using paper from a dollar bill with the Trumpeter photoetch.
-
DougN reacted to AlexM in 1/32 Fiat RS.14
Hi Jim and Kevin, thanks a lot!
After gluing some stringers with evergreen profiles, I gave it a coat of interior color. I don't know for sure what color was actually used. According to this great reference site, it could have been interiour green, or some kind of grey (Grigio Azzurro Chiaro 1).
http://www.stormomagazine.com/RegiaAeronauticaColorsinWWII_3a.htm
There is a color photo of the real thing on the last page of the Ali d'Italia book, but due to the pale colors, it could be both grey or green. I finally chose Grigio Azzurro Chiaro 1 and used the corresponding paint from Lifecolor. The grey turned out slightly greenish, and I think it matches well with the color photo. The fuel tank between the main frames is still dark, but I can't see this color-contrast on the black and white photos, so it will propably become grey as well.
After painting, the perforated coverings were glued in place, and the openings for the waist-guns were cut/sanded open. The edges do still need some cleanup.
Here is the whole thing, showing the slightly modified ends of the engine nacelles.
That's it for now.
Cheers
Alex
-
DougN reacted to Thomas Lund in Tigger (ID Models) Ki-45 Nick Vac - DONE !!!!!
Wasn't really happy with the elevators I did, so I re-did them. Also I found a forgotten source that told me the rib detail I had made was wrong... Also worked on the rudder that only needs final clean-up
But I've had some problems with the ailerons since they are a very much more complex construction since the wing changes thickness across the length. I've started two pairs and discarded them and now I've started the third pair - lets see where that ends up
I added some hinges to the aileron area and it required some serious sanding. Not often I have to go to the shed to get this kind of tool
-
DougN reacted to Tolga ULGUR in 1/32 Hasegawa Farquhar s Spitfire Mk.1a K9962 Finished !!
Yet another Spitfire.
​This will be finished with the markings of Douglas Farquhar s Spitfire Mk.1 K9962 from No 602 "City of Glasgow" squadron RAuxAF.
I am using old Revell s spitfire Mk.I/II released with Hasegawa s moulds and Fündekals set.
-
-
 DougN got a reaction from mpk in Dottie May on sale at the Bros
Sorry, but that's not really "customer service", it's just an automated ordering system (NetSuite IIRC) combined with a late pickup and good service from the carrier.
-
 DougN got a reaction from The Dude in Dottie May on sale at the Bros
Sorry, but that's not really "customer service", it's just an automated ordering system (NetSuite IIRC) combined with a late pickup and good service from the carrier.
-
 DougN got a reaction from coogrfan in Yak 1b
Here are some finished shots of my Montex Yak-1b. I enjoyed the build, and I am beginning to think that building resin kits is actually easier than building injected plastic kits. One thing for sure, the resin sands much easier and faster than plastic, so it seems to be much easier/faster to take care of any fit issues. Other than poor decals, the only complaints I can think of for this kit are that the rear windscreen is pretty cloudy (but it seems that the real thing had issues as well), and the rear and center canopy sections do not fit well. For the full build, and all of it's gory details, please check this thread: Work in Progress Build Thread
On to the photos:
Thanks for looking! Comments/questions welcome!
Doug
-
DougN reacted to Out2gtcha in Is Hobbycraft Sea Fury a good accurate kit? Thanks
I kind of have to agree with this. Its not negativity to answer the OPs question. It was answered, and TBH, I dont see any negativity in the previous posts prior, just the answers to a question that was posed. Included were some reasons why, but i would consider that FAR from negative.
Yes the kit is bad IMHO, but bad is again subjective. I dont think bringing personal opinion in is bad, but harping on the kit without merit can be negative, but these are generally just facts.
Along with the wing, HC also incorporated a part of the canopy into the side of the fuse IIRC, so it would be hard to even pose the canopy open. As is pointed out above, it CAN be made into a nice model, but that has effort involved other than just OOB, and generally I think modelers across the board with experience with this kit consider it sub par at best for the varying reasons above.
I dont know about anyone else, but I WANT people to tell me any possibly crappy things with a kit! I dont have the time or money for kits that dont fit well (other than a subject I am SUPER passionate about) and when people post facts about a kit that are crappy, I personally want to know those types of things, so I can arm myself with ammo to make a well thought out decision on whether or not to purchase said kit.
-
DougN reacted in Spitfire down in France, film, pilot ok
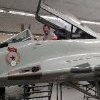
The Spitfire's wings attach at the fuselage using large bolts which fit through the holes visible in the stub spars in this photo (Yellow polypropylene rope woven through some of them):
I would imagine that either the bolts or the holes were what failed when the wing leading edge dug in during the turnover. Repair will not be inexpensive either way; the spars and the fuselage attachments will need remanufacturing.
Edit: Here's a view of the bulkhead which the front spar bolts to. That's what is going to have to be remanufactured:
-
DougN reacted in Don't Cessna 172's have fuel gauges?
Which is why a good pilot knows:
A) Starting fuel quantity;
Expected trip duration;
C) Expected winds aloft;
D) Actual winds aloft, as calculated by navigational fixes compared to theoretical still-air leg lengths;
E) Actual fuel burn at all power settings;
F) Expected fuel remaining at the destination;
G) How to calculate fuel remaining given A - F at any moment during the flight. If at any moment F becomes less than 0, you need to stop for more fuel. If A is less than or nearly equal to the total amount you expect to use, you need to stop for more fuel. It's not exactly rocket science.
"Flight Planning" doesn't just mean deciding where to go.
-
DougN reacted to monthebiff in Revell/ AIMS 1/32 Junkers Ju-188 E-1 Z6+DM II/KG66
Thanks for looking in Peter, As you say, its pretty frustrating trying to find good, clear reference shots especially of the cockpit internals.
Finally decided on a scheme now and decided on an E-1 Z6 + DM of JG66.
Was initially going to do an F-1 with splinter scheme but in the end this one won the day. Love the French scheme's but wanted to build one with the turret fitted.
Regards. Andy
-
DougN reacted to LSP_Mike in How about: a 1/32 Tamiya P-38 Lightning?
I'm the guy playing the guy who is hoping for the Spitty Mk I, Mk Vb, and a Mustang B. Just to round out the series you know.
-
DougN reacted to AlexM in 1/32 Handley Page Hampden (Tigger Models)
Hello there,
it has been a little time since the last update...
One thing I worried about are the engine cowlings. Hubert sent me two very nice vacuform cowlings. But I still had to struggle with the exhausts. And I want to show the cooling flaps open. Therefore I already thought about 3d-printing some timo ago. This 3d-model was created about a year ago:
Now I'm a proud owner of a 3d-printer (Ultimaker 3) and printed the parts (with resin engine from Vector). I'll still use a bit of the vacu-cowling
Is this part accurate? Hell no, but the "engine carrier" will be covered by the engine itself and therefore will be almost invisible when viewed from the front.
Cheers
Alex
-
 DougN got a reaction from LSP_Kevin in New tool Hasegawa 190's
Having built the A6 Galland boxing, I can confirm it is new tool.
-
DougN reacted to Collin in Note to Eduard: Want to print money?
Upscale your F6F -3/-5 kits in 1/32.
Sorry, had to ask.
Cheers
Collin
-
DougN reacted to Bill M. in New Eduard P-40N kit coming
Then don't buy it. I will buy it, nuff said.Bill M.
-
DougN reacted to Miloslav1956 in IAR 81C Slt.Av. Mircea Teodorescu 1/32 Special Hobby
Special Hobby 1/32
MH Models Canopy Mask
All colors Mr.Paint
-
DougN reacted to monthebiff in Revell/ AIMS 1/32 Junkers Ju-188 E-1 Z6+DM II/KG66
It's been a few months since I finished my HpH Ta-154 and I wanted to get my teeth into a another large big twin project so decided it was time to crack on with the Ju-188 conversion.
Even though very little will be seen I've also decided to add some detail to the large U/C bays with the help of a couple of Profimodeller sets. The AIMS conversion looks pretty comprehensive with some very nicely cast resin pieces with the star of the show being the large one piece cockpit replacement.
Still very much undecided which airframe/ colour scheme to go for at the moment and just wish there was more information available when it gets down to detailing.
As ever thanks for looking by and hope you enjoy my build as it comes together.
Regards. Andy