

Tudor Gh
-
Posts
75 -
Joined
-
Last visited
Content Type
Profiles
Forums
Events
Posts posted by Tudor Gh
-
-
Here are some pictures of some of the progress I managed to accomplish over the last couple of weeks. As mentioned above, the rudder pedal parts have been omitted, as they broke. The fuselage interior was airbrushed with a mixture of RLM 79, 04 and 23, in different shades and different layers, respectively. The wood grain effect was simulated by using a brown crayon (borrowed from my sister
 ). I know this technique is rather primitive, but I am pleased with the result. Furthermore, after fitting the fuselage halves together, I noticed that barely any of the interior can be seen, anyway.
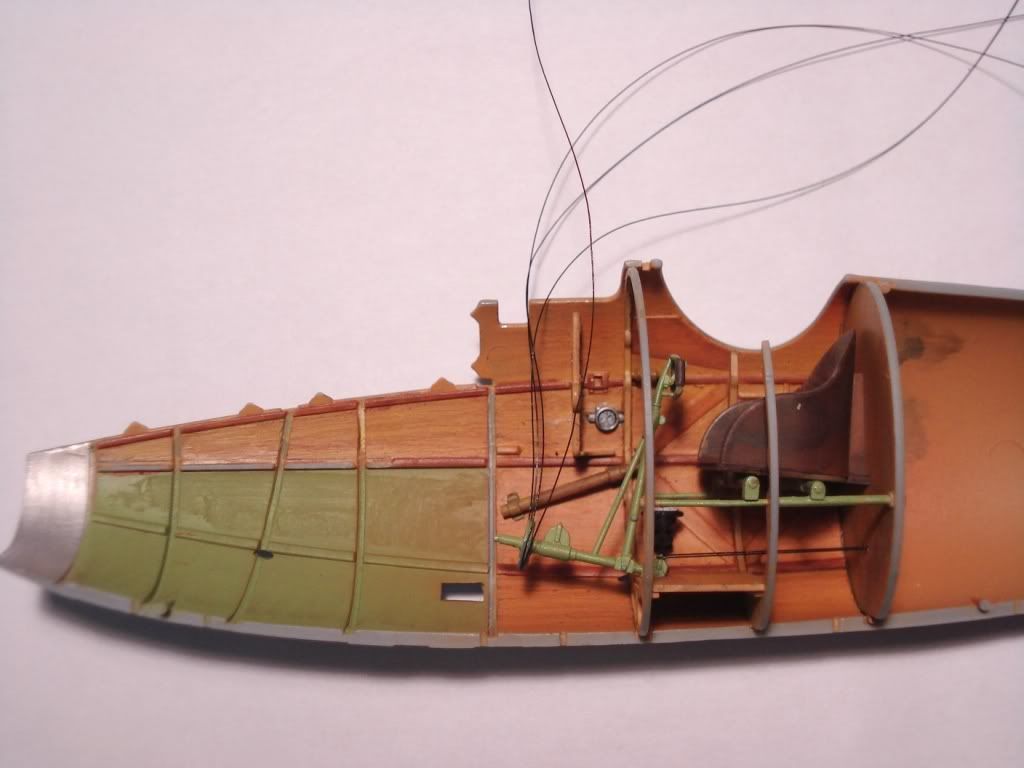

The chair was probably my favorite part to paint. It can be somewhat noticed in the picture below, I have managed to replicate the leather effect by first airbrushing a brown base layer, and then dry-brushing with lighter shades of brown, in random directions.
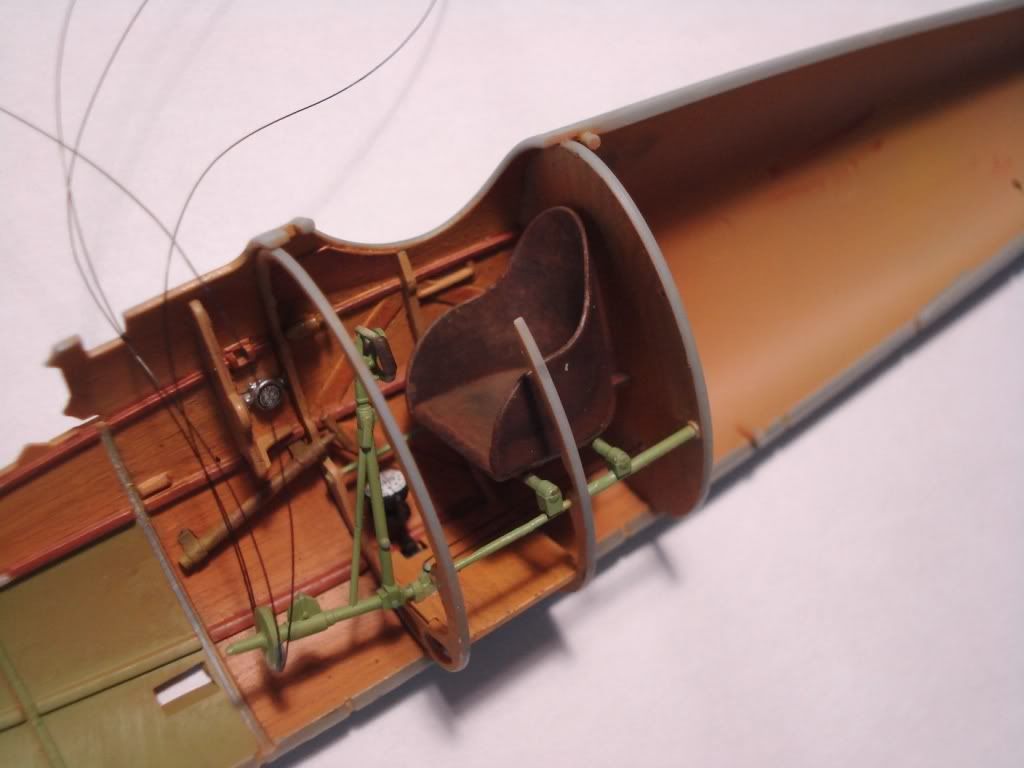
Next, the gas tank was painted and weathered, to account for oil streaks and other sources of "dirtyness". As mentioned in my previous post, the Y-shaped tubes broke as well. I couldn't really live with another incomplete assembly, especially since the oil tank assembly can be seen from the outside, through the open engine section of the fuselage. So I took two copper wires and carefully straightened/bent them as close to the real piece as possible.
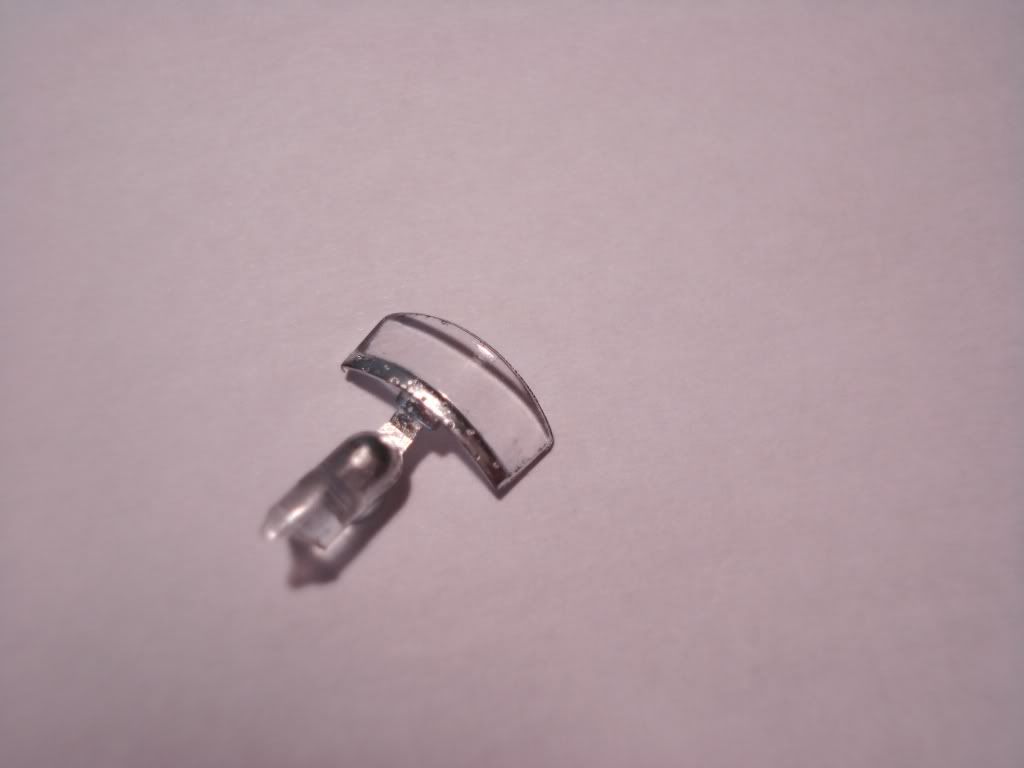
The last picture is the windshield, which was painted with ALCLAD Aluminum.
Right now, I'm working on the engine. I have painted and stripped the paint the job about twice now, but I think I got it right the third time. The complex shape of the engine is going to be a challenge, but I hope to overcome it. More pictures will follow soon.
Tudor
-
Any progress??
Progress has been really slow, and I've been meaning to post about this a while ago. I've reached a period in time when I have no desire to build, paint, and do all that scratch-building magic that used to happen months ago. I have managed to break several pieces now: the tubes that hold the chair in the wooden frames, the vertical Y-shaped tubes that run up the oil tank, and the Y-shapped support for the rudder pedal. These happened during the process of cutting the pieces off the sprues. Also,I could not, for the life of me, bend the PE vertical seatbelts (the ones that come down from the shoulders) to the chair's shape. So I threw them out the window. I painted the engine with some MM Steel Metalizer, but for some reason, the paint kept sticking to my fingers a week after being airbrushed. I ended up cleaning the entire engine block, and stripping the paint job I spent hours on. I can safely say I will not finish this model by the time of IPMS Vancouver, and maybe not even by the time of this GB's deadline. I frankly cannot stand building an incomplete model, but I've reached a point where I'd rather just finish this, since I paid $60. Oh, and the rigging might give me a heart attack soon. Lesson learned: I'm never building WW1 planes again.
That being said, I managed to paint the interior, and some pictures will be posted soon. School has started, and other activities have taken my free time away, including spending time with long-seen friends, and submerging into the abyss of never-ending assignments and projects. Also, since my other hobby basically evolves around Starcraft II, I have been been looking for improvement in that area. I know computer games tend to divide audiences, but I love the culture and community inspired by that game.
Tudor
-
Hi J,
I was asking myself the very same question as I was writing that post. I cannot recall the name of the product, but I picked it up in the LHS for 6 bucks. Martinnfb has the same product, since we found it together on the shelves. I'm positive he knows the name of it. Right, Martin?
Tudor
-
Hey Tudor, nice!!! The foliage came out really nice, also the splattering effect is quite cool.
 can you post pictures of the real thing as well?
awesome achievement, for your second armor
 now it,s time to start the "alby" project ...like totally!
Here are the pictures of the real King Tiger I was trying to replicate


-
It was definitely factory zimmerit. Dragon did an awesome job as it, I believe.
Trust me, I would not have THAT kind of patience to apply zimmerit on myown

Tudor
-
Hello everyone,
I have managed to finally wrap up another project, this time being a 1/35 King Tiger from Dragon. I just finished dirtying it up even more than before, and my beloved sister helped take some pictures of this tank (she's the photography master in our family
 ). I figured it was time to share it with the wonderful LSP Community.
The kit was built out of box, with a few additions, as you can see. The upper armor, along with the turret, was covered with a layer of Testors' Plastic Cement, after which a thick, short-haired brush was used to hit the said surface and thus recreate the grainy texture of steel. The base coat was Alclad II Steel, followed by a deviation of RLM 79, and the brown stripes were a combination of several paints I had in stock (I just kind of eye-balled that colour
 ). The paint was then scratched with a tooth-pick, or a needle in other places, to reveal the steel layer beneath it. The tracks were painted with the same Alclad Steel, then dry brushed with varying shades of brown, ranging from light tan, all the way to mud brown. The same was done for the wheels. The exhausts were weathered with oil streaks, as well (I tried to keep this subtle, not over-killed).
The zimmerit was also chipped and/or removed in places, where one would expect soldier to trample with their boots
. The armor plates were also heavily scratched. The kit decals were used, and with enough Mr. Mark Softer, they conformed very nicely to the zimmerit surface. Lastly, but not least, foliage was added in as many places as possible (I tried not to overdo it), to give the tank a more unique look. A brush dipped in various shades of brown acrylic wash was also sprinkled against the tank, to reveal dirt and mud splats.The tank represents a machine part of the 3rd Company of s.Pz.Abt. 506, operating near Elst, Holland, in September of 1944. As mentioned above, this is my second armor kit ever built, so please let me know where it needs improvement.
I hope you enjoy it as much as I do,
Tudor


-
Nice choice on such a unusual and extremely unique subject
 ...
... Even thou that I am clinically scared of double,triple, quadric decker's and all of the spiderwebs in between I will follow this build with excitement, Good luck bro.
 Just as in your case, with the Mig 29 progress, the Albatros has to wait a bit, until I finish the D-9 renovation, which I can say it's about 85% done.
Tudor
-
You mean back to your Focke Wulf assembly-line factory
-
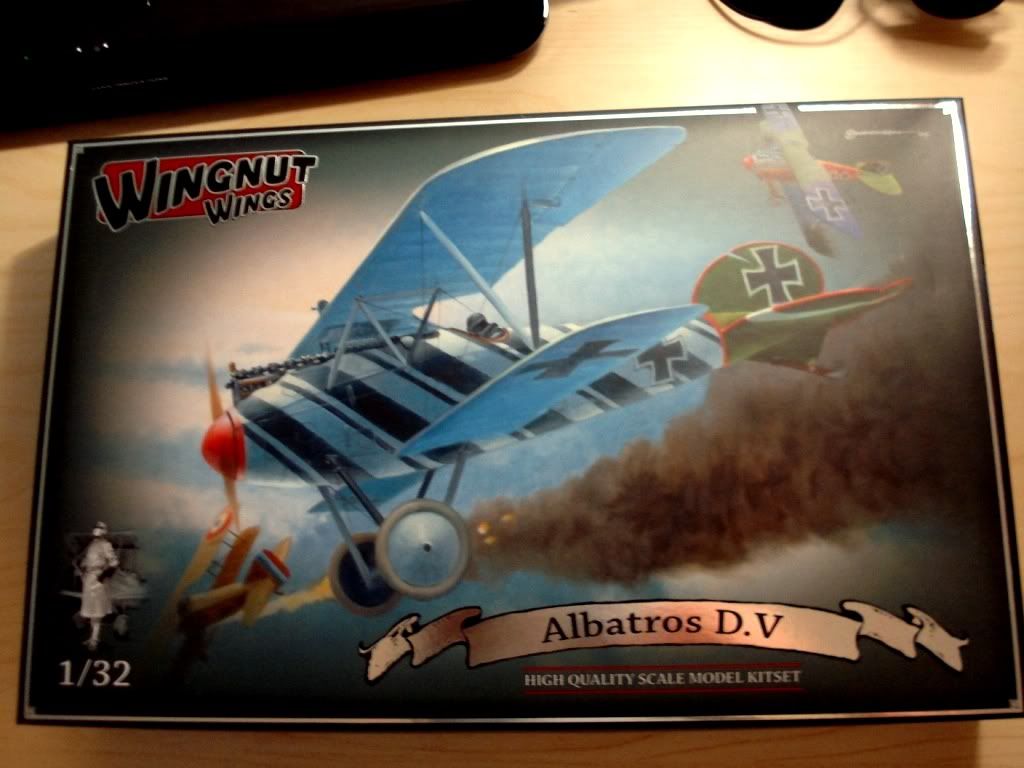
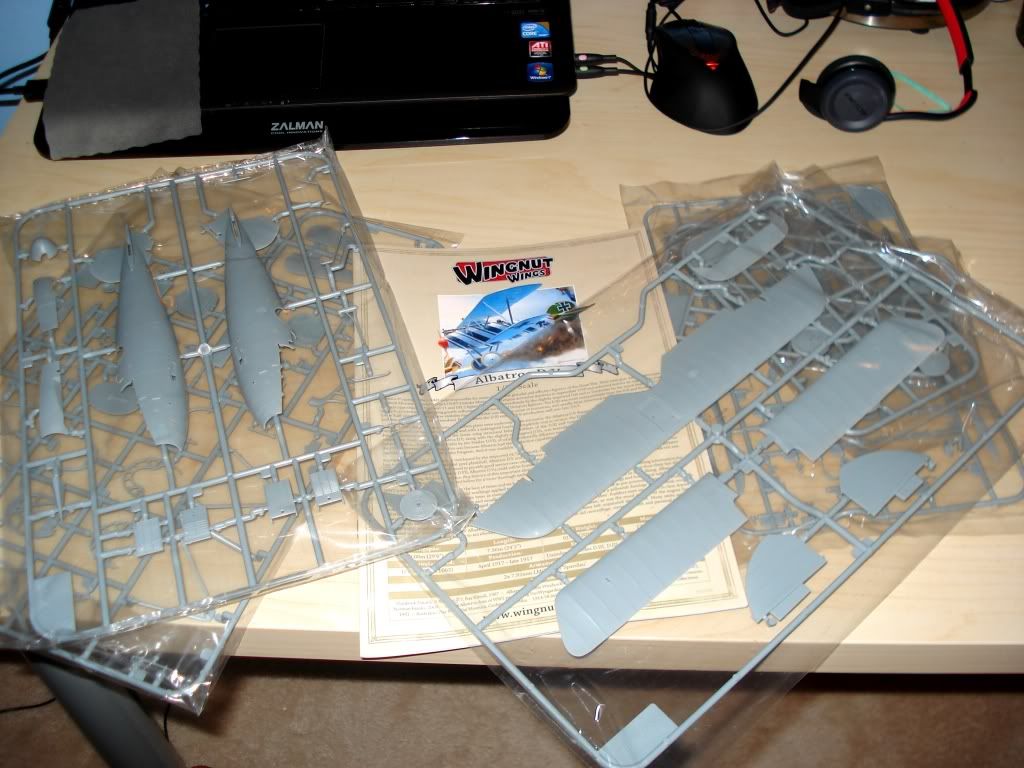
Hello all,
This is the first group build I am taking part in, and I'm really excited to take this opportunity.
I'm building Wingnuts' Albatros straight Out-of-Box. The paint scheme will be the same as the box-art one. More details will follow as progress ensues!
Tudor

-
I need to calculate how much damage school tuition will do to my piggy bank, and then we'll see
Tudor
-
Am I the only one who can't see the pictures?

Tudor
-
I was looking at these posts on the last few pages of the thread, and everyone was talking about something incredible. Once I went backwards, and ran into the pictures of your Spitfire in progress, my jaw simply dropped. And I truly mean that. I have never seen anything so crisp, clean, detailed and breath-taking in artistic marvel

Amazing work, will be following really closely!
Tudor
-
Martin, thanks for your "unique" support.
Nick, I have a few pictures of the D-9 intake, and these can be seen a small, subtle, weld seam. It's one of features that I think it may be present. I'll consult more pictures, and will decide for sure. Thanks for the advice!!

Tudor
-
Hello everyone!
I am glad to return once again to LSP Forums, after having finishing another semester of school and securing a summer job until my final year in university. That being said, I acquired some free time to continue working on the D-9 renovation. During school, I finished a 1/35 King Tiger, which has a few add-ons pending, prior to being posted here
The nose cowling was cleaned, sanded, filled with super glue, and sprue was added in the faulty connection between the gun and engine cowl, respectively. Alclad II Aluminum was used to identify as many surface mistakes as possible. Sanding galore followed.
The wing root seams were filled and sanded many many times, in order to achieve the real look of the plane: the gun hatch/door is supposed to be a seamless piece, while the separating wing links run outside of it. Again, Alclad II Aluminum was exclusively used to reveal the nature of the surface (I am absolutely amazed with Alclad products). Rivers were re-punched here and there.
After rinsing and repeating the glue-sand-aluminum coat process, the plane was airbrushed with the final camo scheme. I also consulted the black/white pictures of this plane closer than before, and tried to replicate the camo. Scratches were added to the fuselage, and painted with aluminum, to reproduce the worn-out characteristics of this JV 44 bird.
1200 and 1500 grid sand paper was used to lightly scratch the paint layer, revealing the aluminum layer below. This was done in the wing roots, and areas on the cowling where damage is usually done: near the edges, and where the cowling hinges open etc. Sprue was added to the side of the air intake to replicate the weld seam. It looks a bit thick now that I take a closer look, so it will be reduced later. Scratches appear on both sides of the fuselage, in the vicinity of the cockpit. The JV 44 emblem has worn out too much, unfortunately, and this will be remedied with some spare decals.
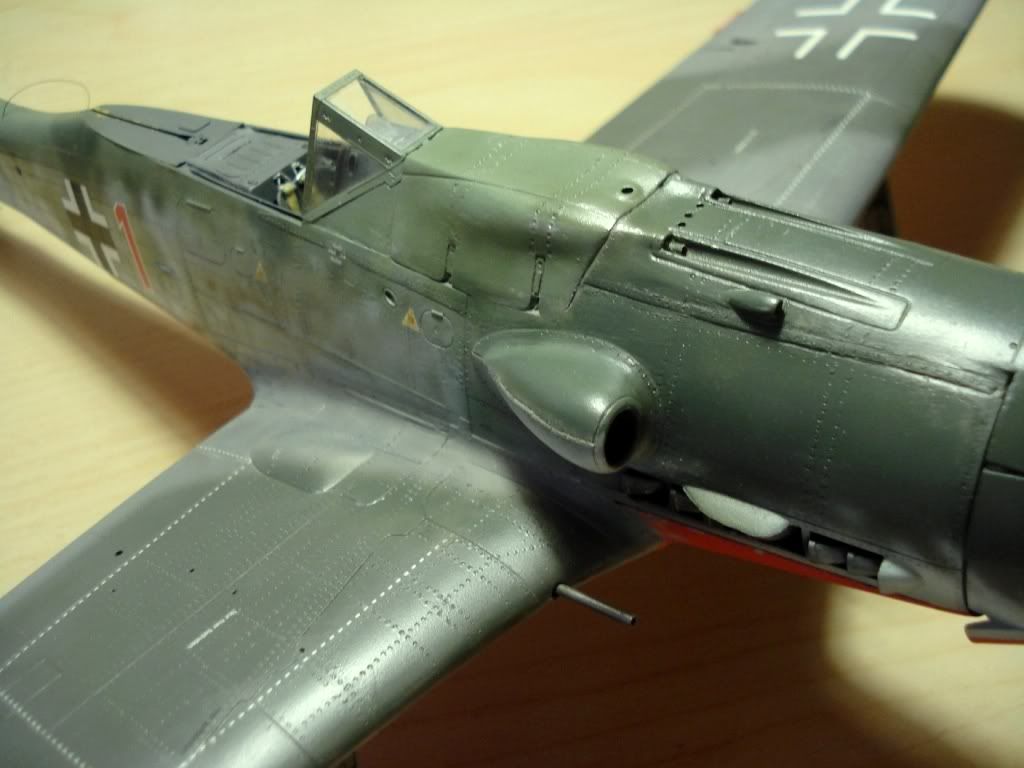
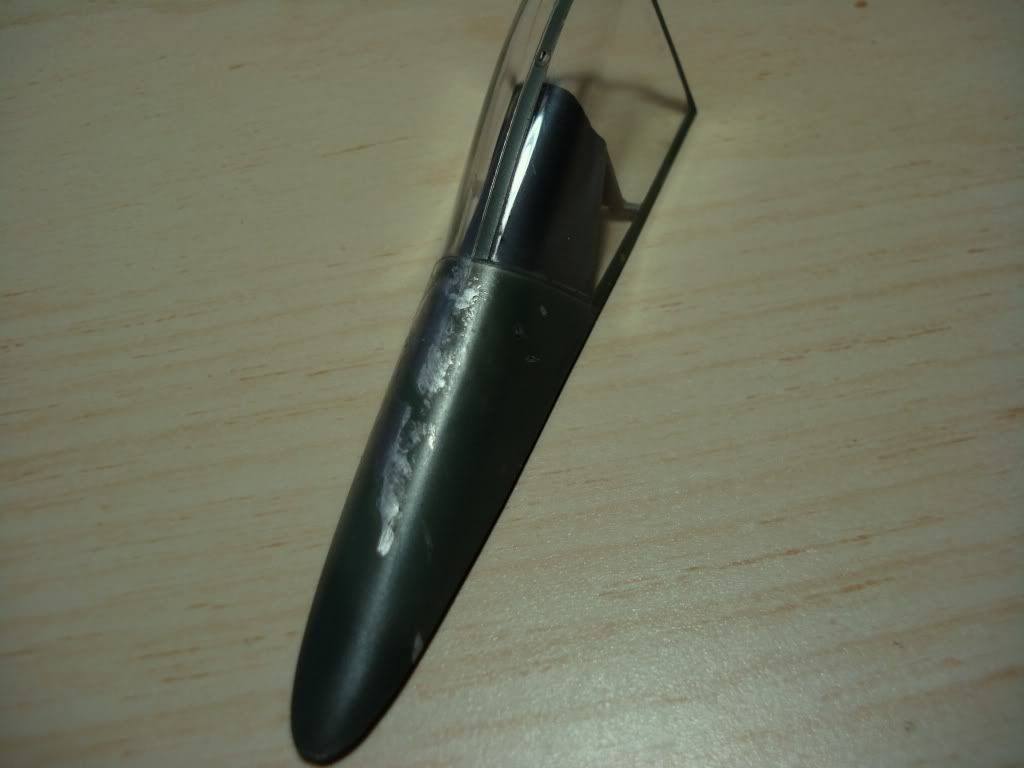
The wing roots are also scratched using the same principle. Lastly, the scratches on the canopy frame and canopy tail were obtained by masking the aluminum coat, painting with green and then sanding.
A silver pencil was used for touch-ups on all scratches. Unfortunately, my camera has a hard time revealing these scratches, but I find them satisfying when I look at my plane in my room

I hope you enjoy the pictures, and please feel free to add comments, pieces of advice and such! Constructive criticism is much needed.
Thank you,
Tudor
-
-
I have omitted a few extra details (and some were added by martin):
- the bulges on the fuselage, under the gun cowl, will be removed
- the flaps will have the angle indicator added to them, which can be seen through the holes on the upper wing
- the cowling in front of the gun one will have its hinges remade, since the present ones are virtually a "mess"
- the 20mm gun cowls, at the wing root, will have their ugly seams removed and filled in
- the wing roots will have the large seams sanded and corrected accordingly
Tudor
-
Hello again gentlemen,
I have decided to return to my last built bird, especially since I've been working on armor models lately and I have been missing working on planes. I have been putting this project aside for long enough, it is now time to engage in it. With the help from my dear friend Martin (martinnfb), we have identified several mistakes and elements that need correction in order to turn this already built model into a better one. Most of the work will evolve around surface defects, weathering, and little details.
The landing gear will encounter some heavy changes: wheels will be re-adjusted, so that they are perfectly parallel, and their vertical axis is 2 degrees off from the ground normal line, or 88 degrees from the ground plane. Yellow wires will be added along the support arms, and the starboard support arm will also feature the cable that activates the tail wheel system.
The under-nose area will also be touched up. The plate connecting the wing section to the engine cowling was corrected, and the engine cowling will also reveive treatment, as seen below:
The wing leading edges have had all their seams filled in with super glue and sanded appropriately.
The scratches previously done on the upper wing surfaces will be cleaned off, and re-done. This includes the wing roots (the most pronounced scratches) and the front, towards the leading edges. The areas of interest will be painted with a layer of ALCLAD Aluminum, then covered with the respective camo colours, which will then be scratched off with to resemble a realistic damage effect (from workers and pilots climbing onto the planes). The same will be done on the areas on the sides, under the gun cowling, then on the gun cowling itself. The damage near the JV 44 emblem will also follow the same trend.
The air intake on the starboard side will also be corrected, with a more realistic weld line being added from stretched sprue. The starboard engine cowl will be repainted free-hand instead of the ones seen below.
The canopy was removed and cleaned, and will also have an aluminum-coat followed by paint-and-scratch.
The following details will also be implemented/corrected:
- tail wings and elevators will be hollowed out and detailed
- the Morane antenna will have a less brutal shape, and will be sanded down to achieve the real shape
- the propeller nose will be scratched and weathered
- the antenna wire will feature the spring-insulator attached to the tail
- Luftwaffe crosses will be darkened, to avoid the unnatural clean look
- brown/black washes will be added in the landing gear well, near the wing roots (dirt from workers' boots), near the fuel fill caps
- wash will be subtly applied to give the plane an overall weathered, beaten-down look
The main purpose of this project is to improve my weathering and finishing skills.
Secondly, I plan to return to IPMS Vancouver with a better model

Hope you're excited as much as I am,
Tudor
-
Breath-taking build! I love the detail, realism and overall look! Looks like it's about to fly!
Tudor
-
Thank you for the help! I shall look into the quick connect area.
Tudor
-
I purchased a new compressor a week ago, and I decided to use the Iwata hose from now on, for all my airbrushing sessions. Since I use the Iwata for camouflage and final touches, and the Paasche for ALCAD and gloss/flat coats, I was wondering if there's any adapter/fitting out there that can connect the Iwata air hose to a Paasche airbrush as well.
Cheers,
Tudor
-
Martin, again! That is some amazing work on the propeller! VERY Realistic!
Tudor
-
Martin, just the fact that you are so dedicated to researching the shape of the intake leads me to believe you're going to build a 100% accurate model, and that you might also be able to build a fully operational D-13 as well.
Extraordinary work,
Tudor
-
Martin, I thought we were each gonna build a 48th D-13 "Yellow 10".

Now I see you moved up the scale ladder.
Tudor
-
You sure are impatient, Martin.
Looking good so far, will follow closely!

Tudor

Renovating the D-9 Build
in Works in Progress
Posted
Salutations, gentlemen!
I come with some good news! I finished school this very last December, and managed to earn a long-awaited vacation after 4.5 years in Engineering school. I took this opportunity to finish the pending project of renovating the D-9. Since my last update, I managed to break both landing gear legs (too much handling led to the plastic failing at the joints). The model was put aside indefinitely, until a few weeks ago.
The final refurbishing steps included closing the landing gear legs and covers, adding the wheels inside, to make sure that the closed landing gear position looked as accurate as possible. I filled in the little gaps between the landing gear covers and wings. I painted all luftwaffe crosses, re-touched the camo scheme a bit here and there, added some more scratches. I also managed to re-apply the JV44 emblem decal. Finally, I added a steel spring to the antenna wire, which I made from scratch (fine wire split from electrical wire).
All in all, I believe I managed to salvage the plane from all the misfortunes I passed it through.
Its aerodynamics surely make it look different in my cabinet now
Here are the pictures of the finished bird!
Hope you enjoyed,
Tudor