Ironwing
-
Posts
3,872 -
Joined
-
Last visited
-
Days Won
18
Content Type
Profiles
Forums
Events
Everything posted by Ironwing
-
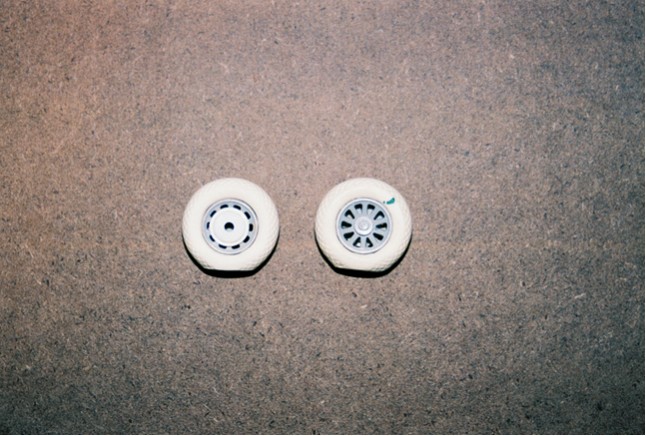
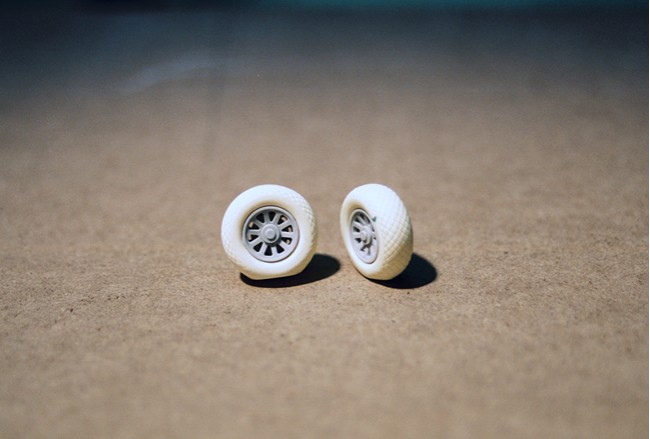
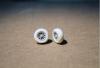
opposite sides of the reworked tire/rim. Hasegawa molds then the same. They arent and should appear thus.
-
the pics dont look as good here as they do on my screen...how do I fix this?
-
True Detail Resin Tire with the Hasegawa rim inserted.
-
i think it worked...
-
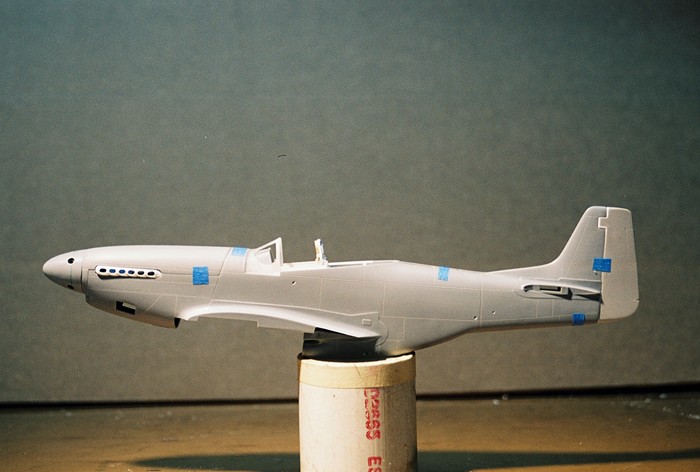
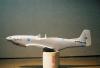
Early exterior work: Reworked/shaped rudder, reworked/shaped spinner assembly, new exhast shrouds (yes i know it's crooked) thinned trailing edge flap seat, internal canopy bracing and the fuselage has been scribed. Ill follow-up with more stuff in "In the Works" with details and interior. Geoff
-
...very pretty sim...nice work!
-
Superb workmanship...
-
...looks like i'll be turning down the heads on map pins.
-
...ok - i tried the Britta water filter - there are tons of litlle plastic balls in there - all of which are too small for applications in 1/32- but it was a good try geoff
-
Nick, I'll definately give the water filter thing a try... Gotta find a Britta Water Filter. Many thanks for the idea, Geoff
-
...you guys are hysterical...I knew I liked this place
-
...if youre ok - rock your wings
-
Need to make the knobs on the ends of the mixture and pitch controls on the 51 throttle quad. Thought about doing the white glue thing then painting them but they always (at least for me) come out looking like globs of painted glue. In that respect they are very realistic. Tried to find some really, really small beads - no cigar there. Mrs suggested those little candy sprinkles- nonparielles I think they are called...so much for that conversation. Course if I screw it up i can always eat the mistakes...and they are about the right size and round...never mind. Any suggestions? Geoff
-
...only X-29 Ive ever seen is stuck on a stick out infront of the Edwards Cafeteria G
-
How to scribe diamond tread pattern?
Ironwing replied to Boise Kent's topic in Construction & Scratch-building
err.....Geoff, that was actually Dave's (Ironman) suggestion. But thanks for your comments...the more info I can get on the whole tyre/rim issue, the better. Cheers mate, Ango. err...ango...thanks ever so much for setting me straight. cheers mate Geoff -
How to scribe diamond tread pattern?
Ironwing replied to Boise Kent's topic in Construction & Scratch-building
Kent, I too am working on a 51 and was faced with the same problem. I must admit Ango's solution to the diamond tread issue is much easier than mine but I thought I would respond just the same. I gave up on the Hasegawa tire rim assembly. As such, the diamond tread is way over done anyway. Further, the outboard rim is fine the way it is. The inboard rim, which they supply exactly the same as the outboard rim isn't correct but its an easy fix to make them right. In stead, I ground away the inside portion of the inboard and outboard rims behind where the openings should be just to remove thickness, then cut away the material between the spokes. the inboard and outboard rim should be open, not solidly cast as Hasegawa has supplied. To repair the inboard rim, cut two diameters from card stock. One diameter should be .350 and the other .280. Center the smaller diameter on the larger and cement them together. Apply this assembly to the center of the inboard rim. The result will be elimination of the radial openings except for the ends which will remain open and leave a circumferential pattern of openings as they should be. For the tire, I used True Details replacements but ground the rims out, removed alot of the over-stated buldge, then inserted the remaining Hasegawa rims into them. It takes some work but the result is well worth the effort. The main gear struts supplied in the kit arent correct either but thats another discussion. Hope youre well and good to hear someone else is working on a 51. Geoff -
Charles, Thanks for the reply. I agree with you about the nose on the Hasegawa 51. It will be interesting to see if this new Dragon kit is able to capture it. About the spinner: I'll agree it's close but it looks to my eye to be too "fat." Ive looked at as many photos of 51's as possible and admitedly my resources are limited. However, it would seem that the curve of the spinner should be an extension of the upper fuselage curve. In the case of the Hasegawa spinner, this continuation is missing. Its subtle, but never the less, it's something that just doesnt look right to me. Just the same, its always good to see your responses. Thanks, Geoff
-
Greetings all, The project is still going strong(hope my ambition holds out). Laurent, the pics you sent along with the stuff that Craig sent has been invaluable in getting the seat and armour plate done. It took hours to build the armor plate and the associated detail but I think it looks pretty good. Here's another question: Hasegawa did a great job capturing the complex shape of the 51 nose. However, I think they missed the shape of the spinner completely. To me it looks far too rounded or bulbous. To change its cross section, I chucked it into a dremel tool, spun it, and reshaped it with the edge of an exacto # 11 so it follows the line of the upper cowling surface in a continuous line. The kit original doesnt do this. What's your take on this or your opinion on the spinner shape? Hope all are well... Geoff
-
Have an anticipated release date? >>>and I'll take those Hasegawa 51's
-
Craig, Thanks for the reply. I guess posting the drawings here would be of greatest service to everyone. If however, emailing them to me is easier, my email is N52949GP@AOL.com. I look forward to your reply. BTW...how or where does one come by an E&M Manual? Geoff
-
Hello all, Work inside the pit has begun and thus far, all goes well. The wind screen framing is done and the structural members for the fuselage skin are in place...mostly. Some time back laurent Boulestin posted a pic of what appears to be the aft area of the pit. The pic shows the fuselage tank in its position behind the pilots seat. I think. It also shows what appears to be the framework upon which the radio gear would be mounted. Can anyone confirm this for me? Laurent, do you have other shots of that area and the tank which reveals more detail? I have one shot of the fuse tank in a Squadron pub but there is no way to determine size. It apparently isnt contained in a housing of any kind. Is this correct? Any help is appreciated... Hope everyone is well Geoff
-
Chris, Interesting dilemna you have there. Im no expert on colors, but the overall scheme of, if you can see it, paint it blue, would appear to to be missing in your photo. Judging from the looks of that tire, that bird seems to need some help. Even if the pic were very washed out, which it isnt, it wouldnt make that gear door or the strut look almost white or aluminum in color. Is it just a field fix that was never painted? I gotta look at that thing again. Ok, Just took another look. If you look at the shadows (or lack of them) the pic had to have been shot very near noon. That puts the gear in darkness under the wing. The gear and doors have to be some color other than the usual blue. I would have to think white
-
Chris, Interesting dilemna you have there. Im no expert on colors, but the overall scheme of, if you can see it, paint it blue, would appear to to be missing in your photo. Judging from the looks of that tire, that bird seems to need some help. Even if the pic were very washed out, which it isnt, it wouldnt make that gear door or the strut look almost white or aluminum in color. Is it just a field fix that was never painted? I gotta look at that thing again.
-
brake fluid
-
Blueing, or annealing photo etch??
Ironwing replied to woodman's topic in Construction & Scratch-building
The idea of blueing is interesting. Perhaps as a highlight. Blueing however is a rather dense liquid and very soluable in most petrochemical solvents. Because of the density it would need considerable thinning. I believe there is also a photographic blueing process but Im not sure about this process.How it would, in some way, improve appearance is lost on me. Annealing is a process which heats materials in order to remove internal stress in the material. I cant see what this would do for photoetched parts except to discolor them. Are you by any chance talking about anodizing?