Leaderboard

Popular Content
Showing content with the highest reputation on 06/10/2022 in all areas
-

1/32 Special Hobby Hawker Tempest V - Fairbanks JJ+F
TankBuster and 18 others reacted to Thunnus for a topic
I can see the finish line coming up soon on this one! With the salt weathering stage done, I felt safe about removing most of the masks, including the clear windscreen. No major surprises but there was a fair amount of dust collecting on the interior side of the windscreen that I'll have to clean off. The masks from the sliding canopy were removed with no issues. It stays in place without glue and can be posed either open or closed but it tends to pop out from the rails if you play with it too much. The resin wheels are now glued into place. 2-part JB Kwik Weld epoxy was used to give me time to position the flat spots correctly. After ten minutes, the epoxy has cured enough to place the Tempest upright on her own feet. Stance check... The tail gear and doors have been glued into place. The tail wheel still rotates freely so the flat spot can rotate to the correct orientation after the main wheels are glued into place and the stance of the aircraft finalized. Only the inner flaps will be glued into place. The outer flaps can be held in place by friction and it will be easier to secure the wings without the outer flaps when it is time to transport the model. She's just about done with only a few more things to add.19 points -

1/16 scale scratch built AT-38B Talon-The Smurf jet is back!
Azgaron and 11 others reacted to Pete Fleischmann for a topic
Took a look at the initial fit of the wings, flaps, and ailerons- pretty psyched- cheers P12 points -
Hi All This is the 1/32 Trumpeter MiG-29C built as a Ukrainian Air Force MiG-29S (9-13). It is loaded for a CAS mission inspired by a photograph I found online. It is impossible not to feel the impact of a war in Europe, in what feels like my own backyard - and like so many on these forums I also felt the urge to show my support. I tried to incorporate as much aftermarket stuff produced in Ukraine as I could. The Rocket Pods and Wheels are from ResKit. The paint masks are both from Foxbot and DN Models. The seat is from Quickboost and the pitot tube to replace the telegraph pole included in the kit is from Master. The exhausts are from Zacto model. The decals are a story of their own - I screwed up the first paintjob using the Foxbot masks I already had so I had to start over While waiting for the brand new released masking set to arrive from DN Models, Foxbot also announced a brand new set of decals for a digital camo MiG-29. I wrote Oleg from Foxbot if I could somehow get a set and he happily sent me one straight from Kyiv in the middle of an active warzone. That kinda makes this model special for me.. I painted the model entirely using paints from MRP - the second time also in the right order . Below in order from Dark to Light: MRP-034 Tank Grey (MRP-405 seems to be too light for the MiG-29) MRP-403 Grey MRP-402 Light Grey MRP-246 Light Arctic Grey The underside is painted with MRP 405 Blue Grey Hope you like it Niels Click the images and they will open in a larger version10 points
-
added the thrust reversers, a bit of Eduard P.E. to the speed brakes left over from the Revell kit I built back in the 90's and the "fin". With a vertical stabilizer this big one could believe the thing could have been made by De Havilland Canada... Thanks for looking10 points
-

1/32nd scale Short Sunderland MkII - ID Models (Tigger) vacform
Loach Driver and 8 others reacted to tomprobert for a topic
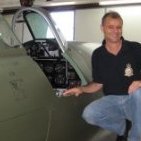
Evening all, I took advantage of my time away from the classroom last week and finally finished this two-and-a-bit year project: Tigger Models' (the old ID Models' vac kit) of the Short Sunderland in 1/32nd scale. This has been a really rewarding project, and despite a setback when I knocked the completed fuselage with its interior off the table, making a rather messy contact with the kitchen floor, it's been great fun and relatively straightforward - despite its size. Kits like this come as a blank canvass for the builder to work his/her magic - 'bumps in plastic' is quite apt, but the shapes are reasonably accurate if not a bit primitive (picture borrowed from Tigger's webpage): The kit provides a the correct hull shape for a MkI or MkII, but with some mods the more adventurous builder could easily convert it to a MkIII/V, etc. All panel lines and surface details need to be added and the parts are devoid of any real detail, but the plastic is lovely to work with and scribes/sands beautifully. Due to the size of the parts, home-made interior bulkheads are needed, and any visible parts of the interior need to be made from scratch: Strong wing spars are also essential to keep the structure of the model sound - thick plastic card spars were made and added: The flightdeck interior, bomb room and nose section were all made from scratch and detailed with some aftermarket seatbelts: All the aerials were made from sprue and thin wire - markings were mix of home-made masks and decals: The engines were made from spare HK Models' B-17 cylinders coupled with Revell Beaufighter parts to make a reasonable representation of the Bristol Pegasus. The early-style exhausts were made from Evergreen tube bent slowly over the toaster! Landing lights were home made from some of my daughter's diamante play/craft jewellery (for the lights) and the covers were clear acetate once again heated over the toaster. Rigging for the floats came for EasyLine and reminded me why I'll never build a biplane! The kit's transparencies were used throughout - all turret interiors were scratch built. Beaching gear was also made from scratch with a friend helping out with some 3D printed wheels: Bomb racks were again made from scratch with some rather lovely depth charges coming from Tim Perry - thanks, Tim! I used Xtracolor enamels throughout the build - 6 tins were used in total! I don't like to go too mad with weathering on my models so kept it relatively clean - however you can't build a Sunderland without the distinctive water marks on the hull: A bit of exhaust staining and some fading with post-shading completed the upper surfaces: And for some generic pictures: I'm often asked how big a 1/32nd Sunderland is. I'm sorry to inflict my ugly mug on you but you can see that it is a massive model with yours truly holding it! My model represents a Sunderland MkII of 201 Squadron during 1942 in the lovely temperate sea scheme. Painting white gives me nightmares (especially something of this size) so I took the easier option. W4001 (ZM-V) was only on strength between February to October 1942, before hitting an underwater rock and being written off, thankfully with no loss of life. Thanks for those who took an interest along the way - I'm off for a long lay down in a darkened room to contemplate the next project! Best wishes to all, Tom9 points -

RCAF Liberator GR Mk VI
themongoose and 8 others reacted to BloorwestSiR for a topic
I masked off the underside to prevent overspray and started on the upper surface camo. First I installed the cowl flaps after thinning their trailing edge a bit. Before: After: Again I stared with the Extra Dark Sea Grey. To match up the camo between the fuselage and wings, I masked off the fuselage around the wing root and sprayed a thin line of Slate Grey to mark the camo The I removed the wings and sprayed the camo. I repeated this with the other wing. When dry I then masked off for the leading edge de-icing boots. This is where I am at the moment. Here's the wing root fit just slid into place. Being able to remove the wings gives me some options now for when it's complete, especially with that wingspan.9 points -

F4U-1 Lt Kenneth Walsh
BrentE and 7 others reacted to Miloslav1956 for a topic
1/32 Tamiya model, Barracuda wheels, HGW wet transfers 232903, All colours MRP8 points -
boxart of Kate posted on Infinity FB page https://www.facebook.com/infinitymodels.cz/photos/a.125326490174511/128286879878472/7 points
-

Miss Jolly Roger
Derek B and 6 others reacted to blackbetty for a topic
i shimmed the pit tub lightly in front to get the sidepanels to fit properly, then i made a spacer to fit the front gear well against the tub it makes slipping it into the recess on the bottom a breeze (this is all just a test fit)7 points -
Miss Jolly Roger
Derek B and 6 others reacted to blackbetty for a topic
nice fit7 points -

AIMS Spitfire PR1G using Revell Mk II kit
Paul in Napier and 6 others reacted to Pastor John for a topic
A little time here and there - fixing the terrible upper cowl, removing and then building back up cockpit details as well as adding the missing top corners - and finally the utter madness of looking into the possibility of using 0.3mm solder balls where the Spitfire frame has the raised rivets. This will be done when the model is almost ready for the painting stage as too many will be lost from handling before that as you can already see. I have also started to thin out the cockpit lower wall sections as they stand too proud for real life otherwise. Never made a 1/48 spitfire before - never mind a 1/32 one so would like to get the details right if I can7 points -

1/48 SB2C Helldiver--Attack on Yokosuka and IJN Battleship Nagato, 18 July 1945 (finished)
coogrfan and 4 others reacted to easixpedro for a topic
Managed to get some color down two nights ago--didn't feel like making buildings or working on the B-24. Making incremental progress I guess. Have some tape residue on the clear bits to clean up, but otherwise happy with how she looks. I was going to cut out the control surfaces, but the key for a divebomber pilot actually hitting his target was to have the a/c perfectly trimmed and no inputs in the controls (i.e. neutral). With that in mind, I left them as is. Here she's just sitting on the rod. Actual dive angle will be steeper. Will also leave off the bomb assembling till right before mounting the aircraft. She sits perfectly on the bomb bay doors so I can work on her. Next up I have to figure out the gigantic cranes. I'll post some pics--each one had its own name. Also need to keep making buildings... More soon -Peter5 points -
Miss Jolly Roger
Derek B and 4 others reacted to blackbetty for a topic
dremeled out the pit area for fitting the sidewalls. the materail is actually a dream to work with5 points -
Now I hav e a fresh Friday-update for you! Hot Metal It's time to get those wonderful hot metal colours on! I work in layers, the first layer was the shiniest, the Alclad Airframe Aluminium. Next I shot Alclad Polished Aluminium in rough lines and over the small hatches. You see how it is lighter though less shiny than AA. Next I masked the outer part and shot Alclad Polished Brass. Here it was time to mask all the hatches, a piece of cake with the New Ware Mask set. Then I covered all with a thin coat of Alcad Magnesium....and I just had to dry fit the the cans to see how they looked, Still some way to go before they start matching Now for the fun part.....masking for the weldlines! Oh joy. I use a violet Sakura pen to draw the welds. Unmasked it looks like this. Now for the outer part of the same nacelle. Here I felt I started to lose focus and sealed them with a couple of dry coats of gloss varnish. So I do the same to the other nacelle next time.....this will take a few updates so be prepared. Cheers!5 points
-
Thanks for all the info on the bombs, much appreciate. In the interim I've been doing some touch up work on the paint. Part of it is to repair areas impacted by gluing the wings together and onto the fuselage. Part of it is touching up some scuffs and overspray and part of it is improving the scheme to be closer to the real thing. As I stared at the picture of 589 posted a couple of days ago, I noted some weathering and paintwork that wasn't captured in the Fundekals profiles. I made those updates, still have a few more but I'm getting every closer to the final finish. Some pictures (note - the vertical stab is just pressed in place): Some of the colors still seem a bit stark but I'm confident the weathering process will tone them down a bit. Speaking of bombs above, one of my joys is weathering these weapons. Nothing irks me more than seeing immaculate bombs hanging off a perfectly done model. For any aircraft from WW2 through the end of the cold war, the vast majority of bombs were in very poor shape (except of course the tail fin assembly, which was kept protected, for obvious reasons). Here's a nice picture of some suitably grubby M117's. That's it for now, thanks for looking.5 points
-
RCAF Liberator GR Mk VI
themongoose and 4 others reacted to BloorwestSiR for a topic
Thank everyone for the comments and checking it out. With the fuselage mostly done, I turned my attention to the flying surfaces. Everything was primed in white. I then started on the camo. I then did a quick test fit of the tailplanes. Nothing is glued together, just press fit. I painted the lower wings white and then installed the MLG bays. If you're wondering about the two unpainted areas on each wing, that's where the nacelles go. They cover those areas so it gave me a place to hold them while I was painting.5 points -
Hawker Hurricane 1/12 scale scratch build
Paulpk and 4 others reacted to hurribomber for a topic
Thats it for now. Further pics will follow. Thomas5 points -
Hello, Second kit of the year after the HPH Helldiver, once more a resin kit. Lot of sanding but that's modelling. Hope you like it.4 points
-

SprueBrothers Lightning Deal: HK Models 1/32 B-17E/B-17F
RadBaron and 3 others reacted to Dennis7423 for a topic
All- In Today's SprueBrothers Lightning Deals, the 1/32 HK B-17E / B-17F kit can be had for a really good price! If you fancy an early Fort, snatch one up. These are getting harder to find (although they did just re-release the F). - Dennis S. Thornton, CO USA4 points -

ICM 1/35 CH-54?
Alain Gadbois and 3 others reacted to Out2gtcha for a topic
AFAICT most of the arctic based CH-54s were OD/red as apposed to the white/red we sometimes see on other arctic helos4 points -
RCAF Liberator GR Mk VI
themongoose and 3 others reacted to BloorwestSiR for a topic
@monthebiff talked about sliding the wings on after assembly which got me thinking. Bad thing I know but anyways, I did some trial fitting and realized if I cut a couple pins off the wings could be glued together and then slid onto the fuselage. The four mounting pins you see in the middle of the wing normally go into holes in the spar and lock it in place. Cutting them off, you can slide the wings on after assembly. With that quick mod, I glued the halves together. And once dry, I got confirmation I hadn't messed up. The Tamiya F4U is for size comparison.4 points -
Hawker Hurricane 1/12 scale scratch build
Paulpk and 3 others reacted to hurribomber for a topic
Both main spars almost finished. Made the smallest hex-heads from hex-shaped stretch-sprue and thin slices. The bigger ones with the nutter of RP toolz.4 points -
I ended up grabbing the kidney bulges from the Revell G-4 kit, as it was easier to extract from the stash than the original Hasegawa kit I also have. It's moulded in a mildly repugnant brown plastic, which translates into a polite beige in the photos. I started by taping around the bulges to protect the surrounding surface, and then using a combination of a #11 blade and some photo-etched razor saws, I removed the old bulges: As I feared, they didn't really survive the experience. In fact, one of them pinged off into outer space, never to be seen again. You can see in the photo the remnants of the filler I had to use to blend them into the wing surface - a need that with hindsight only came about because I had the orientation backwards. The next step was to remove the detritus and prepare the surface for the new part: And obviously the next step is to glue the replacement bulge in place: Drawings suggest that the pointy end should point forward, but I found that the parts conformed to the surface better if I faced the more blunt end forward, so that's how it went. I'll confess that I was a bit sloppy with their exact placement, but hopefully they'll pass the eyeball test - and certainly be less jarring than being completely the wrong way around! Next step is to clean the area up, add a touch of Mr. Surfacer around the edges to disguise any obvious gaps, and move on! Kev4 points
-
F4U-1 1st Lt George Defabio, VMF-213, 1943
AlbertD and 2 others reacted to Miloslav1956 for a topic
My Corsair Number 15. 1/32 Tamiya model, Barracuda wheels, Quinta studio 3D cockpit decals, HGW wet transfers 232903, All colours MRP.3 points -

1/32 Trumpeter A-6A INTRUDER “505 DEVIL LEADER”
TenSeven and 2 others reacted to miketippingmodels for a topic
1/32 Trumpeter A-6A INTRUDER “505 DEVIL LEADER” This is the trumpeter kit, and with all its faults, it somehow comes together pretty well. This build is from the “flight of the intruder film” and depicts 505 devil leader cool hand Luke and Cole Virgil Cole getting ready for a strike. The only addons I used are the Quinta studios cockpit detail, and the Readoak figures, it is painted with HATAKA acrylic paints. Instead of having the wings fully opened, or folded in the parking position, I decided to have the wings being unfolded, as no one builds them this way, it’s a simple bent metal tube that holds the wings in place. I used the AMMO night blue cement, as it shows where you have glued, great stuff, but if you use AMMO gloss varnish, it reactivates the blue in the glue and it all shows through where you have glued, so be careful, if you use this stuff. Enjoy Mike3 points -

Treasure Ships found
Hartmann352 and 2 others reacted to LSP_Matt for a topic
https://www.newsweek.com/two-ships-found-near-spanish-galleon-full-gold-worth-17-billion-1714432?amp=13 points -
Without wanting to kick off a discussion on leaking state secrets, check out the treads on these characters. I saw the pics and details on Twitter amongst the securocrats. It was pretty funny. Imagine if they build AFV's in the forums...OMG Cheers Matty3 points
-
Miss Jolly Roger
Derek B and 2 others reacted to blackbetty for a topic
some more work done to the pit with mr.dissolved putty and primer i concentrated on the areas that are not hidden by the seats and the IPs themselves the seats are actually not that bad, some more holes to close. i will use these, as my painting is not that great anyway, so they will do3 points -
Zoukei Mura - Old Man Blog No.115
Daywalker and 2 others reacted to mark williams for a topic
if I was zm id be too scared to do one incase a bolts the wrong size!3 points -
Even missiles got dirty as they were loaded and unloaded many times, even after they go back to the missile shop sometimes new sections and old sections were mixed together like this pic showing a grungy rocket motor while the rest of the missile is relatively clean: and this one showing how the radomes got a bit man-handled, photo #4: https://us-mil-thai.tripod.com/id14.html even if the missiles were clean, the wings and fins were added on once the missile was loaded so they had lots of hand prints on them: http://www.preservingourhistory.com/udorn011.jpg Jari3 points
-

Top Gun Maverick
JeepsGunsTanks and 2 others reacted to Shoggz for a topic
Loved it. As did Mrs Shoggz. Just sheer fun, with dollops of nostalgia for good measure.3 points -
RCAF Liberator GR Mk VI
Treehugger and 2 others reacted to 2MT Paul for a topic
great progress, this is where I have got with mine so far...3 points -
Thanks guys! The manufacturer of the stand is JH Models and it was purchased from UMM-USA, which is a US hobby retailer. Not sure if they provide shipping to the UK. I did some salt weathering on top. An interesting technique that's hard (for me) to get right. The idea is to use salt crystals as a mask to create either paint chipping or spotty weather stains. I find it easiest to work with a flat finish so the salt weathering is usually the last painted effect that I will perform. Water is spread over the surface of the model and rock salt crystals are sprinkled on. Once it is dry, a very watered down contrasting color is misted over the model. In this case I used Tamiya Buff. After the buff is dry, I use a spray bottle of water and a clean cloth to remove the salt crystals and hopefully leave random spot stains. I want a very subtle effect but in this case, it is hardly noticeable. Which is better than overdoing it. I let the model sit for a couple of days. I had some other things to take care of but also wanted to give some time for any pesky residual pockets of salt to dry up and flare as white frost. I spattered some dark brown pastel wash on the bottom and wiped it off, leaving another layer of dirt on the bottom. Considering the weathering on the bottom complete, I removed some of the masking and started to install the landing gear legs. Checking the forward rake of the landing gear legs. As a rough visual reference, I want the bottom edge of the landing gear legs to be parallel to the alignment of the exhaust pipes on the fuselage. After I'm satisfied with the position of the landing gear legs, I glued into place all of the auxiliary struts and landing gear doors. The radiator exit flap was also attached at this time. The landing gear legs have been attached with Tamiya Extra Thin cement so I am want to let the glue cure completely before attaching the wheels but here's a sneak peak at the Tempest on her own legs. Here's a view of the port wing that shows the salt weathering effects a little better. I've worked a little bit more on the exhaust stains. Looking at the archive photo of this aircraft, I am guessing that the JJ+F codes were scrubbed clean of the exhaust stains and although I couldn't replicate the exact effect, I tried to show something similar on the port side. A similar but less severe effect was attempted on the starboard side.3 points
-
Now that would be a battle of the Titans! To my eye, any differences are due to style only.2 points
-
Considering how important it is for the Ukrainian economy that all businesses perform as well as they can under the circumstances, I'd be very surprised if the kit isn't released as expected, albeit delayed.2 points
-
John some more missile shop photos here: https://366th-tfw.net/bruce-hill_photos4.htm Jari2 points
-
I concur that "Spitfire the History" by Morgan and Shacklady is the best book overall for making sense of all versions. Radu2 points
-
1/32 Dassault Mirage F-1CZ from Scaleworx Resin Models
kalashnikov-47 and one other reacted to blackbetty for a topic
i´d like an iraqi one, saw combat and lots of different loadouts.....2 points -

RCAF Liberator GR Mk VI
Treehugger and one other reacted to dodgem37 for a topic
Love this. Big bird. Sincerely, Mark2 points -
Thank you, I appreciate it! I’ve been making more significant progress, will post an update in the next few days. Cheers, Tom2 points
-
If I had Musk-level money, I'd have scaled composites build me a turboprop ( where are you gonna get original engines??) He-219. Or a Pucara.2 points
-
Unfortunately the link you posted doesn't appear to be working, so we can't see the image. Kev2 points
-
RCAF Liberator GR Mk VI
chukw and one other reacted to BloorwestSiR for a topic
Mark, the turrets I'm using are from Cold War Studios. They're one piece resin so no seam to worry about.2 points -
My little "I enjoyed the film" thread has eh Hmm changed somewhat, Ah well - have fun guys!2 points
-
Hawker Hurricane 1/12 scale scratch build
daHeld and one other reacted to hurribomber for a topic
Made (very thin) flanges for cooling-duct from aluminum rod.2 points -
Thanks, Den. Still slow-going with this one, but I thought I'd snap a quick photo of the vac windscreen dry-fitted to the fuselage: Fit looks OK. The white vertical line that looks like a highlight is actually where I slipped with the blade cutting it out. I need to see the frame under a coat of paint before I decide if it'll pass muster, which means masking it up first. The frame lines are so light that they're quite difficult to see, and without any pre-cut masks, doing it manually is going to be quite a challenge! That alone is a point in favour of using the kit part, but we'll see how it goes. Kev2 points
-
Hello Here's my A6M5 fromTamiya. I built the A6M2 some years ago so no surprises. This is a great kit. Humbrol paint, handbrushed as usual. Paint stripping is done with aluminum paint and a sponge. Aotake from AK interactive 3rd gen. Great paint. Only few addons: Berna decals and guns from Master.2 points
-

1/32 - MiG-29S (9-13) - Ukraine Air Force - Digital Camo
LSP_Matt and one other reacted to Eagle Driver for a topic
I will not try to hide my excitement in regards to the results of the masking this camo out, but surprisingly my favorite part of this kit is the canopy. For whatever freakin' reason, this seems so realistic to me! Everything else is great, it is fantastic. However this canopy is a fetish of mine On the funny side - only a Soviet air superiority jet can be used with unguided rockets for ...air superiority. You know - Russians...2 points -

Mirage 2000D [KH 1/32]
Loach Driver and one other reacted to discus for a topic
Hello Another KH M2000 twin seater : this time the D variant: Xtracolor paint X110 et X005. (X001 and Mat varnish for the nose cone. Pod Damoclès, exhaust, and other stuff 3D printed by Eric Jolly. Missile launchers and pylon for the pdo from L'Arsenal Mix of Berna & FFSMC decals Cockpit has a Quinta studio set of 3D decals. Wheels are from Reskit and the drivers from Reedoak. The GBU-22 are from the Trumpeter US weapons set.2 points -

Heinkel He-111 H-16 BG VIP Transport Revell 1/32
Tony T and one other reacted to ShelbyGT500 for a topic
Hello my friends After four mounts this beauty is done. You can see the WIP here: WIP And here she is: Hope you will like her and as always Thank you for watching. Cheers my friends.2 points


