Leaderboard

Popular Content
Showing content with the highest reputation on 01/14/2022 in all areas
-

SU-27 Flanker B 1/32 Trumpeter
Nikola Topalov and 13 others reacted to StathisP for a topic
The well-known trumpeter kit with the following after market accessories Cockpit by red fox Static dischargers by Master Decal stencls by Begemot Wheels by Armory Pitot tube by Master Mask by Montex Enjections seat by Quick Boost Antenas by Quick Boost Detail set by Aires Nose cone by Zacto models Colours by AKAN14 points -

Mustang NZ2423 restoration visit
Anthony in NZ and 12 others reacted to KiwiZac for a topic
Hi all, Yesterday Brendon Deere was kind enough to host me at his Biggin Hill Historic Aircraft Centre, located at RNZAF Base Ohakea and allowed me to see his P-51D project up close (as well as put up with a lot of questions!). This aircraft, 45-11513/NZ2423 is one of several RNZAF surplus aircraft that were bought and preserved by the late John Smith of Mapua] in the 1950s-60s, among their number being a DH Tiger Moth, two P-40 Kittyhawks (one now being restored to fly), a DH Mosquito FB.VI which has been conserved in running condition, and several literal tons of parts for many other aircraft. This was widely publicised] as a "barn find" following John's death in August 2019 but had been an open secret worldwide among warbird enthusiasts for many years. John was very reclusive and publicity shy but many people were fortunate to be allowed into The Shed to take a look at this truly remarkable collection. Here's a look: Brendon Deere is well-known in New Zealand for restoring and operating Spitfire Mk.IXc PV270, painted in the markings of his uncle the Battle of Britain pilot Al Deere, as well as an ex-RNZAF Harvard and a Grumman Avenger wearing wartime RNZAF markings. I was very pleased to hear that Brendon had been entrusted with Mustang NZ2423 by the Smith family, not just because I've known him since 2004 but also because Ohakea is less than an hour's drive from my home! The aircraft was also based at Ohakea for almost all its RNZAF service between 1952 and 1957. When I visited work was underway: Pete Burgess was focused on pipes for the recently-installed oil radiator and Joe Deere was working on the windscreen side glazing. Brendon and Pete said that as a restoration project the Mustang is a lot more straightforward than the Spitfire was. John Smith saved as much as he could from the scrappers over the years and as such they've had to source very few parts from outside what came from Mapua - they have multiples of many parts, such as six canopies and eleven undercarriage legs! Besides what you see in the photos below there's also a shipping container with countless spares yet to be inventoried. Brendon said the fuselage is structurally complete and the systems/plumbing work is now underway. The wing, being restored by Odegaard Wings at Kindred, ND, is about 2-3mth from completion and the engine (restored by Vintage V-12s at Tehachapi, CA) was recently run for the first time since 1957. As of her final flight on May 30 1957 airframe and engine total time was 260hr 55min. She's being restored in her original single seat condition - the fuselage fuel tank is fitted, the radio rack is awaiting refurbished sets to be installed, and she will fly in 2023 with bomb racks and rocket rails, painted in Number 2 (Wellington) Territorial Air Force markings. All of the pipework you see in the photos is original, as is the radiator and much of the hardware. It will be one of the most original Mustangs flying anywhere when complete. It's all rather exciting! If you're keen to see more I have all the photos I took (including the other aircraft in the two hangars) on my Flickr account.13 points -

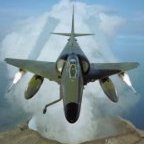
2021 - The year of the Jet Fighter
RALPHY ROCHA and 11 others reacted to Zola25 for a topic
Hi All Well, I guess I am suffering a bit from "Post-Viggen Blues" - I cannot really seem to chose what to build next. I am pretty sure it will be one of my numerous F-16 projects.. In the mean time I uploaded a few pictures of, what turned out to be a productive corona-lock-down-year of Modern Jets for me. I build everything from all eras but it seems to come in waves for me. With the Border Model Lancaster hopefully arriving in a couple of months, I think 2022 will be "The year of the Lancaster" First up is the 1/32 Kitty Hawk Mirage 2000C (OOB) in a special livery. Its a really nice and detailed kit but bit of a pain to build. Next up is the 1/32 Italeri Tornado GR.4. backdated to a GR.1. - I added the Aires Cockpit, Wolfpack Seats and a set of JP233´s I had from Paragon Designs (I think) The kit was bit of a letdown for me if I am honest but it is still better than the Revell Kit. Next in line is a project I wanted to do for quite some time. It is the Tamiya 1/32 F-4E converted to an F-4G. I used the GT Resin conversion kit but that was a disaster. Very very disappointed with the casting quality of that. The cockpit tub was unusable and so was a number of the other parts. I ended up scratch building quite a bit but I like how it turned out. Weapons are from Eduard Brassin. I also found time to complete my 1/32 Trumpeter A-6E Intruder (carry-over from 2020). I know most people would fill in all those rivets but I quite like the look of them. This was my first time using the cockpit decals from ANYZ, and wow! Never again without Bombs are from VideoAviation Lastly I spent quite some time building a 1/32 Trumpeter F-14A Tomcat. I cannot have a 1/32 collection without building a VF-84 Tomcat - I was a teenager in the 80´s and this is what a Tomcat looked like I added the Aires Cockpit and weapons are from Eduard Brassin (it also has a full load of AIM-54´s). Next Tomcat I will use the Zacto Model intakes. Decals are from HAD Models ...and of course the Viggen Hope you like them Niels12 points -

AIMS 1/32 Mistel S3
Starfighter and 10 others reacted to Pastor John for a topic
AIMS 1/32 Mistel 3 update.... hi guys, started to get the green tint on. The Mr Paint green RLM 76 is super thin making it a very bad choice of mine to have used a black primer underneath as I am using litres of the paint to get it covered - does not look like a new build airframe at all sadly. Anyway the shade is a fraction weaker than what I really wanted and so I might blend it all in with some Tamiya 'Smoke' and that might help the over-all appearance. Enjoy11 points -

1/35 UH-1Y Venom
Youngtiger1 and 10 others reacted to matt_1185 for a topic
Some small updates on the upper section. I carved out of some plastic foam to give me a 100% idea of how it will look now to just make it out of something hard lol also used the single engine option from the Huey kit to ad to the front and fill the gap out back under the exhaust… then curing more parts away from the Viper kit to put towards the Venom from flares11 points -

1/32 Revell F-18E hornet
Tony T and 9 others reacted to miketippingmodels for a topic
The Boeing F/A-18E and F/A-18F Super Hornet are twin-engine, carrier-capable, multirole fighter aircraft variants based on the McDonnell Douglas F/A-18 Hornet. The F/A-18E single-seat and F/A-18F tandem-seat variants are larger and more advanced derivatives of the F/A-18C and D Hornet. Let me present to you the 1/32 Revell F-18E hornet, with reed oak figures painted with Hataka paint set.10 points -
Ah, Friday again and here is a small update again. Moving on After finishing that splinter cammo one would think that the model is all but finished but no. Now it's about making the canvas ready.... everything up to this has been a transport distance and there are more to do before it is time to breath life to the model and give it a soul. It's a serene moment when you move on to the small stuff. First off is to paint the regulator and you also see the edge of the cover that shuts the reverser slits in supersonic flight. I begun with masking I masked the fin tip as well. Then I shot Alclad Gloss Black Base I use Alclad Airframe Aluminium to get that shiny base that I can work with The next step was to shoot Alclad steel and then remove the mask. I shot Alclad Gloss Black Base on the fintip and the nose cone. Then I bettered the intake lips with Alclad white aluminium I'm thinking of leaving this beauty spot as is in fact you will find lots of these on real Viggens too....the paint shop wasn´t manned with modellers There you go Next on my to do-list are the black edges on the wings and fins, fix the forward radarsensors, do some bettering painting here and there and from there move on to the wheels and struts. Cheers!9 points
-
The painting has begun. After laying down the first coat of primer, I discovered a few areas needing attention. Once those areas were addressed and re-primed, I started spraying the dark earth. I'll get it finished up this weekend then start on the dark green. Thanks for looking in.8 points
-

ICM AH-1G Cobra АН-1 G Cobra , 67-157621, 235th AC, Daub Ting, 1969
Loach Driver and 6 others reacted to Jan_G for a topic
Hello guys, this is my recent build and my first helo kit finished. Simple almost OOB build, with Eduard PE set used mainly for interior and RB Model mini guns Easy assembly and good overall fit of the parts. Painted with MRP paints and finished with MIG and Ammo pigments, shaders and panel line wash. Hope you like it jan7 points -

1:32nd scale Salmson 2-A2
scvrobeson and 5 others reacted to sandbagger for a topic
Hi all, The aileron control cables have been added. The mono-filament used is 0.08 mm diameter and is left clear. Although the structural rigging was painted blue, the control cables were left unpainted. I assume this was due to the cables being regularly adjusted and maintained. Now onto the observers weapons, Mike6 points -
slow progress but slow is still better than no right. I apparently lost the seat mounting hardware (if it was included in the kit) so cobbled up some (nowhere near true to accurate) rails from evergreen stock that the seats would slide down into the office on (like the seats in an Aires set) painted them up and slid in the crew on their seats, work continues Thanks for looking6 points
-
I am not entirely sure that the F was the "pinacle" of the Bf 109 development. People who believe that "the F was the best" usually claim that after the F the G was festooned with all kinds of bulges and bumps as well as heavier weapons, which made it more sluggish and thus not as good as the F. Well... if we are going to use only the criterion of "clean airframe and low weight", then the peak was actually reached by the Bf 109 G-2, which was for all intents and purposes identical to the F but it had the more powerful DB 605 engine. If the F was that good, it would have stayed in service longer, but it actually saw a relatively brief period of use. Things are not as clear-cut as that. I think that the G-6 was the best airframe overall with the best mix of horsepower and firepower, was appreciated by many pilots and for that reason it saw the longest use as a type. The G-10 and the K-4 were even more powerful and more streamlined, so they continued to make formidable foes. What made the Bf 109 one of the most successful aircraft of all times is its reliable simplicity. I had the opportunity to design models of many types and as such I had the chance to get really close to a lot of aircraft of many tipes and of many nations in museums or airfields. The last time I was in Cosford for a "photo shoot" in November 2019 (just before Covid), I photograhed, measured, opened all panels and sat in both the FW 190 and the Bf 109 (they were side by side in the museum) and they were as diferent as chalk and cheese. One thing that is immediately striking about the Bf 109 is how simple it is. Simplicity means easier and cheaper construction. It is also very versatile in the sense that it was made of standardised parts. The fuselage did not really change shape throughout the lifetime of airframe and on that fuselage it was possible to graft different engines, different wings, different tails, different undercarriages, different canopies, all of which were easily interchangeable between types. It was also reliable, could be repaired easily and when it could not be repaired it was cheap to replace. That was why it was in use from the very first day of WW2 (and even before, in the Spanish Civil War) until the end of WW2 (and after) despite many attempts to find a suitable replacement. This reliability, low cost and ease of service is what keeps good workhorses in service for a long time, such as the AK 47, the Soyuz rocket or the F-16. Radu6 points
-
Flaps. Sanded and with filler smeared over some problem areas. In Situ. Revised tank with pylon. Regarding the shape issues as noted before, I went to Tommy's blog and copied his drawings into Fusion 360. The shape of the tanks is now as close as I can make it. Fins to be added from sheet plastic. Dan5 points
-
Thanks again boys. Got the two side exhaust sets done, but I'm not happy with the spacing after I finished them. After going through my documentation, they should be in two close groups of two, not evenly spread out: You can see here what it should look closer to, although mine will likely be a closer set of two so the exhaust ends will give some support to each other: Unfortunately, I did the starboard side of the starboard engine just like it. I didn't take any pics of my screw up, bit needless to say I'll have to redo the 8 exhaust pipes on the two side ports of the starboard engine. Oh well, at least these 8 won't be as bad since I'll only have to change them slightly to get two sets of two. I also got the top exhaust set of the starboard engine done as well, but this time modified them as they should be, closer together: I've now got all the exhaust pipes built for the starboard engine, and now just need to modify the 8 side pipes and will have one 1/2 of the exhaust pipes built in initial configuration. Onward and cheers!5 points
-
The G stayed the longest in service because it was reliable and got results. Many people get distracted by numbers for speed, weight, etc, because that is what computer games use as signifiers for the varous aircraft included in the game packages. Plane "X" has more "lethality points", "speed", "strength" than plane "Y" therefore it must be "better." Such comparisons even use coloured bars side by side so that you can see that one aicraft has a longer coloured bar than the other (longer is better, right? ), then numbers are added and the resulting figure is what is used as a measurement. It was computer games that concluded the Bf 109 F was the best, but that is a faulty yardstick. That kind of "game stats" mentality taints many conversations about aircraft on many forums. There are tons of examples of weapons that, on paper, have better "numbers" than their counterparts, but failed spectacularly in the field. Here is an example of my own. I had a very fancy Sony Experia mobile phone with impressive megapixel numbers, impressive processor, impressive memory, lots of numbers and acronyms to describe the fanciness of the screen, and a large price in euros to match. It had one slight flaw: it had to be charged every day. I was in Japan and I used this phone to travel from one point to another. I used the phone for the underground train schedule, the digital train ticket was on the phone and I used the maps app to get me from where I was to the train station. One day, while I was heading back to my hotel in Shinjuku from a trip to the Tamiya shop in Yokohama, the battery simply drained in late -afternoon. My fancy "digital assistant" was just a brick and no use to get me back to my hotel. I went analog, I got a taxi to the nearest train station and I bought a new ticket. When I returned back home I promptly changed my fancy phone for a much cheaper Nokia phone (170 euro!) with less impressive numbers to describe its awesomeness but with a battery that lasts three days of moderate-to-heavy use. Three years later I am still using this phone. I was oging to tell you the story of the camera I use the most these days, but I think I tried your patience enough. Where am I going with this? Fancy numbers and fancy do-dahs mean nothing if they fail when you need them the most. The Bf 109 G was not the best because it had better "speed" or "punch" or "weight" numbers, it was the best because it did what it was expected to do more reliably. Radu5 points
-
1:32nd scale Salmson 2-A2
Uncarina and 4 others reacted to sandbagger for a topic
Hi all, I've now added the pilot's Vickers machine gu ('GasPatch replacement), gun sight, ring site, mirror and coolant header tank. Also the wind driven pump/generator, with pipe from 0.4 mm diameter black tube from 'MFH'. Just the ailerons and control cables wind screens and observers weapons to add, then it's onto the figures, Mike5 points -

Tamiya F-15E
Hrvoje and 4 others reacted to Stokey Pete for a topic
A few more photos. I managed to tweak the support rods to create a more interesting pose. One that can be used either top surface facing, or more interestingly, showing off the deadly arsenal attached to its belly. There were one or two decals that silvered a touch but nothing drastic. It’s not like I’m looking for awards anyway. I’m afraid, I’m a bit stuck for a decent, uncluttered background, so they’re not the greatest.5 points -
Jetmads 1/32nd scale Viggen. What can I say? An impressive model. Very well engineered and very well presented! Resin is brittle, so careful handling required at all stages. Camouflage, it had to be done in fields and meadows! was achieved with Humbrol enamels and a lot of masking tape! I have always loved this aeroplane and now I have one in 1/32nd scale, well I am very, very happy. Thanks for looking Angelo4 points
-
Hello When it was released some years ago, the Tamyia Spitfire was my first LSP. After sometime I started to question some of the choices I made, especially leaving the engine visible. As I was not happy, I decided to redo the built, unfortunatly for some reasons (probably my lack of skills at that time) I couldn't fit the engine cowls.. So guess what, I started other with another one (meanwhile, an other idea took shape in my mind.... i'll see in another thread.. Not much to say about this one, everything was already said about this magnificent kit. I used the Renaissance decals dedicated to the Free French Spitfire to depict the aircraft used by Cdt René Mouchotte. It is probably aboard this particular aircraft that he disappeared.4 points
-

Lancaster from above
D.B. Andrus and 3 others reacted to Finn for a topic
Here is another one, the caption said it was attacking a V-1 site: Jari4 points -

Trmpeter SU 27 UB finished
Hartmann352 and 3 others reacted to Martinnfb for a topic
4 points -
Also worked on a few other odds and ends. Got the gear door mounted in the lower fuselage. Still needs a lot of work but it is a start. As I am using TLTL (Thierry Laurent's Tweak List, it will be TLTL from now on) there needs to be a panel line added to the right wing as it was removable. I have it penciled in where it has to go, but on the underside wing it is really close to RCS. Not sure if that is supposed to be that way as I can not find any picture's of it. Here is a closer view of the lower wing. Anyone know if this is correct?4 points
-
Got an organized bench/work area? Post pics!
scvrobeson and 3 others reacted to matt_1185 for a topic
Just recently got a new desk, far more room than previous desk haha4 points -
 Hello everybody! We are proud to present our new product! 1/32 F/A-18С Early 3D-Printed & coloured Interior on decal paper (for Academy kit) Article: QD32101 Price: 26€ Available to buy on our website: https://quinta-studio.com/en/product/453/ Also available on: https://www.ebay.com/itm/165276416023 https://www.etsy.com/listing/11436723063 points
 -

1:400 scale DSS Bonestell
Brett M and 2 others reacted to Phil Smith for a topic
Here is a project designed to scratch an itch composed of a few parts: 1) my fascination with spaceflight, 2) a box of random parts seeking a home, and 3) fun with miniature lighting effects. The result is the Deep Space Ship Chesley Bonestell, an interplanetary spacecraft one could imagine being built and operated many centuries from now. I'm not an engineer, but I've worked in the industry for many years and can play among engineers for a few hours before it becomes clear I am an imposter. This thing would carry a few hundred people to destinations within the solar system. It is powered by a nuclear engine, perhaps an inertial confinement fusion drive system. Tanks and so forth are located in the propulsion module, which is shielded from the forward and middle sections. The middle stretch is composed of microgravity labs and storage, possibly probes. The habitation module spins, something on the order of 1 RPM to generate just under 1g along the circumference. A dome of thick material shields the section from oncoming debris and radiation. I imagine the forward section having the capability to separate and move on its own in an emergency, so there are tanks and engines inside there, despite being difficult to see. The model is composed of an old gundam kit I picked up for parts, an aspirin bottle, wheels from the crewed rover seen in the movie "Moon", parts of the 1/72 Saturn V kit, a nifty kit from China of the space station in "Wandering Earth," some antenna bits from Tamiya's 1/350 CVN-65 Enterprise, ping pong balls, and parts from a 1/72 Discovery kit (as in 2001: A Space Odyssey). The lights are from Evan Designs - excellent products and service, and I highly recommend that business for your lighting needs.3 points -
I am! Its like working on my car.............when I'm behind it I get exhausted, but its better than being in front of it and getting tired!3 points
-

Z-M Bf109G-14 “Old Man Blog”
cbk57 and 2 others reacted to Citadelgrad for a topic
Another thing, totally unrelated to the issue of technology, was the German philosophy of how to use fighter pilots. They put guys into fighters, and if they weren't good, they died. Sure, they had a handful of Hartmanns, etc. Massive kill counts. But massive because, all Germany saw in them was a talented fighter pilot. They stayed in the cockpit until the war was over or they died. The US and other allies took our best and brightest pilots and had them help train even more pilots in what works, what gets you killed, etc. Top gun etc are a direct result of this philosophy. EDIT, of course the US in particular had massive resources of potential new pilots, snipers, tank commanders, etc, but still, the decision on one hand to use up talented people until they are dead versus picking the best and having them train replacements is a big one.3 points -
McDonnell Douglas OA-4M Skyhawk "MAG-32" - Hasegawa/Trumpeter
Starfighter and 2 others reacted to LesterPK for a topic
OK, I think I have it (after a couple of hours searching). I believe the name is MAJ JJ KREJMAS JR, I also thought it was MAJ JJ something JR, I found a find a friend style site for MAG32 and M&HS-32 but no luck with any JJ or Jnr there, so then I googled "skyhawk pilot Maj JJ Jr", first hit is about an accident at VMA-214 in an A-4F flown by a Capt Joseph Krejmas. So then a search for Capt Joseph J Krejmas turned up a USMC university PDF about 7 hits down, this appears to list all units and their senior officers in 1990, and what do you know, one Maj JJ Krejmas Jnr is listed under HQ MAG-32. Link to photo below, don't think I have enough posts to be able to share it directly from Flickr. https://www.flickr.com/photos/167022908@N03/51820205788/in/dateposted-public/ Now going back to the best photo you had, it definitely looks like a J in the middle of the surname, MAS looks like MAN as you thought it was BELLMAN but not quite right. What do you reckon? PS-he retired a LtCol.3 points -
I’ll give you the beer for sure. My mug is filled with Belgian or Trappist nectar on most occasions. I had fun poking around trying to track down other possibilities for Maj. Sometingman’s actual name and callsign; looking at veteran websites I belong to and finding no matches. Though MAG-32 is painted on the side of the jet Maj. Somethingman would not have been the MAG-32 Commanding Officer, that billet would be a bird Colonel. Maj. Somethingman would be the Commanding Officer of H&MS-32 (the ampersand should be included in google searches) which could be a Major billet. H&MS units were broken up into Maintenance Aviation Logistics Squadrons (MALS) and Headquarters and Headquarters Squadrons (H&HS). As purely support units they often would have Commanders that did not go through a command selection board, thus Majors were occasionally Commanding Officers; at least they were in my day in the early 2000s.3 points
-

X-15A-2
themongoose and 2 others reacted to Dekon for a topic
Sorry for the crappy cell pictures. Looks like I might break out the DLSR. Also, anyone have any tips on how to deal with the seam at the rear between the upper and lower sections? You can see the gap at the bottom. Richard3 points -

Trumpeter F-105G (Done)
Daniel Leduc and 2 others reacted to denders for a topic
Well, the underside is painted gray and the top side is almost ready for some color.3 points -
Nice work with the foam. My Bearcat is built up with it. I sort of wish it was harder would be my only complaint. It's almost too easy to work with but once you sort of respect that, you can adjust.3 points
-
Ok, I have printed out the starboard wing. Here is how the Vigi looks right now. And yes, it is getting big! Everything is dry fit at the moment, I want to get the wings sanded and primed, scribed and riveted before it is glued in place. And here is a rough prototype of the drop tank. I am thinking of printing the tank and pylon as one component. That way the tank is securely affixed to the pylon and sitting straight and level. Currently I cut the slots for the fins by hand. Final print will have the slots for the fins added at the digital level. Cleaner and more precise that way. It seems that every time that I print something I get the wonderful idea to make an improvement, which necessitates changes to the cad drawing. If I was thinking of what the finished, final configuration would be I would save myself some filament and printer time. If only I was that smart. Dan3 points
-
1:32nd scale Salmson 2-A2
Uncarina and 2 others reacted to sandbagger for a topic
Hi all, I've added the vent pipe from the fuel tank, using 0.4 mm diameter black tube from 'MFH'. Also the four wireless wires, made from annealed and twisted 0.2 mm diameter copper wire. Now onto the front end parts, Mike3 points -

F-14D VF-213 NH101: Major Decision Time
jeroen_R90S and 2 others reacted to Crew Dog for a topic
Another milestone has been hit, thanks mainly to an executive decision I made regarding a bit of detailing: the front end is now closed up! The original plan was to have the Wolfpack refueling probe assembly installed without the main fairing on the probe, since 99% of the reference pics I've seen of operational jets underway during the timeframe I'm aiming for ('99-02 cruises) and immediately after show the panel removed, no doubt due to availability while underway and necessity of that particular panel. Since this will be NH 101, being the CO bird, she would've been taken care of a bit more. Especially due to the lion head nose art, she most likely would've been a dog 'n pony show jet, though still out doing work while with the fleet. So, after deliberating with coworkers (who are all former USAF Maintainers) and the almighty General, I opted to close up the gap with the included panels. The rear panel went on without a hitch, but the forward one needed a bit of sanding and "convincing" to sit flush with the rest of the fuselage. Surprisingly, and contrary to the horror stories I heard about this particular section, the tolerances aren't that bad, and will not need any filler to shore up the panels. After spending quite a bit of time aligning the nose bay, I finally was able to secure it to the left fuselage with superglue, constantly checking the alignment for any sort of settling or angling. Once I was happy with the lay of the nose bay, I sealed up the forward section, minus the bottom plate (due to wanting to have access to the nose bay to secure it to the right side as well.) I then lined up the forward coaming, and set that in the pit. Unfortunately, that is where fit issues reared their ugly head. I used the radar bulkead without the dish as a structural member, and as a result, there is a nasty gap on the upper forward seam. Luckily all the detail there seems very salvageable once I get on to the gap filling stage. The rear section, luckily, fit much better, especially when i pushed the cockpit down a bit to ensure it will be flush with the outer fuselage. A quick sand/blend job and restore any lost detail. Additionally, I am calling, for now, the burner cans done, having added the Gunmetal to the overlaps (it sprays much different than hand painting.) I will still hit the forward third with Hot Metal Sepia to tarnish them, but other than that, they're good to go. I have also prepped the rear lower fuselage in anticipation of Zactoman's fix to the most glaring issue with this kit. As always, thanks for stopping by the hangar!3 points -

Hawker Hunter - Masquerading as Miss Demeanour - Finished :-)
Sepp and 2 others reacted to themongoose for a topic
Tonight i have the fuse assembled and the wings on. I have to say Revelogram did great with the fit on this model. So far minimal filler, and even that has been all perfect plastic putty. I sprayed some vibrant yellow behind the jet intake strakes and we’re off to the air show. still more sanding to do on the belly. The plastic near the join to the cockpit area is really weak as others have pointed out. Needed to get it all glued before final gluing and sanding of the fuselage halves there. a little clean up of the ppp once it dries and this will be so smooth. My big goal is full primer by the weekend.3 points -

Vigilante
blackbetty and 2 others reacted to Dandiego for a topic
Slow but steady progress. Newly designed wings. What did I change? The profile up against the fuselage was made thicker. This added thickness was also added to the whole wing so that the outermost portions were thicker and less prone to breakage. I also re-aligned the slots that the metal connecting tab goes into. On the first wing the slots were mis-aligned and produced a "step" on both upper and lower surfaces. Not anymore! Drop tanks. The Vigi didn't often carry tanks but mine will. Or bombs, ( I have pictures). My sources said that it carried 400 gallon tanks. I looked up the dimensions on a 400 gallon tank, drew it up, printed it, doesn't look right. Way too fat. So I found some extra tanks in my spares box. You can see the difference. So I used the small diameter tank as a guide and printed out some new ones. And some pylons. That's all, Dan3 points -
My wife and I decided today would be a hobby room day, and it was a nice snowy day to be relaxing in the room. My focus was to get the build ready for a coat of primer later this week. I was able to get the seats and canopy installed, and the canopy is masked. Now the fun part begins! My last two GB builds crashed and burned when the painting began, but I figure the third time will be a success. Fingers crossed. Thanks for looking in.3 points
-
This build was inspired by one of the most beautiful aircraft to grace the sky. Its participation in the Korea War was a major part of the Sabre's legacy, and it held a special place in the hearts of the small group of South Africans who flew it in combat. This is the photo that inspired over a year's worth of tinkering with a 1972 Hasegawa kit, that proved to be more accurate than Kinetic's 2007 attempt at the same aircraft. I'm not going to rehash the story here, but if you feel inclined to find out how it all came together, you can see the build here: Enjoy!2 points
-
Those exhausts do look challenging, Brian. You must be exhausted! Kev2 points
-

McDonnell Douglas OA-4M Skyhawk "MAG-32" - Hasegawa/Trumpeter
Starfighter and one other reacted to easixpedro for a topic
Holy cow, good find! Did a little digging with that info. His call sign was "Famous" Think that is what is under the name.2 points -

Hrvatska kockica
Anthony in NZ and one other reacted to blackbetty for a topic
i assembled the seats and added some lower belts on the seat cusion beause there were non these seats only resmble the real thing up to a point, bit i will close the canopy anyway and hope for the best2 points -

Nuclear Delivery Testing
D.B. Andrus and one other reacted to Pete Fleischmann for a topic
Nuke delivery was/is part of the F-16 RTU course. We even had a TOT competition between the students for the title of “Duke of Nuke”. The B61 Silver Bullet is the coolest bomb I’ve ever seen. The polished silver body and Bakelite nosecone are right out of Dr. Strangelove. I periodically get asked about my feelings about my nuke delivery training. My perspective was that if anyone ever told little old me to chuck a nuke, the whole world had probably gone to shitz anyway; so let that sucker fly! cheers P2 points -
OUCH! Sincerely, Mark2 points
-

Airfix announcement - 1/24 Spitfire
Derek B and one other reacted to Captain Boogaloo for a topic
Well, stap me! It seems the modelling gods are truly generous right now! Ahem, of course some brave soul is putting the finishing touches to a Griffon engined Spitfire conversion set in 1\24 scale even as I type this ( on the basis that at the moment one has to but wish for desired models and they appear/ are announced for release......!!) If only it were true....... Awesome....still can't believe Airfix have done it. I've been grinning like a goof all day! Blue Skies! Captain Boogaloo2 points -
AIMS 1/32 Mistel S3
Tolga ULGUR and one other reacted to Pastor John for a topic
AIMS 1/32 Mistel 3 update....Hi everyone, started painting the fuselage/wings. As with a number of other G-6's, G-10's and even a finished G-7 fuselage you have a massive tonal difference between parts with the lighter shade being used also to break up the darker shade along the fuselage and leading edge of the wings. It is really academic whether the darker shade is an undocumented green shade of RLM 76 or old stock of documented chemically unbalanced 65 - I do not really care as I am more concerned simply with trying to replicate the contrast. I always thought, and have always illustrated on decal sheet instructions that the clouds must be a bright RLM 67 Weiss, never stopping to think that it was washed out 76 and the area behind it was darker than normal. Well anyway I have started and am enjoying it. The next step will be to mask off the washed out 76 subcontracted parts and then spray the greener shade. I hope you like the contrast and if you are familiar with the two photos of Ju 88 G-10 W.Nr. 460065 then perhaps you will more appreciate what I am trying to do. Thanks for looking and taking an interest2 points -
Fantastic progress, Peter! For future reference, here are some pics of the floor area (from a P40K), note the panel lines continuing across the span of the wing. Hope that helps! Denzil.2 points
-
thanks chaps It is like Christmas morning here in the airscale house.. my giant PE sets turned up, perfect as always from PPD a walk around.. left to right - gun sides, cockpit floor, below that main gear door inners lower canopy, canopy retraction mechanism & wheel, rear cooler meshes, below all that main gear roof parts.. cockpit parts, rudder pedals, cowl flaps, fuselage cockpit bulkhead formers instrument panel, throttle quadrant, tailwheel door inner flap ribs.. cockpit parts, belly tank / bomb shackle, fuselage hatch ..rudder mass balances, wheel parts, bulkhead 5 backing plate fin spar, rear canopy skins, bulkhead 5 face plate and in the middle of that cockpit parts ..chin radiator / cooler meshes seat parts.. ..very happy with how they turned out, just need to remember what they all are now TTFN Peter2 points
-

(Infinity) 1/32 SB2C-4 Helldiver
Martinnfb and one other reacted to Huub van Dijk for a topic
Also did scratch build the recognition lights out of transparent colored plastic buttons2 points -

RAF FG.1 XV571 WILD HARE Phantom Conversion
Rockie Yarwood and one other reacted to Anthony in NZ for a topic
Not a lot to report, but it's a new day. But I decided in the interests of getting the wheel wells done nice and cleanly I would cut this part out of the fuselage paint Mule Trim neatly to fit This being the result....much tidier I think? Now I think I can continue on (both sides now done) and add rib detail Lets see what today brings, but my wife thinks I am neglecting some jobs around the house that need tending to before I go back to work...... Cheers Anthony2 points


.thumb.jpg.5da8bff9741de420eb2e87addd8f2cf6.jpg)
