Leaderboard

Popular Content
Showing content with the highest reputation on 11/25/2021 in all areas
-

Hasegawa F-16A The NAVY's best jet.
chuck540z3 and 13 others reacted to Cheetah11 for a topic
In 2002 the Navy Aggressor unit at NAS Fallon Nevada received 14 ex Pakistani Air Force F-16A aircraft, these having being embargoed and in storage since the late eighties. This resulted in some of the more colorful color schemes to be carried by the F-16. The model was scribed and a few details updated to represent the NSAWC Vipers like the Data Pod and the intake scoops added to these aircraft. Pilot ,AIM-9L/M training missile and Aces II seat from Tamiya in spares box. Reskit provided wheels. Profimodeler provided the short pitot and the rest mostly scratch built. Despite its age still of my favorite kits. And ready to join the other Vipers in the pit. Cheers Nick14 points -
Thanks one and all! All of the nice comments really do provide a good base for motivation. And to that end we are 95% done, with only the XM-158s left to add, which I will add later, then take some RFI shots. The kit was great fun, and I would highly recommend the kit with the addition of an RB Productions 1/35th M134 (yes it fits perfectly) and either a mod to the landing gear to strengthen them yourself, or hopefully we will see a brass set from Ali @ Aerocraft Models. These to me were two of the very glaring weaknesses of the kit. I also added some SS tubing for the tail rotor shaft and main rotor mast, as well as rear earth magnets in the tail rotor for easy removal for storage and transport. Yikes! I did myself in again and dirtied both benches, as I still have my next project on the main bench. Things ended in quite a mess. *sigh*..........they always do. My next/continued project feels near buried! In the end I got there though. As I said previously, the kit is not perfect but with a few additions can be really fun and you can have yourself a hell of a nice looking model in the end right out of the box. Here are some temporary bench shots until I can take some RFI shots when its actually finished: The tail rotor can (literally) now be installed with a single finger yet still spins. Handy for any show and tell and such The RB Productions M134 Minigun is 100% needed IMHO. This is the 2nd major weakness of the kit, as the OOB M134 is pretty terrible and in its position in the chin is highly noticeable. The OOB M129 was go great shakes either, and didn't even have an open barrel IIRC. I scratched my M129 from some SS tubing sleeved with some wire insulation and styrene sheet for the guide. The RB Productions M134 is a real standout, and looks amazing IRL: Thanks to one and all for following along. Ill be putting the model up for a bit and I will post some better photo-booth quality pics once I finish the Cobra. Since Mikkel has been generous enough to offer up his experience in 3D printing the XM-158s, I will be shelving this one for a tiny bit while Mikkel works on those. No rush I figure, as I have plenty to do in the mean time, and there is anther project already on my bench that needs my attention. Cheers and happy Thanksgiving to all my countrymen! Thanks to one and all for following along!10 points
-

1/72 DHC Dash 8-300
scvrobeson and 7 others reacted to chrish for a topic
Good relatable stories. Carrying on with some, what I call, improvements I have decided to make a representation of the exhaust pipes, using aluminum tube and a bunch of filing and sanding I've gotten to this point, new pipe on the left, kit part on the right; Both sides cleaned out for pipes and with the pipes I'll be using (already test fitted) the engine air intakes will also need to be opened up, re-profiled and just generally fixed. Thanks for looking8 points -

Hawker Tempest Mk V Revell/Special Hobby 1/32
Lud13 and 6 others reacted to Daniel Iscold for a topic
Did not use nose correction made by Barracuda. This beast fought me all the way. I wish to thanks Mr. Chuck Sawyer, for his precious pictures of his build, they helped me a lot during this build, and where a great inspiration. Revell decals are great (printed by Cartograf I think). The roundels are painted using homemade masks. Eduard PE to make the office a little bit busier, home made seat belts using spare PE seatbelt buckles. The pitot tube is made from steel tubes. Hope you like my model fellas.7 points -
thank you all, i really appreciate your kind comments! a special thanks to Zac, I just had a look at the Hadfield's videos (i didn't think at that option, til now) and I found some weak spots in my building, I have to corrrect these asap! tonight just a couple of little things i did today in the wake of what I did yesterday: the compass, that will go under the main IP, then established the size of the additional tank. still missing some stuff, but as a basis it works. now let's face it: this is the Mk.III, I threw away two, before guessing the right shape and size. to his left the bench installed on the SD instead of the gunner's seat. this allowed to seat two people (how I have no idea, the spaces are really small) and to contain the parachutes for the passengers. since I was in the tank area, I decided to throw the kit one (on the right) and to redo one that conforms to the space in the fuselage and above all to the photos which fortunately are abundant. even here I'm far to call it done, but the basis is there. I then gave the elevators some primer, and made the rudder in the same way. I would say that we are, I could switch to wing, aileron and flaps, except that I have almost run out of rivets, I have to wait for the order while traveling so far to the borders of the empire. it may take some time... between a minor job and the other I carried on the spats, and I almost see the end of these, at least until some primer will reveal more work to be done! the wheels are pitiful, but I really don't know what to invent, to come up with a credible tread. and that's all for today, I'd say. cheers, Paolo7 points
-

Airfix' next large scale model?
clarkis and 6 others reacted to ade rowlands for a topic
Last week they were sat at the desks building the Quick Build Spitfire and on both the guys desks there were other brands of Models. I saw an Eduard Tempest and I think on the other desk was one of the Arma Kits boxes. I wouldn’t read too much in to it. They obviously aren’t taking notes on other brands either as they still keep turning out kits with surface features I could park and lose my car in. I looked at one of the new Vampire kits the other day and was half expecting to see an X-Wing being chased by 3 TIE Fighters down one of the wing panel lines it was that deep it could have doubled for the Death Star Trench run.7 points -
Start your Tiffie... I just finished mine and it was a very enjoyable experience. Surface texture lacks finesse and there is for sure room for improvement with regards to molding quality but engineering is first class. More pics in RFI soon. In your list you missed the 1/24 Stuka, which is still a winner I think. Tristan6 points
-
Thanks yes, I traced the rough angle of the outlet onto the aluminum tube then transferred the angle to and sawed a slot into a piece of channel then put the length of tube in the channel and cut it with long ends, then cut those square ends with a “imp” tube cutter. That way cutting one angle cut gave me two matching angles…hope that all makes sense?6 points
-

ICM Gladiator Milestone.
Jan_G and 4 others reacted to Bradleygolding for a topic
So here it is, the first 1/32 model I have completed since about 1975 when I made a couple of Hasegawa inter war biplanes. It's not perfect, but I just wanted it out of the way to work on other projects, like the still uncompleted WnW Felixstowe. Although that will have to wait a little longer. What did I think? Well generally it's a really good kit, great fit and reasonable detail. Only the seatbelts were added. I do have one or two niggles though. The plastic is very soft and weak allowing many small parts to break if even breathed on, I wondered if Revell's version would have Revell's plastic which is stronger? ICM show rigging spreaders between the wings, and a mast above the wing, but these are not part of the kit. I almost had to buy a biplane jig to put the top wing on it was so tricky. I still think it slopes forward too much, and the box unless shut up completely allows small parts to fall out and disappear! Apart from that all good. Steve5 points -
Sorry for delay guys. Decals came berofe 25 minutes. Your orders will be send tomorrow morning...5 points
-

Z-M Bf109G-14 “Old Man Blog”
daHeld and 4 others reacted to frothingillbellows for a topic
I cant see the point of criticising the ZM 109 because is not like all the other 109’s. Why should ZM build a hollow shell kit that everyone else has already produced? They are offering some unique modelling interpretations to whoever wants them. ZM should be universally celebrated for expanding the boundaries of the hobby.5 points -
Great work, Tom. Really impressive. Maybe a diorama would make the whole size thing more manageable?5 points
-
The beast is complete. I'll do better pictures another day. It's too dark for that now.5 points
-
.thumb.png.84c5d3a464f2dd83f0ac37a5aac81ec8.png)
1/15 Bf109 " my first fully scratch build"
TAG and 3 others reacted to Antonio Argudo for a topic
some progress update, the nose ribs were glued, also I am thinking about doing 2 interchangeable noses using some aluminum tubing system and some magnets, one closed and a second with open cowling covers and displaying the engine, right now playing around the cockpit dimensions and elements, thanks for watching, cheers Tony4 points -
Thanks for all the compliments and interest Jeff, Brian and Maru. Really appreciated. Hi Pete, tanks for the compliment. This coming from a former F-16 pilot is special. The F-16 has been my favorite fighter since the YF-16 showed up and I have built most of the 1/48 and 1/32nd models . First one the old Tamiya 1/48 prototype with the vertically split fuselage. I think this is my sixth Hasegawa 1/32 one and as you mentioned a challenging kit. But as they say 'the familiar touch of an old lover'. Interestingly the Navy had to find an Air Force plane to simulate the Mig29/Su27 threat in the form of the F-16N in the late eighties and then replace these with the F-16A in 2002. The replacements for these are rumored to be more Vipers. Good luck with the move and happy modeling. Nick Hi Ron thanks for the compliment. You are right the F-16 have gained a few pounds. As a youngster I remember being super impressed when Janes pocket book quoted the empty weight of the YF-16 as 12500 lbs. with 24 000 lbs. of thrust. A little far away from the Block 60. My Belgian friends said the F-16A was a fair match for the F-16C. Not as much thrust but better wing loading. Cheers Nick Hi Alain, tanks for the interest and the compliments. I hope your Friends at Master194 would like the amount of "juice" on this one. I hope the winter is not too cold this year and you can do a lot of modeling. You wanted a few photos of the F-16F. Here are a few. AM seats, nozzle, and undercarriage bays, the rest all scratch build. BTW I have started cutting the fuselage of the F4u-5. Cheers and happy modeling Nick4 points
-

Many Messerschmitts!
Martinnfb and 3 others reacted to Bruce_Crosby for a topic
Hi Guys, You may remember I made some masks for the 109 walkway boundaries. If not. here's the screen of my computer. Here's the OraMask 810 and I've made a start weeding out the little rectangular segments. It actually worked! Port wing with the mask removed after airbrushing some MMP Red paint. Starboard has the mask in place but I haven't added the overspray shields yet. This is the Hasegawa G-6 with both walkways finished. And here's the Trumpeter K-4. I'm going to let the acrylic paint cure overnight then tomorrow's task is to apply some Gloss Varnish so I can start decaling over the weekend. I was filled with anxiety about these mask, in reality they were really easy to locate and airbrush on the red paint. I managed to screw up one mask so ended up using one set twice. There will be a couple of tweaks, nothing serious, then I'll cut and use some more for the next run of 6 off 109's. All in all, a fairly happy bunny! Regards, Bruce Crosby4 points -
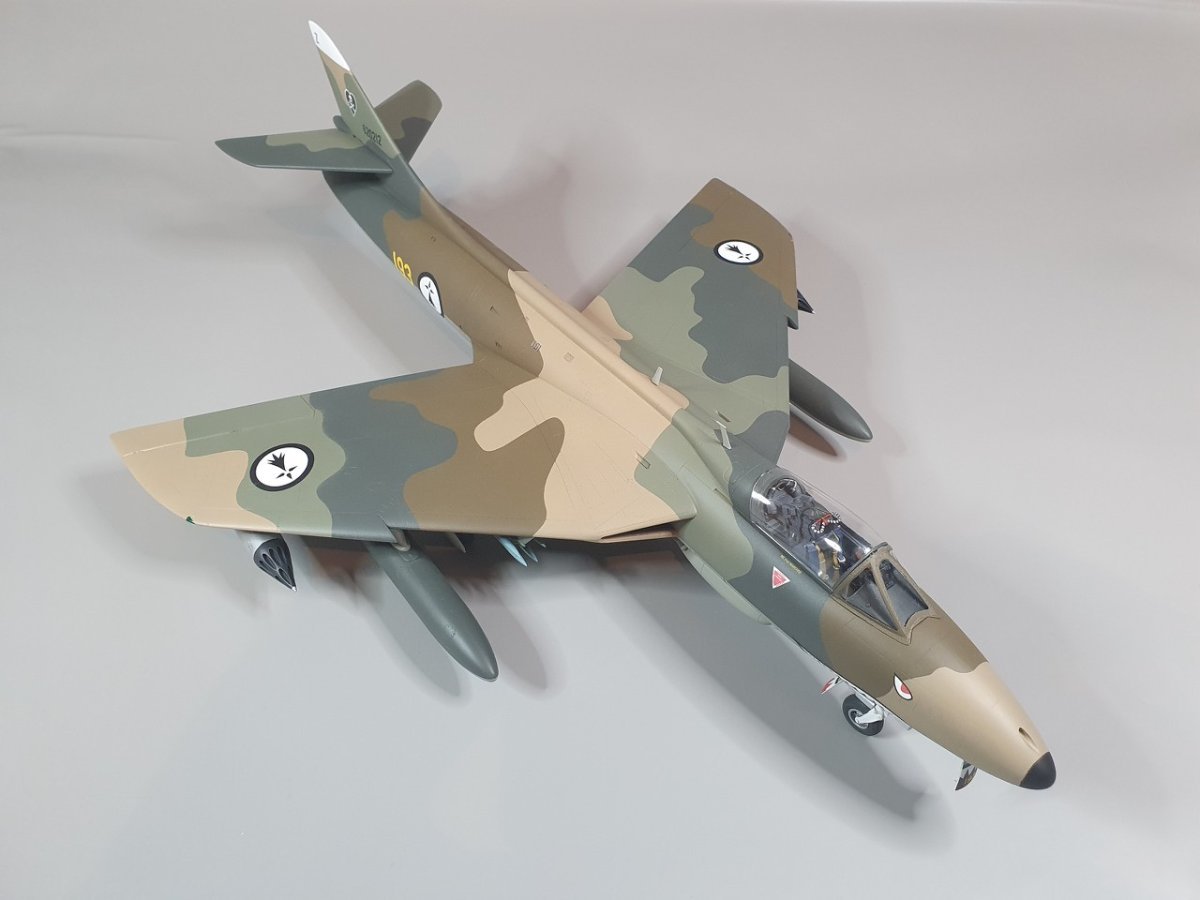
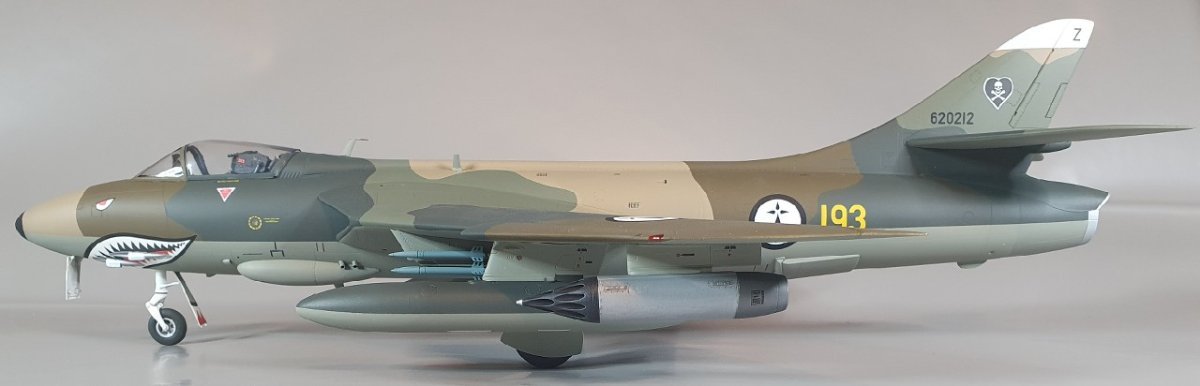
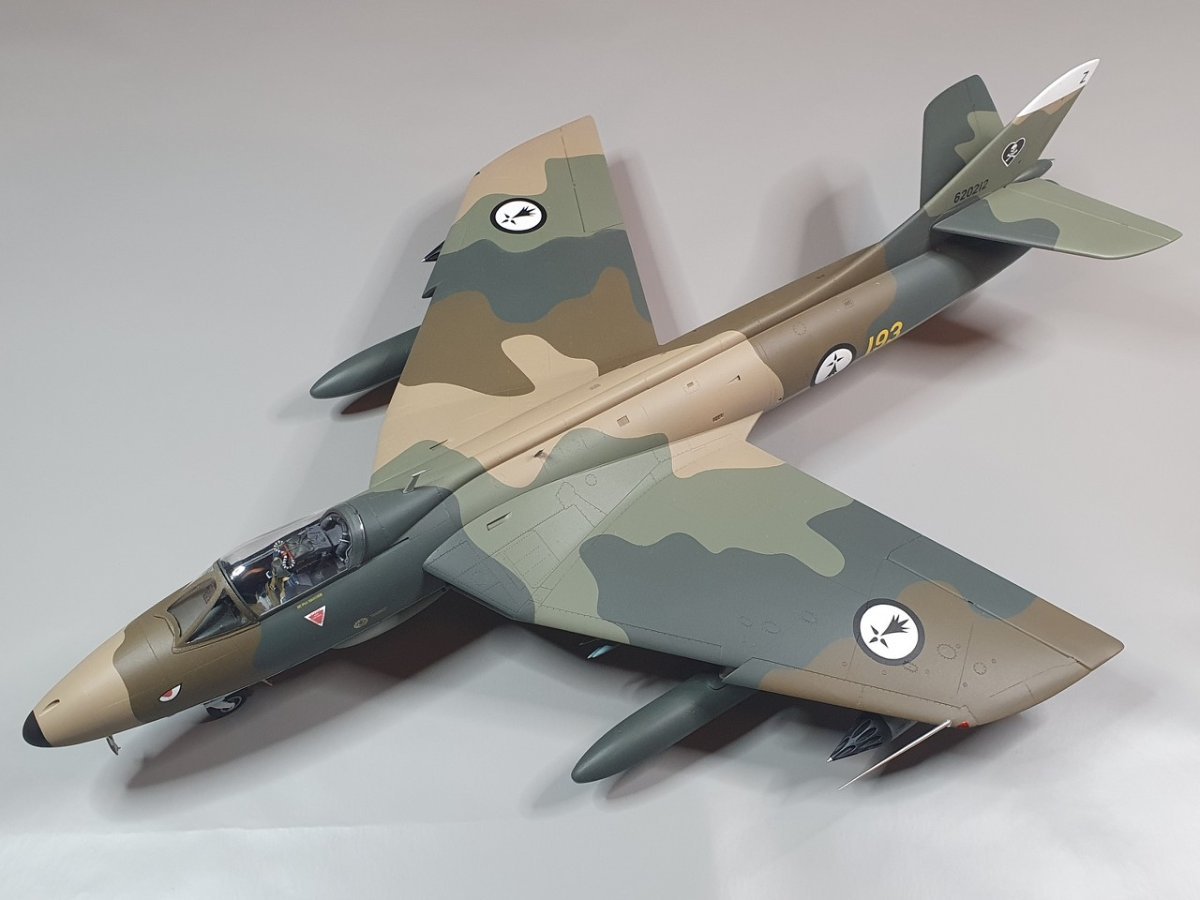
Sepp is here with a very nice Hunter FGA 9 that has a little twist with the markings. Great work mate. Link to build thread;
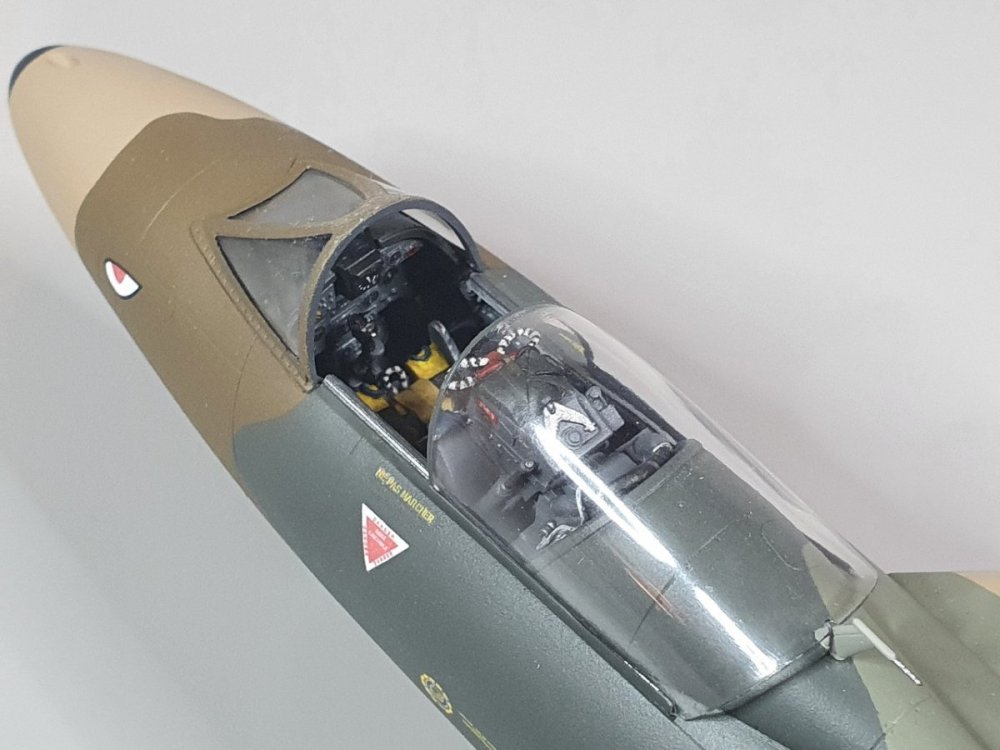
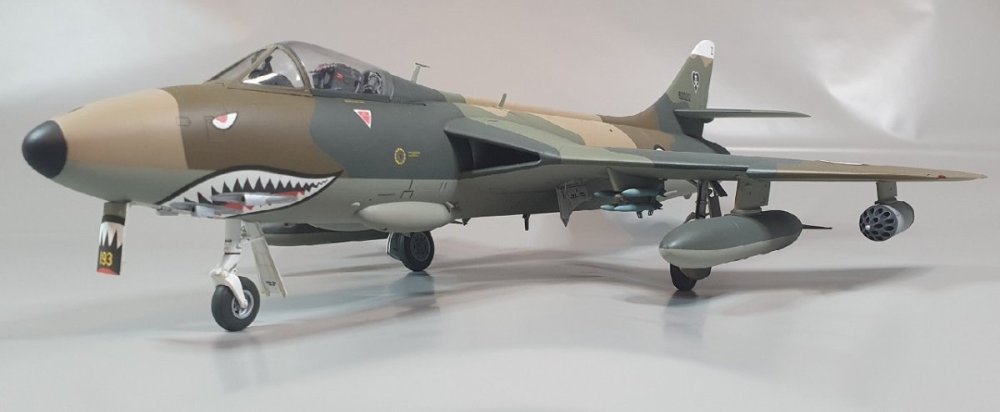
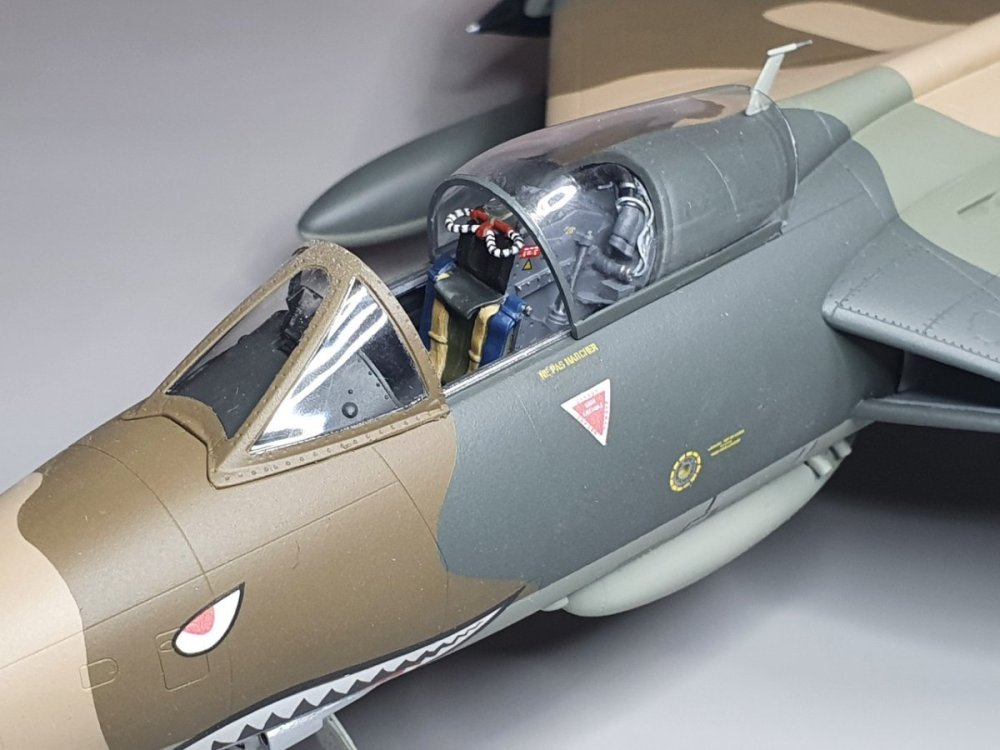
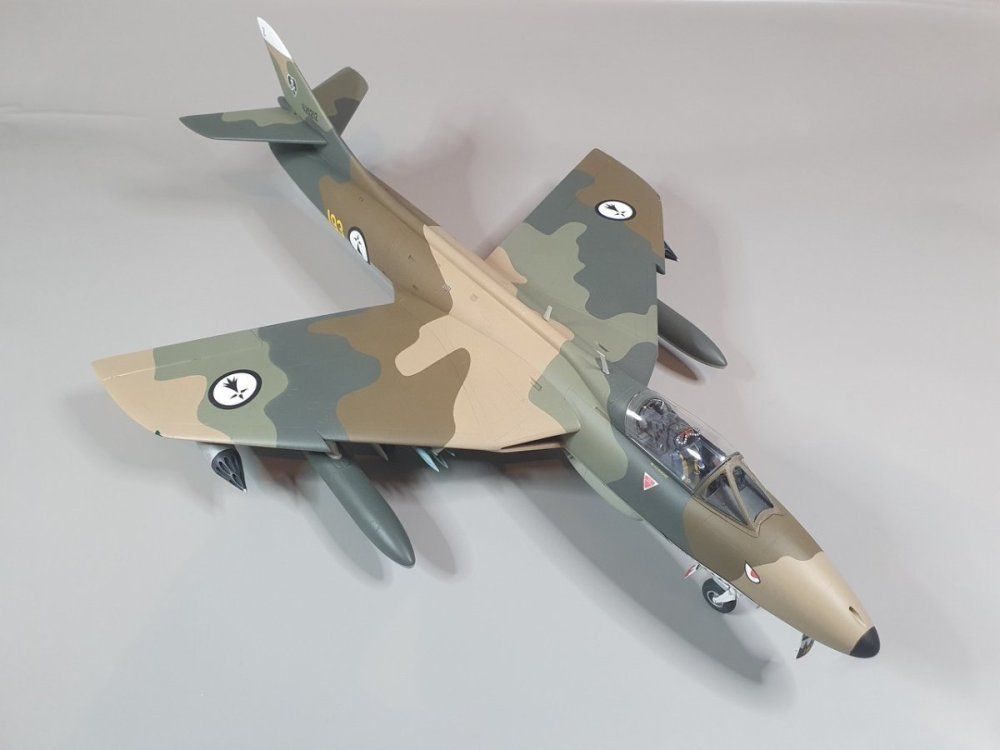

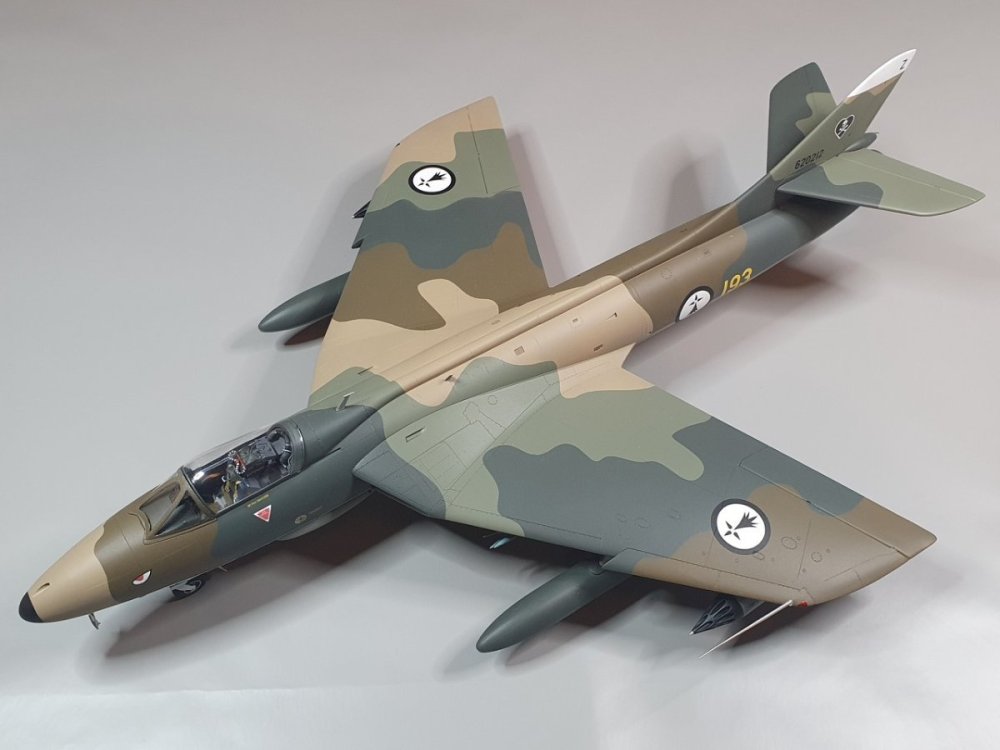 4 points
 -

Ju-188 conversion builds
chukw and 3 others reacted to The Phantom for a topic
My JU188 conversion arrived today. Now waiting on kit from uk then moving house.4 points -

1/32 Modified Zoukei Mura Do-335 B-2
scvrobeson and 3 others reacted to mc65 for a topic
I see... obviously the magnetos solution is the simpliest to do. hinge like the real is challenging due to the thickness involved: to achieve a natural movement the cowlings should be as thick as the real, in scale, wich is near impossible (ask me why I know?). the best way for this "conventional" approach I think is use very thin brass foil to replicate the cowlings, reinforcing this with plasticard profiles glued in the inside. here an example of cowlings of the right thickness, but wich I found very very difficult to obtain moveable. so difficult that I ended making two separate cowling sets: open and closed, so I may switch from one to another with the help of magnetos to hold these in the respective position. but I found other possible paths, one provides, where is praticable,the use of wire as hinge: it's not 100% true to reality, but it may work. here you may see two wires protruding from cowling and passing through the structure. also is visible a magneto embedded in the cylinder head on the left. please disregard the one on the external side of the cowling, on the right. the two wires (per cowling) allow these to open and close, the magnetos in the cyl heads keep the cowlings tight shut when closed, while the rods, like in the reality, are necessary to hold the upper cowlings open and to prevent the fall of the lower one. another path is based on the magic of the magnetos, and works only with very lightweight cowls: installing magnetos in the thickness of the fuselage panel where is possible, but in positions very near of the cowling, these can act as hinges themself. installing some iron-based wires in the thickness of the cowling panel, normally thiniest than the fuselage, will consent a firm (well, more or less) joint between the parts. positioning the two components with judice, and a lot of trial and error, of course, will let the cowling be opened and pivot around the magnetos, albeit there is not any mechanical hinge. without panel. panel in position. obviously in this case the holding rod is even more necessary than in the other situation. sorry, no picture of the open cowl, for this example. I hope I have not overrun your discussion and have been helpful, in some way! I'm sure there are some other solutions out here, we have just to find these! cheers, paolo.4 points -

1:32nd scale Salmson 2-A2
Greg W and 3 others reacted to sandbagger for a topic
Hi all, A few updates on the Salmson 2-A2 build. The front end is coming together now. The engine assembly is fitted with the painted access panels. The three on the left side are being left off as the intention is to have a mechanic working on that area. I've added the twin cross bracing wires to the front bay frame (0.08 mm mono-filament, 0.4 mm diameter blackened Brass tube and 'GasPatch' 1:48th scale turnbuckles (Type C). I've also added the access panel metal support ring around the front of the engine support beams. The 'GasPatch' replacement Vickers machine gun and the mounting recess in the panel have been slightly modified to fit. Also the carburettor air intake pipe has been drilled out as it was moulded solid. Now it's onto adding more detail such as wiring, terminal box, cables etc to the exposed structure, using photographs as a guide, Mike4 points -
The mechanism for raising the rear light is somewhat more complicated.4 points
-
https://www.flyingleathernecksdecals.com/p/fl32-2025-f-14abd-bomb-racks https://www.flyingleathernecksdecals.com/p/fl32-2031-fa-18abcd-lex-fence3 points
-
PZL 11C IBG 1/32
ScottS. and 2 others reacted to Daniel Iscold for a topic
Lovelly model, just add Master from Poland stuff, great addition to this model! Hope you like my model3 points -

Airfix' next large scale model?
JerseyChris and 2 others reacted to Shoggz for a topic
Having built a number of their recent 1/48 offerings over the last couple of years, I'd say some of the comments about Airfix in this thread are a little harsh. For instance, I have an Eduard and Airfix P-51-D sat next to each other and the differences are not that great. Those panel line comments etc. would certainly have been valid a decade ago, but I think they have got a lot better with their most recent kits. Having only ever had good experiences with their customer services over the years though, I've been bitterly disappointed to hear of Chuck's experience with them for his Hellcat build...3 points -
Airfix' next large scale model?
scvrobeson and 2 others reacted to mark williams for a topic
hehe why doesn't airfix make a big splash and do a 32nd scale Victor....I bet it would sell3 points -
And that is perfectly OK. This model is not mandatory. Radu3 points
-
Hi John, Hope this helps, This is not as hard as it sounds. Paul Stoner showed me how to do it when I had a couple of warped Seamless Sucker intakes. Just cut the upper part of the front of the intakes off the fuselage and glue them to the two intake parts, B26, B42 and B27, B43. Glue the intakes into the exterior side fuselage parts A1 and A2. Then glue a piece of 10000 plastic sheet over the joint/bump in the mating area of the trunks and parts A1 and A2 as shown below. Use your favorite filler to blend in the step and sand a little and viola seamless intakes as shown below. Oh and tapping sand paper around these little guys really makes the sanding go a lot easier. All told I think a spent less than 4 hours total over two days (drying time for the kit parts does add a little down time) on both intakes from start to finish. Good luck with the build.3 points
-
Added these guys to the collection today cant get enough Bandai 1/12 scale they are getting hard to find3 points
-

Z-M Bf109G-14 “Old Man Blog”
LSP_Matt and 2 others reacted to esarmstrong for a topic
^^To Radu's post above I say amen. I have been waiting for this kind of 109 to be released and ignoring the others. Some like pop music; I like symphonies when it comes to the 109. Very glad that someone like Zoukei Mura is out there producing these symphonic beauties.3 points -
dashboards painted3 points
-

1/32 Trumpeter F-8E sidewinder?
Daniel Leduc and 2 others reacted to Dave Roof for a topic
Working on the single mount adapter for the LAU-7 now. Hope to have something available by the end of the day. The single mount AERO-3B will be added to the line and uploaded to the web site within the next few hours.3 points -
The model was designed in such a way that it can be built with one side complete and one side without “skins” in order to show the skeleton. The interior (as well as the exterior) was designed as accurately as possible, using factory drawings and measurements of the real thing, of course all within the tooling limitations. The internal structure is not superfluous, it is still very visible from outside. For example the wing structure, apart from giving extra strength, also contains the wheel wells, radiators, the operating mechanism for the leading edge slats. If built carefully, the leading edge slats will be “operational/movable” and can be set in either position, which should please all “purists” who insist that they were always open/closed. The interior of the fuselage is very visible if the radio hatch is open and the model was designed in such a way that you do not need to glue the radio hatch, you can easily remove it to show the interior. The Zoukei Mura approach to models should be well-known by now. In a world of pop, they produce symphonies. It may not please everyone, but their models always sell out. This is not “yet another 109” because there has never been a 109 like this before. Radu3 points
-
thank you, seeing it as old-fashioned modeling can be acceptable, that's the way I'm taking it. today some progress, ready to some bad photos? well, the kit's seat would not even be so bad, but from the historical photos you can see that it was a metal tube structure with leather padding, which has nothing to do with the one supplied, so I tried to make it with welded copper wire and magic sculpt. the pilot sat on the parachute, so the base remains naked. the armrests on the sides would be missing, but I don't know whether to do these or not, in several photos there are not. another necessary thing, either because the original instrument panel was a flat piece of plastic, or because I also lost it, was to redo the instrument panel. side A and side B. the cables relating to each instrument will be glued into the holes, clearly visible between the panel and the fuselage (transparent permitting, another bad chapter in this story, I'm afraid). and up to here... now these have to go stuck in the chicken cage! the panel was fixed to a spider web of metal pipes that I tried to reproduce, while for the oil tank I limited myself to installing the rear wall, the only one visible -maybe- in the dark toward the bow and aft the instruments. the kit involved attaching the seat to the fuel tank, and under the seat a perch on which to attach the rudder pedals. of course I threw all this away and rebuilt everything trying to follow the diagrams and photos of the real welded structure. a second fuel tank was installed behind the driver on the SD. to make from scratch the latter I had to glue the upper horizontal truss, which now sits between my eyes, but at least stiffens the lateral struts and above all gives me the volume in which to build the tank itself. I think that I have placed the rudder pedals too far forward, I will have to intervene, I'm afraid. but in the meantime the volumes in the center are there, now I can move on to the side panels, here the one on the left, with throttle, mixture control, horizontal stabilizer control wheel, and a map case. and the whole story of the tailplane, you say? I did it ... and I'm moderately satisfied with it: Archer resin rivets and adhesive aluminum strip above. tomorrow I'll give it a round of primer, but I think we're there. forgive the David Hamilton's style photo, but I'm boiled at this point of the day (night, actually). well, it's a loooong way, but I think I'm starting to see a light at the bottom of the dark. cheers, paolo3 points
-

Hasegawa Fw190 F-8
TwoHands and 2 others reacted to Alain Gadbois for a topic
Hi! The missing instructions were found on this very website and printed. I've been cleaning up and gluing various bits, but here is one detail of interest: If you remove the lower part of the landing gear cover, don't follow the Hasegawa instructions, as you will remove about 2mm too much. Cut at the location shown in the photo below, then sand the raised section left on the exterior side. The upper and lower sections overlap in reality. Here is the difference in fin thickness after scraping and sanding quite a bit. Still 3 more to go...(sorry for the slightly out of focus shot) The lower wing inserts were carefully glued in place take care to have them flush with the adjoining wing sections. A bit of scraping in places and use of thin shims was required to achieve a pretty good result after a bit of sanding. I forgot to drill out the locating holes for the bomb racks, as somehow I thought at first they would be somewhere else on the wings...Luckily, you could discern the emplacement by identifying the small circular deformation of the exterior plastic surface. The wheel wells were glued in place at this point, and I kept a bit of runner to protect the fragile wing leading edge parts. This also keeps the geometry right as these bits are easy to bend when gluing. No decals means I have to make masks. Here is the first attempt while looking at the photos. I will remove the tapes, and go over with a ruler and a circle template for the final cut lines. Bye for now, Alain3 points -
1/72 DHC Dash 8-300
scvrobeson and 2 others reacted to chrish for a topic
Moving along with the dash 8, both fuselage plugs are now fitted and dealing with the seams. Tamiya putty to the rescue; a comparison of the size change; Thanks for looking3 points -

KopeckyScaleModels
Michael931080 and 2 others reacted to CruZz for a topic
Python build.... about 30 minutes...3 points -
1/72 DHC Dash 8-300
scvrobeson and 2 others reacted to chrish for a topic
Hmmmm I may be in over my head then. Well, in any case I'm still kind of chugging along. I added stringers to the correct length and made some resin plugs that I've begun trying to fit, I never considered window spacing when making the plugs and now I'm thinking I may have to make new plugs from sheet plastic Thanks for looking3 points -

Revell/ AIMS 1/32 Junkers Ju-188 E-1 Z6+DM II/KG66
Kagemusha and one other reacted to monthebiff for a topic
Can't believe it's been nearly 2 years since I last worked on it! I need to get a few tricky bits finished in the cockpit and then it's assembly of all of the main sub assemblies. What I need is some really decent bench time, get stuck in and finish the nose section. Regards. Andy2 points -

1/32 Trumpeter F-8E sidewinder?
Daniel Leduc and one other reacted to Grizly for a topic
While not an expert on the subject, I simply used modified kit parts to replicate the single rail launcher. Now if I could only find a pair of Matra Magic missiles....2 points -
Yes, that and the scale 1½"x3½" proud canopy framing. They really ought to tighten up those panel lines and provide flush frames, especially on jets. Such a pity; so near and yet so far. Having said all that, I'd buy a 1/24th E E Lightning F.6. In fact, two. Tony2 points
-

Airfix' next large scale model?
scimitarf1 and one other reacted to Gary Needham for a topic
IF Airfix were to do another 1/24 kit, I would have thought an obvious candidate and potential best seller would be the Hawker Sea Fury. A 1/24 P-38 however would be huge and where do you display models of that size; hence why most large scale models simply get stared at and looked over on occasion and then reverently placed back on the shelf or into the loft with a promise to self that "I will build that kit one day....in this life or the next." Gary2 points -

Airfix' next large scale model?
thierry laurent and one other reacted to nmayhew for a topic
As an Englishman there will always be a warm nostalgic place in my heart for Airfix (and Matchbox for that matter) - they are what I grew up with in the late 70s when every corner shop in every sleepy little village had kits for sale. Now, putting down those English rose-tinted spectacles... Airfix is very much a joke in other modelling groups I am a member of, and deservedly so. With the exception of their 3 modern 1/24 kits there is nothing in their aircraft catalogue that is worthy of consideration; and even then I have seen quite a few builds of the Typhoon and the Hellcat which show enough to put me off starting my Tiffie. In their 1/72 and 1/48 kits, their engineering looks like it is a generation behind - I love the Star Wars trench run analogy! - and their quality control is legendary for all the wrong reasons. The only cause for optimism I can see is in armour, and shown in their new 1/35 Cromwell - I am a keen armour modeller and by all accounts (experts on Missing-Lynx), this is a pretty decent kit. Despite all their problems they still have an ultra-loyal following here which i find a mixture of annoying and sad to be honest - they can't all be people of my generation (born '72), so there must still be lots who just don't know any better, brainwashed by the Florys of this world, and those who no doubt chant "gloss before decals" lol. The F6F-3 seems most likely next 1/24 release to me, and provided the kit didn't have more Flash than Gordon (see what I did there, or am i just showing my age again?) I might consider it. But unless they completely change their modus operandi and up their game, I just don't see AIrfix in my aircraft modelling future (small 'f') in any way, beyond being the butt of Star Wars jokes, and t-shirts at modelling shows ("Airfux"). Nick2 points -

1/32 Trumpeter F-8E sidewinder?
Daniel Leduc and one other reacted to Bill M. for a topic
That’s great! Maybe a set of correct Y-rails too? Both will be most welcome! Bill M.2 points -
With one exception (the Harrier), Airfix‘ 1/24 kits have been well-known WW2 aircraft. The German ones have been done, most of the British ones too. The two US aircraft (P-51D and F6F) were types that were also used in the UK. My guesses would be Grumman F4F Wildcat/Martlet Hawker Tempest Mk. II Vought F4U Corsair2 points
-
Here is my F-105g this again I built last summer using Aires cockpit set and wheel wells .I also was able to get a hold of a cutting edge nose cone set ,I was also reshaped the rudder . All the major markings were painted on ,the wheels came from Reskit.2 points
-
Scroll down a little to pg 2-40 of this manual: http://www.george-wright.com/assets/f8tacmanual_b.pdf edit: Jari2 points
-

F86 D Sabre Dog ... Revell 1/48 NMF Paint Trial
coogrfan and one other reacted to Panzerwomble for a topic
So this ended up as mixture of black gloss and matt basecoats, Tamiya acrylics for spot panel work and varying Alclad shades for the main work. It forces me to mask , which is something I can avoid 99.9% in my armour antics . "Go to" weathering on Alclad currently is black Flory wash which seems to “pop” the aluminium more than oils .2 points -
Airframe complete, almost ready for paint. Cheers, Tom2 points
-
Some more progress and some backward steps. Airbrushed the Dark earth using my normal "handle" type affair, using Xtracolor X2. The aim is to duplicate the fading of the fabric areas of the wings shown here. And on "my" Hurricane. Then on with the camouflage paint masks. Then the plan was to fit the paint masks, tape off the fabric areas and airbrush a lightened Dark Green, but I soon realised that this would make it rather difficult to fade the dark earth accurately, so a new plan is called for, I think I will start by removing the masks and doing an all over fading of the dark earth for a start. Cheers Dennis2 points
-

Libyan Mig-23MF, 0200 Tripoli August 2005
GMK and one other reacted to Daniel Leduc for a topic
Hey guys, Here's a little update I did today, Decided to add a little twist on those stabilizer .... Different, I like it, will post more during the week-end.. Have fun and hope you like, Dan.2 points