Leaderboard

Popular Content
Showing content with the highest reputation on 09/21/2021 in all areas
-

Forum Hack
F`s are my favs and 21 others reacted to LSP_Kevin for a topic
Hi everyone, Many of you will be aware by now that we suffered a major hack some time in the last few hours. The only way I could regain control was to restore the forums from this morning's back up, but this means we've lost around 12 hours or so worth of posts. There was no way around this, unfortunately. It looks like many of use have lost our avatars, too. Hopefully the hackers have had their fun, and moved on. But there's also a chance they'll be back, so I recommend you all change your forum passwords just to be on the safe side, even though technically they're encrypted in the database. I have no idea how they got in, which makes it difficult to keep them out, but I'll do what I can to beef up security. This is our first major hack that I'm aware of in more than 20 years online. Kev22 points -

Forum Hack
Troy Molitor and 7 others reacted to chuck540z3 for a topic
FWIW, I highly recommend that all negative comments here be terminated. Whoever hacked this site can obviously read them and since chaos and turmoil is what they are seeking, why give them another reason to hack us again? My company has been hacked twice and after getting advice from experts, this is what they recommend. Don't give these guys the gratification of recognition. Cheers, Chuck8 points -
 Hello! Here's our new releases: He 162 3D-Printed & coloured Interior on decal paper (for Revell kit) Article: QD32075 Price:12€ Available to buy: https://quinta-studio.com/en/product/415/ https://www.ebay.com/itm/165082746115 https://www.etsy.com/listing/10878947637 points
 -
Honestly, IMHO, this is most definitely a good thing. The money saved by not including an engine can be better spent on exterior detailing, resin additions or upgraded surface detail. Just opinion however.6 points
-

1/35 UH-1Y Venom
Alain Gadbois and 4 others reacted to matt_1185 for a topic
Getting an idea of how new parts will sit.. not gonna be easy but hope I can make it work.. I’ll be using vipers tail section as well as the venoms is just about identical from all the pictures iv seen.5 points -
Viper parts on deck… top section cut off. again excuse the work bench it’s been cleaned up since these pics lol5 points
-
Well done Kev! That hack looked very “serious” and I thought we’d be down for days if not weeks….but you’ve worked your magic again!5 points
-
Hello all! This is my first build post. As the title says 1/35 scale venom I’ll be converting my Dragon 1/35 scale UH-1N to a UH-1Y venom I’m sure I’m not the first to think or try this but iv looked with no luck. So I’m gonna give it a shot, with the help of a 1/35 scale AH-1Z viper for the critical parts that the viper shares with the venom! please excuse my bench, multitasking multiple projects haha I’m using the Academy AH-1Y for the parts as it was very affordable.4 points
-

DH.82A Tiger Moth - G-ACDC (1/32, ICM)
scvrobeson and 3 others reacted to PrzemoL for a topic
Thank you for looking into the details of my build. I have already commented, though the hack on the LSP tis morning caused the removal of my post, that I based my build on a small Polish monograph on DH.82a by Jacek Mainka. Even though it has lots of great detailed photos, the right-hand side of the cockpits was sort of forgotten, so I trusted Eduard in this aspect. Now I will have to live with the erroneous slats controls in the front cockpit. With the belts - in the rear cockpit they are attached to the internal truss element, as per Eduard instructions again. I presume it is wrong? (Again, this detail is missing in the book I have). It was also pointed out to me, that the compass should be grey instead of black - I have overlooked this, I hope to manage to retouch it carefully. Again, I am grateful for all your comments and suggestions of corrections. And special thanks for the invaluable material in the link!4 points -

1/32 Roden SPAD XIII with added detail
Model_Monkey and 3 others reacted to kensar for a topic
Got some weathering done with pastels and oils. Now adding a few more details on the fuselage before getting serious with the struts.4 points -

Forum Hack
LSP_K2 and 3 others reacted to Panzerwomble for a topic
Kinda sad ....I mean ...hacking a hobby forum ....wow ....real anarchy there, I bet the NSA are quaking at what this 14 year old will do next. Didn't they make a really cheesy film about that back in the 80's ? EDIT - Hey anyone suspect maybe it was Tamiya hacking in to get all those lists of what they should produce in 1/32 scale next ?4 points -

Ta 152H-1 Ofw. Josef "Sepp" Keil, Stab/JG 301
Bruce_Crosby and 3 others reacted to Miloslav1956 for a topic
4 points -
DH.82A Tiger Moth - G-ACDC (1/32, ICM)
Pastor John and 2 others reacted to PrzemoL for a topic
Here is my current project. I am planning to build one of the oldest flying DH82As, G-ACDC, in its burgund red livery. Actually, I will rather build it in this livery: The work on cockpit is over. I have used Eduard PE sets, and also added some linkages and missing handles for fuel valve.3 points -
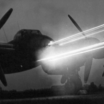
Naaaah, I don't believe it! I just discovered that my original post about this subject was lost due to hackers attack. well, I don't want to give up or gratify these people the score to get we lost anything, so I'll do it again, trying to be as possible adherent to the first one. well, after having built the Trumpeter single seater and being not satisfied by it at all, I wanted try the Revell night fighter version. I started it in january and completed it in march, a very short time, by my standards. I was attracted by the red 11, but being unable to find any reference on it, and wanting a full ghostly pattern, also on the wing, I elected the red 10, of wich there is some relatively good photograpic documentation. the initial plan was to do an OOB kit, but I was attracted by some areas I found very well represented by Revell, like the cockpit, the cannons bay, and the engines. so I drilled holes within the clear canopies to insert pins and make them openable. actually it wasn't as simple as I said: you see that the aft canopy hasn't a straight bottom surface. being instead curve, I produced a flexibile hinge system that allows the movement fluidly. thinking about the cockpit, I asked myself if it was possible to illuminate the cockpit without too much effort. I found that four yellow/orange-colored nanoleds enclosed in alu tubes were enough to do that. here these can be seen on both cockpit's sides. so, here we are by night. closed and opened. in the background, with some imagination, it can be seen another night hunter with the very same camo, one of my cats. so far it was almost a linear way of build it, but what about cannons bay and engine? I absolutely didn't want to ruin the beautiful lines of this aircraft, so I built some alternative parts to be exchanged at will revealing the interior details, arranging a very positive contact with micro magnetos. again, fully closed and fully open. and that's it. in this picture are not to be seen some details on the cannons bay, like the rods that support the opened panels and opened latches, I forgot to display these when I shooted the pictures. I discovered the beautiful work made by Thunnus on the very same subject just few days ago, definetly too late to take advantage of that wip. knowing that before, I would have done the same correction to the tail navigation light, or I'd have less headache to position the flaps extended, just to mention a couple of the many tips I found there. or, may be, this is a good reason to do another Revell 262... all in all I really enjoyied the time i spent on this one! cheers, P.3 points
-
Yep I agree, I was just having some Animal House fun. I wrongly assumed since WNW kits had engines these would also. The WWI birds in most case had the engine exposed so it must be included. Its a confirmed sale either way for me.3 points
-
Kotare Models - a New Venture from Former Wingnut Wings Staff
Paul in Napier and 2 others reacted to Paramedic for a topic
Agreed. Not every kit needs it. And there is the Tamiya IXc for a (later) Merlin if you fancy one.. Or AM.. I prefer cheaper basics and then chose what AM I want myself.3 points -
Forum Hack
thierry laurent and 2 others reacted to Gerhard for a topic
Did this Russian hacker try and build a Trumpeter 1/32 Mig 17 per chance? Hence he is taking revenge on modeling forums.3 points -
No, you only get them in the Pacific boxing, no doubt you could buy the specific sprue from a Tamiya distributor.3 points
-
Seconded. Well done, Kev Richard3 points
-
Hi Kev confirmed, I got about 2 hours ago an email by the hacker that LSP was HACKED BY russian name ..... bla bla ... the idiot! Fortunately, I was able to still login and immediately changed my password and that worked out. Thank you Kev for doing your best and hard work to restore! and that seemed to have worked. Thanks!3 points
-
Today my dream came true. I went to a theater and watched Denis Villeneuve’s Dune film which premiered over here last wednesday. I waited 50 years for this movie since I read the Frank Herbert’s novel back in the early 1970s. Today is the day of reckoning and I got to say I’m not disappointed. Everything is just like I imagined it, just so much more: the brutish grandeur, the plot, the characters, the action, the photography, the music … BUT… the thing which impressed me most is the technological artifacts deployed in the film notably the ORNITHOPTER, a cross between a Huey Cobra and a dragonfly with translucent wings! A marvel of sci-fi design, mechanical and organic at the same time. No cgi here but I suspect they have built a full-size mock-up for the filming because it’s incredibly realistic down to the vibrations of the flapping wings. I search the internet for a picture of the Dune 2021 ornithopter but for some reason I couldn’t find any. Now I know what I’ll be doing for the next few years: waiting for a 1/32 plastic kit of the Dune Ornithopter Cheers, Quang2 points
-
May your day consist entirely of doing the things you love with the people you love, not necessarily in that order. Cheers, Tom2 points
-

1/32 Tamiya P-51D 44-13298 "QP" flown by Korean ace Fred Ohr
John1 and one other reacted to Thomas Lund for a topic
As mentioned earlier, I'm on a 'cover as many nationalities from WWII as possible' trip these days. The air forces involved were relatively few, but other nationalities in the 'normal' airforces are good too. So,,, this it Fred Ohr, born from Korean immigrant parents, who made a career in USAAF. Ohr is credited with 6 victories and 17 destoryed on the ground. Kit is Tamiya almost oob - Resin wheels replace the rubber ones, barracuda cockpit stencils. All main markings are painted on with homemade masks (stencils from kits).2 points -
While I await a new kit to re-do the wings, here's the progress on the fuselage: For conversion to the L-159 type: 1. Make the exhaust area straight (parallel to red line shown) 2. Add a filet below the rudder that extends all the way back 3. Add a small fairing for a rear-facing light 4. Finish up the dorsal hump For general additional detail: 5. Cut out the NACA scoops 6. Cut out the elevators I won't print a new set of elevators until the horizontal stabs are installed. That way I'll have a final set of measurements to use. And I won't install the horizontal stabs until the aft fuselage is close to complete. While looking at photos of the L-159 on the internet I noticed something unexpected. The wing pylons seem to be perpendicular to the underside of the wing rather than parallel to the local vertical (gravity vector). It's only about 4 degrees of difference, but I wonder how common this is? Maybe it's like this on all airplanes and I just never noticed before? I've always assumed the pylons are vertical. (original photo credit: Jan Kouba Czech republic 2013. All rights reserved.)2 points
-

Make the others jealous
Hartmann352 and one other reacted to dutik for a topic
Quarterscale! Quarterscale! He said: Quartescale! To add something more to scale: Added two 1/32 diecast curbside cars to my stash. A Camaro is a nice car, Transformer or not, and the De Lorean a truly icon of movie history. Could also be used in a post apocalypse diorama or something Who knows? A bird in the hand is worth two in the bush Regards - dutik2 points -
The model that reached me the day before the new year. I couldn't wait and decided to take him to the workshop right away. The model F-5F from Kitty Hawk is a typical model of this manufacturer, definitely I not recommended to people who don't like fighting with matter. Cut without sense, with disappearing rivets and dividing lines. As I mentioned a typical KH model. I chose different painting versions than in the set using the Two Bobs decal. Model made straight from the box So much talk, time for the model: F-5F VCF-111 Kitty Hawk 1:322 points
-

Kotare Models - a New Venture from Former Wingnut Wings Staff
Archimedes and one other reacted to Out2gtcha for a topic
I have a feeling it will be for me as well! I feel like the overall Kotare model mantra seems very in line with my likes, and you KNOW the model should be good either way with the people known to be behind it2 points -
They did one in, ahem, 1/48!2 points
-
Looks great! The wheels are a bit noticeable, but did not put it together until it was pointed out. Hope it can be fixed. Other than that, it looks like a very well done build2 points
-

Forum Hack
A-10LOADER and one other reacted to Big Texan for a topic
PW changed. Darn shame this happened, glad you were on top of it!2 points -
No engine it seems. I have been advised to start drinking heavily....2 points
-
A-7D: 1981 is too early for Ballutes, except possibly on F-111s. A-7Ds would have used Mk.82s fitted with Snakeye or slick tails. F-4E: you'll need to add LES slats to the Tamiya hard wing for a 1978 Soesterberg Wolfhound. Alert aircraft would have AIM-7E-2s and AIM-9Js. HTH Tony2 points
-
Hi Kev. Managed to change my password now. Thank you for saving the day once more (your super hero cape is already in the post! ). Many thanks Derek2 points
-
While probable and unfortunate, the reality is that all of our email addresses are readily available to any hacker via any number of easily obtainable databases. I personally receive around 200 spam emails daily. Kev2 points
-
Most annoying about this is the lowlife hacker now has our email addresses. Hopefully doesn't cause more spam. cheers2 points
-
I'm no techie either, but I doubt it will do any harm to change your password to something only specific to the site, and I think everyone needs to be extra vigilant to spam emails, sadly this is the world we are living in.2 points
-
That's because the hacker has already maxed out our allocated SMTP relays for the 24 hour period, so no more emails can go out for a good 20 hours or so. Kev2 points
-
2 points
-

DH.82A Tiger Moth - G-ACDC (1/32, ICM)
Stevepd and one other reacted to hangarrat101 for a topic
Absolutely lovely! I'm very fortunate to have logged a few hours in the real thing, which I'm sure looks far scruffier than the model. Small point of detail, you have a lever mounted on the RHS of the cockpit. This locks and unlocks the leading-edge slats, and is fitted in the rear cockpit only. The levers on the left for the throttle, fuel and trim are correct. Looking forward to seeing this come together!2 points -

1/16 scale scratch built AT-38B Talon-The Smurf jet is back!
Buster99 and one other reacted to Pete Fleischmann for a topic
Gorgeous renderings brother! Can’t wait to see how this prints! Fun fact: the silly canopy mechanism is pretty delicate. Certainly susceptible to high winds and jet blast. We took a 4 ship into Nellis AFB when I was a UPT student. My IP didn’t like the way I parked the jet on the transient ramp, so he grabbed the jet, whipped it around and out of the spot to line it up “ properly “. Trouble was, in his frustration he wicked-jet-blasted the -38 next to us, and knocked it’s raised aft canopy off of its gimbals, and it wouldn’t shut after that. And I, the savvy student, after he stopped swearing, yelling, and pissing his pants, told him “hey sir, that was my fault. If I had lined up perfectly in the first place, then you wouldn’t have had to reposition the jet. My bad. Beers on me tonight “ All better. cheers Pigfighter2 points -
thank you all, I'm really glad it ecounters your approvation! today I show the last steps before camo painting and the figures, next to be called completed. in a session nearer to the ship in a bottle modeling than aircraft one, I build up the last cockpit internal structure. this kind of support seems to be peculiar of the D-1 type, being necessary to support in the closed position the hinged down big rear windows. port side, opened, and starboard side, closed. then I added the inspection doors made by plasticard discs on the wing surface and PE fuel and oil filling doors. here also the central step pad, made by alu foil from a cheese packaging. and the strange double fixed vertical fin trim tab, for this one I used anchovy paste tube (yes, I spent quite some time in kitchen, also). what else... I drilled out a number of drain holes in the underwing and added Archer decal rivets and stitching, wonderful products. that's it for external details. I added also on the fuselage flare tube, fuel drain plug, blocks for the folding wings and rudder rod cover, but I think these are not worth specific pictures, we'll see these after, possibly. about the stretcher bearers, I think that I have reached my limit. they need just some mud to be armonized with the dio base. I also arranged the last two figures, a pilot and an officer, these still need much more attention to be completed. well, that's it for today... next step, some RLM colors on the aircraft! cheers, P.2 points
-
2 points
-

Make the others jealous
Hartmann352 and one other reacted to Shogun for a topic
2 points -
1 point
-
Well done and thank you for sorting this out so quickly.1 point
-

Forum Hack
LSP_Kevin reacted to TankBuster for a topic
Thanks for sorting it out , I recieved an email earlier that said HACKED BY ARTHUR SERGEEVICH TRUSOV. Cheers Bob.1 point -

KASL F-16 goodies just released
Derek B reacted to ade rowlands for a topic
There’s nothing in the instructions about fitting the kit gear. But there are these receptacles for the kit gear pegs on either side of the gear bay walls. So the kit gear will sit in rear of the large raised ribs on top of that small raised oblong, which should be easy to remove if the need arises. I’m not sure if this answers Pete’s concerns or not. I’ll bow to his knowledge of the F-16 seeing as he drove them.1 point -
KASL F-16 goodies just released
Derek B reacted to ade rowlands for a topic
My set just arrived. If you’re thinking of getting one, I highly recommend it. Casting is up to the usual high KASL standards. I have not checked fit against the kit as yet, but never had an issue with their stuff before. The only way it could be better is if it were full length. Got them direct from KASL via their eBay store. Even better it evaded Customs so no charges.1 point -
The Sprues Brothers.1 point
-

Hobby Boss 1/32 P-61B Black Widow...
Derek B reacted to Steve Sobieralski for a topic
I believe that fixing the kit’s incorrect exhaust system is more involved than just replacing it with the correct exhaust stacks, there are associated issues with the engine mounts as well. The kit is engineered so that the bogus exhaust collector ring at the rear of the engine is also used to attach the engine to the engine mount. The front ring of the engine mount attaches to the rear of this “exhaust” ring, so If you just eliminate the fictitious kit exhaust, and replace it with the correct dual exhaust pipes, there will be no way to attach the engine to the kit engine mount. On the MAAM website in the “Recovery” section, there is a photo of one the engines lying on the ground. The engine mount struts have been cut or ripped away, but the front ring is still attached to the rear of the engine. The size of the ring and the location of its attachment to the engine are quite different from what’s in the kit. The front ring of the engine mount should be much smaller and attach to the engine crankcase, not to the exhaust system. There are also several photos of the rebuilt engine mounts in the “Restoration” section, and comparison of these with the kit engine mounts shows many differences. Photos of the restored engines reveal some other detail variations from the kit engines as well. For the most part, this seems to be a very good kit, but the exhausts, engine mounts, and other engine details appear to have come pretty much from the kit designers' imaginations. A comprehensive fix will require not just new exhaust pipes, but revised engine mounts and a few other parts as well. Been a member of this site for about ten years, but this is my first post. The P-61 has always been a favorite of mine and I am really looking forward to building this kit. Steve Sobieralski1 point