Leaderboard
Popular Content
Showing content with the highest reputation on 09/18/2021 in all areas
-

HK B-17...C 5/4 sweating the metal
JeepsGunsTanks and 10 others reacted to brahman104 for a topic
Thank you gentlemen! I can finally tell you that the line has at last moved! Today, the fuselage sections permanently become one after 8 years in the making. Firstly though, a minor point to note for those playing along at home....... Turns out, there was actually a gun socket in the forward-most upper window (thanks for having my back as always Terry!) Always be careful about exactly which photos you are looking at I also spent about a day re-polishing and cleaning windows (particularly the cockpit ones) as there was definitely no access once she's all closed up. Yes it looks horrible around the window and join now but it's just light curing resin that can be cleaned up afterwards. A combination of JB weld, superglue, styrene and resin and she's together as she'll ever be now! Couldn't resist adding the tail just to give an overall look... To say I'm totally pumped that the build has hit this milestone is an massive understatement, but if you thought this project was coming to and end, well you're not rid of me just yet! As you can see there's quite a lot of filling and shaping work to blend the tail surfaces into the fuselage (not to mention attaching the bathtub), and also a lot of seam work prior to marking out where all the panels are going and then getting my litho on, but it all about the small steps. My B-17 actually had a social outing today. I visited a fellow modeler whose models adorn pretty much every bit of free space in another gentlemen's hangar, in which he keeps a C172. As he had already built a G model, it was an interesting photo to compare the two. I'll do this again at some point when there's a bit more progress, but it was interesting to see the difference in fuselage length between the two, with my C only slightly longer than a HK B-25J! More to follow soon hopefully! Cheers, Craig (feeling quite chuffed)11 points -
Since when was large scale aero modelling a "relaxing and rewarding hobby"? Perhaps I'm not doing it right... Richard.10 points
-
When 900 years old you reach, have built all your stash you will not.9 points
-

Blood & Chrome Galactica
Ol' Scrapiron and 5 others reacted to spacewolf for a topic
And the BOOM.... at some point there will be a BOOM as Ivonova advised us ( one always must listen to Ivonova !) I one episode we get to see the G preparing to deploy and fire nukes... a friend of mine wanted as set of them for his Moebius kit so I had my buddy in England do some research and he found the info and made a printable file. I had him make a set for my friend and a set for the kit I'm working on. I have the spare neck part so I set it up in case I ever want to sub it in for a change. That's it for this time ! Feel free to comment or suggest things, thanks for looking. Vaughn6 points -
Whatever they do... I hope it goes well and they prosper.6 points
-

ICM NEWs 2021 - Bell AH-1G Cobra in 1/32
TankBuster and 4 others reacted to Jan_G for a topic
decals to be included in SH boxing https://www.specialhobby.net/2021/09/sh32082-ah-1g-cobra-early-tails-over_18.html5 points -
Well, one Saturday turned into two Saturdays and a Friday but the cockpit tub is finished. One of the things I found out is the correct anchor points for the shoulder harness. I’ve seen builds with the straps hanging over the back of the seat and attached to the “shelf” behind the seat, and stumbled on this drawing which is substantiated by actual photographs - which embarrassingly also show my decision to not use the kit seat was not a wise decision. Regardless, since this will be a closed canopy I’m sticking to my decision. I used .015” lead wire and fashioned the anchor points. They’re going to be left like this since the seat covers them. More on this later, but first….. …. let’s talk about the 3D printed cockpit parts from Quinta Studios and Red Fox. Both company’s offerings are superb but each has unique features. The Quinta Studios are essentially decals and flexible unlike the Red Fox pieces which are rigid and require glue to attach. The printing is nothing short of amazing. Everything is in perfect registration, colors are bright and the resolution is extremely high. It should be noted that the Red Fox offering for the A8 only provides the IP and console upgrades which I used, while the Quinta Studios A5 sheet (they don’t offer an A8 as of this writing) includes many additional bits and I also used a few of them. Any difference in quality between the two is so minuscule it’s not worth mentioning although you may have to mix your cockpit color to match the printed parts which I did. You can’t go wrong whichever you use, both are brilliant. Here's the IP with Red Fox goodies. The one thing that the Quinta Studios flexible process can offer is seat belts and harness which is a mixed bag of good and not so good. For the most part they are one-piece although there is some minor sub-assembly required to better replicate layers. I chose to build them up with the major component still attached to the decal paper. I was careful to keep as much water off the base paper as possible, blotting up any errant drops. I would suggest you do the same. Installation is straightforward but you will need a microdot of CA glue here and there, but the best part is that you won’t ever wind up crawling around on the floor with a flashlight and microscope looking for PE, however this convenience comes with a price. The hardware is not metallic silver, but rather a color which tries but fails to replicate metal. I guess you could choose to painstakingly pick out these details with metallic silver paint, but I chose not to. All things considered, I’m very happy with the results despite the fact that the seat belts seen a bit too long requiring some creative folding and gluing. One of the parts included in the Quinta Studios sheet is what appears to be a document holder so I scrounged a FW190 parts list cover off the internet and scaled it down and printed it to fit the holder. Unfortunately most of it is hidden by a tie down strap. Here you see the strap (also included in the Quinta sheet) holding the booklet in place and the shoulder harness in place waiting for the seat. Seat with Quinta belts and one Red Fox console. Seat, shoulder harness, side consoles and control column all in place so I’m calling the cockpit done. I even had enough time left over to get the invisible engine started and some other bits painted. Thanks for watching and to all the FW190 authorities out there gasping in horror, my apologies.5 points
-
Made a start on this and so far so good. These are the main cockpit and forward wheel well sections. Detail is ok, there are some upgrades available but I'm just going OOB for the plastic here. The parts above now installed in the fuselage. Also given is one open gun bay but I will be closing this up. I also strangely had an issue positioning one of the side consoles for the cockpit but some removal of plastic made the section fit. She's pretty basic inside, but so was the real thing. Main wheel well bay fits nice and snug too.5 points
-

Short Sunderland MkII
Sharkmouth and 4 others reacted to tomprobert for a topic
Afternoon all, Progress on this build has slowed somewhat after returning to teaching for the new academic year, so evenings have been taken up with marking books and planning lessons. It's such a shame when work gets in the way of one's hobby. However I've been working on the floats when time allows, so thought I'd share some pictures... The basic shapes were removed from their backing sheet with a sharp blade. I hold it at a 45-degree angle and score around the part numerous times before snapping it free. It then means there's only a very small 'lip' of plastic needing to be removed which cuts down on the sanding time significantly: To aid the gluing together of the parts I lined one half of each float with a thin plastic card tab: The floats are obviously going to be positioned on the outboard sections of the wing in quite a vulnerable position, so I made a trip to my local model shop and bought some alloy tube, helpfully in the shape of an aerofoil like the real thing. This will provide plenty of strength if they inadvertently get a whack! Before joining the floats together I worked out the position of the struts using the plans, before securing them in place using Araldite Epoxy glue: Here are the floats now together and the struts cut to the correct length. Everything about this model is massive - here's a pot of Tamiya paint as a useful size reference: I am now going to need to scribe and detail the floats before working out a plan to attach them to the wings and getting a nice and strong join. Stay tuned! Until next time, Tom5 points -
Kotare Models - a New Venture from Former Wingnut Wings Staff
Pete Roberts and 4 others reacted to The Phantom for a topic
You closet Roden builder...5 points -
.thumb.png.84c5d3a464f2dd83f0ac37a5aac81ec8.png)
P-47D Razorback "Vulneratus non victus"
TAG and 4 others reacted to Antonio Argudo for a topic
thanks gazzas, I'm a mess in building my models with coherent order cheers some paint on the rear canopy also cheers5 points -
A bit of an update. This one has fallen seriously behind.5 points
-
Having set aside the cockpit and calling it mostly done, I turned my attention to the gear assemblies, and this is where the fight is really starting to rear it's ugly head. I started by cutting the bays off their casting blocks and priming with black. While that was setting, I began assembly of the struts, and this is where Trumpeter made...interesting design choices. First, the trunnion anchor points are separate pieces, and the gap left by them are less than acceptable in my eyes. Not only that, but the inserts for the struts are now plastic instead of white metal, which to me seems to defeat the purpose of having a structural support that is the same material as the rest of the kit. On top of that, the lower "scissor link" for the nose gear is too wide for the attachment point on the axle (which is part of the support rod.) When test fitting the nose strut to the associated bay, the fit is so precise that the attachment pins on the trunnion prevent the strut from being inserted into the bay (in Trumpeter's defense, their OEM nose bay is multiple parts, allowing the strut to be attached first, followed by the side walls.) I shaved the anchor pins to half their original length, and tried fitting again, with a big ol' "nope" from the bay. This morning I came to the decision that the locator pins will be completely removed, and when the strut assembly is located where it needs to be, I will flood the pin holes with superglue to form the necessary anchor. I may also need to trim the support insert as well, as it is currently forcing the nose strut forward due to a wire bundle located more or less directly over the guide hole. As always, thanks for stopping by the hangar!4 points
-
Thanks for the comments lads! Weathering continues. In addition to Flory washes, I've added some paint chips and wear/tear to the upper surfaces. Need to keep this restrained, I can easily get carried away and end up with something similar to a late WW2 Japanese Zero (ie - more exposed metal than actual paint)! Just got my Brassin 1,000 lb bombs, they will be the next thing I focus on. Still tweaking the weathering, also removed the windscreen masks. Not that bad, got some touchup work but nothing major. Always a bit suspenseful taking off the masks, wondering if I have a major mess waiting for me underneath. Once done with painting, I'll polish up the clear bits as well. Haven't painted the bomb shackles yet, I'll also be reducing the brownish wash aft of the gear well. That's it, thanks for looking!4 points
-
"accurate and highly detailed scale model kitsets that are enjoyable to build for both experienced and novice modellers alike." Highly detailed doesn't mean it 'has' to have an engine. Cost is important if you want to attract novice modeler's. I've heard many non-novice modelers say they were scared off from a kit because of it's cost. " relaxing and rewarding hobby " Remember when you built models as a kid ?4 points
-
Do you mean on the fenders/mudguards? Because its there, if you look on the Das Werk sit at the pics they provide, you can see it: https://www.das-werk-models.com/products/stug-iii-ausf-g-early/4 points
-

Another Hasegawa T bolt Bubbletop, my first LSP. November 12, 2022, It is DONE at last!!!!!!!!
Alex and 3 others reacted to Citadelgrad for a topic
Fingers crossed, Woody! Thanks for following along. Thanks, Mike, i laid in a supply of newspaper and will try that out as soon as i get the decals set. Thanks so much, Jay, as you know your build are basically my reference. Thank you for sharing this, i will try it out on my mule. Thanks so much, me, too. The Mustang gets all the girls but T Bolts have always held my attention. so i put it off long enough, after screwing up the first decal attempt, i had to give it another go. I did dutifully apply an unneeded tail number to the paint mule, both to see how they go down generally, and to check for a propensity to silver. pleased to report that despite some reports that some Techmod decals seem impervious to solutions, at least this sheet seems to like micro set and sol. I dont really want the kill markings to necessarily conform to every panel line, as they were just stickers and wouod not have conformed like that. With that box checked, i got some fresh warm water and carefully cut out the kill markings. They seem to have gone down fine, so well that i decided to go with the other decal, wasnt sure what it was but its prominent on every photo of this part of the plane. its a crew placard, and its fully legible. and so are the model types over each kill marker. Any issue with legibility is my poor photography. Should i hit these with a bit of clear to protect them while i am weathering? I dont expect that either will be directly weathered, amd i am using lacquer clear, if that matters. weathering will be a pastel panel line treatment, and some oil washes. Probably very minor pencil chipping. one last beauty shot! if the decals were both flat and good when i left it, do i need to check it continuously, or should it be fine?4 points -

HK Models 1/32 B-17E/F WIP
Dadeo911 and 3 others reacted to Gil Hodges for a topic
I've begun working on the fuselage....added the "E" nose and tail to both of the fuselage halves...the fit was a little better than I expected for such a large kit. The next step was adding a wash to the interior and many of the detail parts.... While not overly difficult, it was tedious....each fuselage half taking almost an hour each.... But, I can now actually start working on the interior parts themselves; AFTER first studying all of the Eduard interior sets to see what needs adding and/or modification to use them. There will also be quite a bit of detail painting that will be time consuming....but then that's the nature of this big beast. More pics when I have some significant progress to show! GIL4 points -
from here on, the game gets complicated... one of my many weakness is on figures painting, i never achieve a result that I may call fully satisfactory. well, that's my be(a)st. the blue-green clothes of the HG are not well depicted, and I was reluctant to add any "pulp factor", so just light wounds, here. another little big complication I discovered was in the HG camo splinter pattern: it wasn't the heer's standard one, but it had smaller pattern and slight different colors, it's commonly called "splinter B". to paint it on figures big as my thumb was a nightmare, here we are in progress: meanwhile, I played around the engine, adding oil tank and lines, some electric wires, air intakes and ducts, and this plate that appears on pictures, but of wich I don't understand the use. I emulated it with a soda can plate and a little gizmo. then I pressed on with the fuselage: glued on the big window, and tested the landing gear. hey, it seems to hold! not so bad... but doing the aft doors, and comparing these with the pictures of the real ones, I realized the holes i cut in the fusealge are wrong. now is too late to correct the hole, so the only thing I can do is to adjust the door's internal frame to disguise a little bit the mistake. sigh. modeling is suffering, I know... cheers, P.4 points
-

20% Off Sale at Flying Leathernecks Decals
thierry laurent and 2 others reacted to Dave Roof for a topic
For no reason other than to say Thank You. Thank you for your continued patience Thank you for your continued understanding Thank you for your continued support Thank you for your continued business And by golly, thank you for being such a swell bunch of fella's! Runs from now until midnight on Sunday, the 26th of September. 20% off the entire order, no minimum. For the handful of orders that need still need to be shipped, I'll toss in a couple extras. https://www.flyingleathernecksdecals.com/3 points -
Some more.3 points
-
Lots of details being painted. Exhaust nozzle. In Place Weapons. Wheels. Gun bay painted gloss white. Wheel bays. Control surfaces finished. Next will be an overall gloss coat in preparation for decals, Dan3 points
-
F-8E Crusader Trumpeter 1:32 The model is made, as always, straight from the box + self-made masks3 points
-
Thanks, Mike! i snuck out and snapped a few photos as i checked it, it looks good so far. i also took a few of my progress on the cowl Im really happy with the pastel results, and cant wait to do the rest of the airframe.3 points
-
My revised list: Spitty Mk Ia P 51B Me 109E1 A6m3 Spitty MkVb FW 109A1 A36 Rufe Hurricane MkI Do17 Typhoon P47 razorback3 points
-

Seafire FR.47 Conversion
scvrobeson and 2 others reacted to Shogun for a topic
Going!3 points -
Seafire FR.47 Conversion
scvrobeson and 2 others reacted to Shogun for a topic
Thanks Scotty! The Aftermarket sets we have.....3 points -
Some progress. Long skinny wings. One of my reference photos looks like the wing tips can be interchanged. I can see what looks like a panel line at the separation point. So, you can change it from a 15m wingspan to 18m wingspan. I've chosen to build the 18m wingspan. The joint needs some work because it looks a bit too wide. I'll have to create a mask for the canopy because it will be installed before painting almost everything white.3 points
-
 Here is some preliminary work done on the Hispano-Suiza HS.404 20 mm cannon. This is the drum-fed model suitable for early Beaufighters. A belt-fed cannon for late-model Beaufighters will also be designed. Four of these are fit below the observer's station, parts of which will be visible through floor cutouts. Much work yet to do. Some of what you see here will change.3 points
 -
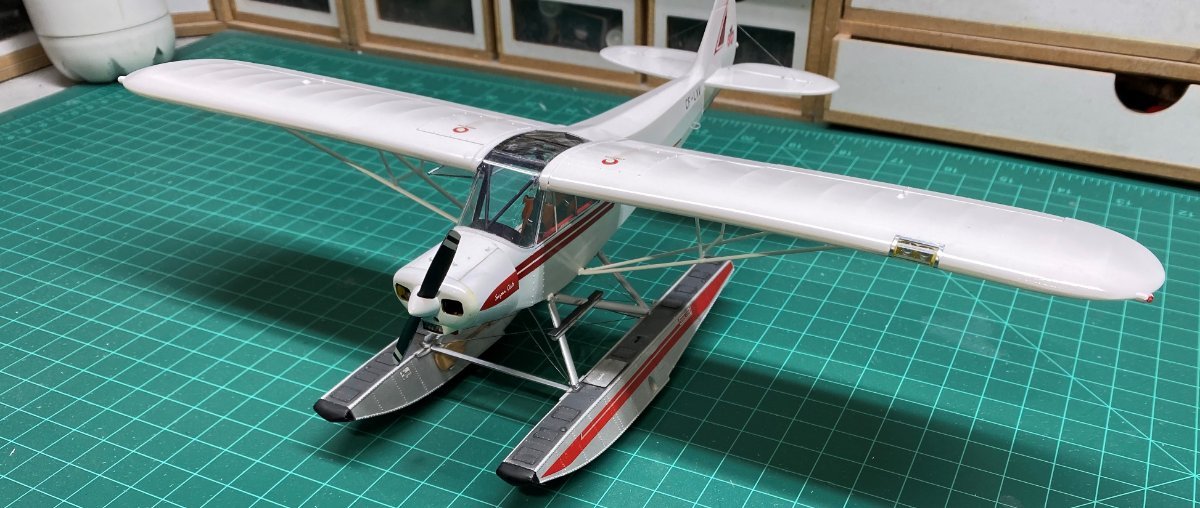
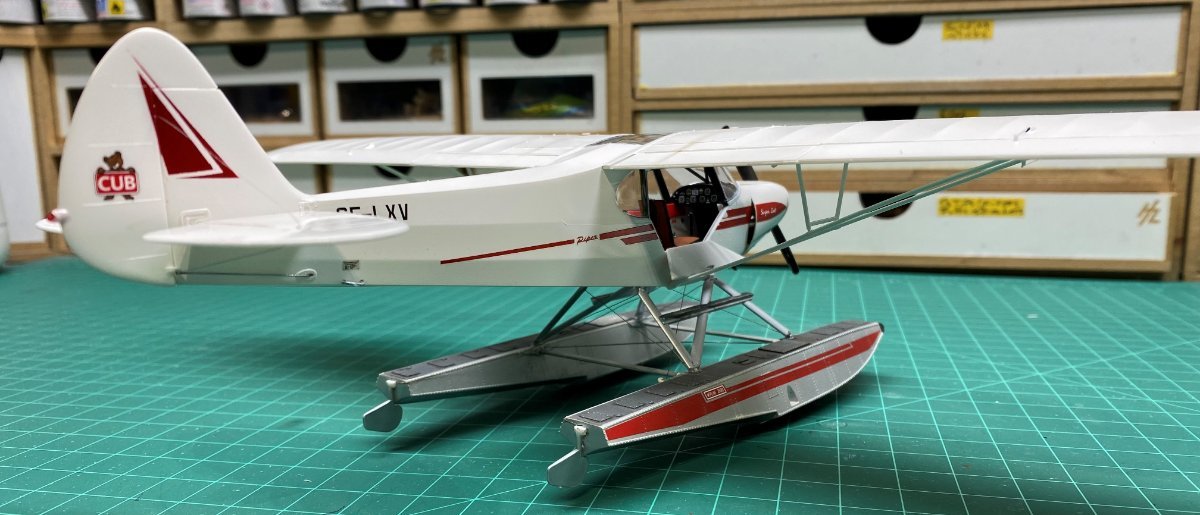
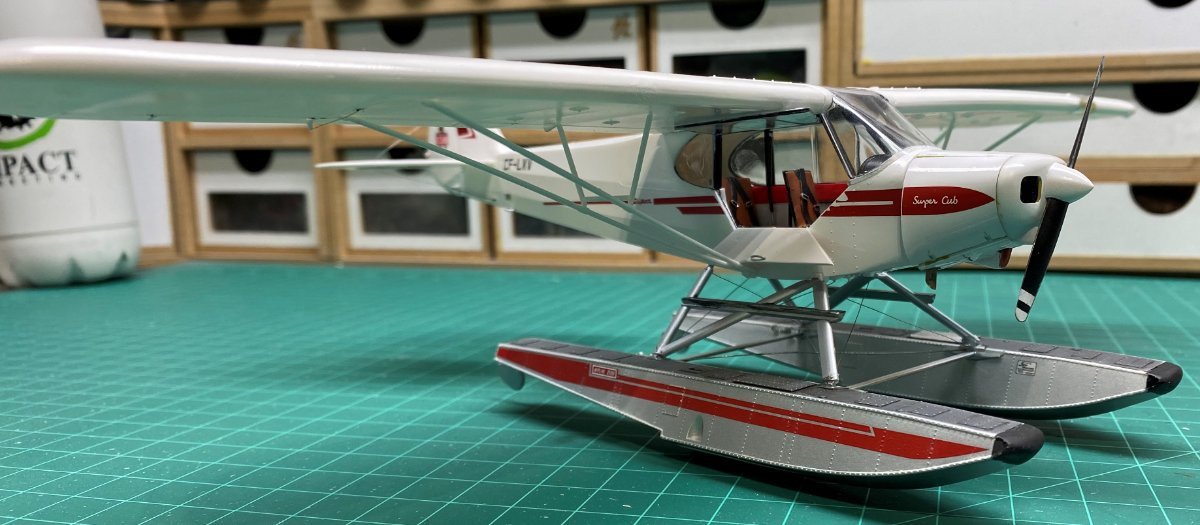
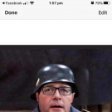
Kicking off the gallery in style is chrish with his very nice Piper 18 floatplane. Tremendous. Link to build thread;


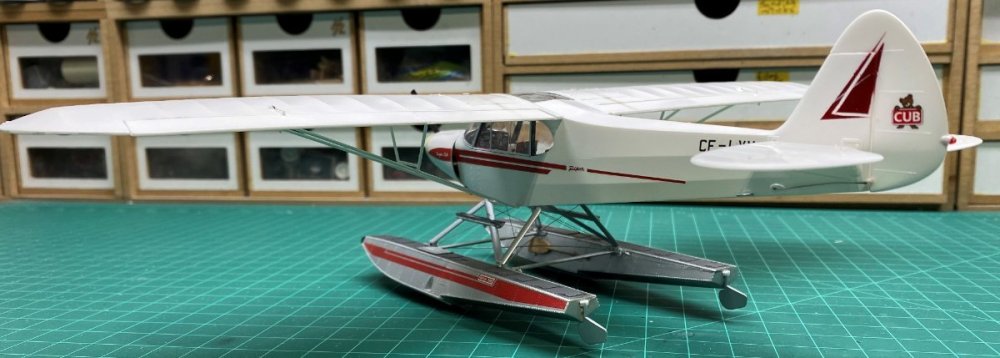
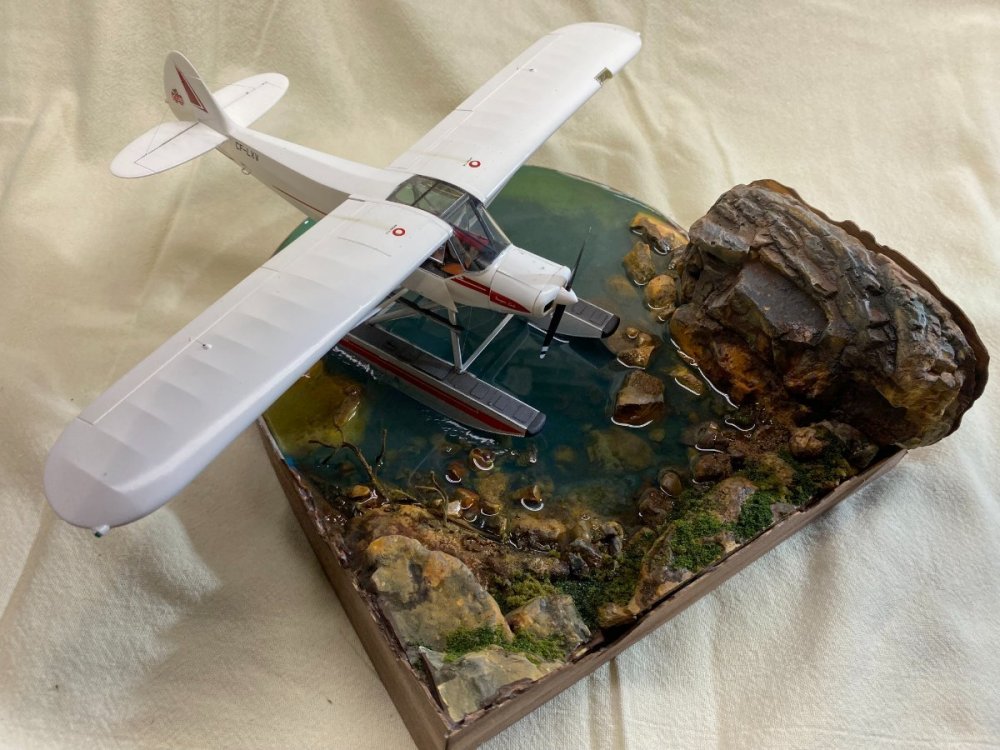
 2 points
 -

B-2 Spirit of Alaska USAF Testors 1/72
Kagemusha and one other reacted to ShelbyGT500 for a topic
Hi guys this model is too old, but with some scratch-reworks, AM and new Begemot decals, it will close to the real bird. It's painted with tamyia acrylics as always, Alclads for exhausts and some filters over the paintwork for finish. Maybe new modelcollect B-2 is the best at that moment, but I already had this and think that the final result it's not bad at all. So here is the birdy: Well it is not a LSP thing, but for 1/72 scale - 80 cm of wing-span it is a big bird Thank you as always for stopping by and Cheers friends.2 points -
I've always liked the '162, it's a pretty sleek looking jet. It appears that it was a rather good aircraft to fly, with Eric Brown noting that it was manoeuvrable and fast. If it wasn't for the fact that dodgy glue led to parts falling off them, sometime with fatal consequences, it might have been an excellent fighter. Another short coming was it's limited fuel endurance. The Revell kit appears to be basic, but nice enough. I haven't decided on a French of captured Air Min aircraft yet. I also transferred the plastic to a better box as the Revell side opening ones are not the best.2 points
-
Yep. The relaxing part was building it with foul smelling, potentially addictive model glue, then slopping on some paint, followed by decals with NO gloss coat. The rewarding part was then taping an M80 to it and watching it perform a “rapid disassembly”.2 points
-
Blood & Chrome Galactica
Model_Monkey and one other reacted to spacewolf for a topic
Now for small guns... the kit molded guns are hit or miss.. not bad but not great either... so I got the file from Tony and had a friend in England make up a bunch for me... 650 to be precise !... Mush better detail .... Of course each molded on gun will have to be removed and the new one placed... about 500 in all......2 points -
Blood & Chrome Galactica
Model_Monkey and one other reacted to spacewolf for a topic
It's that time again ! ...and this time we get to play with guns...big and small !.. and things that really go BOOM ! ( Ivonova would be unsurprised..) I was never happy with the belly KEWs being buried in the trench so my thought was they would be on the edge where they would have clear fields of fire. I played with various positioning and it took some time to decide on the proper look. Once decided on, the perimiter fenceing was built and then holes drilled for the guns.... So here is the final belly configuration... just as that first view of the top of the G with all those guns.. it give a bit of a chill....2 points -

Das Werk 1/16 Sturmgeshutz III ( STUG III )
Rick Griewski and one other reacted to eoyguy for a topic
I believe all the ammo was stored in the right front sponson, to the right of the main gun, well forward. You would be able to see this if you look forward into the hatch, but its not like it would be noticeable if you were just casually looking straight down into the hatch. I'm thinking it would be pretty easy to scratch some racks with shell bases, at least enough to give the impression of the shells being in the racks.2 points -

Das Werk 1/16 Sturmgeshutz III ( STUG III )
Rick Griewski and one other reacted to Finn for a topic
The view of the commander's area: Jari2 points -
Thanks, Paramedic! working my way around with the pastels. I foolishly did the underwing white stripes, this will likely be obliterated when i do some oil treatment of the ejection chutes, but whatever…. looks pretty messy at this point.2 points
-
20% Off Sale at Flying Leathernecks Decals
thierry laurent and one other reacted to Dave Roof for a topic
Not that specific scheme, but I do have a sheet in progress.2 points -

Hawker Fury
MikeC and one other reacted to Panzerwomble for a topic
Hi Max No wish to derail your great build thread , (please PM me to delete this post if you feel it is inappropriate ) but took some more pics of the Hawker....er ....not Fury as I thought in the Victoria the other day . Either way though you might appreciate them ...the bar staff gave me those "sad old bogger" looks !2 points -
The project is on hold because an unrecoverable problem appeared. While I await another vacuform kit from Tigger I'll continue to work on the fuselage. See if you can spot the problem: I need a drink.2 points
-

JetMads 1/32 Viggen
scvrobeson and one other reacted to Chek for a topic
CA glue of any description (that I know of) goes brittle when cured. Neither does it penetrate into the bonded surfaces. I've added resin and other materials to kits using CA, but I'm unsure about its capacity to hold an entire heavy kit together. I'm wondering if a UV cured resin bonder is a better answer than epoxy, at least for the larger parts. I'd be interested to know what the builders at somewhere like HpH use.2 points -

Make the others jealous
Rick Griewski and one other reacted to LSP_Ron for a topic
I don't build a lot of cars but I like to slip a build in once and awhile. Two of many of my favorite cars.2 points -
To detail engine or not to engine. As long as the engine dosen't affect getting cowl on don’t mind. But if I had option of cheaper kit without internal Uber detailing yea please. ( with a few exceptions ) And if it didn't have an engine I wouldn't care if the exterior and pit were nice. (think Tamiya without all the open panels) I’d love to see them go nuts with surface detail, maybe even some subtle oil canning? If I want a complex build there’s plenty in the stash to make my hair turn white and fall out...and look like Yoda after 300 years Relaxing build - sounds good to me! Though the poor wallet groans, cheers NZ. Can't wait for your kitsets to come out bros2 points
-

KASL F-16 goodies just released
Derek B and one other reacted to ade rowlands for a topic
There’s nothing in the instructions about fitting the kit gear. But there are these receptacles for the kit gear pegs on either side of the gear bay walls. So the kit gear will sit in rear of the large raised ribs on top of that small raised oblong, which should be easy to remove if the need arises. I’m not sure if this answers Pete’s concerns or not. I’ll bow to his knowledge of the F-16 seeing as he drove them.2 points -
Yesterday I assembled the wings. The kit provides a few options: one, two, or no bombs per wing, and the presence or absence of wing guns. I'm building mine with no bombs and the guns. The kit provides locating holes for the machine guns; don't use them because they won't line the barrel up with the hole in the wing. Instead, the kit instructions show using a photoetch frame for the guns, and an outline on the lower wings for placement. I used this and the barrels will line up. I'm using the Master barrels so I've cut off the kit parts. The Master (AM-32-120) set also includes the ring and bead sight and a detailed venturi tube. The wings fit together really well, but I removed the locating pins to make it easier. The photos show the unsanded wings just placed on the fuselage to show how well everything goes together: Cheers, Tom2 points
-

Kotare Models - a New Venture from Former Wingnut Wings Staff
Pete Roberts and one other reacted to Dpgsbody55 for a topic
Agreed. Tamiya do this so well, as if you don't want to see the engine, you just build enough to support the prop, then glue the cowlings on. On the other hand, the kit has all you want to build a well detailed engine in your well detailed plane. This is what Kotare should be aiming at. Cheers, Michael2 points -
More work done on getting the camo scheme looking right. Topside almost done. And the underside, still lots to do. Thanks, Dan2 points
-
thank you, Antonio! yes, digging on the books i have and on the web I found at least two images of GA +TH, W.nr. 5228. I hope to do not harm anyone posting those here, the only intent is on behaf of study and discussion. the two pictures says some interesting things, to me: this aircraft has been in the standard splinter scheme, but also, in a period of his operational life, it sported whitewash camo and skis instead of the wheels. also, we have the proof that it crashed, in a moment of its life. that's very important to me to quiet down the anxiety due to the kit's high and apparently flimsy landing gear, so, in case it should not be strong enough, I may depict the bad landing scene! needing a couple of stretcher for the diorama I have in mind, I built two of these with wood and kleenex, and started to assemble two patients and four carriers: the four have a mix of Hermann Goering division's uniforms that attest the period between 1943 and 1944, but being the scene I want to depict pure speculation, I will leave the things as are, I'll just use resin heads. cheers, P.2 points
-
My next shipment has come in, after a longer than usual wait. Not only did I receive my gear bays, I more importantly got the paint and washes to complete the coaming for the IP's, having gone with Vallejo's Panzer Aces Leather Brown paint, and Game Washes Sepia & Umber. I began by repriming the leather area in gray to give it a more neutral surface to paint on. Then I brushed on the Leather Brown. After the initial drying time I applied first the Sepia, then the Umber, hoping to not only use the as washes, but also filters to get the overall tone to my liking. Coming back to it this morning after letting it set all night, I can't complain about the end results, but I will leave final judgement to you folks. The only things left to do, cockpit-wise, is to touch up the IP's, attach the front side walls, stick and rudder pedals, then attach the IP's. Additionally, I'm not sure if Aires has changed their formula, or my saw is just getting dull (most likely the latter,) but the gear bays seem to be tougher to get off the casting blocks for some reason. As always, thanks for stopping by the hangar!2 points


.thumb.jpg.745e9c32fdfafef712dcea77f75e8a27.jpg)