Leaderboard

Popular Content
Showing content with the highest reputation on 09/17/2021 in all areas
-
I would wholeheartedly have to disagree with that. Out of all the LSPs I've ever made since my 2nd modeling renaissance in 2007 I've not once made one with an exposed engine. Honestly open panels like engine panels not only are unwanted, but IMHO down right spoil the lines of the aircraft. To me they are much harder to fit when separate, and the extra money spent on providing a detailing engine (s)could better spent in cockpit/exterior details or upgraded exterior parts.14 points
-

Phear the Bones. Another F-4B conversion.
GROWLER 96 and 6 others reacted to MDuv for a topic
Hi Small update on the sandwich assembly. First job was to assemble the mylar sheet, with CA glue, just to see if everything works togheter. It was mostly OK, I just tweaked the inner flap part. enlarged the holes, just to have them not interfere with the upper sheet. Then it was time to cut real plastic and try it for good. I did not send the rivet pattern to the cutter for this one. as I wanted to have them positive. So once the parts were cleared and cleaned, I runned the riveter on the other side of the sheet, to have them appearing on the outer face. MLG door. Airbrake, a pity i wont use them Doors all completed : And a comparison, kit parts, proto parts, final parts. Kinda happy with how it turned out. I have just dropped the files overs at ScaleModelPaintMasks.com Here is the link: Thin wing conversion Would you want to give it a try, I wish you a lot of fun. Cheers. Mathieu7 points -

Kotare Models - a New Venture from Former Wingnut Wings Staff
geedubelyer and 6 others reacted to Archimedes for a topic
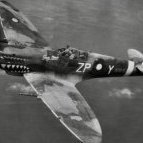
+1 on the hotcakes! When considering the major Spitfire variants; whilst Tamiya have done what is a beautiful MkIXc and (my personal favourite Spitfire variant) the Mk VIII, not only has there never been a 'definitive MkIa in this scale but nor has there been a definitive MkVb from the Merlin engine series. The Matchbox effort at the Mk22/24 is credible for its time but it would be nice to think that Kotare may even go in that direction. For now I am simply glad that this manufacturer will fill one of the most obvious gaps in the 1/32 LSP canon: a (hopefully) definitive Supermarine Spitfire Mk1a. Kind regards, Paul7 points -
+1. The point about cost is well made. The aftermarket will usually cater for the engines and other internal bits for those who want them (and there is nothing wrong in that, just different taste) and this means a simpler kit for those with other priorities.6 points
-

Friedrichshafen FF33L - Polish 9 (1/32, Lukgraph)
scvrobeson and 4 others reacted to PrzemoL for a topic
Let me present the model of one of Polish early naval planes - FF33.L White 9, photographed during the inspection on Aug. 20th, 1920 in the Naval Air Base in Puck. It was then unarmed but I have taken a freedom to speculate, that it could later be fitted with Parabellum gun. I wish to express my enormous thanks to Łukasz from Lukgraph for fulfilling this dream of mine - "dziękuję bardzo!"5 points -
From their website: Kotare's passion is to provide accurate and highly detailed scale model kitsets that are enjoyable to build for both experienced and novice modellers alike. We hope that by designing these models to be as trouble-free to build as possible we will attract even more people the relaxing and rewarding hobby of building scale models.5 points
-
I have been to Japan a few times and I spent a good bit of time around model shops. I also went to the Shizuoka show a few times and there are a few vendors there who sell second-hand and rare kits. Some kits are shrink-wrapped, some are not and it all seems to be random. These appear to be wrapped by the store or maybe by the distributor. Have a look at these photos I took a few years ago: Some kits such as Airfix and Special Hobby kits are shrink-wrapped even though they are not wrapped in that manner in Europe, which tends to indicate that the wrapping was done in Japan. B's Hobby in Kyoto: Leonardo LG in Akihabara, Tokyo (second-hand shop) Leonardo ET in Akihabara (second-hand shop) Leonardo G in Akihabara Tokyo (second hand shop) Tam Tam in Akihabara Tokyo Yodobashi Akiba in Akihabara Tokyo Tamiya Plamodel Factory in Tokyo Volks (Zoukei Mura) when it was in the Radio Kaikan building in Akihabara Tokyo (they got their own building now, around the corner) Volks (Zoukei Mura) Hobby Square in Kyoto (also headquarters of the company) But my favourite place to spend money is the Shosen Book Tower in Ochanomizu. The books tens to be in sealed plastic bags. I have more photos from Yellow Submarine and the Volks Hobby Square in Osaka, but they are on an older phone. I love Japan and I miss going there. If you can travel, go there. Also, it is cheaper than you expect. For example, travelling to the US has always been much more expensive for me than travelling to Japan. HTH Radu5 points
-

Hasegwa Bf 109G-14/AS
Landrotten Highlander and 4 others reacted to LSP_K2 for a topic
After stripping the paint (twice now), I finally noticed that all three prop blades had sink marks in the back. A little Tamiya white, and they're all fixed up now.5 points -

Ju-52 Bulgarian Air Force Revell-Monogram 1/48
Troy Molitor and 3 others reacted to ShelbyGT500 for a topic
Hi friends, at this topic I'll show you WW2 Ju-52. Planes like this one were used for cargo transportation and para-jumps after 1944 in BG Air Force, when Bulgaria pass to USSR side. The model it self is beautiful - revell-monogram parts are great. For AM I've used Vector engines and resin-etched interior from Aires. The interior is painted with tamiya acrylics and weathered with oils and pencils. The exterior is painted with gunze laquers, weathered with tamya filters and dry brush. So here it is: Thank you always for stopping by and Cheers friends4 points -
From today we accept preorders - shipping time to 60 days. Albatros C.III 1:32 scale kit https://lukgraph.pl/.../Albatros-C.III-1-32-scale.../194 Albatros C.III PREMIUM SET 1:32 scale kit https://lukgraph.pl/.../Albatros-C.III-1-32-scale.../195 Albatros C.III in Polish service https://lukgraph.pl/.../Albatros-C.III-1-32-scale.../196 Premium set: 3 x A4 sheets woodgrain and canvas decals, and masks (1mm rib strips, main German crosses) all made by LukGraph (few decals added to the online store as separately product). Description of the kitset Resin Casting Parts: fuselage, wings (wire reinforced), horizontal and vertical fins, larger interior elements. All struts and axes reinforced by wire. 3 fuel tanks, wheels x 2. 3D prints: Mercedes D.III 160 hp Engine x 1 – separately boxed with 2 exhaust pipes, propeller, small interior and exterior parts, rear struts, 1:32 scale kit, upper wing support, gunner turret, guns Additionally, over 30 photo-etched parts - including barrels for 2 guns. The German Albatros model has 3 painting schemes available - Albatros C.III 766/16, Kasta 10, Russia 1916, Lt. Erwin Böhme - one of the most recognizable plane from the First World War. - Albatros C.III 4078/16 tactical „3" of Kasta 20 - Albatros C.III 106/16, 1916 Above screen printed decals. Based on the decal, you can make a few other paints (e.g. on the Albatros C.III Windsock cover). Separately boxed Albatros C.III in polish service - Albatros C.III 103/17 (light grey-blue overall) – digital printed decals. Even less experienced modelers should be able to assemble the model. We try to improve our workshop with each release. We try to do everything we can to ensure that this short series of resin models is at the highest level. We will continue the series of models from the First World War. LukGraph Team4 points
-

Kotare Models - a New Venture from Former Wingnut Wings Staff
mozart and 3 others reacted to Pete Roberts for a topic
Engine. Or no engine? Why not both? Some of us like to have an engine to detail up. Some want to close the cowlings. So why not provide BOTH options? A fully detailed engine AND an option to just plug in a bit of engine so you can close the cowlings and still have somewhere to install the exhausts if you don’t want to assemble dozens of parts just to get this ability.4 points -

Kotare Models - a New Venture from Former Wingnut Wings Staff
LSP_K2 and 3 others reacted to thierry laurent for a topic
Actually in spite of the tons of released books the Spitfire is NOT well documented except some specific and quite standard marks such as the Mk.II, some Mk.V and the Mk.IX. For most other marks, the documentation is only average and totally insufficient for some others such as the Mk.I, the Mk.XII, the FR47 or the early PR versions! One stupid and very visible example: up to now nobody correctly documented the evolution of the wheels bumps in the upper wings!4 points -
I have to agree, 100%4 points
-
And so a small update.. I'm sure you've all heard about the Kotare Mk1 coming out, and modellers of lesser moral fibre would simply scrap this project, but I will continue... as best I can! Here is a comparison of the instrument panel moulding to the decals.... I need to make a plan as no AM is possible... but decals are the wrong size, place etc.... on careful consideration, the panel would work for a Mk IX (The other kit from these mouldings,) but the decal bears no resemblance to anything I have found online, and the white outlines are not great and most of the dials too big.... I don't think there's a swop of panels from left to right, just a lot of work to do... https://i.ibb.co/JmwttvK/IMG-2931.jpg Also working on the seat, I have no AM here too, bust adding the leather padding on the seat back, and using strips of thin plastic card, well sanded and Tamiya primer to sort the gaps, it still needs some sanding... https://i.ibb.co/MGBm1Zt/IMG-2932.jpg I know things look a bit scruffy so far, a combination of the second-hand kit and my enthusiasm, but I will endeavour to neaten up and fly right... Thanks for looking in! Regards, Marc4 points
-

HK Models 1/32 B-17E/F WIP
Dadeo911 and 2 others reacted to Gil Hodges for a topic
I've begun working on the fuselage....added the "E" nose and tail to both of the fuselage halves...the fit was a little better than I expected for such a large kit. The next step was adding a wash to the interior and many of the detail parts.... While not overly difficult, it was tedious....each fuselage half taking almost an hour each.... But, I can now actually start working on the interior parts themselves; AFTER first studying all of the Eduard interior sets to see what needs adding and/or modification to use them. There will also be quite a bit of detail painting that will be time consuming....but then that's the nature of this big beast. More pics when I have some significant progress to show! GIL3 points -
Since when was large scale aero modelling a "relaxing and rewarding hobby"? Perhaps I'm not doing it right... Richard.3 points
-

Kotare Models - a New Venture from Former Wingnut Wings Staff
scvrobeson and 2 others reacted to MikeC for a topic
Apparently it's a common word in New Zealand to describe a kit. There's more on this on the Kotare FB page iirc.3 points -
This is a very nice kit, the detail is great, fit is near perfect and the decals are extremely nice, all 200+ of them. My only gripe is there was not enough room for me to get the nose weighted down, so I made up a little base for her to sit on. I really like Tiger Meet special markings and this is a cracker of a kit. It's painted in overall RLM 04 yellow, weathering kept down as she looked pretty good when on display. It seems this aircraft was kept in her tiger colours and put on a pole outside an airbase hanger.3 points
-
 Here is some preliminary work done on the Hispano-Suiza HS.404 20 mm cannon. This is the drum-fed model suitable for early Beaufighters. A belt-fed cannon for late-model Beaufighters will also be designed. Four of these are fit below the observer's station, parts of which will be visible through floor cutouts. Much work yet to do. Some of what you see here will change.3 points
 -
Again, cost. A startup company like Kotare is not Eduard. They may or may not have that money up front that a Tamiya or Eduard DOES have to spend. In that case, deleting a very expensive open and visible engine may be the difference between putting the model out and making money, and putting a model out, and loosing money. It also costs a lot more money to make separate runs of kits, and when a company like this is starting out it seems a much better idea to keep things simple and accurate and sell a ton of kits VS dumping all your eggs in one basket with a "super kit" that does everything EVERYONE wants and pushes production costs so high that profit to make other kits is lost.3 points
-
Why not both? Eduard already does it. Armor manufacturers offer a "basic" kit, as well as their own branded add-on packs with extra detail. They can design the whole thing keeping the engine sprue and/or gun bay sprue separate. Sell upgrade packs (at a premium), then after a while bring out a Special Edition with those sprues in the box.3 points
-

Kotare Models - a New Venture from Former Wingnut Wings Staff
LSP_K2 and 2 others reacted to Gary Needham for a topic
You are never going to please everyone and I personally prefer the 'clean' and simplistic lines of the aircraft itself like in the style of the Hasegawa 1/32 range of WW2 single seat aircraft. I don't like to model my aircraft with panels and engine cowls off etc. and looking at those online and at shows etc, that seems to be the majority of us. The problem with all the 'bells and whistles' like full engines and gun bays etc. is that it pushes the overall cost of the model up for (everyone) and I recall when I built the Tamiya Spitfire IX in 1/32, I left out all the engine and plumbing parts other than what was necessary to attach the spinner and thinking "how much would this kit have cost if all the parts not used along with the little magnets etc. had not been included?" It's probably not economically (or moulding?) viable, but like with Zoukie Mura's 1/32 stuff, imagine if you could buy the base kit and just with those parts which add structural integrity and support and then another boxing for those who want everything 'open' or actually like painting and installing parts that will never be seen again. Ultimately, the manufacturer has to make the final call and then we then have to decide whether to buy it or not. Either way, I am sure that Kotare Models Spitfire will be a superb package. Gary3 points -
Hi John, thanks for the input. Tom (the subject pilot) can’t recall the exact sidewinder that he carried on that day so I went with my best guess based upon some images that I had at the time. Someone put up a stack of pics of the cruise that Tom was on which featured a great pic of an A-7A from VA-82 carrying an AIM-9B, so that is the one I went with. Subsequently, I have found a picture that Tom took of a stack of A-7A’s and also F-4’s in formation, bombed up and heading out to a sortie. This picture actually has -305 in it and was the basis for my small correction on the cam demarcation at the end of the tail cone. It also has -305 carrying a sidewinder with a longer nose than the -9B so I have considered that I might have the wrong - winder on. I have also got a very good pic of an A-7A on the carrier deck, loaded with the large Bullpup, which is rare to find. The sidewinder loaded has its nose partially covered but it features the same colouring as the later models. I have used brass pins to attach the missiles to the rails so can easily change them based upon any new information that comes to light. cheers, Eric.3 points
-
Specs call for RLM 24. Eventually, due to raw material shortages and different manufacturers, in different regions, like Germany and Czechoslovakia, and because the allies were bombing the brains out of the Germans, ingredients weren’t available in the proportions and quantities required to make the same color as earlier in the war. Sincerely, Mark3 points
-
I'd quite happily buy a budget version without the engine and ancillaries.3 points
-
I can just imagine the engine and plumbing....oh boy oh boy!3 points
-
And it has legs! The landing gear legs fit securely to the fuselage, and the photoetch struts lend a lot of strength. Not sure how securely the wheels will fit, but we will cross that bridge later. In the meantime, I am assembling everything that will be the main color. Accounts vary, but I am planning to go with MRP RLM 81. The entire fuselage, the legs, and all the struts get this color, so just the underside of the wings and tailplanes get the underside color, and I'll be using MRP RLM 76 for this. Cheers, Tom3 points
-
The scratched Delmar Target equipment... Pieces of resin, sprue and styrene. Cheers: Kent3 points
-
I am sorry to say, I had failed to document the progress on this model. It is now completed. More photos in the final gallery.3 points
-

Tamiya F-4B Phantom Conversion (Finished! 25 Sep)
John1 and 2 others reacted to easixpedro for a topic
So quick update on the flight deck. You can't make 'em too nasty. I'm working on the cross deck pendant (that's the name of the cable that goes across the deck and the hook catches). Its held up by leaf springs similarly to an old car. I'll make mine out of a section of aluminum soda can, and then drape the pendant across it. Here's an image I found on the web (for illustrative purposes only). Check out how the non skid is worn away. I'd call that about 2 weeks worth of flight ops. After several line periods or an entire cruise, it will be worn down to bare steel. Even worse, it'll be covered in hydraulic oil, oil, grease etc and be slicker than ice. It's no fun being in a 58K pound jet and sliding or worse being blown by exhaust. So I set out to beat up my deck and bring out some of these details. First I chucked a big sander into a drill and began knocking back my non skid. Go slow and you'll end up with a good representation of how the pendant grinds down the deck Next, I hit the bare section with a steel paint, drybushing the edges. Following that, I used some of my kids old water color paints (Hello Kitty to be exact) to replicate some rust. This is the first pass. Gotta remember that exposed metal rusts super quick in the salt water environment. You can walk up on deck in the morning and there will be no kidding salt crystals sitting in the non skid. But even with all the oil on the deck, it still rusts quickly. Need to weather it a whole lot more and add some more stains before adding rhe springs and the cross deck pendant. More pictures when I get to that point! -Peter3 points -

LSP Cockpits
Model_Monkey and 2 others reacted to Pete Fleischmann for a topic
Just for you MARU- 1/16th AT-38B: Link to the build is here: The Smurfjet cheers Pete3 points -
Revell Mosquito 1/32 - Really loved this one
Fencer-1 and one other reacted to Suresh Nathan for a topic
Hi guys been busy with this one (https://www.largescaleplanes.com/articles/article.php?aid=3569). Many aftermarket parts but really only the undercarriage and cockpit was necessary. The rest was scratchbuilt. Really enjoyed this build. Let me know what you think. Suresh.2 points -
my last built , nice kit for a nice plane , enjoy :2 points
-

Tigger L-39 Conversion
Marcin_Matejko and one other reacted to daveculp for a topic
How did I miss the hump? It was staring right at me the whole time. Here's a shot of wing trailing edges installed and the new spine being built.2 points -
Guys you will kill me... I want to go away from Eagle topic for last 2 months and you..... :-D For example this... not 32 scale but 48scale pylons for C/D Ealges can be usefull too ... https://www.kopeckyscalemodels.com/?page=22 points
-
Same OV-10D+ from the cockpit thread...2 points
-
Well, I know 24 was mandated for oxygen equipment (oxygen bottles, lines, etc.), and this was followed rather strictly until the end, but I'm not convinced the other light blue color seen on regulators/economizers specifically is simply the result of end of war shortages and mayhem. When you look at earlier regulators/oxygen economizers like the Fl.30402, they are generally just painted in 02, or possibly even just an industrial grey coating, not necessarily a specific RLM color. In the case of the ubiquitous Fl.30403, which came in use from 1941 onwards and is the type depicted in the images above, there are basically four main types of coloration I'm aware off: - Completely in RLM 24, as the example shown by MikeMaben - Main cover in 24, but with the central push button in the unidentified bright blue color (note that in MikeMaben's example, under the 24 paint on the push button, the bright blue appears to be present) - Main cover in 66, possibly with a quadrant in 24 with in white the words "Sauerstoff-Dusche", and a bright blue push button - Entirely bright blue While the differences in finish are indeed no doubt due to various manufacturers having different practices and using different subcontractors/suppliers, the bright blue color seems to be rather consistent across all examples. This, combined with the fact that it appears well before the final stages of the war, and occurs in conjunction with 24 on the same device would seem to rule out this being the result of shortages, poor paint quality control and general disorganization. Rather, it seems to me the bright blue, while not an official RLM color, was nevertheless a standardized color which was used deliberately on regulators by at least some manufacturers At the same time, it strikes me that we're discussing the color of a relatively small cockpit device than in many cases is hardly visible even in the real aircraft... Too much time on our hands maybe?2 points
-

Kotare Models - a New Venture from Former Wingnut Wings Staff
MikeMaben and one other reacted to ade rowlands for a topic
Engine, no engine, I’ll be buying it anyway. I prefer all hatches and panels closed myself, and a lot of the time the canopy too. If there’s an engine I’ll do what I do with the Tamiya kits, build as little of the engine as required to hang the Exhaust stubs and Prop off and slap the panels on. Same goes for gun bays. Doesn’t stop me marvelling at those who super detail though.2 points -

Kotare Models - a New Venture from Former Wingnut Wings Staff
esarmstrong and one other reacted to LSP_Mike for a topic
It's going to come down to the vision of the principles involved.2 points -
Quite simply cost. If it's in the kit, it adds to the price. So why not leave it to the aftermarket, so those who don't want it don't have to pay for it? Of course, take that argument to its extreme and you'd end up with a 1950s-standard set of basic parts and have to rely on aftermarket for things like cockpits, but there's a balance - question is where is it?2 points
-
Unrestored ...2 points
-

Das Werk 1/16 Sturmgeshutz III ( STUG III )
Rick Griewski and one other reacted to LSP_Ray for a topic
Never heard of them! Wonder if it is a release for Asian market? BTW: for those of us near the west coast, Kitlinx (one of our sponsors) is taking pre-orders for the StuG III G for $95.2 points -
I think Kotare mentioned going for ease of build so think Tamiya or ICM rather than ZM or Verlinden for engines. I'm also ok with that2 points
-
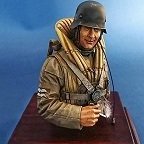
from here on, the game gets complicated... one of my many weakness is on figures painting, i never achieve a result that I may call fully satisfactory. well, that's my be(a)st. the blue-green clothes of the HG are not well depicted, and I was reluctant to add any "pulp factor", so just light wounds, here. another little big complication I discovered was in the HG camo splinter pattern: it wasn't the heer's standard one, but it had smaller pattern and slight different colors, it's commonly called "splinter B". to paint it on figures big as my thumb was a nightmare, here we are in progress: meanwhile, I played around the engine, adding oil tank and lines, some electric wires, air intakes and ducts, and this plate that appears on pictures, but of wich I don't understand the use. I emulated it with a soda can plate and a little gizmo. then I pressed on with the fuselage: glued on the big window, and tested the landing gear. hey, it seems to hold! not so bad... but doing the aft doors, and comparing these with the pictures of the real ones, I realized the holes i cut in the fusealge are wrong. now is too late to correct the hole, so the only thing I can do is to adjust the door's internal frame to disguise a little bit the mistake. sigh. modeling is suffering, I know... cheers, P.2 points
-
Hmm. Don't know what that double is about. Anyway, onward thru the fog. Cut down and blanked off the MK 108 cannon housing and made a handle and knob. I didn't bother with the shady side detail as I figured it wouldn't be seen. Chiseled off the seat belts. Not so perfect. Oh well. Rudder cable and electrical line cut-out toward bottom. Sanded down the rudder pedals, cleaned the heel as best I could. I suppose I can go over that are with liquid cement to smooth things out. Tape straps. The pedals have .010 x .040 returns glued to the back, with the extension folded forward. Anyone who has tried to fold thin styrene will know that the styrene has memory and tends to return and not stay at a 90degree angle. If you put a spot of CA on the inside of the return you can get the styrene to stay at 90degrees. The CA will harden and allow the piece to keep the angle. Rudder pedal cable, Left side: old electrical box chiseled off and new electrical box located to accommodate right side oxygen regulator panel. Right side new configuration for I know not what. Right side panel. A lot of chiseling done, here. 2 new fuel lines to the left. Next, a cover, below that a handle. Needed to chisel off the oxygen gauges from behind the panel. Didn't do such a good job and had to scrounge oxygen gauges from the spare parts box. Also chiseled off some oxygen tubing and stuff from behind the panel. Chiseled off the lower left diagonal rib from the circuit breaker. I see there is more work to do. Built the flare cartridge base. Made the oxygen on/off handle with tubing. A lot of fiddling to get everything to fit. The flare cartridge box as you will note when comparing its' location to the reference drawing is elsewhere. I couldn't manage to fit it as per the photo. Knob on vent door, and enhanced vent door triangular guides. Other side. The outside wheel should be smaller. I failed miserably in my attempt so went with the kit wheel. Albion Allow tubing to the left of the wheels for the chain, which is twisted wire. At the top, canopy release and canopy emergency release are G-10 details as the canopy is an Erla. To the right, the wiring and cover are enhancement of what was chiseled off from the kit. Balls on throttle and emergency canopy release I think is Purigen, a salt water tank filter media. Still have the bucket seat and Instrument Panel to do. Thank you for looking in. Sincerely, Mark2 points
-
1/16 scale scratch built AT-38B Talon-The Smurf jet is back!
Azgaron and one other reacted to Pete Fleischmann for a topic
Busy getting ready for an influx of parts from Timmy! Bought these as rifle rests- temporarily re-purposed as ginormous model rests!2 points -
P-51D-5NA 339th FG FINISHED
John Stambaugh and one other reacted to MikeC for a topic
Today's update involves a couple of painting sessions. The tape is along the mating surface - it saves scraping later. On balance, and bearing in mind my experience of the Eduard 1/48 kit, I decided to fit the tailwheel leg while I could still get at the locating hole. This saves trying to fit it "blind" later. I just need to be careful not to knock it off. And a few more bits done. I can get on with some assembly and detail painting next time. Still to do: paint the backpad and harness on the Barracuda seat.2 points -

LSP Cockpits
Model_Monkey and one other reacted to Uncarina for a topic
The superb little IBG P.11C. This is kind of cheating since the engine is there as well! Cheers, Tom2 points -
From my SBD build.2 points
-

WHIRLWIND special hobby
Flight Line Media and one other reacted to red baron for a topic
I took the first one to compare2 points