Leaderboard


Popular Content
Showing content with the highest reputation on 09/11/2021 in all areas
-
Thank you all Well I better do an update then Cees when I left you last, I was working on all the little bobbins in the cockpit - switch panels, control boxes etc - most of these are PE faces, custom decals & toggle switches from wire, some of the bigger knobs & buttons are modified watch parts (cogs & shafts etc)... ..these are the front cockpit right hand side.. ..and fitted - the fuse panels in the lower half were first made up, then finely chopped coloured wire dropped onto blobs of CA - a bit like decorating a cake with hundreds & thousands.. ..same for the left.. ..here the knurled wheel was a modified 1/24 tailwheel (Fw190 i think) with ribs added.. ..rear right.. and rear left.. ..the rear bulkhead has quite a lot of complex work and it's own buoy and target towing control panel - the yellow thing in the middle is a pull cord to cut the towing cable.. ..when dry fitted in the airframe it starts to look like this.. ..then as we modellers like to do, we start to cover it all up.. ..here with the upper decking.. ..and when built up the cockpit starts to look a bit busier - in all areas there is still quite a lot of cabling & wiring to add.. ..and thats it for now - until next time.. TTFN Peter11 points
-
A rare color photo of the real deal, anno 1939. The ''passengers' are Miniart, the luggage cart is scratched. Thanks for looking: Kent9 points
-

1/16 scale scratch built AT-38B Talon-The Smurf jet is back!
Azgaron and 8 others reacted to Pete Fleischmann for a topic
Hello all! something was bugging me about the nose. It simply didn’t look right. Pretty damn close; but not right- Now I have the most accurate T-38 plans on the planet, short of what might be in a vault somewhere at Northrop Grumman..so I have 100% confidence in them- so I checked my work against them, and yep- I was right. The nose on my model was about 5mm short. pretty simple but obvious construction mistake by me..I knocked the nose off of the master pattern way back when, and obviously didn’t place it correctly.. so- off with the nose! I cut a 5.30mm laminated sheet styrene plug to insert at the forward bulkhead of the nosegear well more to follow, but just holding it all in place with the plug looks much better- cheers Pete9 points -
.thumb.png.84c5d3a464f2dd83f0ac37a5aac81ec8.png)
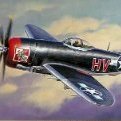
P-47D Razorback "Vulneratus non victus"
daveculp and 7 others reacted to Antonio Argudo for a topic
more work done, some different lights, had to use a wood stick to widen the windscreen otherwise a noticeable gap would show, it worked and now ready to paint, also filled the mirrors inserts which are not in the right position represented by Trumpeter, the sliding rear canopy will be a nightmare to mask, not my favourite task in modelling cheers8 points -
Thanks for the encouragement I've managed to add some float and gear rigging Thanks for looking7 points
-
The kit instrument panel has some reasonable detail, and would look fine with some careful painting and instrument decals. However, I steeled myself for a little "creative destruction" ... ... so I could stick the Yahu panel on the front. Better than I could have achieved. The lower console is still to be added, of course.6 points
-

1/16 scale Boxer reconnaissance vehicle
JeepsGunsTanks and 4 others reacted to GMK for a topic
Jumping between 1/16 projects at the moment. This will be a design, 3D print, & build project, much like my Bushmaster & M113s. The Boxer combat reconnaissance vehicle (CRV) is a ~40 metric tonne 8x8 armoured roller skate being introduced into service in the Australian Army. Not without some hiccups along the way, it should mature into a capable truck in time. This was the vehicle that prompted me to learn CAD in the first place, with the initial intent to convert a flat pack styrene “kit” of the flat top Boxer. Turns out it’s easier to design the whole vehicle. Roughed out the basic hull…again! The lower hull geometry is complicated, to say the least. Only modelling one half at the moment. The lower hull is symmetrical, apart from minor details. Boxer is modular insofar as each vehicle comprises a drive module & an interchangeable “mission module”. The Lance turreted mission module is uniquely Australian. Time will tell whether that’s a good or bad thing! Trying something different for the turret interface that’ll clip in and allow 360 degree rotation. This design has taken a daily session over the five days. When I started CAD 18 months ago, this would’ve taken months!5 points -

HK B-17...C 5/4 sweating the metal
Greg W and 4 others reacted to brahman104 for a topic
Thanks Terry! Churchill certainly was a fine orator, especially at a time when his country so badly needed one! Pretty much the final details for the interior... Just had to install the bombardier's controls and checklist clipboard. Then there was the issue of the small, but highly visible socket gun mounts.... I very gingerly drill and reamed a hole in the middle of the correct (yes I checked like a thousand times before drilling!) window on each side, then fashioned two discs in litho (one inner and one outer) The ball came from the HK barrels, which I removed the barrel sections, then very carefully drilled out the centre..... just another one on the long list of nerve wracking operations on this build!!!! The ball was then sandwiched in between the two discs and there you have it. A small, but very noticeable addition. Interestingly enough, these are the very fist items of exterior detail on the fuselage! Must be nearly finished then It seems there isn't a socket joint in the top window on the C/D. That came out on the E, but I think had disappeared again on the F. As you can see there's a lot of dust on the interior (you'd expect a little after 8 years!) that I need to clean out first, but otherwise the next installment should finally see the two halves joined! Cheers, Craig5 points -
Greetings All I took a bit of time off with the grandson(hes 4) and its back to work. I still cant get over how annealed aluminum behaves. There is still much to learn but now having attached the two side panes to the cowling..Im a bit wiser. I dont really know what things should like like at this stage in terms of rough finish, but what Im doing seems to agree with the litho. I mentioned, in my last post, that I had been using a polished stainless steel spatula for rubbing down and smoothing the surface of the litho, both before and after final attachment of the part...here it In reading thru articles about aluminum forming, I came across a shaping too that looked like a bent spatula, very similar to this one. I gave it a shot. It has an excellent capacity for smoothing annealed litho. Being stainless, many times harder tha aluminum, It moves the material quite easily and doesnt scratch the surface. Have a look... The nose cap hasnt yet been attached permanently. The surface hasnt been sanded, only rubbed down with the spatula. Note the difference in finish between the top segment and the side panels. The top panel hasnt been rubbed with the spatual..the side has been. The opposite side...5 points
-
More work on the Fury after a lovely week's holiday in Monmouthshire! I've finished cutting all the nose panels except the bottom one using the Silhouette cutter, makes life so much easier! These pics show the forward nose band being applied, quite a complex curve so lots of pressure and burnishing required, but results are OK: Some points that I've learned about using Bare Metal foil: a) it's quite robust so can take a bit of "mishandling" b) despite its inherent stickiness, it can be moved slightly before final smoothing and burnishing c) it can be cut perfectly on a Silhouette cutter using a Force setting of 2 d) it comes off easily if you don't get it right the first time and need to re-apply a newly cut panel BUT e) every time you peel one off, it leaves a slight sticky residue which prevents b) above to a degree f) it goes down well, I've used a combination of different size and profile cotton buds as my main tools but for real burnishing of creased parts the handles of a small pair of scissors works Might even do some painting soon.....there's quite a bit of touching up to do as well as all the markings! So looking forward to getting that top wing permanently on, I can't count the number of times I've bashed the interplane struts...it's amazing they are still there.5 points
-
Thanks all for you encouraging comments! I've decided to make a little addition to the build. At least two of the Danish T-33's had Delmar equipment, DT-497 & DT-571 So, I've started scratch building the parts... The two T-33's had yellow rudder to identify them as target planes. Cheers: Kent5 points
-
5 points
-
In 2018 after my 1/18 spitfire won at Telford, I was approached by an aircraft restoration company acting on behalf of one of their clients (a Hollywood producer i was told) who was having a full size spitfire restored. It was for a commission quote to build 'his' spitfire to the same standard. I told them £25,000... They didn't bite, if they had, they would have got a bargain in terms of invested professional time Do not undervalue what you do provided the outcome is equivalent to a professional artisan or artist5 points
-

1:32 F-16XL
Anthony in NZ and 4 others reacted to Dandiego for a topic
Kits wing on top of XL wing. Can't show you the original Kangman wings as I threw them away. Here is the drawing that I used. It is just a generic 3 view off of the internet. And blown up to 1:32. Bombs with 3d printed pylons. And main wheels. I have added a spacer to give a thicker wheel, not sure if this correct. Dan5 points -
Thanks, it is a quite quick build. I was working on the floats which are a quite nicely designed assembly but my spreader bars were bent, I straightened them with hot water and pressure but over time they re-assumed the bend, not as badly but I wasn't confident they would stay straight once finished so, I took a chance and made my own spreader bars from spring steel (surplus windshield wiper spring stiffeners) I also added my own registration (spurious) and added the kit decals (some of the kit decals) The spreader bars being replaced with spring steel: adding some graphics just for aesthetics decals on and floats glued on; wire visible here will be for rigging sharp eyed folks may notice I've deleted the amphib gear. I plan to (hopefully), some day, build a watery looking base for it to "float" on Thanks for looking5 points
-
Thank You all for joining in and the replies! Yes, Stefan, I agree completely with your comments on the IP, seat and exhausts, but well, AM not easy to come by here, so I will have to use ingenuity instead! But firstly, a ham-fisted moment and a cracked oil cooler, will need repair! https://i.ibb.co/kSZXktL/IMG-2918.jpg And the seat assembled and refined a bit, but the detail on the padding is spurious, so filled the detail with putty and I have a plan for the proper padding pattern... https://i.ibb.co/GJVjDqK/IMG-2926.jpg Hopefully some more soon! Regards, Marc4 points
-

JetMads 1/32 Viggen
Violator1991 and 3 others reacted to frank83 for a topic
That was my point as well. I wrote to Jetmads when they announced the Viggen and said it should be "JA 37" and "not JA37". Their reply was kind as always, together with the front pages of the official Viggen manuals of the Flgvapnet. Now I am typing JA37 and AJ37 as their reference is the ultimate one4 points -
I make my own stands too. I've posted these before, but all I use is a router. Print the images on an ink jet, Elmer's glued to the base, drill a hole in the side and bend a piece of acrylic rod after heating it in a frying pan with boiling water. All 1/48 but obviously could be done in any scale. The last shot , Balkencruez is made from 4 plinth blocks I bot at Home Depot. Kinda fun and plan to do more. Someday edit, oops , I also used a band saw to cut some of the shapes.4 points
-

Kotare Models - a New Venture from Former Wingnut Wings Staff
KiwiZac and 3 others reacted to esarmstrong for a topic
Given the pedigree of these individuals, my attitude is that if it has wings and is in 1/32 scale, then it will be fair game.4 points -
Hey Guy's the T-33 is slowly getting there, the 'day glo' is on and someday in the near future I will start decalling... Cheers: Kent4 points
-
Back to the title of the thread, I have started this kit but I'm not sure I will get enough time to finish it soon, so have not started a WIP... but here are a few progress shots... so something happened... in orange... and I am really impressed with this kit, the quality, detail and thought that went into it's creation... And to add a few thoughts of my own... https://i.ibb.co/KLBCBvh/IMG-2919.jpg I much prefer to assemble the fuselage halves first, so here are tail, nose and central pieces both sides all together, I can line up the curves on the outside much more accurately this way, and if there is a center line seam, well, we've all spent years dealing with those! I also added the doors to the transmission and gearbox compartment here, as I can line it all up... of course, if you are doing open doors, leave off... The internal detail is accurate, as far as I can see, but not complete... you will need to do some work... https://i.ibb.co/hDjBLcL/IMG-2921.jpg Here are the assembled blades, tailplanes and tail rotor. The blade halves go together well, just please remove the ejection pin markings and burrs from the mating surfaces first, a minor job, but then they go together so well and have a fine trailing and leading edge... I started on the yellow tips and the yellow is an undercoat for the orange on the tailplanes.. no kit is started unless you throw some paint on... https://i.ibb.co/d2K52yH/IMG-2923.jpg Yes, the cockpit is a little sparse, but accurate and enough for a simple build. The AM guys are already going mad here... some seatbelts would help! https://i.ibb.co/Sn9bzy4/IMG-2924.jpg The skids look good, if you're not using the ground handling wheels drill out the attachment points ... oops, I see a seam I missed.... https://i.ibb.co/n7FmqHH/IMG-2925.jpg The stub wings and armament look good, and fit well, started on the bang, bang stuff! Well, just a great kit so far and I will blog it if I get some time... HTH, Marc3 points
-
Click on your name top right, it's under Settings - Account Settings.3 points
-

1:32nd scale Albatros D.I
dodgem37 and 2 others reacted to sandbagger for a topic
Hi all, I'm a bit slower than normal working this model as I'm working another unrelated model at the same time. In order to sand and fill gaps after fitting the lower wing, some of the surface detail under the lower wing was also removed. I thought this would be a good opportunity to try the 'Quinta Studios' 3D printed detail set for this aircraft. To that end I've sanded off the surface details in preparation. If the 'Quinta' parts don't work out I will revert to the photo-etch detail set I have from 'Part'. In the meantime I've had to fill the pre-moulded recesses in the fuselage sides, above the lower wing roots. These are intended for attaching the flying wires, but are not located correctly. The flying wires for the Albatros D.I were routed through a cover panel on the upper surface of the lower wing root at the fuselage. The wires passed through a recess below and into the fuselage attachment points. Mike3 points -
3 points
-
No, I haven't fallen off the face of the earth, just got sidetracked with some other "stuff", so let's get on with this. First let me introduce the one tool that I'd be lost without, this curved face riffler file that I've had for over 40 years. With it being curved the part that touches is very narrow and made short work of this IP and the side consoles in preparation for the Red Fox Studio goodies. The other thing it does with ease is getting down into curved surfaces like getting rid of ejector pin marks. I love this tool! The Hasegawa rudder petals leave a lot to be desired so I put these fancy-schmancy ones in, scrounged from the left over Revell F8 bits. Not that you’ll ever see them, but who’s not guilty of that? The Revell F8 seat looks more like the real one so I substituted that for the kit seat which is kinda strange. The edges of the actual seat is rounded, not squared off like the Revell so I rounded that off too. Since this going to be a factory fresh bird, I like the nice puffy cushion too. Coat of Mr. Color oversprayed with a wet coat of Leveling thinner really lays this stuff out smooth. Only problem is that you would think that those stylish Germans would come up with a more fashionable cockpit color other than this. Let’s wrap this up for now. Tomorrow is Saturday and I promised myself that I’d get this pit done then. Good luck to me. Thanks for watching.3 points
-
Hey all, here a few of the pictures I've taken at Alan's home (I'm not a professional photographer) Alan is currently working on a Supermarine Walrus used through the war for air sea rescue. 1-24 scale constructed in plywood and aluminium sheet, further detailed work and assembling to complete. Here are some of the showcase aircraft models Alan has displayed in his home today. He also has a HMS Frigate of Nelson’s time, rigging to complete 1.96 Alan is loving hearing all of your messages Do let me know if there is anything you'd like to know from him at all? I'm seeing him regularly so can share on your questions. Thanks so much for your help with the advice on image posting. Thanks Jo3 points
-

Spitfire Mk Vb BL924 AZ-G 'Skagen Ind' (Hobbyboss)
Sparzanza and one other reacted to Thomas Lund for a topic
Hi guys Recently I've been on a trip where I build WWII aircrafts with pilots from as many different nations as possible, and the time had come to do one from my own country. Following the (oh boy, very svift) invasion and occupation of Denmark on the 9th of April 1940, relatively few people managed to escape and join the allied forces. Danish ex-pats in the UK collected money to aid the war effort. It was hoped to raise as much money as the Norwegians to create a complete Spitfire squadron but in the end only enough for 3 aircrafts were collected. On the 9th of April 1942 - on the second anniversary of the invasion - the money was presented to Winston Churchill at No 10 Downing Street. The next day the 3 Spitfires were presented to the RAF (and the press) at RAF Station Ibsley. The aircrafts were BL831 AZ-K 'Valdemar Atterdag' (A legendary Danish king from 1340 to 1375), BL855 AZ-U 'Niels Ebbesen' (a National hero in the 14th century) and finally BL924 AZ-G 'Skagen Ind'. Skagen is the extreme northern point on the Danish mainland, and 'Skagen Ind' is an expression used by seamen passing that point, moving into our internal/home waters (ok shared with Norway and Sweden). So in essence 'Skagen Ind' means something like 'Coming home' (my translation). The use of a maritime expression signifies that many of the Danes that joined the allied war effort were sailors, away from Denmark at the time of occupation. This picture is taken on the day of presentation, and it has long been my ambition to build this situation. On the wing is Pilot Officer Aksel Svendsen, born in Denmark, but his family moved to the UK. Svendsen joined the RAF and flew 'Skagen Ind' on 20th April 1942 when he went missing on mission to escort Boston bombers attacking Abbeville airport. The formation was intercepted by Fw190's and Svendsen and another pilot Fl.Lt Vivian Watkins went missing. At the time of his death he had been with 234th Squadron for 3 weeks, had flown 12 mission over 8 days. Leaning on the fuselage is Pilot Officer Jørgen Thalbitzer. In 1939 he gained his pilot licence at an age of 19, at the time the youngest pilot ever. He managed to escape Denmark in december 1940 and via Cyprus, Suez and Cape Town he made it to London and joined the RAF. On 27th june 1940 he was hit by flak on a Rhubarb mission but managed to make an emergency landing, but was taken prisoner. He was imprisoned in Stalag Luft III where he joined up with a team of escapists, but was not successfull. He was transferred to a punishment camp in Schubin, Poland. However in march 1943 he was part of a 30 prisoner breakout. He teamed up with Lt Cdr J. Buckley and planned to find a danish ship in Stettin to take them to Denmark and eventually Sweden. No luck in Stettin, nor in Rostock or any other port until they reached Flensburg, immediately south of the Danish border (check on a map, that's pretty far to go for an escaped prisoner). They managed to get to Copenhagen and Thalbitzer went out to find friends to help them. By pure chance he met his father at a train station and arrangements were made for them to cross the narrow sound between Denmark and Sweden - 4km / 2.5 miles at the narrowest point which had a great deal to do with the rescue of Danish jews. On the night of the 28-29th march 1943 they set out, but never made it. It is not known what happened, but Thalbitzer washed ashore some months later and Buckley was never found. This is one of the planes I've always wanted to do, but never got around to it. That changed when I witnessed a book presentation of a new book 'Britain's victory, Denmark's freedom' by Mikkel Plannthin. A super presentation and a super book - recommended. The other book in the picture is a book Thalbitzer's mother wrote on the story of his son (in Danish, sorry, and not easy to find) So... finally the model. I used Hobbyboss' nice Spitfire Mk Vb and used a resin cockpit (Aires IIRC), HGW belts and some resin wheels (perhaps Aires too) with plain hubs. The figures were a bit more challenging. For Svendsen (on the wing) I modified a wings cockpit figure (awesome quality) that had one leg on a spitfire wing root and the other extended, so relatively close (relatively). I cut and repositioned the extended leg so he could sit on his parachute. The selection of figures were limited because since this was at the presentation Svendsen and Thalbitzer was in dress uniform and Svendsen only threw on a parachute and a helmet for the picture. That meant that he had on shoes and not boots, but fortunately the figure had that. The Thalbitzer figure was from Masterbox, but if I were to do it again I'd get a better resin figure. The masterbox figure head had the ear basically on the jaw ??? Everything painted with Vallejo. The plane was kept rather clean as it was brand new. Everything painted with homemade masks. Had some issues with paint lifting, but eventually got it done...2 points -
A rather sporty departure of one of the last flying MD-80's in North America. If in a rush, scroll to the last minute of the video, otherwise, there is also some nice shots of a beat-up C-47 going about it's business as well.2 points
-
Hi Carl, I messaged Jetmads about using another carrier. I will message you and let you know what they said. Dave2 points
-
JetMads 1/32 Viggen
scvrobeson and one other reacted to Paramedic for a topic
That´s correct. F 13 Wing was the first to get them and flew them bare metal finish. iirc Flygvapnet painted them themselves to save money. But SAAb painted the first Ajs and later Flygvapnet painted the m themselves so i could have mixed it.. Anyways, F 13 Wing did some test on a number of aircraft, trialling different greys and an almost white airframe 8White Lady!). four or five in total, can´t remember right now. So there is room for baremetal, "splinter camo", the two tone grey (same as J 35Js but different from AJSf 37s from SWAFRAP and the JAS 39s) and those test.schemes of darker and lighter greys. it is indeed black. Some have it faded however. Tamiya NATO black is probably better than Flat Black as JetMADS suggest however. But MRP is what I will use.. Draken is actually "The kite" (from the designers!) due to its shape.. Now, Draken happen to mean dragon too..2 points -
Land Cruisers! (And a Hilux)
dodgem37 and one other reacted to Pete Fleischmann for a topic
Hi Mark, mostly less weight and greater strength- here’s a good comparison: cheers Pete2 points -

LSP Forum: How to change the signature
LSP_K2 and one other reacted to Rainer Hoffmann for a topic
Thanks a lot ... It's so simple when you know it. Cheers Rainer2 points -
I think they did all of them except the fabric wing. BTW I think a Hurricane would be nifty. I only have 8 from 3 producers.2 points
-

New Contest - Ultimate Scratchbuilding Challenge
Rick Griewski and one other reacted to Finn for a topic
Will there be a diorama category? : Jari2 points -
Hi Matt. I painted the areas with a very light faded yellow. After that I sprayed Gunze's Fluorecent Orange where the shadows would be. Finally I used oils mostly Burnt Sienna to bring it all together. I was actually surprised how easy it was to get the effect of weathered 'day glo' Kent2 points
-
 Masks off, upper surfaces clearcoated, ready for decals after a once over in the am. Heres the formerly obliterated to bare plastic HV and camo, masks off, clearcoat on! in the morning, i will take a quick look at it from all angles and confirm we are finished with paint and clear, and i will apply…two decals. Then weathering. Good to be moving forward again.2 points
 -
Why is everything in Spanish now?2 points
-

1/12 MFH Ferrari GTO 250 - Finished
Rockie Yarwood and one other reacted to MikeA for a topic
Finally got the decals on, but still a final couple of clear coats to go once the decals have throughly set. The one on the boot surrounds was a challenge to line up with the remainder of the race number on the lid itself. They were two separate decals, whereas my preference would be for one that I could then cut along the panel edge. The other challenge was getting the number on the nose to settle into the radiator access panel lines - it took a long session with multiple applications of Microsol to get there. A dark wash inside the panel line should sort it. I also had my first go at chipping paint using the hairspray method for the underseal just behind the lower air intakes. Worked a treat, although it did make my garage smell like a ladies salon. I'll weather the underneath, wheel arches etc once I've finished the clear coating. The photos also show the door and window rubbers inserted and/or painted as appropriate. The headlight enclosures have been painted in Humbrol polished aluminium which seems to give just the right finish as compared with photos of the real car. The first photo shows a finished air intake cover with the Dzus fastener in the open position. I used some fine fuse wire for the spring. It can sit for another few days now before clear coating. Thanks for looking Cheers, Mike2 points -
2 points
-

By JOVe! Grumman's toothy Mohawk JOV-1A
Troy Molitor and one other reacted to chukw for a topic
Thanks everyone- Matt was a member here- Scrodes: https://forum.largescaleplanes.com/index.php?/profile/2413-scrodes/ He was a damn fine modeler and a good friend. Thanks, LSP_Kevin! I never really left. James Rademaker- I think they're sometimes the best part. That's very much appreciated, Tom- thanks. Thanks, Troy- I think I'm finally back from my long recuperation- cheers! Thanks to you as well, Rich! I'm currently stretching my skills by sculpting all-new upholstery on the bang seats from Magic Sculpt epoxy putty. Not looking too terrible so far!2 points -

ICM NEWs 2021 - Bell AH-1G Cobra in 1/32
Violator1991 and one other reacted to eoyguy for a topic
The early version has the suppressor. It has all the parts except the Xm35 parts. You can do a late version from the early version kit sans XM35. The sprue with the gun parts, and the decals, are the only difference. Both types of skids, tail booms, nose and turret armament are in both kits.2 points -

JetMads 1/32 Viggen
scvrobeson and one other reacted to dustiepal for a topic
Here is the start of the first build/review on ARK, http://www.arcforums.com/forums/air/index.php?/topic/318474-saab-ja37-viggen-jetmads-132/ . This guy is an amazing modeler. Dave2 points -
My next shipment has come in, after a longer than usual wait. Not only did I receive my gear bays, I more importantly got the paint and washes to complete the coaming for the IP's, having gone with Vallejo's Panzer Aces Leather Brown paint, and Game Washes Sepia & Umber. I began by repriming the leather area in gray to give it a more neutral surface to paint on. Then I brushed on the Leather Brown. After the initial drying time I applied first the Sepia, then the Umber, hoping to not only use the as washes, but also filters to get the overall tone to my liking. Coming back to it this morning after letting it set all night, I can't complain about the end results, but I will leave final judgement to you folks. The only things left to do, cockpit-wise, is to touch up the IP's, attach the front side walls, stick and rudder pedals, then attach the IP's. Additionally, I'm not sure if Aires has changed their formula, or my saw is just getting dull (most likely the latter,) but the gear bays seem to be tougher to get off the casting blocks for some reason. As always, thanks for stopping by the hangar!2 points
-

Hasegawa 1/32 Fw190D-9 re-issue?
barkhorn and one other reacted to thierry laurent for a topic
Well, keep in mind we had unencrypted web pages for more than two decades and the planet didn't stop turning... Actually that encryption is only protecting you from 'man-in-the-middle' type attacks and this is typically useless when visiting basic webpages not doing any transaction and with no money in the picture. Frankly, I'm pissed off when a browser decides for me that I cannot have access to a page for stupid reasons (such as a recently expired certificate) and without giving an override possibility.2 points -

New Contest - Ultimate Scratchbuilding Challenge
RLWP and one other reacted to Stokey Pete for a topic
RFI. I claim my very valuable prize please.2 points -
Nope, gotta be a P-51D. The market is screaming for a new-tool D model!2 points
-
I agree and to be perfectly frank, it's been a blessing. It's just a hideous waste of time. Reminds me of when I was hooked on flight simulators.... Years of my time wasted with absolutely nothing to show for it. Well, there was one this shining moment when I landed a F-18 on a carrier.... at night. But I digress. When I get back in I'm unfriending everyone except close friends, family and some scale model groups. Thank you FB for giving me my life back by throwing me in the clink. Oh, and kiss my petunia too.2 points
-
Slow and steady, a little paint, a little bit of metal work.2 points
-

Revell Hawker Typhoon 193 Sdn
Greg W and one other reacted to Panzerwomble for a topic
Moving on , I like this old style of instructions . In good old English , not some IKEA'esque pictogram nonsense . It gives a bill of materials , an assembly schedule and a clear drawing , heck it's almost like engineers were involved . And so following we get this , although this is not what will be in the model . Not too shabby for the era, and if a fella were inclined no doubt could be improved upon a heap .2 points -
Roughed out the upgrade antennas from 2.5 mm half-round styrene. Once the solvent cement fully flashes off (ie tomorrow) I'll fill the gaps with CA and file/sand to the final shape. Fortunately the kit part that makes up the forward part of the intake trunk is long enough that the antenna fits entirely on it, without overlap to the rear. That's going to make getting it stuck down solidly to that curved surface much easier, I think. I also started work on the ejection seats. I then found this website https://www.ejectionsite.com/ that provides some nice clear photos which set me to more scratch building. Updates on that process to come.1 point