Leaderboard

Popular Content
Showing content with the highest reputation on 04/25/2021 in all areas
-

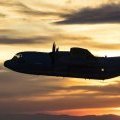
F-4J (UK) Phantom II 74th "Tiger" Squadron
Cicciuzzo and 12 others reacted to David Mooney for a topic
Hello all, I hope everyone is keeping well. This F-4J is built from the Tamiya kit, so there maybe a few inaccuracies in the final make up from the real thing, so apologies for that. It had been a 'thing' I have always wanted to build but sadly we don't have a good 1/32 F-4 that is suitable for the RAF except these of 74th Squadron that were directly imported from the US. Only add on were the smile lights that came from Eduard, painted with Gunze paints and all stores are fitted with magnets.13 points -
my last built : a full resin kit10 points
-

RAF FG.1 XV571 WILD HARE Phantom Conversion
Starfighter and 9 others reacted to Anthony in NZ for a topic
thanks buddy...now back to your Phantom please! Thanks Chuck! I dont know if it's patience and determination or madness and obsession??? LOL, a tad more mate, yes I agree This illustrated just how big the Spey really was compared to the J79, admittedly the Brassin parts will be undersized to match the kit parts...but still Well the other intake is all dolled up ready to go, just have to sort the surface details out one the fuselage before I can epoxy them on... I will probably lose a lot of that surface detail on the top of the intakes when I modify the 'shoulders' Thanks for looking in Cheers Anthony10 points -
Main gear legs Main Landing gear legs also needed a lot of work to make them resemble the real ones! I use the two metal ones for the main legs and the plastic one as i have to glue it on the resin and i need to put a pin inside to strengthen this point. Below you can see all the details added, some of them from Eduard exterior set! Wheel wells I placed the rest of the resin and i improved the rear section as it was wrong and to add some but not a lot detail inside!! Also the decals on the wheel well doors are custom made from photoes taken from a real bird! Hook Had to modify the trumpeter one from rectangular to cilindrical one, so i cut the front and rear sections, added a rod, epoxy putty and some sanding, modifying the ''horse shoe'' painted and weathered! Really happy with the outcome! Wings Trumpeter gives you the option for folded wing but if you want not to use this option you need to strenghten the point where the two halves are glued together, the joint is very weak. Also i used long strips of a really straight plastic in order to be sure that i will glue them really straight. The wings have a big span and even the slightest curve will be real present on the final symmetry of them!!! I also placed thick strips of plastic where the holes for the weapons are, i will use metal pins to make the joint stronger so i needed something to bite on! Weapons and pylons I will depict the aircraft as a Quick Reaction Aircraft for Attack Mission with 1 Aero1D external tank and 5 Mk-83 LDGB bombs. So i decided to deal with the weapons now as some details should be added to them. We used rear mechanical fuses for soft targets. So i needed to build 5 of them and try to place them on the bombs!! The external tank comes from a Hasegawa 1/32nd A-4!! The trumpeter ones are terrible!! Finnaly i placed the wings on the fuselage, with minimum of work, nice job here from trumpeter. I masked everything and i am read to throw some paint onher as soon as possible!! As you can see i have glued the windshield on...took me some time to make it bahave its self!!! Thanks for your time and patience, hope you like it!! John10 points
-
Hi there, some time ago, I started with my Hobby Boss B-24D kit. Since the fuselage interiors are pretty much finished, I thought it's time to share some picutes. The fuselage section in front of the nose wheel-well was cut off and replaced with my own 3d-printed version, since I wasn't happy with the cross-section shape of the kit at this area. Like most/all aircrafts with nose gear, it would tilt backwards without weights on the front side, especially with its heavy tail. Therefore, I added lots of lead plates between the cockpit floor and the wheel well, as well as in front of the cockpit. Together with some additional lead below the floor at the bombardier station, this should be sufficient, although this makes the whole model quite heavy. To hide the lead plates, I added a styrene plated which contians some diagrams from the manual. The kit's bulkhead between the cockpit and radio station was replaced by a more open one made of styrene. I also added some 3d-printed radio-equipment. The side-walls got some more structure details. Since I wasn't happy with the shape of the kit's bombs, I replaced them with my own 3d-printed ones. That's it for now. Cheers Alex9 points
-
evening folks Thats a great spot Flarpen - the gap isn't as bad as it looks in the dry fit, but on checking it wasn't right - I think it's because I actually made hinges that pin to each other so they were a bit too deep - got rid of the pins and closed the gap - I will just CA it in place when the time comes... ..thats what I love about this place, you get a free army of builders with you on your shoulder ..now then Geoff - no self loathing here - I have seen what you can do so that would be badly misplaced - really happy to see you back at the bench with the ST-A.. ..I only did the rivets on the tail surfaces - it was just by imressing into the plasticard skin from the back before skinning the parts - i still need to find a way to do that convincingly on any model... so just a brief update as while I have been busy I didn't get any in progress shots.. firstly, the wings were given rib tapes from decals & primed & painted... also added the fixings for the rigging wires.. ..also added these two panels.. ..having decided on a scheme, I have also designed all the masks I need which Radu Brinzan has kindly made & sent to me - in readiness for these I rough painted the white bits of the roundels on the lower wings.. ..I couldn't find MRP Roundel red & blue anywhere and have ended up buying them from a place in Holland - £30 for both after shipping so a bit of a sting.... once they get here I am ready to paint most of the markings.. ..the other area of focus is the metal panel work at the tail and adding the lower rudder hinges.. ..the struts that hold the tailplane in place have to be made, but the mounts are done (though they need their canvas boots.. ..I also made the tailskid which again needs a big canvas boot - the skid bit was made from brass - not sure what the real one was made of or what coulour it should be? ..the other side has a smaller panel & the big hole is where the rudder control cables come out of (in a boot..).. ..and with it's roundel blank I am tempted to put a number in it and call it an air racer.... ..I want to get lots of the fiddly bits done and all the painting before the final main assembly which is the upper wings - that will be a model in itself.. TTFN Peter9 points
-

I'm one proud Greek!
Hartmann352 and 7 others reacted to Rick K for a topic
My Papu (Grandfather) started this business in 1921. This year marks 100 years in our family. My twin brother is current owner. How many restaurants do you know that have been around for 100 years? Owned by same family for 100 years? Watch the video, it tells the story. Ernies Texas Lunch 100 years Mods, if this inappropriate remove. I'm super proud of my brother. If you look close you'll see a pic of my twin brother Ernie (15) and to his right you'll just make out over half a dozen models I built. Model on - Rick8 points -
Aaaaaaaaaaaaaaaaaaand were done!! I'll take some proper RFI pics this weekend. I can HIGHLY recommend this Meng kit. I took it way, WAY slower than I should have, but after about 20 min of overall correction work for the warpped wings, it was a joy of a kit. Cheers and thanks to those who dropped in on me!8 points
-

AGGRESSOR F-5E in Afghan Camo - Finished!
Derek B and 6 others reacted to themongoose for a topic
Twas a good day for modeling, just rain outside! All the rivets on, stainless exhaust metal painted, some touchups done and all the decals on...what few decals there are, the Navy bird has more than the Marine and most of the standard stuff isn’t there by design. What i love is that it doesn’t have those oversize dashed lines on top of the wing! i know they have a real purpose but from an aesthetic point of view they take away from the look of the AC7 points -

32nd Mirage IIID2Z (with ScaleWorx conversion set)
blackbetty and 5 others reacted to Mistral for a topic
Thanks Tom So, a little more progress. Painted the orange and blue stripes on the rudder : How she'll look with JL-100s :6 points -

Tamiya F-4B Phantom Conversion (Finished! 25 Sep)
Starfighter and 5 others reacted to easixpedro for a topic
Ok then, where were we? Thats right getting the cockpit sorted prior to working the tailhook so we can close up the fuselage. Here's the pits under a quick cote of paint. Nothing fancy and a quick drybushing to highlight the knobs and thats it. I might pick out some more later before the seats go in, but that will be after major construction and just before paint. Now onto the hook. Picked up a 1/4 inch thick piece of steel. I traced the shape of the hook onto it and then used a cutoff wheel in the dremel. Pretty easy. Took me longer to file it down to fit in the corresponding brass tubing. I trimmed the plastic out of the area between the exhausts. The brass will fit in there and I'll use JB Weld to ensure it never moves... I'll cut the brass and round off the edges of the steel to better replicate the hook. Best part of using the brass tube is I can leave the hook off until the end and not stab myself with it! Till next time... -Peter6 points -
After experimenting with different techniques to introduce the slight feathering, which included double-sided foam tape applied to the underside of the mask, I've decided to apply the feather freehand with the airbrush on a very tight setting, at ~12psi, applied 45-50 degrees to the edge of the pattern. It's actually easier for me because the foam tape proved to be more work and left more cleanup work. Before: And after: So at this point my plan is to apply the masks and paint as before, go over the edges to introduce the feather, then fade back with the paint into the pattern to avoid shade differences along the edges. Until next time! Cheers, Tom6 points
-

MH-6M Little Bird
Bravosierra001 and 4 others reacted to Pete Fleischmann for a topic
Hello all- I stumbled on this gem at KERV while doing some L-39 instruction. Not the same as a -6M; but plenty of similar details to examine and photograph pretty cool. This one is used for power line support. cheers Pete5 points -

JA 37 D(I) - 1/24 ---- SOD
Treehugger and 4 others reacted to Rainer Hoffmann for a topic
Here is a small update on the Jaktviggen. I did all the missing details on the thrust reverser. Not much to show, but it was quite a bit of work. Unfortunately it is not as clean and precise as I had hoped (and the macro lens reveals it all ... ), but it was the best I could do. I consider the thrust reverser done and will proceed to the wings and main gear wells. Here are the images of the thrust reverser (again, the lighting is crap, but one of these days ... wait, Ive said that before, haven't I ? ) Thanks for looking! Cheers Rainer5 points -
Chuck here's an idea on how dirty the bottom got: Jari5 points
-
Coming back together now: The wing needed one of the cabane bracing wires refitting, the legs are back on together with their bracing wires, and the replacement fairing is waiting for paint Richard5 points
-

Bf 109G-6/R-6 Hptm. Wilhelm "Willi" Batz, Stab III./JG 52, 1944
109 and 3 others reacted to Miloslav1956 for a topic
Bf 109 Number 13. in this year. Project 14. 1/32 Reverll model Hasegawa gun cover & bulges, Aires wheels, exhaust & cockpit Eduard instrument panel Look Painting mask homemade & Propeller 77 All colours MRP4 points -

HK Models 1/32 B-17G
KiwiZac and 3 others reacted to FreightDog for a topic
Finally got the electrics installed in such a way as I was able to “commit” joining the wing quarters/halves to their respective fuselage halves. Each section’s wiring was by necessity connected through to each other simultaneously while separated before trying to mate. No glue used yet, I’ll seal it up next. The MSM electric installation was a BIG battle I have to admit. It is all so easy in concept, and their instructional guides make perfect sense. I had a plan (based on their suggestions) to route the wires such that it would all be invisible. I failed, and I’ve pretty much sacrificed the rear fuselage to a mass of random jumbled cables. Sacrificed the lighting for the waist & tail gunners; there’s just no room. Had to do surgery to the kit on the fly after my carefully done modifications when the parts were separate. The cabling is just too thick and unmalleable for my skills. It was also recommended to cable in such a way as to be able to remove the wings and disconnect/re-connect for transport or storage. This is beyond either my skills or patience or both. It’s cabled for ever now & those wings ain’t coming off. No project has given me as much stress as this, and I lost count of the moments I was tempted to just rip it all out and build it as a static model. Anyway, about 8hrs of utterly frustrating intense combat with it today, today and I think it’s going to work. Pictures tell a better story so behold the chaos in case anyone wants a case study in bodged electronics - you really need 18 hands with needle fingertips to work with this stuff. so there it is, the lights motors & sounds fitted & working. Should be relatively fast now, as I’m ready to go with the last few detailed parts so with a bit of luck painting by next weekend.4 points -

1/32 Copper State Nieuport XXIII
Greg W and 3 others reacted to scvrobeson for a topic
Happy Sunday! Work continues on the Nieuport, the first weathering stages have been done. Started with a mix of MRP Smoke and Exhaust Soot with a touch of NATO Brown and Black to bulk it out. Thinned it a bit with Mr. Leveling Thinner, and dusted on with the .15mm needle on my H&S Infinity. Trying to do this oil staining is definitely something that I've been struggling with on WW1 builds, but I think I'm finally starting to get closer. Let me know what you think of it. Also finished the interplane struts. Started with a coat of MRP Ochre Wood, then Raw Sienna woodgrain. Coat of Tamiya Clear Orange to varnish it, then shaded with the same staining mixture as the rest of the plane. The "tape" strips on the struts were Tamiya Medium Blue XF-18. Little dark for Horizon Blue, but it should be okay for now. Let me know what you all think, and if I need to fix anything. Matt4 points -

Minicraft 1/144 Electra
Troy Molitor and 3 others reacted to LSP_Kevin for a topic
I'm pleased to report that, for the first time in longer than I can remember, I've been able to get a decent modelling session in this afternoon, and have now got some white on the fuselage of the Electra: It picked up a little bit of airborne garbage while I was spraying, but I'll sand that out once the paint has fully cured. I used SMS PL02 White, by the way - great paint! It's not a gloss colour, however, and has a slightly gritty feel to the touch, so I'll have to buff it out a bit anyway. Perhaps a coat of Tamiya TS-26 Pure White after that - though I think a lot of modellers fall for the trap of making their small-scale airliners too glossy, so I won't be going for any kind of high-shine finish. I'm not happy with the way the engines look, but really just want to kick this one through to the finish line, so will attempt to make them look half decent via paint work. Wish me luck! Kev4 points -

1/24 Airfix F6F-5 Hellcat "Kicked Up A Notch": New eBook Now Available!
Sasha As and 2 others reacted to chuck540z3 for a topic
After building my Italeri CF-104 Starfighter, I took a break from modeling for a few weeks, to recharge my Modeling Mojo and also allow the parts for this new build to come in from all over Europe and the US, while researching all I could about the Hellcat. While I usually build a prop after a jet, I wanted to try something a bit different from my prior prop builds and I also wanted to build a kit a bit better made than the last 4 kits I made, of the 1/32 Kitty Hawk F-5E, Kitty Hawk T-6/Harvard, Special Hobby Tempest Mk V and the Italeri Zipper. While none of these kits were horrible (F-5E came close), I spent a lot of my time and effort to get these models lifted up to the average level first, before I could even dream of “kicking them up a notch” to the next level of detail. This time I wanted a model kit that was good or great to begin with, so that I could concentrate on super detailing it instead. After looking at many reviews of this kit and a few builds, this appeared to be the ticket, especially in big 1/24 scale. I have to admit, I’m not really a big fan of the Hellcat from an artistic perspective. It has none of the graceful lines of the Mustang or Spitfire and looks a bit like a Pot-bellied Pig. It was lethal though and accomplished its main mission, which was to shoot down and destroy Japanese aircraft. According to the Kinzey book I’m using as my main reference, of 6,477 kills scored by Navy and Marine pilots, 3 out of every 4 were made by the Hellcat and they had a 19 to 1 kill ratio. Pretty impressive Pig! I built an A-10C Warthog for my son a few years ago that I wasn’t all that fond of at first either, but by the end when I got to appreciate how purpose built it was, I became a big fan and it is now one of my favorite models today. I’m sure I’ll feel the same way about the Hellcat when I’m finished this model as well. As usual, I bought as many aftermarket parts as I could as follows: · Airfix 1/24 Grumman F6F-5 Hellcat Kit, A19004 · Aerocraft Brass Landing Gear · Airscale Instrument Panel · ANYZ Spark Plugs and Wiring set, AN011, AN013, AN015, AN016, AN017 · ANYZ Dials, Knobs, Switches and Cockpit Handles. AN028, AN029, AN030 · HGW Seatbelts, 124511 · Barracuda Diamond Tread Tires/wheels, BR24412 · Eduard Wheel Bay Detail Set, EDU23035 · Eduard Canopy Masks, LX006 · DN Models Paint Masks for Insignias, Letters and Numbers · DN Models Paint Masks for Canopy, Wheels, Lights · Fundekals Grumman F-6F-5 Hellcat Decals · * A Boatload of 3D Printed Interior Details from Italy · Reference Book: Detail & Scale, F6F Hellcat, by Bert Kinzey and Chris Sakal Here’s a few selected pics of some of this aftermarket, and a few explanations that go with them. The Main Kit of course. The box is huge at 26” X 14” and it has almost 600 parts! More on the kit later. Airscale PE Instrument Panel. Pure precision like anything from Peter Castle, who wouldn’t take my money and refunded it! While not all that surprising coming from Peter, the gesture is much appreciated, so I’ll try to do my best to make it look good sir. No pressure! Aerocraft brass landing gear. I’m not sure if this is required due to the weight, but the casting is beautiful and strong, while revised resin gear doors are added, that accommodate the changes made to the brass detail which is slightly different than the kit parts. ANYZ Engine Detail Set, which isn’t truly an actual set made just for the Airfix PW R2800 Double Wasp Engine, but a collection of ANYZ parts that are needed to super detail an already terrific looking engine. HGW cloth seat belts and Barracuda resin wheels. While the kit seatbelts are all plastic and so-so, the tires are 2-piece, so you will be dealing with seam lines down the middle of the diamond tread, which will be difficult to fill without making the tires smooth all around. You can see quite a bit of the landing gear bays at this large scale, so the Eduard PE set should enhance them further. DN Models Paint Masks. I plan to paint all the big insignias and numbers, while any added masks are welcome for other hard to mask parts. I have the Fundekals Hellcat decals coming soon, which will be used for all smaller items like stencils, etc. Now a very big surprise! Several weeks ago when I first started researching this project, “Giovanni” from Italy contacted me and said that he wanted to send me some resin parts for this new project. I was hesitant at first, because I wanted to get going on this model and what if I didn’t like or use the parts? After some back and forth by email, Giovanni sent me some pics of what was coming, which convinced me to stop my assembly of the cockpit parts and wait for what he was sending me. Again like Peter, he wouldn’t let me pay for anything, including shipping by UPS which is expensive from Italy. A few days ago, I received all these parts at my doorstep from “Adriatic Models”. Adriatic doesn’t have a website yet, but Giovanni thinks they will by May sometime. I will let you know when it's up. Here is the rear wall behind the seat, which is apparently “Station 52 ½”, with the kit part on the left and the resin replacement on the right. I was going to trim off the kit lines that look a bit too perfect and add my own anyway, while there are a few obvious changes like the detailed junction box and the big knobs on either side. Since these parts are 3D printed, they need a light sanding, so rivet detail was not added as strong as the kit parts and I can easily add some Archer decal rivets once the surface is smooth. This part also comes with 3 different headrest/shields, for a 3 series Hellcat, early 5 and late 5. This is the firewall behind the engine, with the kit part again on the left. Apparently the engine mount is a tube and not a rectangular recess, so if you’re a purist, you can modify the kit parts to go into these holes instead. I’ll pass on this one, because engine mount strength is more important to me than accuracy. Giovanni also tells me that that box on the lower right of the kit part shouldn't be there, because it was moved on all 5's. Now things start to get really confusing with all sorts of parts. Giovanni has sent me several pics of where most of this stuff goes, but I’m still doing research and learning. Note the 2 additional headrests, with super fine “towel bars” for the fabric seat belts. I have left all the parts in their plastic cases for now, to protect them and avoid losing any. More gizmos and more questions. This is sort of like solving a complicated puzzle, but I can say this: Each part is super detailed and quite strong. Lots of little hand wheels and connectors, much like the ANYZ parts. Of course I will only be using a few of these, so I will still have a great selection for "the stash" when I'm done. Now some observations about the kit itself. As mentioned above there are a LOT of parts, almost 600 of them. Generally speaking, the parts look good to excellent and while seam lines and pin marks are still there everywhere, they should be able to be cleaned up without too much effort. This kit is famous for it’s “oil-can” stressed panel lines on the fuselage and wings which I really like. What I don’t like, is that all large parts are quite rough and require a lot of sanding, which is going to be very difficult to do without removing nice surface detail, like fasteners. Here’s an example of a fuselage part, which is typical of all the wing parts as well. While I can sand this down, I have to be careful to sand it in an up and down motion, to reduce the removal of the subtle panel lines that are slightly raised ridges with rivets on them. Other large surfaces with raised detail will be much more difficult to do. After a sanding session. Much better, but still not good enough. This is going to take a long time to do properly and explains why a few builds of this kit have rough paint. Not this one if I can help it! This is the rear of the firewall, so the upper pin marks will be hidden behind the IP, while most of the others need to be filled, which are pretty darn big. Most of the other parts have the pin marks on the side that likely doesn't show, but the top of the main seat does. Really? So avoidable. Build Strategy This model comes in 4 configurations, although only the first 3 are mentioned. 1. Flying, Wheels Up 2. Standing, Wings Down 3. Standing, both Wings Folded 4. Standing, 1 Wing Folded I plan on super detailing the cockpit and engine and when the Hellcat wings are folded, you can barely see into the cockpit, so with all the detail I plan to do in there, the wings must lay flat. The gun bays on the wings can be exposed and are highly detailed, but after doing that on my Tamiya P-51D Mustang, I kind of regret it. The open doors kill the contours of the wings and those panels are always in the way or falling off. No exposed guns, other than what’s poking out the front, because I will have enough other detail in other areas already. I also plan on building this model “Smart”. For some reason, this model has many, many parts that go behind the seat wall and beneath the cockpit floor. Without doing major modifications and opening up panels, you will never see any of it once you close up the fuselage. I’ve seen several other builds of this kit where the modeler followed the instructions and added all this stuff, only to wave goodbye to it all later, which to me is a big waste of time and effort. Here is a good example of it in Step 27. All that stuff on the left behind the seat will be buried- and there’s lots more than this like radios and other items in Step 32, and Step 39- Step 41! I’m not doing it. For other areas like the wings, I will only add those parts that hold the guns in place, because all those cross members will never be seen again as well. If you can't see it or need it for other construction steps, I'm leaving it out. With a bit of a game plan established, I cleaned up and trimmed all the kit cockpit parts from Steps 1 to 39. I didn’t glue too many of them together yet, for ease of painting and the fact that the Adriatic resin parts were coming soon. This involved many hours of trimming and sanding, but nothing extraordinary, which is a nice change from my recent builds. I got a good start on the Airscale IP as well. Here are most of the parts, which attach to the clear kit Part R3 at the bottom. I cut the optional acetate parts, which will be sandwiched between the IP decals and the outside panel to give the instruments a glass-like look. All surface detail should be sanded off R3 before the PE part is glued to it later. Instead of painting the PE parts and adding the decals first as instructed, I glued the main IP parts to R3 first for ease of handling. After painting all the parts black, the decals will be added to the flat backings, the acetate will be added, then front bezels will be glued to the front. Along the way I will using dull coat and dry brushing to make them look more worn and realistic. Note that there is a handle slot on the lower left of the PE IP, that should be opened with a hot knife or similar method. The decision to use the Airscale panel on the right side is a tough one, because to do so, you need to remove and save all the fine switches, then glue them back on later. Good luck with that. I decided to do it anyway, thinking I would find switch replacements someplace else. I also filled in the gauge dial recesses, which do not align with the PE part perfectly. Here is that right panel dry fit on the kit parts on the right, while the left panel has been glued to the kit parts which covers a big seam. Holes were drilled for future knobs and switches, which I have now sourced from ANYZ, so what appeared to be a big problem with their replacement is now easy, so I’m glad I took the plunge. The central console Part D34 under the IP was a bit trickier to decide, because the PE part isn’t wildly better, except at the bottom. It’s also a bit different if that look is what you’re after. For this one I compromised, cutting the bottom of the PE off and gluing it to the kit part with a little trimming to both parts. I also sanded the interior of the gauge at the top, to prep it for a future gauge decal So I’ve finally got this model on the go! Having said that, this model is going to take a long, long time to complete. Between distractions like a ruptured Appendix last Monday and a stay in the hospital and the fact that the weather is starting to warm up a bit, I expect this build will be at a snails pace until October, when progress should really pick up substantially like it usually does. Another big thanks to Peter Castle and Giovanni! You guys are the greatest, so I’ll try my best to make your parts really “pop” in this model for all to see. Cheers, Chuck3 points -
Actually Larry together with Sazo knez founded the pre-LSP site before it was renewed after a dispute they both had, and went separate ways, but both were at the birth of this great large scale society. Jack3 points
-

1:32nd scale Hansa-Brandenburg W.20
chukw and 2 others reacted to sandbagger for a topic
Hi all, I've been working on creating the engine support frame, which was located between the centre sections of the upper and lower wings. Nothing is supplied in the kit for this frame, apart from two bits of wire and a rather rough side drawing of the side of the aircraft. Quite how 'Omega Models' expect any modeler to fabricate this frame from the kit is a bit of a joke. Anyway I've made the bottom half of the frame soft soldered from 0.8 mm diameter brass tube using heavily modified 'Connec+o' joiners from 'Albion Alloy's'. The front under plate at the top of the frame is made from 0.2 mm plastic card and the two rear side filler plates from scrap photo-etch. The completed frame will also require cross bracing wires to be fitted as well as the engine assembly of course. Now it's onto the top half of the frame, Mike3 points -

F 4 C/D : which AM stuffs
Daniel Leduc and 2 others reacted to Tony T for a topic
The G T stuff can lack, er, finesse at times. QMT and ResKit (very soon) make or are making jetcans for the RF/F-4 Revell kits which look excellent. I bought a set of QMT long cans for the Revell to use on a Tamiya F-4E and they are the right size. A bit of tweaking but nothing serious. Tony3 points -
hi thank you for the feedbacks , now , I know what to do . My aim is to build a "decent" F 4 , I think that a nice cockpit with good details , as well a nice seat ......and canopy , is essential ( an inquisitive eye is always ...attracted by details inside .......and I like these tiny details ) . I think I should have to remove the raised panels on the fuselage , add cables and wires on the gear legs .. and take care about the building of the kit .. no weapons , only drop tanks......I am tempted ( for years now ) by this unusual paint scheme ..... I have an old " microscale " decal sheet ( 48249) that will help me for the markings ...... BTW : any idea about the cammo colors ?? " microscale says " light compass grey ,and light grey ?????? Alain photo from pinterest..... different AC were painted in this two shades of grey , with different schemes though3 points
-

Tamiya Spitfire Mk VIII help
LSP_Ron and 2 others reacted to BloorwestSiR for a topic
Andy, I should have some around as I've only used one set of them. PM your address and I can drop them in the mail for you. That was on a Revell II kit I converted to a Vb like you're planning. Carl3 points -
Good evening lads, Time to resurrect this topic once again!! It will be a long post with sections, please excuse me for that, hope all the work and photoes to make you forget it!! Closing the fuselage Before that I had to install the M-61A Vulcan gun and add some detail on the rear area of the gun. I also painted all the details not accessible after closing the fuselage. And i finally i closed the fuselage. Not an easy thing to do as i had to align everything, from the cockpit tub to the rear fuselage details to the intake and all the zacto details. Time consuming, a lot of dry fit before taking the decision to put glue on it, but thankfully everything went like a charm! Rear cone glued on without problems, and i spent some sanding periods to get the trumpeter plastic to behave itself!! i also glued on the canoe and the rear cone! Canopy frames I changed some of the details of zacto canopy frames to the A-7H ones.... Wolfapack AIM-9P4 pylon and launcer Engine area... Nose gear leg A-7E Nose gear leg was different from the one used on -7H. I needed the -7D one and a fellow modeller was kind enough to provide me with one!! As you can see i shortened the ''V'' shape of it and i added a lot of details (steering mechanism, landing lights etc.) painted and weathered! h [/thumb] .....3 points
-
1/32 Copper State Nieuport XXIII
KUROK and 2 others reacted to scvrobeson for a topic
Decals are now on the Nieuport. They were definitely a bit finicky, but they look great when they're done. They were quite thin, which is usually fine, but were also a bit sticky. But with a bit of hot water, they all settled down. Did find that they DO NOT like Mr. Mark Softer or Solvaset, so that's certainly something to keep in mind going forward. Let me know what you think. Needs a clear coat to seal everything, then it should be on to the fun stages of weathering. Matt3 points -
AGGRESSOR F-5E in Afghan Camo - Finished!
Derek B and 2 others reacted to themongoose for a topic
Not much to share lately. Doing the standard stuff; finishing the landing gear, painting and detailing the canopy, and touchups. Thought I would take a second and share the Archer Fine Transfers rivets. These really add to the look of the tail on the F-5! should have an awful lot done this weekend as it’s supposed to rain a lot...uggh, see i lost a rivet there. Will touch that up too haha3 points -

"Rocket science" - Fly's Bachem Ba-349 Natter
Paul in Napier and 2 others reacted to dutik for a topic
Our scientists opted for alignment pins and smoothing of the joints with putty. We did so: Fit is of a typical short-run kit, so there some putty had to be applied here and there along the wing and tail joints. One wing also needed a styrene strip to cover the gap. The tail is mixed media, with a resin part at the base. Superglue is a bit tricky if you have to carefully align a part, thats why I added the two pins here. Now it is drop-fit Regards - dutik3 points -
Thanks Alain. Thank goodness the Japanese WWII paint standards committee in 1939 decided that their paint would be useful 30 years after the war for SAAF colour schemes and that Tamiya faithfully replicated this as XF-11 . Seriously though, I've done so much looking at pictures of SAAF Mirages and this is the best colour match I can come up with. It does vary a lot depending on artificial light vs. shade vs. direct light. And the cell phone camera is not the best. Here are two additional photos taken with two Canon cameras (G9X and 50D) in shade - colours uncorrected, but see how they vary depending on camera. Both taken in RAW. I used the blue background as neutral (this is what they do at model shows to provide a nice viewing environment) and you can see from the printed photos that the dark green is almost darker with an olive drab tint. However, look at the colour of the buff - it's almost pink in the one image - so can I rely on the printing quality of these two images ??? As I said, looking at an array of photos and the CZ at the war museum in Johannesburg, these colour mixes I used are good to go. This shows it nicely :3 points
-
I was lucky enough to get this kit as a already started kit for $10 usd. This will be gifted to a great friend who brought me back into the hobby. I am so glad I have Chucks recent build to use as a reference. I am going to try my first metal finish so wish me luck. I will build her wheels up to look like the rocket she is. Will use a pilot from a Tamiya kit. This is the box but does not have the Decals so i will be using aftermarket.2 points
-

1/32 A-6 Intruder
Chris Wimmer and one other reacted to miketippingmodels for a topic
This is the 1/32 A-6 intruder with a lighting chip, allowing all lights to function out side and in the cockpit. Along with Reedoak figures I also used and the verlinden mule, and the Eduard mer pods ,this is all then painted with Tamiya acrylics. Its a good kit overall, it has its dowe points, but mainly a lot of up points, I have another one to build later in the year so I am already looking forward to this any way enjoy The Grumman A-6 Intruder is an American twinjet all-weather attack aircraft developed and manufactured by American aircraft company Grumman Aerospace that was operated by the U.S. Navy. It was designed in response to a 1957 requirement issued by the Bureau of Aeronautics for an all-weather attack aircraft for Navy long-range interdiction missions and with STOL capability for Marine close air support. It was to replace the piston-engined Douglas A-1 Skyraider. The requirement allowed one or two engines, either turbojet or turboprop. The winning proposal from Grumman used two Pratt & Whitney J52 turbojet engines. The Intruder was the first Navy aircraft with an integrated airframe and weapons system. Operated by a crew of two in a side-by-side seating configuration, the workload was divided between the pilot and weapons officer (bombardier/navigator (BN)). In addition to conventional munitions, it could also carry nuclear weapons, which would be delivered using toss bombing techniques. On 19 April 1960, the first prototype made its maiden flight.2 points -
Good Morning all. I would like to introduce myself. I tried once before on these forms, but the project stalled indefinitely, and I'm not much for posting WIP threads. I have been following along builds here for many years, and I think LSP is my favorite modeling forum by far. You folks are some of the kindest and most talented modelers out there. A little about me, I grew up in my dads local hobby store and have been building for most of my life. I have always done 1/48 scale models, and felt it was time to jump into something a little bigger. I bought this kit when it fist came out and started assy, but frankly I got intimidated by it and it sat on the SOD for years. I decided this year to finish up any SOD kits and this was the last one. So here it is. Now that summer is coming quickly my building will slow considerably, but I'm thinking for the fall/winter season a trumpeter avenger in the FAA livery would be a very nice compliment to this kit. All in all, I found it to be a bit of a difficult build. However, it put me out of my comfort level in a wonderful way and am quite pleased with the result. I chose the FAA scheme simply because I haven't seen it done anywhere on this kit before. I used mostly vallejo air and tamiya colors. The build is strictly out of the box. Hope you all enjoy it. Thanks for looking. PS, please excuse my photos. I'm far from a pro photographer.2 points
-
Like the title says, Larry popped into my head today at work, I don't know why. I can't believe he's been gone for 10 years now. I'm sure that wherever he is, he's wowing the crowd or pissing someone off, because that's the way he rolled. We miss ya, you curmudgeon!2 points
-
Thanks, Jack, Sepp and Troy! Well, friends- sit down to tale of modeling adventure, styrene feats of derring-do and cold brass tragedy... if you dare!2 points
-

Thinking about Larry Hawkins today
Lee White and one other reacted to Rick Griewski for a topic
Thanks Jack I did not know this.2 points -
sweet! wonderful to see airscale stuff in action and in your hands Chuck, I am sure I am in for a treat really looking forward to a step up in scale too - hopefully you get hooked Peter2 points
-
Thanks guys! The engine support was glued to the firewall and work continued on the wiring: I'm not there yet, still a few wires to go. To be continued. Cheers, Peter2 points
-

F 4 C/D : which AM stuffs
Anthony in NZ and one other reacted to aircommando130 for a topic
I was stationed at Kadena when the 32nd F-4C/D came out...I think I bought 3 right away! I built one as a Michigan ANG in the ADC gray with that wild nose art they carried. I put intake covers on the intake to fix that problem. I still have it on the shelf and it still looks good. My next one is gonna be the 147th FIS that flew out of Ellington at Houston with the Texas flag on the tail (need a F-101 to go with it). Have 2 32nd RF-4C's...one will be inflight in the early gray over white (Thanks Jennings) and the other I'd like to do as a RF-4E and several Revell E and G models. Lots of GT resin aftermarket for both Tamiya/Revell... have 2 sets of Aerocraft canopy sets...need some brass landing gear for the Revell kits! Also have a Tamiya J...are they perfect...no...but...it's a Phantom II and when built and it's on the shelf it's a representation of a badass fighter that was the backbone of the USAF and I believe 12 other air forces around the world. It was an awesome sight to watch a flight of four to depart in burner! Cheers....Ron2 points -

MDC P-47 Cockpit
D.B. Andrus and one other reacted to Juggernut for a topic
Yep, those are the sources I looked at as well.2 points -

MDC P-47 Cockpit
D.B. Andrus and one other reacted to Fencer-1 for a topic
I had some thoughts about such possibility. Some sources hint at such hypothetical chance of using early floor parts up to D-30 series. I had to made additional research to make sure in my initial conclusion. There are two reliable sources I can refer to: "Parts Catalog for P-47D-25 Through P-47D-40" and assembly drawing 89F11237 for corrugated floor for all P-47 up to D-25 model. Catalog doesn't have any other reference than 93F12237 (flat floor assembly). Drawing 89F11237 has some remarkable note: "See drawing 93F12237 for later P-47 models. This assembly (89F11237) is not interchangeable with 93F12237."2 points -

Why has no one done a Me 410 in 1/32
Derek B and one other reacted to David E Brown for a topic
Zoukei-Mura would be the ideal company to consider releasing a 1:32 scale kit of the Me 410. As others have noted this aircraft is a twin engine machine (which they seem partial to given their previous releases), its has lots of variants, a large canopy with lots to see through the canopy, many camouflage and markings schemes, and so forth. As well, there is lots of documentation to draw upon and a preserved example in the UK to study. Count me in for one! David2 points -

F 4 C/D : which AM stuffs
Anthony in NZ and one other reacted to thierry laurent for a topic
The exhausts of the C/D are not underscaled whereas the J and E ones are too small. Tons of elements were released to improve or detail close to all areas: nose radar, cockpit tubs, panels and seats, canopies and locking hooks, belly engine air intakes, wheels, air intakes and variramps, tail front intake, exhausts, arresting hook, pods and weapons, etc.etc.2 points -

F 4 C/D : which AM stuffs
Anthony in NZ and one other reacted to Dave Williams for a topic
You’ll probably at least want seamless intakes or intake covers due to the parts breakdown leaving a large step inside of the intake. Also, depending on your loadout, some new weapons. The AIM-9s, at least need to replaced. They sort of represent AIM-9Es, but aren’t quite right. New wheels, if you don’t want to deal with the vinyl tires. The cockpit is generally OK, except for the lack of sidewall detail. I’m waiting for the Quinta Studio set to come out. Seats are OK, but need belts, unless you add pilots, or just replace with aftermarket seats. The Eduard interior set has some nice details for the cockpit sills and canopy frames.2 points -
The FF-888 and USAF would be very easy to produce masks for. I'd be happy to give it try. Is it possible for you to scan the decal sheet (jpg format) and email it to me with the exact dimensions of the decal sheet? The masks would be cut on Oramask 810 material. Contact me via PM if you are interested.2 points
-

1/32 Hasegawa Fw190D-13 Yellow 10
Hartmann52 and one other reacted to Thunnus for a topic
Thanks Mike! As a Dora Nut, this is one of those schemes that I felt I HAD to do. Thanks Kevin! I appreciate it! Thanks Troy! The pleasure is mine! Thanks! Thank you John! Since they were side by side, the contrast between the decals and painted markings needed to be reduced so I did some extra work to get the surface details to show up through the decals. Thanks Jeff! Still lots of work to do but the build has certainly crossed over the hump and it should be relatively simple from this point on. Thanks Anthony! Hopefully, I'll get re-started on the Tempest as well. Or.... I may just start something completely new. Thank you Michael! After the decal work was completed the decaled areas were sprayed with a coat of Alclad Aqua Gloss. The next step is to apply a wash over the model. I made three batches of liquid wash from pastel chalks... a very dark brown/black for the upper surfaces, a lighter brown for the lower surfaces and a light grey to highlight the rivet areas within the black markings. The wash is spread over the model and then allowed to fully dry. Once dry, I used moistened static-free wipes to wipe off the wash, leaving a residue of contrasting dark (or light) wash in all of the recessed areas. A closer look at the effects of the panel wash... It pays to hold off sealing the wash with a clear coat UNTIL you've carefully inspected every inch of the model. It's ok to leave some subtle streaking of the wash on the model as long as it is consistently in the direction of the airflow but unwiped blobs of dark wash should be removed.2 points -

"Sugar's Blues" Late War RCAF Lancaster
Archimedes and one other reacted to Uncarina for a topic
"In the midst of the shells S-Sugar’s past run of luck had seemed a flimsy guarantee. But as I flew westward a few feet above the white caps and the boys belted out some dirty ditty with unfettered joy and vigour, a more positive interpretation recommended itself. She had pulled it off again. The sixteenth motif would be added below my port window. And still she was invulnerable." Yates, Harry. Luck and a Lancaster (Airlife Classics) . Crowood. Kindle Edition. I've begun painting, starting with some preshaded panel lines followed by MRP RAF Dark Earth, with some RAF Light Earth mottling. After three paint sessions of an hour each and almost a complete bottle of paint I still have the starboard wing to cover. However, I wanted to start using the TopNotch camo masks before the hot weather became a factor, so I painted the tailplanes. I'm pretty pleased with the progress so far., with just a little bit of touch-up from overspray. The masks that I've used have aligned fairly well, with just a few gaps here and there at the edges which I supplement with patches of tape. Onward and upward! Cheers, Tom2 points -
32nd Mirage IIID2Z (with ScaleWorx conversion set)
blackbetty and one other reacted to Mistral for a topic
I missed these two photos - here she is with her friend, the IIICZ : And whilst drying of the first paint coat in the lovely African sun with the cat guarding it from Hadeda poop .... Samsung cell phone camera really battling with colour saturation2 points -

RCAF Mustang, from 1/24 scale to 1:1 ...sometimes it pays to be a nerd
daHeld and one other reacted to R Palimaka for a topic
And finally, the first flight in full clothing:2 points